What to Do With Leftover Buttermilk: Buttermilk freezing instructions and 30+ buttermilk recipes for using up leftover buttermilk.

This is the first post in my new “Waste Not” series, a series where I highlight some of those ingredients that always seem to go to waste after their initial use.
Waste is one of my biggest pet peeves in the kitchen, but something I am totally guilty of and struggle with.
I’m hoping these posts will help me and others find creative ways throw away less, use up more.
More Waste Not Posts
- What to Do With Leftover Pesto
- What to Do With Leftover Whipping Cream
- What to Do With Leftover Buttermilk
- What to Do With Leftover Pumpkin Puree
- What to Do With Leftover Egg Whites
- What to Do With Leftover Egg Yolks
Up first, buttermilk. More buttermilk has gone bad sitting unused in my fridge than I want to think about. Most recipes call for a couple of cups at most, yet it’s generally only sold in quarts.
Here are some ideas on what to do with the leftovers…
What to Do With Leftover Buttermilk
Freeze Buttermilk
The great thing about buttermilk is that it freezes beautifully. My preferred method is to freeze 3/4-cup portions (the amount most of my recipes call for) flat in plastic bags so it can be neatly stacked or filed in the freezer.
For smaller portions of buttermilk, you can freeze cubes of it in an ice cube tray and then store it all in one bag. Just take out a cube as needed.
When it comes time to defrost, put the bag of buttermilk in a large bowl just in case the plastic has been damaged (you don’t want buttermilk everywhere) and defrost on the counter.
Frozen flat, it defrosts in about 15 minutes (let it come to room temperature if you are using it in baking). The only caveat is that buttermilk has a tendency to separate in the freezer, so make sure to give it a good stir before using in dips or dressings.
Buttermilk will stay fresh in the freezer for up to 3 months.
Recipes That Will Use Up Your Buttermilk
And now the fun part. If you have leftover buttermilk on hand and don’t feel like freezing it, why not take the opportunity to try something new?
Savory Recipes Using Buttermilk

(2/3 cup buttermilk) Beef Pasties
(2 tablespoons) Individual Chicken Pot Pies for Two (1/3 cup) Pie Crust Pizza Tarts (1/2 cup) Dip Recipe Creations’ Cheddar Bay Biscuit Dip (1/2 cup) Culinary Hill’s Homemade Buttermilk Ranch Dressing (1/2 cup) Karen’s Kitchen Stories’ Oven Fried Onion Rings (2/3 cup) Green Eggs and Ham Mini Quiche (2/3 cup) Two Purple Figs’ Upside Down Veggie Kale Herb Cake (1 cup) Game of Thrones Frey Pie (1 cup) Baker Bettie’s Buttermilk Biscuits (1 cup) The Cozy Cook’s Cheddar Biscuits (2 cups) Aileen Cooks’ Buttermilk Ranch Chicken Tenders (2 cups) Chew Town’s Baked Panko Buttermilk Drumsticks With Hot Sauce Mayo
Sweet Recipes Using Buttermilk
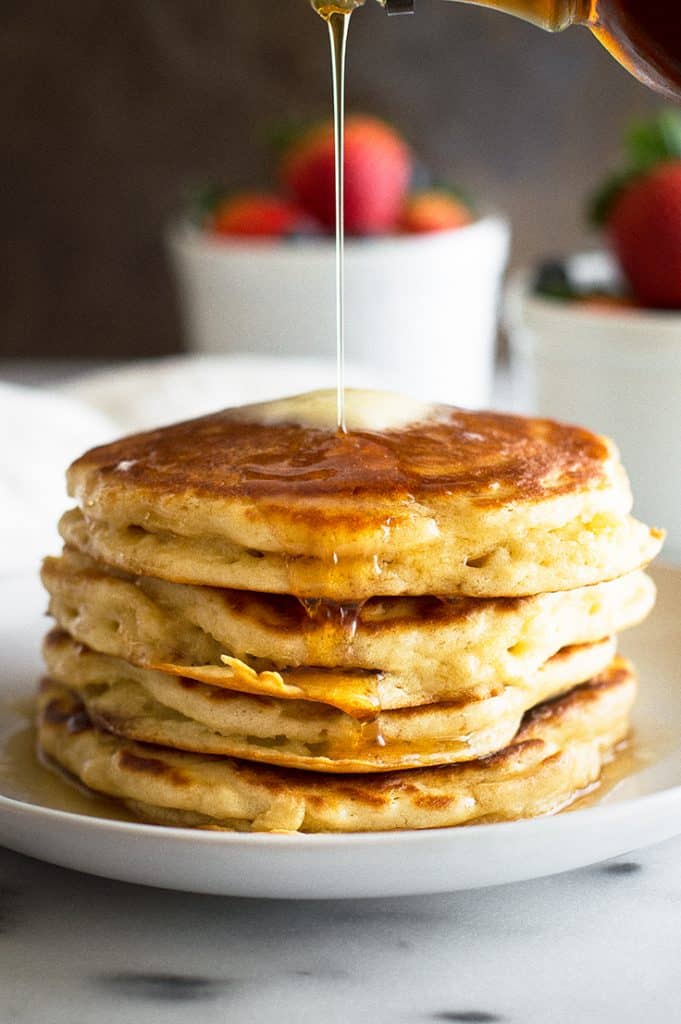
(3/4 cup buttermilk) Fluffy Buttermilk Pancakes for Two
(2 tablespoons) Dutch Apple Galette for Two (2 tablespoons) Marsha’s Baking Addiction’s Red Velvet Roulade (3 tablespoons) Strawberry Shortcake Sundaes for Two (1/4 cup) Mini Strawberry Breakfast Cake (1/3 cup) Easy Dutch Apple Pie (1/3 cup) Caramel Apple Pie Sundae (1/2 cup) Small Red Velvet Cake (2/3 cup) My Favorite Buttermilk Pie Crust (3/4 cup) Domestic Gothess’ Buttermilk Spice Cake With Vanilla Mascarpone Icing (3/4 cup) Living Lou’s Whole Wheat Gingerbread Muffins (1 cup) Sweet Buttermilk Cornbread Muffins With Honey Butter (1 cup) Say Grace’s Red Velvet Cupcakes in a Jar (1 cup) Zag Left’s Lemon and Grapefruit Buttermilk Cake (1 cup) Mon Petit Four’s Hazelnut Chocolate Cake With Caramel Marshmallow Ice Cream (1 cup) The Flavor Bender’s Chocolate & Peanut Cake With Caramel Peanut Butter Nougat Filling (1 cup) Keep it Sweet Desserts’ Fudgy Black and White Devil’s Food Cake (1 cup) Ilona’s Passion’s Strawberry Shortcake Baked Mini Buttermilk Donuts (2 cups) All Roads Lead to the Kitchen’s Cherry Buttermilk Popsicles (3 cups) Living Sweet Moments’ Ricotta Filled Cornbread Recipe
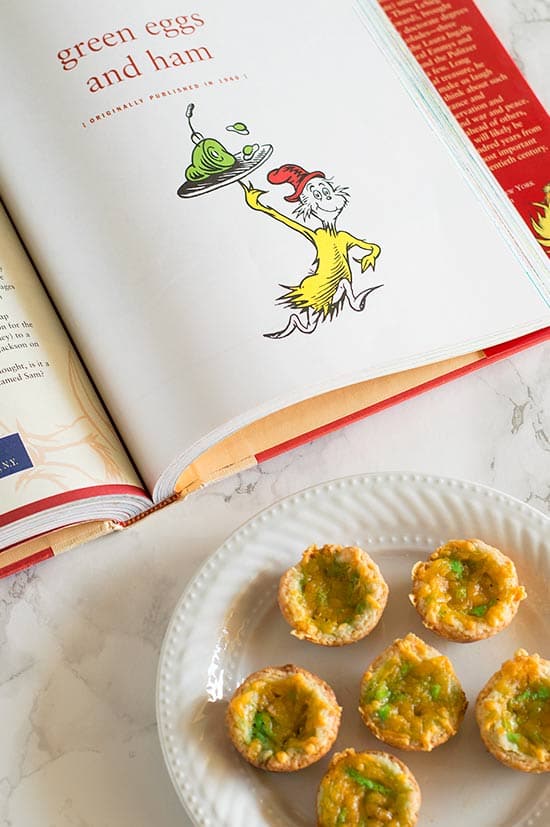
Green eggs, ham, and cheddar cheese in a buttermilk crust make a fun and delicious tribute to one of Dr. Seuss’ most beloved works. So tasty you might not want to share them with the kids!


This might sound a little odd coming from a grown-up human being, but I LOVE Dr. Seuss. In college, I worked for three years doing one-on-one therapy with autistic children, which meant I spent many hours reading and reading children’s books with my clients. Dr. Seuss’ books were the only ones I never ever tired of. I still have half of them memorized and some nights when I can’t sleep, I see how far into The Lorax I can recite before I drift off.
March 2nd is Dr. Seuss Day ( Read Across America Day ), so now seemed the perfect time to post this Green Eggs and Ham Mini Quiche recipe!
This idea has actually been bopping around in my head since my therapy days, but as some of you may know, many autistic children have a hard time with oddly textured foods like eggs. Getting them excited about eggs that were suddenly a new color too would have been a hard sell. And since I don’t have kids yet, I’m sharing them here today in hopes that you’ll share them with your kiddos/nieces and nephews/students/ random kids on the street just kidding don’t do that that’s a terrible idea .


These things are made with purely kid-friendly ingredients. We start with the amazing flaky buttermilk crust, add diced ham, egg, a little green dye to give us our titular color, and then top the whole thing with cheddar cheese.
Bonus, this particular pie crust recipe is SO easy to work with. You make it in the food processor so you don’t have to worry about hand cutting butter into the flour, and it is so much easier and more forgiving to work with than your usual fat and flour pie crust. It’s perfect for when you have little hands helping you cut and roll, and it is what I use any time I am making something that requires more hands-on time than just draping and cutting. Believe me, this is not the last time you’ll be seeing this dough recipe on the blog.
The end result is these super simple, super adorable mini green eggs and ham mini quiches, and guys, they ARE SO GOOD.
I realize I made these intending them to be a kid’s snack, but leave out the food coloring and they are still the best quiches I’ve ever made. Once I tasted them, I was of half a mind to just publish them as regular mini quiches so adults would try them too!
What I’m basically saying is: I will eat them in a house. I will eat them with a mouse. I will eat them here and there. I will eat them anywhere!

The buttermilk pie crust in this recipe now has its own post on the site. If you’d like to see a step-by-step walk through for making this dough, go check it out.

Ingredients
Buttermilk Crust
- ▢ 1 cup ( 8 oz) cold unsalted butter cut into 1-inch chunks
- ▢ 2 1/2 cups ( 350g ) all-purpose flour
- ▢ 1 tablespoon sugar
- ▢ 1 teaspoon salt
- ▢ 2/3 cup buttermilk
Filling
- ▢ 1/2 cup cooked ham diced very small
- ▢ 2 large eggs
- ▢ 1/4 cup milk
- ▢ 3-4 drops green food coloring
- ▢ Salt and pepper
- ▢ 1 cup shredded cheddar cheese
Instructions
Buttermilk Crust
- Before you begin measuring everything out, place the cubed butter in the freezer to chill.
- Sift together flour, sugar, and salt, and pour into the food processor. Add butter and pulse until butter is cut into the flour, but still has visible chunks.
- While pulsing, slowly pour in the buttermilk and continue to pulse until the buttermilk is incorporated into the dough. At this point, your dough should look like rough crumbs and just hold their shape if squeezed together. The dough will look a little scary, but don’t worry. It’s supposed to look like that!
- Lay a sheet of plastic wrap on the counter and dump half of your dough (crumbs) onto the sheet. Gather the edges and press tightly together to form a 1-inch thick disk. Do the same with the rest of the dough.
Rest
- Refrigerate for at least an hour, up to 24 (I like to make the dough the night before).
Prepare Crusts
- Preheat oven to 400°F and spray your mini muffin tin with cooking spray.
- On a floured surface, roll out your disks to 1/8-inch thick. Cut into 24 to 30 2 1/2-inch rounds. Press rounds into muffin tin.
- Pre-bake crusts for 10 minutes. If the centers of the crusts have puffed up, gently push them down with the back of a wooden spoon.
Prepare Filling
- Turn the oven down to 375°F.
- Whisk together eggs, milk, and food coloring.
- Add about a teaspoon of ham to each cup. Pour egg mixture over the top of the ham, filling to nearly the top of the crust. Do not overfill!
- Sprinkle salt and pepper over each of the cups. Top each with cheese.
- Bake for 11-14 minutes until your filling is set and cups are lightly golden.
Notes
Used To Make This Recipe
Small Yield Instructions: This recipe halves cleanly, no cooking changes needed. Make Ahead Instructions: This dough will keep in the refrigerator for 48 hours or up to 2 weeks in the freezer. Ham can be cut up to two days in advance. If you are short on time the day you need these, I recommend making them completely in advance, freezing, and defrosting them day of. You really can’t tell they were ever frozen. Freezer Instructions: Allow to cool completely and freeze in an air-tight container. To reheat in the oven, bake on a cookie sheet at 350°F until warm, about 10 minutes. You can reheat small batches in the microwave by cooking them for 1 to 2 minutes.
If you make these, I would love to see them! Tag me @bakingmischief onTwitteror #bakingmischief onInstagram!
I was so excited to use this Dr. Seuss hat in the photos, but you can’t really tell what it is, so here’s a cat in the hat instead. 😉


Easy Broccoli Chowder made with sharp and delicious cheddar cheese and ham. A perfect and easy weeknight dinner for those nights when cheese is a necessity.

This post and images have been updated. Don’t worry. You’re in the right place. 😉
We are in week three of our February soup series. So far, we’ve had the World’s Easiest Chicken Taco Soup and Easy and Comforting Ham and Potato Soup . This week, we’re moving onto something a little heavier and A LOT cheesier, Easy Cheesy Broccoli Chowder.
Proving that good recipes come from all over the place, the original version of this one came out of a recycling bin. A couple of years ago, I used up the last stick of butter in a Danish Creamery Butter box, broke the box down, and threw it in my kitchen recycling bin. Just as I was walking away, the recipe printed on the inside caught my eye. I fished it out, gave it a shot, and I’ve never looked back.
Of all the soup recipes floating around the interwebs, aside from your classic chicken noodle, broccoli chowder is the one I see with the most variations. I think that’s because everyone likes something a little different from their broccoli chowder. Are you there for the slightly sweet, earthy broccoli? Is it all about the salty ham? Do you like the rich creaminess of the broth with just a hint of cheddar?
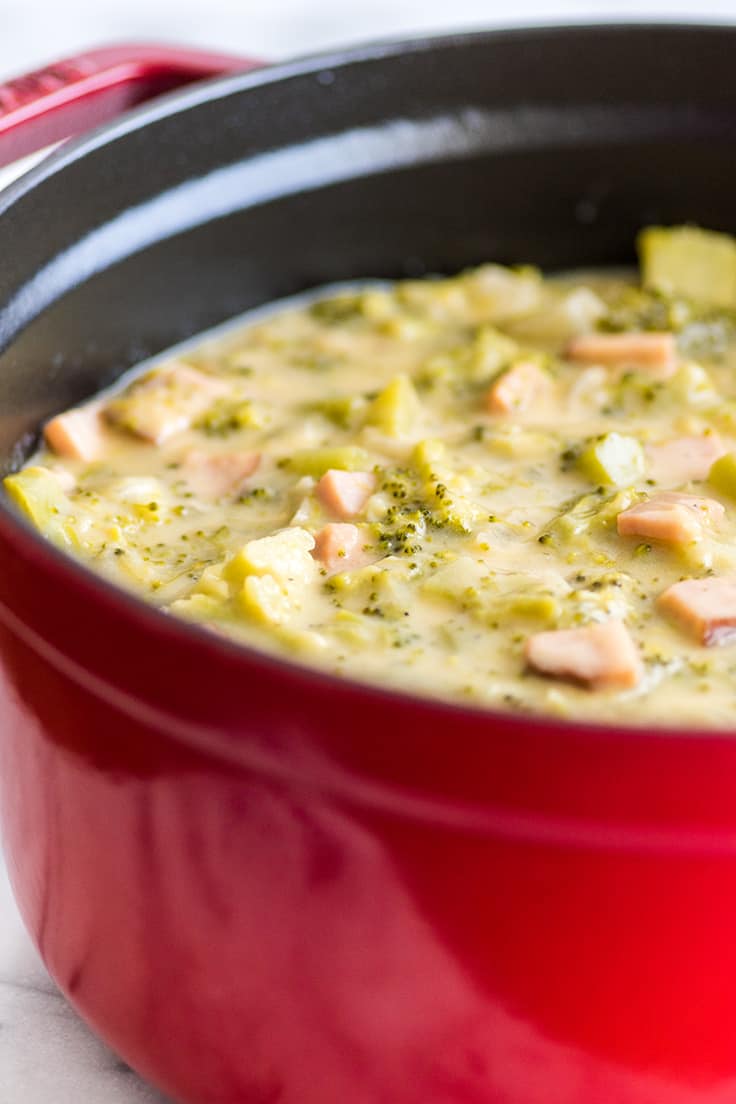

This particular broccoli chowder is all about the cheese. And not just any cheese. This is sharp, tangy cheddar in a broth so thick, you could practically stand a spoon up in it. If you don’t like sharp cheese, that’s okay, there are a million other broccoli chowders out there for you. If you do, oh, my friend, you are in for a treat.
This soup is fast and easy, and you can do all the prep work a couple of days in advance. It’s absolutely gorgeous when it’s done and is so rich and delicious, you’ll feel like it should be eaten curled up by a roaring fire under a giant fluffy throw.
More Easy Weeknight Meals
- Tri-tip in the Oven
- BBQ Chicken Pizza
- Chicken in Cream Sauce
- Chicken in White Wine Lemon Butter Sauce

Ingredients
- ▢ 1 1/2 pounds broccoli cut into bite-sized pieces
- ▢ 3 cups chicken broth
- ▢ 4 tablespoons ( 2 oz) butter
- ▢ 1 cup diced onion
- ▢ 1/4 cup ( 30 g) all-purpose flour
- ▢ 1 1/2 cup milk any percentage
- ▢ 1 1/2 cup ( 6 oz) sharp cheddar cheese cubed or shredded
- ▢ 1 cup ( 6 oz) fully-cooked ham diced
- ▢ 1/2 teaspoon black pepper
- ▢ Salt
Instructions
- In a medium pot, combine broccoli and chicken broth. Cover and simmer until tender, about 10 minutes. Drain the chicken broth into a separate container to use later and set broccoli and broth aside.
- In a large pot, over medium heat, melt butter and add onions, cooking until translucent.
- Add flour and cook, whisking continuously for about 2 minutes, until the flour is just golden.
- Continue to stir and slowly pour in chicken broth and milk. Simmer, stirring occasionally, for about 5 minutes, until the broth has thickened.
- Stir in cheese, ham, broccoli, pepper, and salt generously to taste. Heat until cheese is melted and soup is warmed through.
Notes
Nutritional Information Recipe Adapted From: Challenge Dairy
Low-yield Instructions: This recipe halves cleanly. Make-ahead Instructions: Broccoli, ham, onions, and cheese can be cut up to two days in advance and stored in an airtight container. Make sure your broccoli is dry when you store it. Freezer Instructions: This soup will keep in the freezer for up to four months in an airtight container. It must be defrosted in the refrigerator. If you try to defrost it in the microwave, the broccoli will turn to mush.
