
Saturday Morning Snapshot

Can you possibly guess what the main ingredient in two of today’s test recipes was?
State of the Blog
On the blog this week we finished up March Meatless Mondays with a delicious creamy pasta and a round up of a year’s worth of Meatless Monday recipes, and on Friday, there was my new favorite milkshake. Have you checked out that post yet? I love everything I post on the blog, but I really love this one.
Next week’s the start of our April series. I love the subject matter, but having shot two of the recipes already, I can say that this is the hardest thing I’ve ever tried to photograph and I have no idea why! Keep an eye out for that on Monday. Then there’s a quick and easy side on Wednesday and a positively adorable desert on Friday.
Recipes/posts released this week were:


Easy Fettuccine Alfredo With Broccoli – A quick and easy vegetarian dish for busy Meatless Mondays, full of broccoli and cheesy Alfredo goodness!
48 More Meatless Monday Meal Ideas – An entire year’s worth of delicious Meatless Monday dinner ideas.
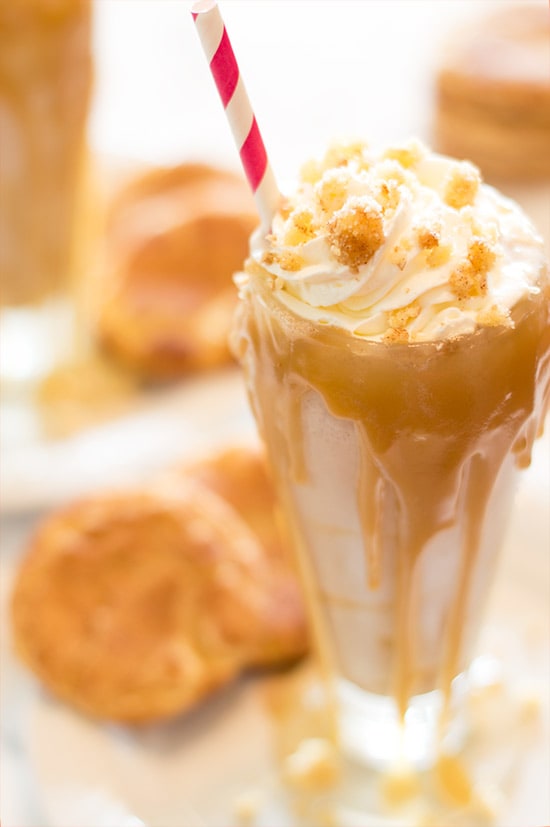
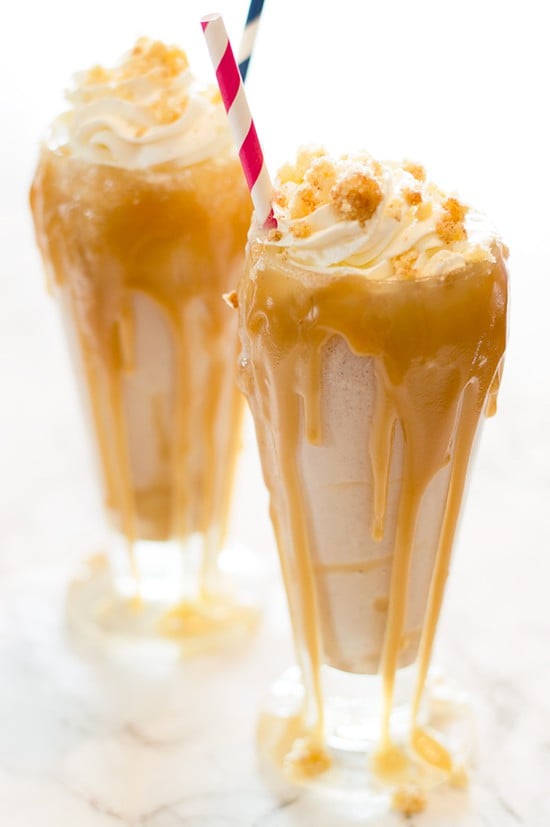
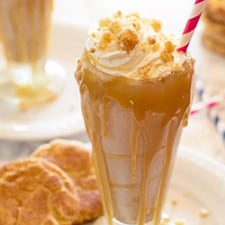
Salted Caramel Snickerdoodle Milkshake – A ridiculously delicious snickerdoodle milkshake topped with salted caramel and whipped cream.
Pop-culture Corner
Why did no one tell me Grantchester season 2 was airing right now on PBS!? There has been such a dearth of pastoral picnics, disconcertingly attractive vicars, and Labrador puppies in my life since season 1 ended!
Archer is also back! Some of my fellow geeky bloggers did Archer -themed posts for the premiere and they – are – fantastic!
Is anyone else watching Hap and Leonard on Sundance? I binged episodes 1-5 this week in preparation for the season finale on Wednesday. It’s so good, like Justified , minus the law element. All the episodes are available on demand if you want to catch up!
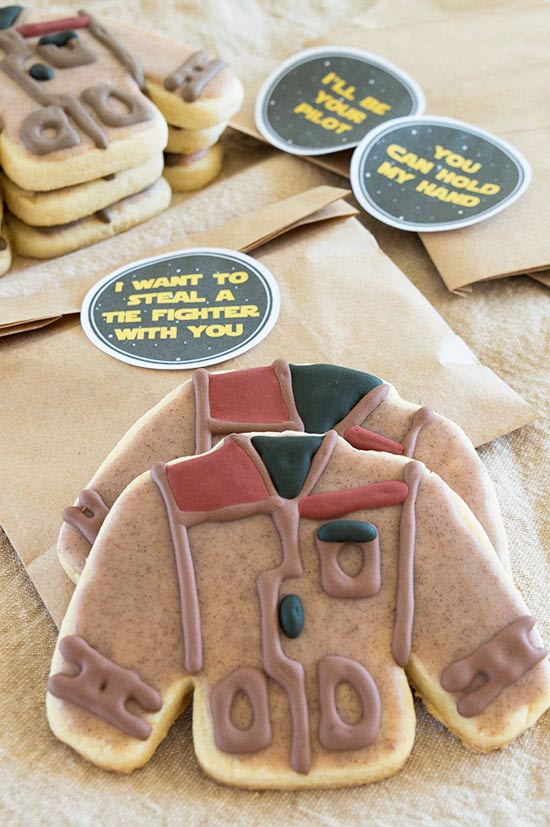
Marvel’s Poe Dameron #1 drops next week. I’m not really much of a comics reader, but I somehow got roped in to baking Poe’s Jacket cookies for a comic shop release party, so I think I’m going to have to check this one out.
And speaking of Marvel, what do you think of these new Doctor Strange photos? I love Cumberbatch’s hair and Ejiofor’s sword, but that practical footwear looks like someone spray painted my dad’s tennis shoes and made them into boots. Not into it.
Meal Planning
Saturday: Take Out Sunday: BBQ Monday: Easy Peasant Soup Tuesday: Chicken Salad Wednesday: Sweet and Sour Chicken Thursday: Shanghai Pork Friday: Chicken in Basil Cream Sauce with Orzo
A ridiculously delicious snickerdoodle milkshake topped with salted caramel and whipped cream.

Happy April Fools’ Day! Have you been fooled yet? Or have you been the fooler? I’m not usually much of a prankster on April 1st, but since I have Baking Mischief now, I thought I should do something .
I had this whole silly post planned where I was going to write a straight-faced recipe for making toast, but THEN I thought instead of playing a joke on you, lovely readers, what if we all played a terrible, horrible, amazing, delicious joke on our bodies instead and ingested something terriblicious.
Enter, this monster of a milkshake.


I’m sure you all saw those crazy-pants milkshakes from down under on Instagram last summer. They are the type of thing you see and your brain instantly goes, “NOPE!” And your heart sighs, “ Someday .”
Well, someday has come. (And in the interest that this not be your last someday, please don’t drink this entire thing on your own. Share it with somebody–or 5 somebodies–you love.)
Hello, Salted Caramel Snickerdoodle Milkshake.
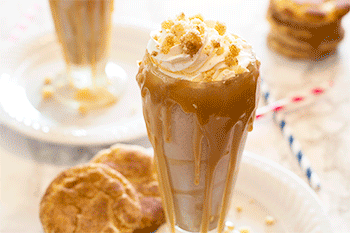

You’ve got snickerdoodles . You’ve got cinnamon. You’ve got vanilla ice cream. You’ve got all those things mixed together and then whipped cream piled on top. Then, since that clearly isn’t enough, we douse the glass, inside and out, with salted caramel and put some cookie crumbs on top. Whaaaaaaaaaaaaaat!?
I previewed a little snapshot of this recipe a couple of weeks ago, because I was just too excited not to. It’s not often I get to leave sanity behind and create something purely ridiculous and delicious.
And just in case you’re wondering, hey, Tracy, do cinnamon cookies and salted caramel really go together? The answer is, yes. Yes, they do.

Ingredients
- ▢ 3 cups vanilla ice cream slightly softened
- ▢ 1/2 to 1 cup milk
- ▢ 3/4 teaspoon cinnamon
- ▢ 4 inch 3-snickerdoodle cookies* divided
Toppings
- ▢ Salted caramel sauce
- ▢ Whipped cream
Instructions
Milkshakes
- Combine ice cream, 1/2 cup milk, cinnamon, and 3 of the snickerdoodles, broken into smaller pieces, in your blender. Blend until cookies are incorporated. Add up to 1/2 cup more milk and blend until milkshake reaches your desired consistency.
Assemble
- Take a heaping spoonful of caramel and drizzle it around the inside of your 16-ounce glasses. Divide milkshake evenly between them.
- Things get messy from here, so if you are going to line the rims of your cups with caramel, make sure the cups are on a plate to catch the drips and are where you plan on drinking them! Use a spoon to drizzle caramel around the edges, letting some of it fall into the cup as well.
- Top with whipped cream.
- Crumble the remaining cookie and sprinkle over the top.
- Add a cute straw, drink responsibly, and enjoy!
Notes
Nutritional Information

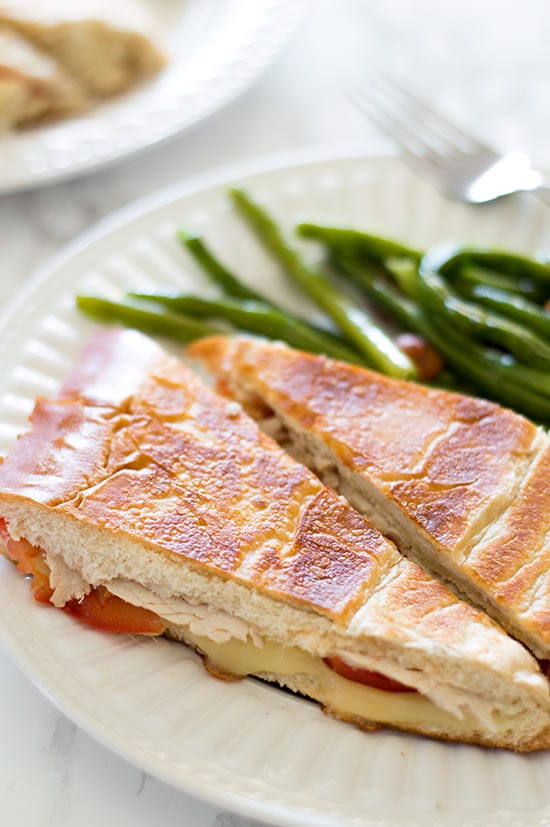
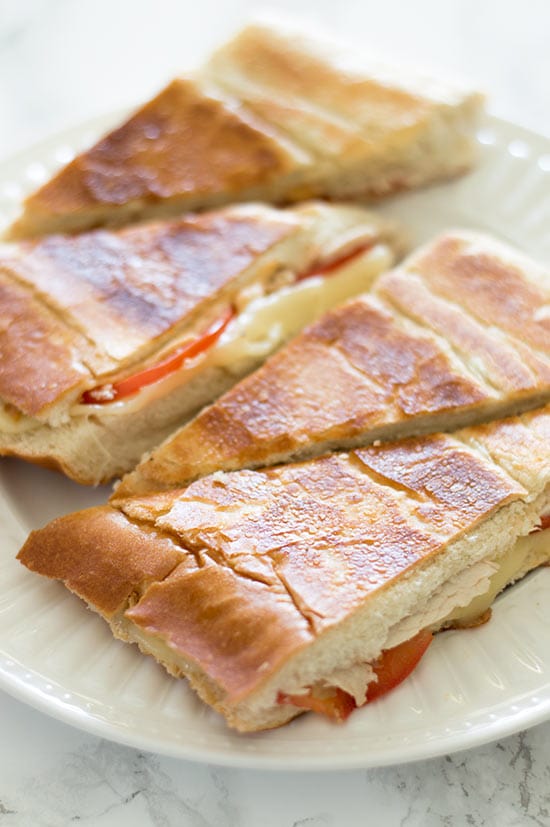
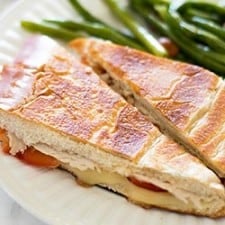
Perfectly cooked panini without a panini press, crunchy and toasted on the outside, warm, gooey, and cheesy on the inside!

It’s time for a new monthly series on the blog! Last month, we conquered Meatless Monday Meals, this month, we are tackling one of my favorite dinners, hot sandwiches. I have four really good ones coming at you this month, but we are going to kick April off with the one I make most often, delicious, fantastic homemade panini without a panini press.
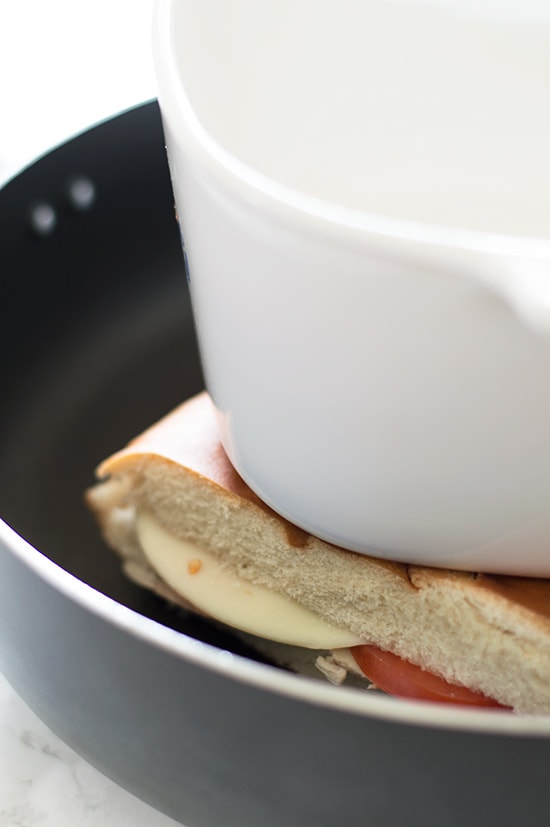
I didn’t make panini at home for the longest time because I didn’t have a panini press, and then I learned this trick, and oh, the panini I have made since then. You don’t need an expensive press to make a good panino. All you need is a skillet and a heavy piece of cookware like, for example, an ancient piece of your grandmother’s CorningWare.

Making panini without a panini press is quick, easy, and honestly, less trouble to clean up afterwards. The resulting sandwiches are not as attractive as panini made with a press, but they taste just as good and are fantastic options for easy dinners. I make this quick weeknight version at least twice a month.
These panini involve tangy garlic aioli spread over French bread, paired with turkey, tomatoes, and your favorite melty cheese. They take 15 minutes from start to finish and are so, so good.
Add a quick and easy side (coming Wednesday), and it’s a perfect dinner for a busy weeknight that you can feel good about!

Ingredients
Garlic Aioli
- ▢ 1/4 cup ( 56 g) mayonnaise
- ▢ 1 garlic clove pressed
- ▢ 2 teaspoons lemon juice
- ▢ 1/8 teaspoon salt
- ▢ 1/8 teaspoon pepper
Panini
- ▢ 1 loaf French bread
- ▢ 4 ounces chicken or turkey deli meat
- ▢ 4 slices cheese of choice
- ▢ 1 tomato optional
- ▢ 1 to 2 tablespoons butter
Instructions
Aioli
- In a small bowl, mix aioli ingredients together. Set aside.
Panini
- Cut bread into four even sections and slice those in half from end to end.
- Spread aioli on both sides of bread and assemble sandwiches with meat, cheese, and optional tomato.
- Give each sandwich a little press with the palm of your hands to flatten slightly.
- Heat a large skillet over medium heat for a minute or two, so it has time to heat fully.
- While skillet is heating, butter the bottoms of two of the sandwiches and place into the hot pan.
- Place a heavy piece of cookware over the panini (cast iron works great for thiand press down firmly. Allow to cook for 1 to 2 minutes until golden and crunchy.
- Butter the tops of the panini and flip. Set cookware back on top, pressing down to flatten further. Cook for a minute or so and remove from heat.
- Repeat with the other two panini. Slice diagonally if desired. Enjoy!
Nutritional Information
Make-ahead Instructions : Aioli can be made up to 2 days in advance. Recipe For Two Instructions: Half of 1/4 cup of mayonnaise is 2 tablespoons. No cooking changes are needed.

Cookiefied versions of “Star Wars: The Force Awakens’” best character: Poe’s Jacket.
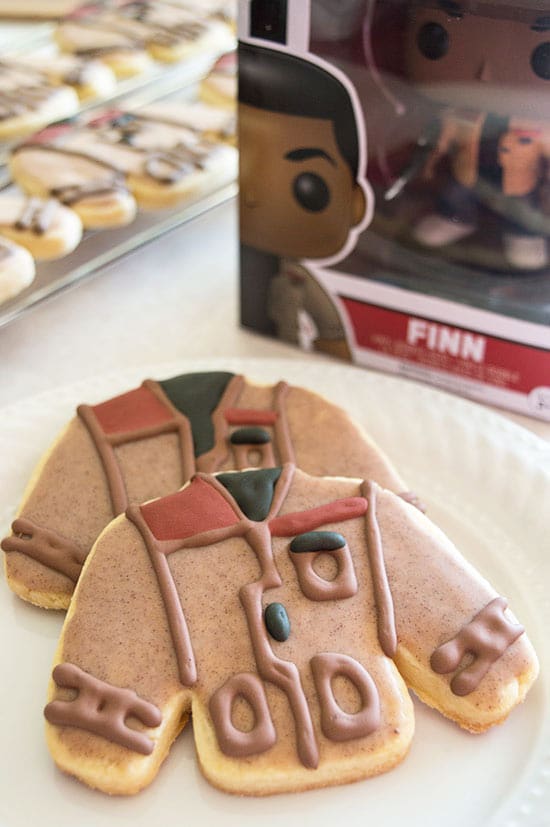

Okay guys, I was not going to do another Star Wars recipe after my BB-8 Cupcakes . When I started this blog, I said I’d limit myself to one nerdy recipe per franchise, lest the blog just become all Hannibal recipes all the time (people-free obviously, and I’m saving that one for a special occasion). BUT, I wanted to do a nerdy/pop-culture Valentine’s Day treat and once this idea popped into my head, it refused to leave. So here you go: Poe’s Jacket Cookies.
Why are these my Valentine’s Day treats? Because, was there a purer expression of love and friendship in all of pop-culture this year than the sharing of Poe’s jacket? I think not. The movie might as well be called Star Wars: Siblinghood of the Travelling Jacket for all that thing gets passed around by our three heroes. AND IT’S BEAUTIFUL!!


Disney via Dork Side of the Force
The jacket starts off the film with the best pilot in the Resistance, who passes it off to the universe’s most adorable stormtrooper, who then loans it out to our favorite young Jedi, who then gives it back to our newly minted Resistance member, where it, SPOILER probably helps save his life. And each time it’s handed off, it’s given in the spirit of friendship and affection. I love it so much, I might just cry. And if that jacket doesn’t get repaired and make it into the sequel, I really will.
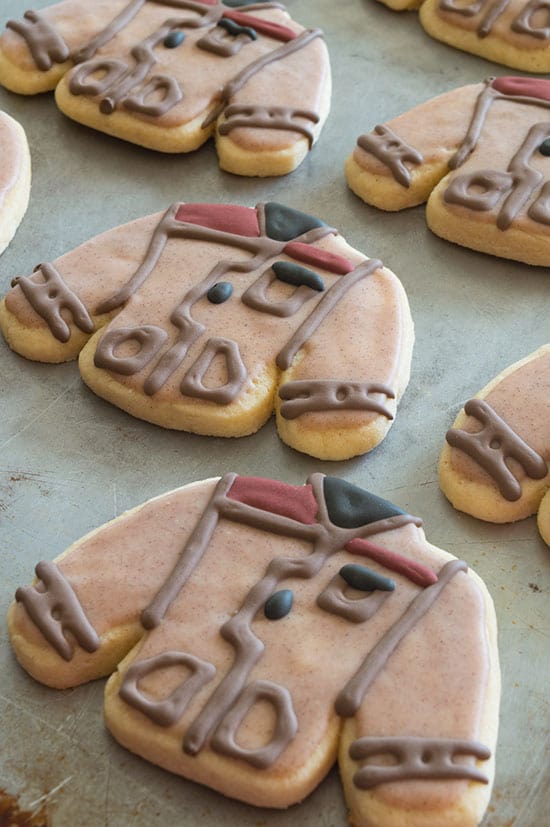
I made these cookies with the recipe from my Copycat Heart Cookies with Cinnamon Icing , minus the food coloring. If you want to see me rave over how delicious they are, click over to that post. Just trust me when I say they’re really, really good, but you can use whatever cutout cookie dough you like best (or store-bought to make things simple). I do recommend using the cinnamon icing I link to though, because the cinnamon is what gives the coat the great, slightly distressed leather look, no coloring needed!

In case you want to use these as valentines or party favors, I created some printables to go with the cookies. You can print them out on sticker paper or just use double-stick tape like I did. (Click on each one for a large version.)


And before we move on to the instructions, I’ll tell you now, these cookies are a bit of a labor of love. They are easy to make, BUT they require a few resting periods, so they are not quick cookies. Don’t start these at 8pm on Valentine’s Day eve or the morning of a party. There will be tears. With that dire warning out of the way, on to the instructions!


Ingredients
Cookies
- ▢ 18 sweater-shaped sugar cookies cooled - I used my Copycat Heart Cookies dough
- ▢ 1 batch of my Cinnamon Icing without food coloring
- ▢ 2-3 cups royal icing made thick* - I used a double batch of Cake Wiz’s Royal Icing
- ▢ Red, yellow, green, and black food coloring
You Will Also Need
- ▢ Piping bags
- ▢ A coupler and #2 tip
Instructions
Icing
- Cover cookies by dipping them in the cinnamon icing. Use a knife to scrape off the excess and clean up the edges. Set aside to harden.
- Separate royal icing into three bowls. 1/4 in two of them and 1/2 in the third. In one of the small bowls, make black icing. In the other small, make the maroon. I used mostly red with a couple drops of yellow and green. In the largest, make your brown icing. I used about 57 drops of red, 45 green, and 11 yellow.
- Stir and check the consistency of your icing. You want 15-second icing, which means, if you run a knife through it, it takes about 15 seconds to fill back in. If it is too thick, add a little water to it in 1/4-teaspoon increments. If it becomes too thin, stir in a little sifted powdered sugar.
- If your cookies are firm enough to handle without smudging the base icing, you can begin piping. Otherwise, cover the royal icing and wait.
Piping
- Fill your piping bag with the brown icing and pipe on the jacket details.
- Switch to maroon and do the breast line and shoulder patch. I used a toothpick to spread the icing around and get into the corners.
- Finally, switch to black and do the accents and fill in the shirt. Again, using a toothpick for the corners if needed.
Rest
- Allow to dry for at least four hours before stacking or packing. The royal icing will dry quickly, but the base icing needs a few hours, or it will dent and smear.
Notes
Used to make this recipe:
