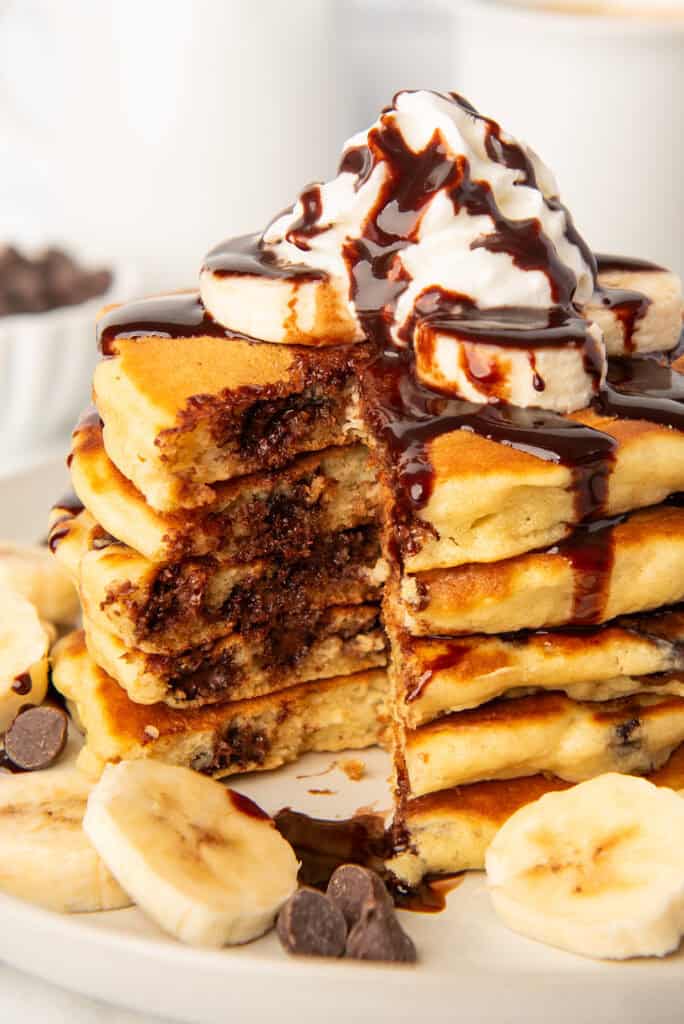
Start your morning off right with these incredibly soft and fluffy chocolate chip pancakes. Quick and easy to make and filled with gooey, melty chocolate, they’re sure to become an instant family favorite.
These pancakes are a twist on my reader-favorite buttermilk pancake recipe for two . They’re the same super soft, super fluffy, super tasty pancakes, but family-sized with an indulgent chocolatey upgrade.

Add a stack of these to your Sunday brunch or make a batch to freeze for busy weekdays. However and whenever you eat them, it’s going to be a good time.
Ingredient Notes


- Buttermilk: The buttermilk in this recipe makes the pancakes soft, moist, and just a little tangy. However, if you don’t have buttermilk, you can make a quick buttermilk substitute using milk (regular or dairy-free) and a little lemon juice.
- Eggs: In this recipe, you will divide the eggs and use the egg yolks and the egg whites separately. Whipping and adding the egg whites to the batter at the end makes these pancakes incredibly light and fluffy.
- Chocolate Chips: You can use semi-sweet, milk, or dark chocolate chips.
How to Make The Best Chocolate Chip Pancakes
This is a quick recipe overview with photos. For the full, printable recipe, scroll down to the recipe card below.
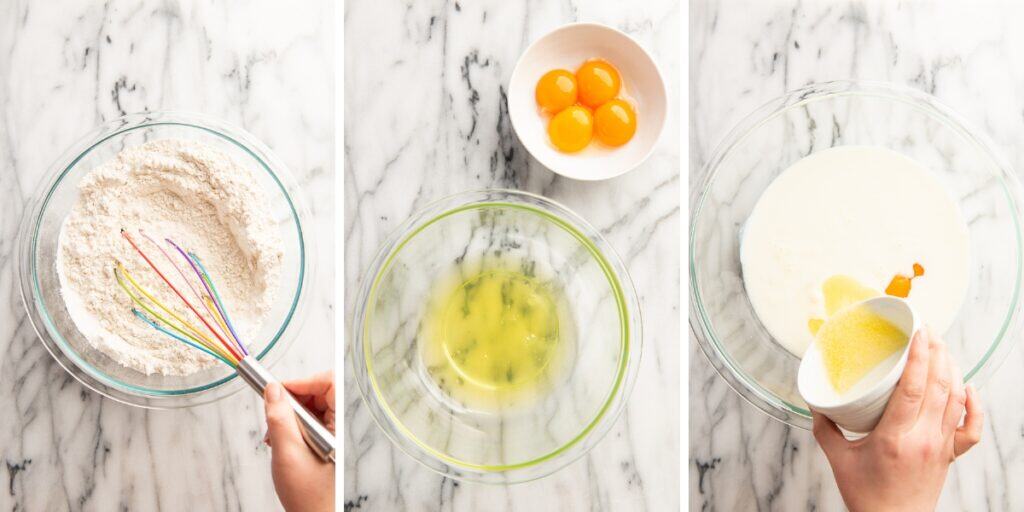

Separate your eggs: You are going to separate your egg whites into a small mixing bowl and your egg yolks into a large mixing bowl.
Mix your dry ingredients: In a medium bowl, mix together your flour, sugar, baking powder, baking soda, and salt.
Mix your wet ingredients: In a large bowl, whisk together buttermilk (or buttermilk substitute), the egg yolks, cooled butter, and vanilla until it is well-mixed.
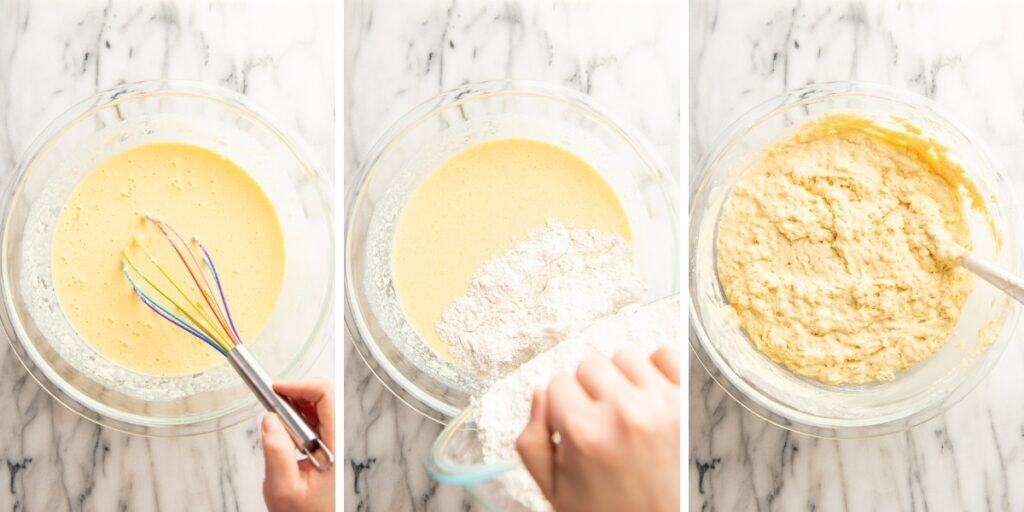

Combine: Pour your dry ingredients into your wet ingredients and stir them together until they are just combined. Your batter should look pretty thick at this point.
Beat egg whites: Using a handheld electric mixer, beat the egg whites on high until stiff peaks form.
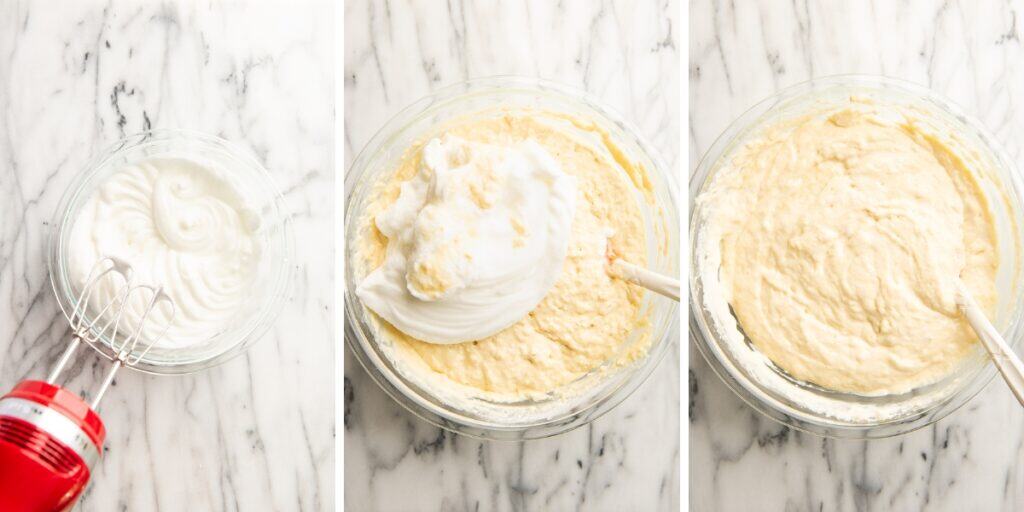

Fold in egg whites: Gently fold in the egg whites into the batter, being careful not to over-mix and accidentally deflate the egg whites.
Fold in chocolate chips: Gently fold in the chocolate chips.
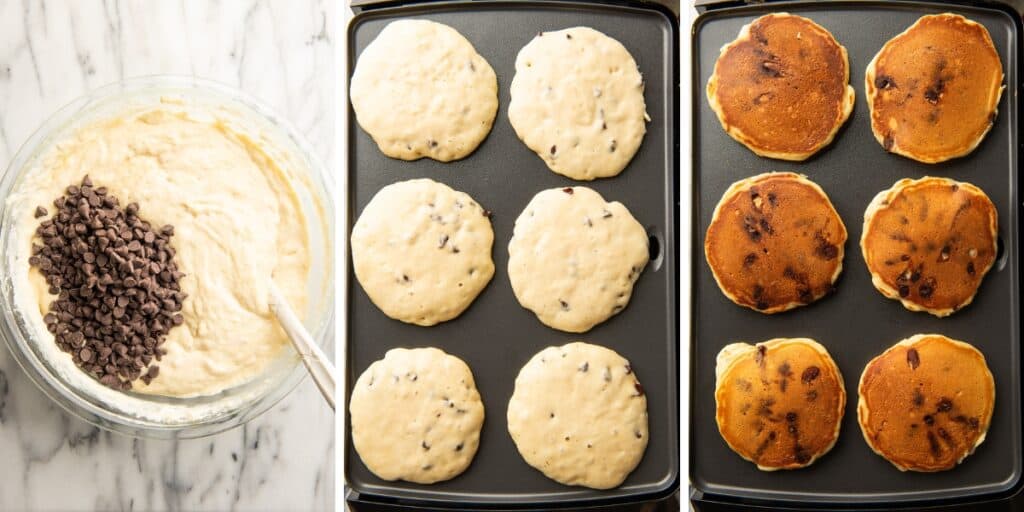

Cook your pancakes: Heat up your griddle, and cook your chocolate chip pancakes.
Serve, and enjoy!


Topping Ideas
These pancakes are excellent all on their own or topped with a little butter and syrup. But if you want to make things really fun, try adding:
- A dollop of whipped cream and your favorite fruit
- A drizzle of fudge sauce or dulce de leche
- Blueberry syrup or strawberry syrup
How to Store Leftover Pancakes
- In the refrigerator: Store your pancakes in a ziplock bag or airtight container in the refrigerator for up to 2 days. Reheat gently in the microwave in 10-second increments.
- In the freezer: Place pancakes in a freezer ziplock bag with a small piece of parchment paper between each pancake to keep them from sticking together. Store for up to 3 months. Once you are ready to eat them, just pull out your desired number of pancakes and reheat in the microwave for 20-30 seconds (slightly extending the time for each additional pancake you make).
How to stop the chocolate chips from burning in the pancakes?
While some recipes have you sprinkle the chocolate chips over cooking pancake batter to keep the chips from burning, for this recipe, you can fold them directly into the batter. Since this batter is naturally quite thick, the batter helps protect the chocolate chips from the heat on the griddle. Cooking the pancakes over a lower heat (325°F) also helps protect the chocolate chips from burning.

Can pancake batter sit overnight?
Some pancake batters can sit overnight, but not this pancake batter. Because this recipe uses folded egg whites which give these pancakes the extra light and fluffy texture, it should be made right before cooking to keep the egg whites from deflating.
How do I keep my pancakes warm?
To keep your pancakes warm while you cook the next batch, simply preheat your oven to 200°F and keep any cooked pancakes on a tray in the oven until all the pancakes are ready to serve.
More Breakfast Favorites
- The Best Homemade Waffles
- Mini Coffee Cake
- My Favorite Chocolate Banana Muffins
- The Best Cinnamon Toast
Equipment
- Handheld electric mixer
- Electric griddle optional but great to have!
Ingredients
- ▢ 4 large eggs
- ▢ 4 cups (480g) all-purpose flour measured by weight or using the spoon and sweep method*
- ▢ ½ cup (100g) granulated sugar
- ▢ 1 tablespoon + 1 teaspoon baking powder
- ▢ 2 teaspoons baking soda
- ▢ 2 teaspoons table salt
- ▢ 3 cups buttermilk *
- ▢ 6 tablespoons salted butter melted and slightly cooled
- ▢ 2 teaspoons vanilla extract
- ▢ 1 ½ cup chocolate chips
- ▢ Cooking spray or a little butter for greasing the skillet
Instructions
- If you are planning to serve all the pancakes at once, preheat your oven to 200°F to keep the pancakes warm between batches.
- Separate out egg whites from yolks, dropping the whites into a small mixing bowl and reserving the yolks in any small container to use later in the recipe. Set both aside.
- In a medium bowl, whisk together the flour, sugar, baking powder, baking soda, and salt.
- In a separate, large bowl, combine buttermilk, the egg yolks, melted and slightly cooled butter, and vanilla. Whisk until smooth.
- Pour the flour mixture into the bowl of wet ingredients and stir until just mixed and there is no dry flour at the bottom of the bowl. The batter will look very thick at this point.
- Use a handheld electric mixer starting on low and working up to high to beat the egg whites until stiff peaks form (when beaters are lifted out, the whites should stand straight up without curling over at the tips or collapsing)
- With a rubber spatula, gently fold the egg whites into the batter. Do not over-mix or you risk deflating the egg whites.
- Fold in the chocolate chips.
- Heat an electric griddle to 325°F or a large skillet over medium heat.
- Once your cooking surface is hot, lightly grease it with cooking spray or butter. Evenly space out slightly heaping ⅓ cups of batter. Cook until bubbles begin to form on the tops of the pancakes and and then flip and cook until done.
- If needed, place the pancakes on a cookie sheet in the oven to keep them warm. Repeat with remaining batter.
- Add your favorite toppings, serve, and enjoy!
Notes
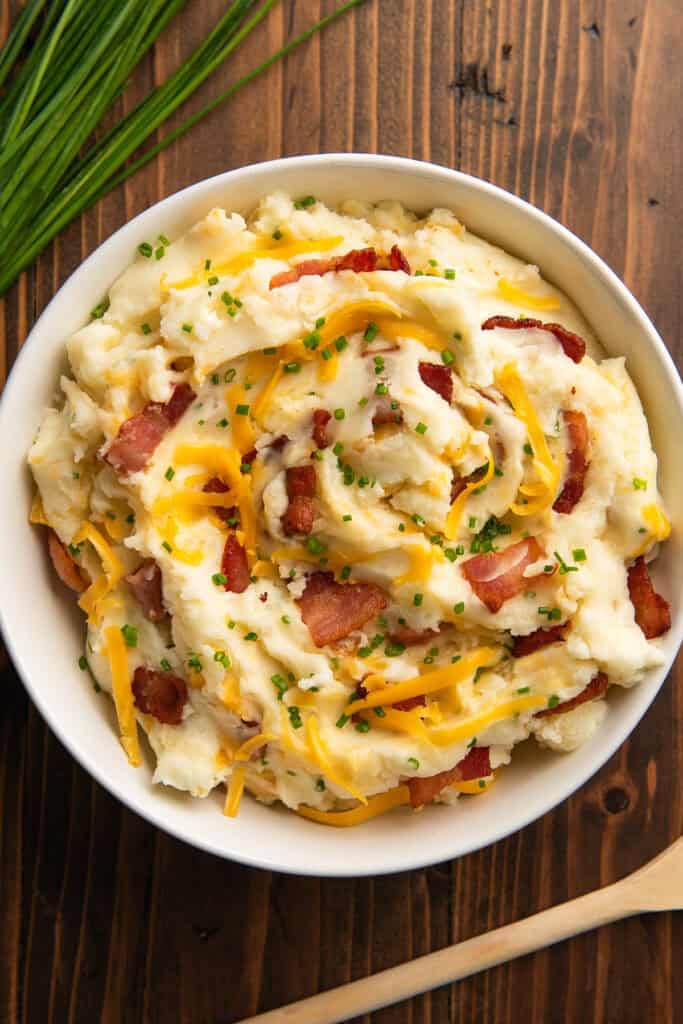
These incredibly easy and deliciously indulgent Loaded Mashed Potatoes are quick, nearly foolproof, and perfect for when you need a side that will WOW.
Who doesn’t love loaded mashed potatoes? It’s comfort food that combines the creamy richness of mashed potatoes with all the best toppings of a baked potato. Genius!!

I apologize in advance if after making these once you find yourself making them a little too often, but they’re just SO good and so easy to throw together. You’ll start dreaming of all that gooey cheese, crumbled bacon, and ultra-rich mashed potatoes, and the next thing you know, you’ll be in the kitchen throwing them together.
Ingredient Notes
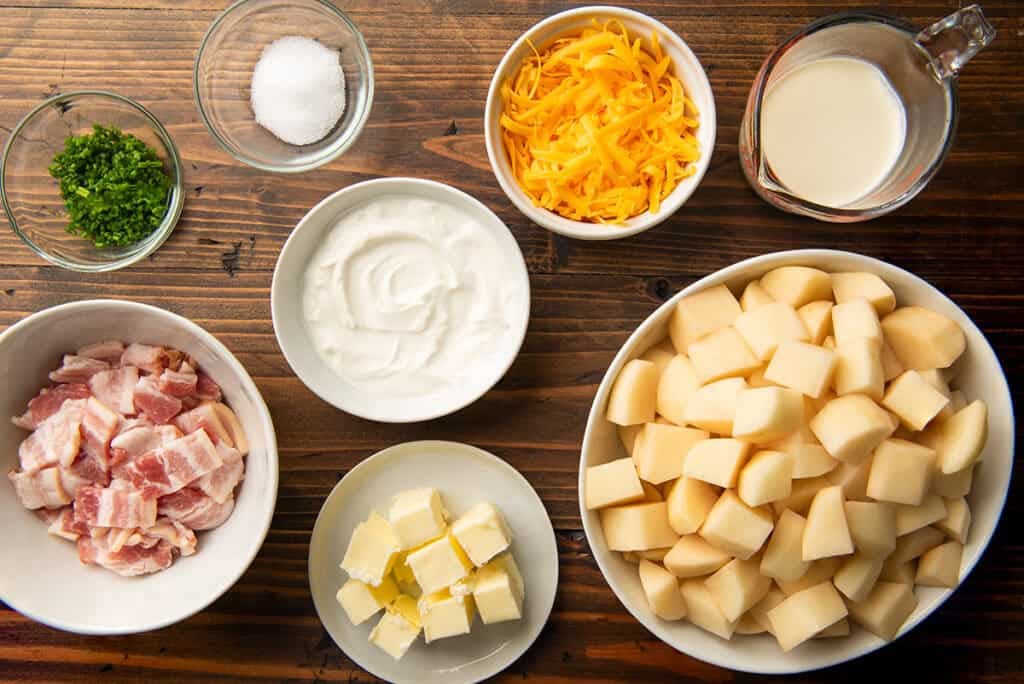

- Sour cream: I highly recommend measuring your sour cream using a kitchen scale . It is the fastest way of measuring and makes cleaning up super easy (although the old-fashioned measuring cups will also get the job done). You can use either full-fat or low-fat sour cream, although full-fat sour cream is going to give you the best, richest results.
- Potatoes: This recipe calls for Russet potatoes, but you can also use Yukon Gold or red potatoes. Just be careful if you use reds or Yukon Golds not to over mix because you can wind up with gummy potatoes.
- Heavy cream: You won’t use a full carton of heavy cream for this recipe. For storage tips and recipes to use up leftover heavy cream, check out my post What to do With Leftover Whipping Cream . If you are out of heavy cream, you can also substitute for it with milk or half and half.
- Fresh chives: You can also substitute minced scallions for the fresh chives.
How to Make Loaded Mashed Potatoes
This is a quick overview with photos of the cooking process. For the full, printable recipe, scroll down to the recipe card below.
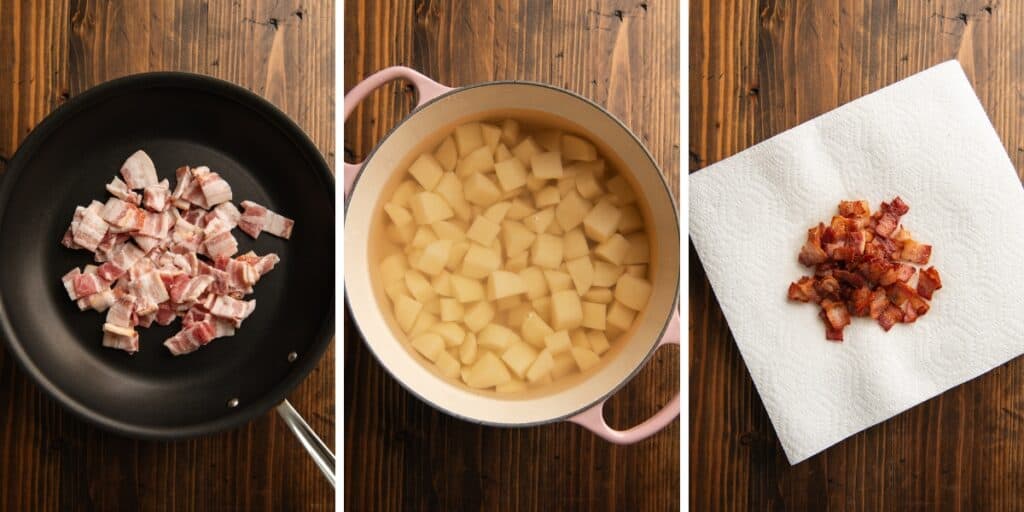

Prep your ingredients: Before prepping anything else, cut your butter into 1-inch pieces and measure out your sour cream. Then, set them both in a warm place in your kitchen. (The warmer these two ingredients are, the easier they are to mix in, and the less they will cool your potatoes down before serving.) Once your sour cream and butter are prepped, chop your bacon into ¾-inch pieces, and peel and chop your potatoes.
Cook your bacon: Place your bacon pieces into a cold skillet and cook them over medium heat until your bacon is cooked to your level of crispiness. Use a slotted spoon to transfer your bacon pieces onto a towel-lined plate.
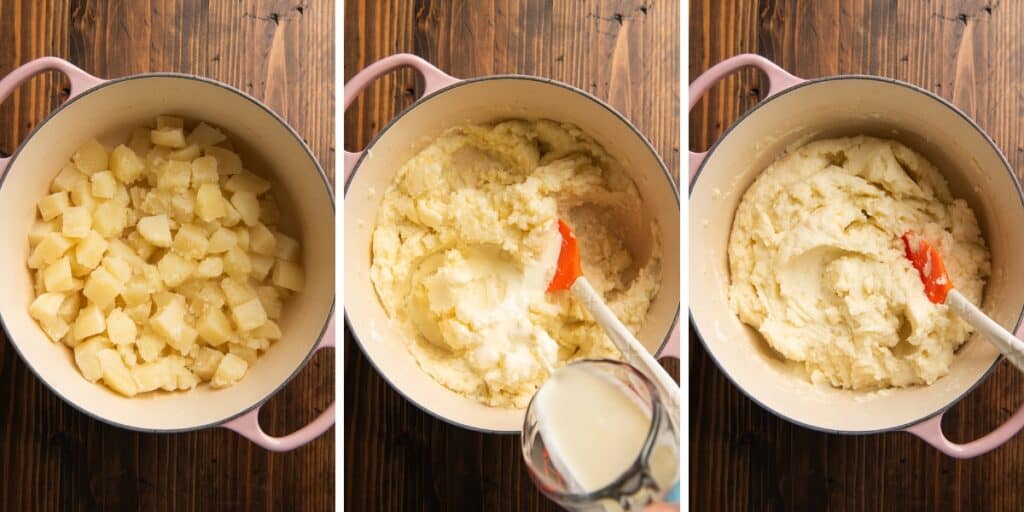

Cook your potatoes: While your bacon is cooking, add your peeled and chopped potatoes to a large pot. Fill the pot with cold water until your potatoes are fully submerged by about 1-inch. Add salt, and bring to a boil. Reduce heat to keep the water at a good simmer, and cook until the potatoes are fork tender (you should be able to easily smash a potato against the side of the pot with a fork). Then drain, return them to the pot, and cover to keep warm.
Heat heavy cream: Heat the heavy cream in the microwave until it is steaming hot.
Add butter and mash your potatoes: Add the cubed butter to the pot with the mashed potatoes. Then use a potato masher to mash your potatoes until they reach your preferred texture.


Add the rest of your ingredients: Stir in the sour cream and ¼ cup of the warmed heavy cream to the mashed potatoes. Taste and add the rest of the heavy cream if needed. Then stir in the cooked bacon, cheddar cheese, chives, and salt and pepper to taste.
Serve, and enjoy!

How to store your Loaded Mashed Potatoes
- Refrigerator: If you have any leftover loaded mashed potatoes, store in an airtight container in the refrigerator for up to 3 days.
- Freezer: I don’t think the texture of mashed potatoes is quite as good after freezing, but many people disagree with me, so try it for yourself and see what you think. To freeze these potatoes, transfer them to a freezer bag, press out all the air, and store them in your freezer for up to 3 months. Defrost overnight in the refrigerator.


Serve These Potatoes With
- Country-style Pork Ribs Oven-roasted Tri-tip Slow Cooker Beef Ribs

Equipment
- Large skillet
- Paper towels
- Large pot
- Potato masher
- Microwave-safe measuring cup, or microwave-safe dish to heat cream in
Ingredients
- ▢ 8 tablespoons (115g) butter salted or unsalted is fine
- ▢ ½ cup (120g) sour cream
- ▢ ½ pound bacon chopped 3/4-inch
- ▢ 3 pounds russet potatoes peeled and chopped into roughly 1/2-inch pieces
- ▢ 1 tablespoon table salt plus more as needed
- ▢ ½ cup heavy cream divided
- ▢ 1 cup ( 4oz ) shredded cheddar cheese
- ▢ 2 tablespoons minced fresh chives plus more for topping if desired
- ▢ Ground black pepper
Instructions
- Before you begin preparing any of the other ingredients, cut the butter into 1-inch pieces and measure out your sour cream. Set both in a warm place in your kitchen.
- Place bacon pieces in a cold skillet and cook over medium heat until bacon reaches your preferred level of doneness. Use a slotted spoon to transfer the bacon to a paper towel-lined plate and set aside.
- While your bacon cooks, to a large pot, add your peeled and chopped potatoes. Cover with cold water so potatoes are completely submerged by about 1-inch. Add salt and bring the water to a boil. Reduce heat to keep the water at a good simmer. Cook until the potatoes are tender—you should be able to easily smash a piece against the side of the pot with a fork, about 10-15 minutes. Drain the potatoes, return them to the pot and cover to keep them warm.
- To the cooked potatoes, add the cubed butter. Use a potato masher to mash the potatoes until they reach your preferred texture.
- Heat all of the heavy cream in the microwave until it is steaming hot. Stir in sour cream and ¼ cup of the warmed cream. Taste and add remaining cream if needed.
- Stir in the cooked bacon, cheddar cheese, and chives, and then salt and pepper to taste.
- Keep the potatoes covered until you’re ready to serve them, and enjoy!
Notes
- Refrigerator: Store in an airtight container in the refrigerator for up to 3 days.
- Freezer: Transfer to a freezer bag, press out the air, and store them in your freezer for up to 3 months. Defrost overnight in the refrigerator and reheat gently in the microwave.
This Hot Fudge Sauce takes only 15 minutes to make and requires only 5 ingredients. It is gooey, fudgy, and the perfect topping for ice cream sundaes, cakes, and waffles.
I’m so happy you found your way here today because it means I get to share my absolute favorite hot fudge sauce with you. This sauce is the best combo of easy to make and exceptionally delicious. It’s perfect for hot summer days drizzled over frozen treats or indulgent brunches topping waffles and pancakes.

I’ve had the single-serve version of this recipe, Hot Fudge Sauce for One , on the site for a few years. But I’ve gotten a surprising number of requests for the full-sized version, so here we go.
Ingredient Notes
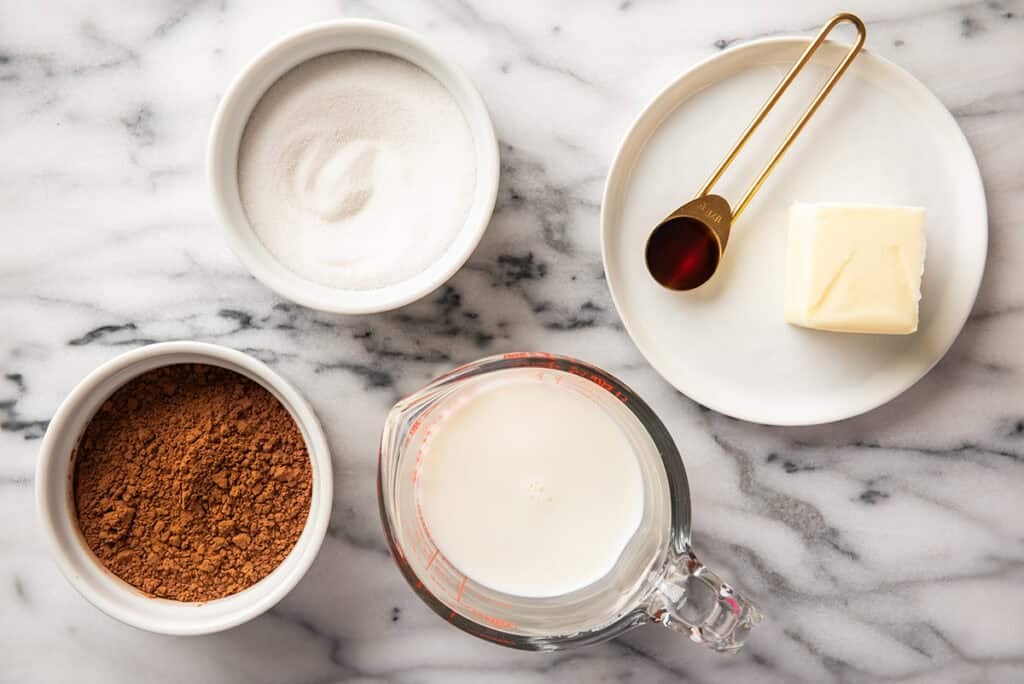

- Cocoa powder: You can use either Dutch-process or natural cocoa powder for this recipe, both of which can usually be found in most large grocery stores. Using Dutch-process cocoa will make your hot fudge sauce a darker color with a more robust chocolate flavor while using the natural cocoa powder gives the sauce a lighter color and a bright, slightly acidic tang.
- Butter: You can use either salted or unsalted butter in this recipe. If you use unsalted butter, just add a pinch of salt to the recipe.
How to Make Hot Fudge Sauce
This is a quick recipe overview with photos. For the full, printable recipe, scroll down to the recipe card below.
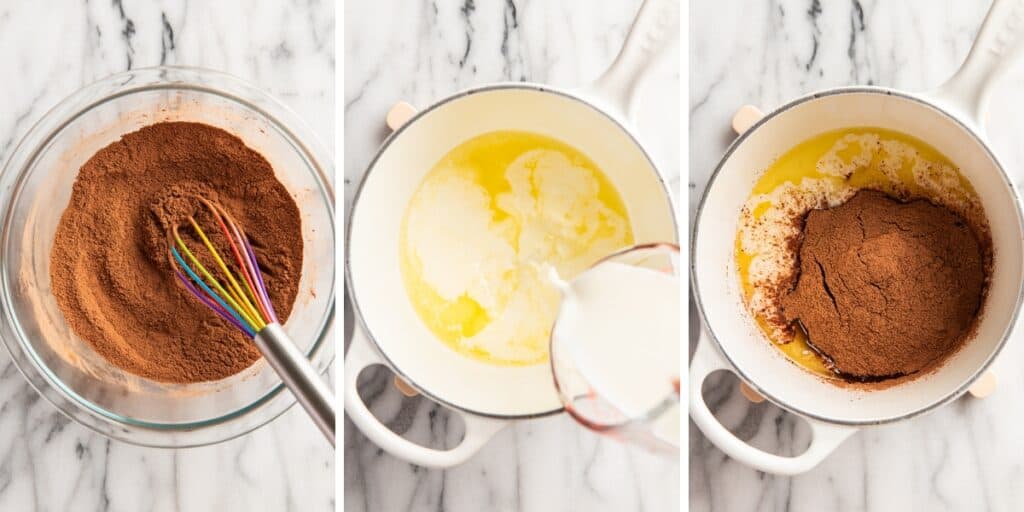

Whisk sugar and cocoa powder: In a medium bowl, whisk together the sugar and cocoa powder, making sure there are no clumps in the mixture. This will help produce a silky-smooth sauce with no lumps.
Melt butter: In a medium saucepan, melt the butter over medium heat.
Add in milk and the sugar and cocoa powder mixture: Once the butter is completely melted, whisk in the milk. Then whisk in the sugar and cocoa powder mixture, whisking continuously until the mixture begins to bubble around the edges and thicken (around 3-8 minutes).
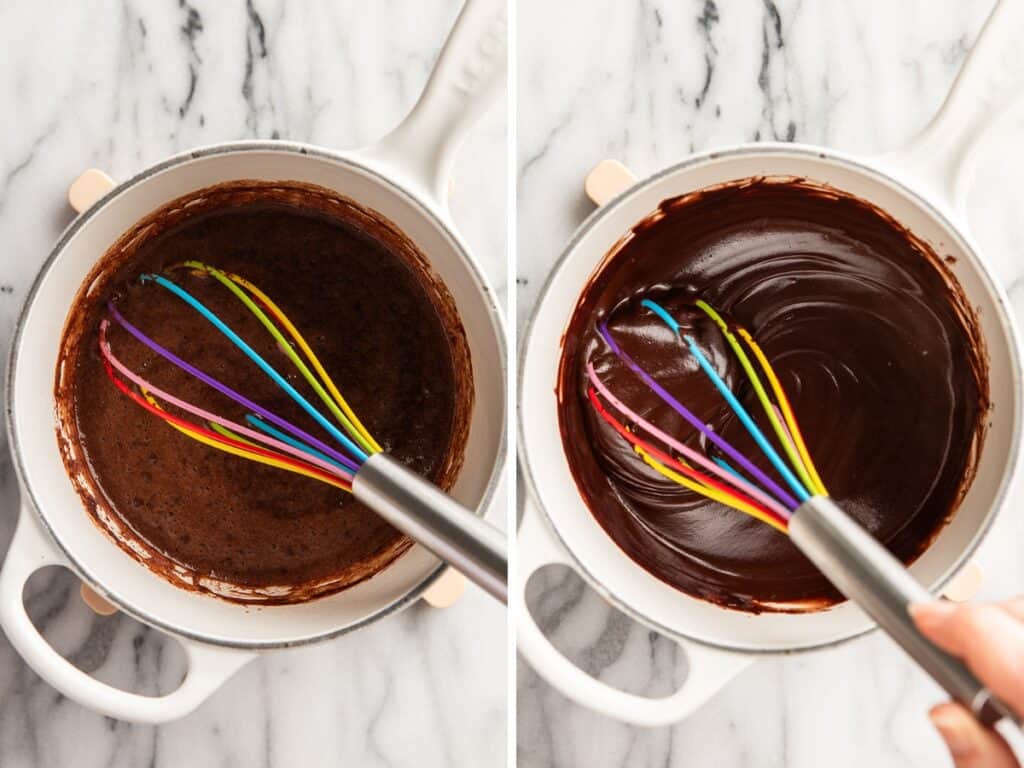

Add in vanilla: Remove the saucepan from the heat and stir in the vanilla.
Let sauce cool: Let your sauce cool for around 3-5 minutes before serving. The sauce will continue to thicken as it cools.
Serve, and enjoy!
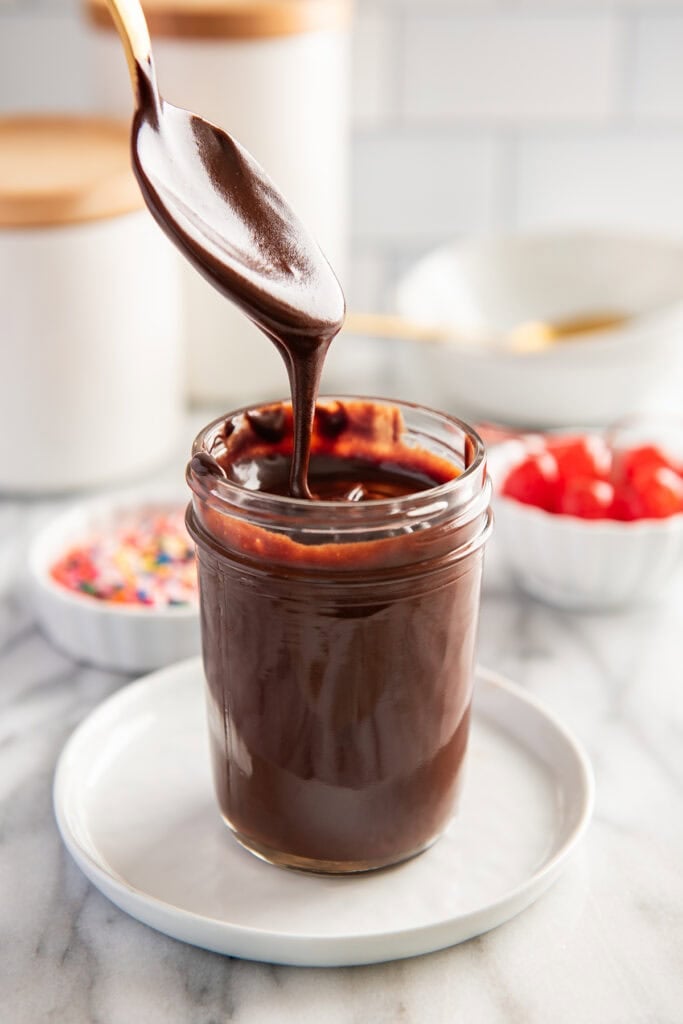

How to Store Hot Fudge Sauce
- Refrigerator: You can store this sauce in an airtight container in the fridge for up to 1 week. As it cools, the hot fudge sauce will solidify. Once you are ready to use it, reheat the sauce by microwaving for 10 seconds, stirring, and repeating until warm. This will return your sauce to its smooth, pourable state
- Freezer: You can freeze this sauce in an airtight container for up to 3 to 4 months. When ready to use, let it thaw in the refrigerator and then heat gently on the stove or in the microwave.
Related Recipes
- Nutella Sauce
- 2-ingredient Magic Chocolate Shell
- 30-Second Easy Chocolate Sauce
- Peanut Butter Sauce

Ingredients
- ▢ 1/2 cup (100g) granulated sugar
- ▢ 1/2 cup (40g) cocoa powder
- ▢ 1/4 cup (56g) salted butter*
- ▢ 1/2 cup milk any percentage
- ▢ 1/2 teaspoon vanilla extract
Instructions
- In a medium bowl, whisk together granulated sugar and cocoa powder, being sure to whisk out any lumps in the mixture.
- In a medium saucepan, melt butter over medium heat. Whisk in milk, and the combined sugar and cocoa powder.
- Cook, whisking continuously, until the mixture begins to bubble around the edges and thicken, 3-8 minutes. Remove from heat and stir in vanilla.
- Sauce will continue to thicken as it cools. Let it sit for 3-5 minutes before serving.
- Serve poured over something delicious, and enjoy!
Notes

The Best Chocolate Chip Pancakes
Equipment
- Handheld electric mixer
- Electric griddle optional but great to have!
Ingredients
- 4 large eggs
- 4 cups (480g) all-purpose flour measured by weight or using the spoon and sweep method*
- ½ cup (100g) granulated sugar
- 1 tablespoon + 1 teaspoon baking powder
- 2 teaspoons baking soda
- 2 teaspoons table salt
- 3 cups buttermilk *
- 6 tablespoons salted butter melted and slightly cooled
- 2 teaspoons vanilla extract
- 1 ½ cup chocolate chips
- Cooking spray or a little butter for greasing the skillet
Instructions
- If you are planning to serve all the pancakes at once, preheat your oven to 200°F to keep the pancakes warm between batches.
- Separate out egg whites from yolks, dropping the whites into a small mixing bowl and reserving the yolks in any small container to use later in the recipe. Set both aside.
- In a medium bowl, whisk together the flour, sugar, baking powder, baking soda, and salt.
- In a separate, large bowl, combine buttermilk, the egg yolks, melted and slightly cooled butter, and vanilla. Whisk until smooth.
- Pour the flour mixture into the bowl of wet ingredients and stir until just mixed and there is no dry flour at the bottom of the bowl. The batter will look very thick at this point.
- Use a handheld electric mixer starting on low and working up to high to beat the egg whites until stiff peaks form (when beaters are lifted out, the whites should stand straight up without curling over at the tips or collapsing)
- With a rubber spatula, gently fold the egg whites into the batter. Do not over-mix or you risk deflating the egg whites.
- Fold in the chocolate chips.
- Heat an electric griddle to 325°F or a large skillet over medium heat.
- Once your cooking surface is hot, lightly grease it with cooking spray or butter. Evenly space out slightly heaping ⅓ cups of batter. Cook until bubbles begin to form on the tops of the pancakes and and then flip and cook until done.
- If needed, place the pancakes on a cookie sheet in the oven to keep them warm. Repeat with remaining batter.
- Add your favorite toppings, serve, and enjoy!
