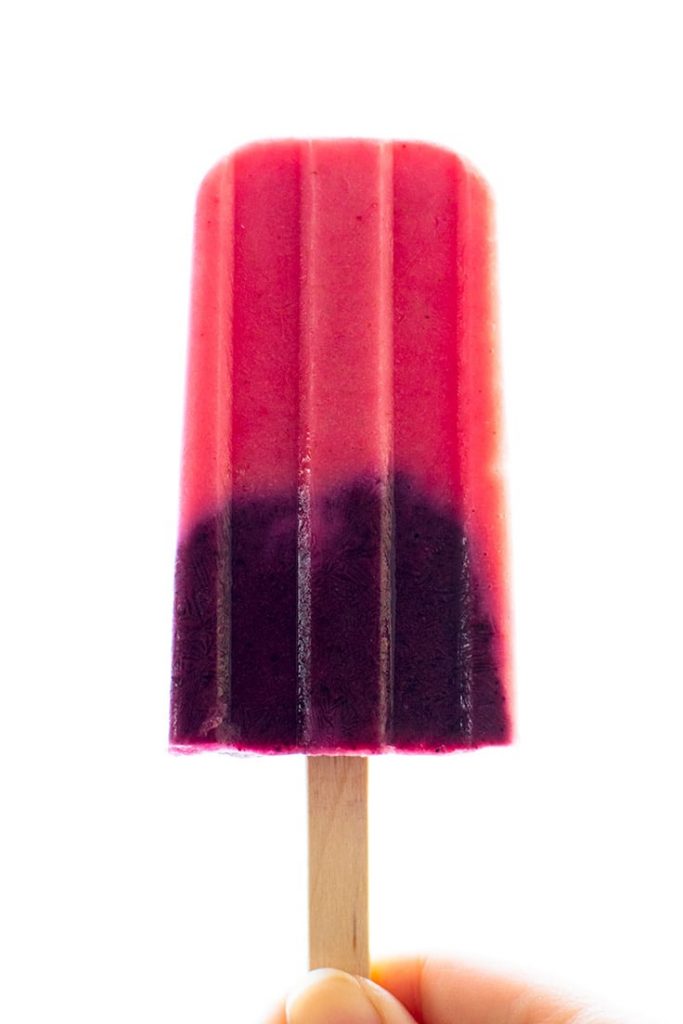
These Strawberry and Blueberry Yogurt Smoothie Popsicles are fun, easy, and absolutely delicious!

Heeeeey, I have something a little nerdy and a lot delicious to start off your Monday!
It’s been a little while since I’ve posted a nerdy recipe . After my Creepy Recipes From Fiction series ( Sanguinaccio Dolce and Game of Thrones Frey Pie , anyone?) back in October, it’s been quiet on the nerdy front, but not any longer, because I’m sharing an X-men -inspired recipe today!!
I wasn’t a kid who watched the animated X-men series growing up, but I am a fan of the X-men movies, especially First Class. When the theme was announced, I knew immediately what I was going to make: a chess pie, because the scenes where Erik and Charles sit around and chat over a game of chess are basically the best parts of the movies in any timeline (or with either set of Erik and Charles).


Buuuuut I made a test chess pie, and it was an eggy, too-sweet failure, which was a bummer because you know I do love my word play.


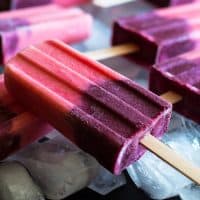
So instead of a punny pie, I decided to make something sweet in the red and purple colors of Magneto’s costume and figured it would be a perfect chance to make smoothie popsicles for the blog. So I made Strawberry and Blueberry Yogurt Smoothie Popsicles, and unlike my mess of a pie, these are so good!!
Smoothie popsicles are super fun and easy to make. They only require a few ingredients, and just in case you don’t feel like making them in Magneto’s colors, you can use your favorite smoothie fruit instead.
How to Make Smoothie Popsicles
You just blend together fruit, yogurt, lemon juice, and a little bit of sugar (more on the sugar later) in two batches, and pour the smoothie into your popsicle mold ( this one’s my favorite ). And since the yogurt gives you a fairly dense smoothie, you don’t even have to freeze the layers separately the way you do with most two-toned popsicles.


A Note on Sugar
The sugar here is optional. You don’t have to add it, especially if you are working with really sweet fruit, but freezing mutes sweetness a lot, so I always like to start with a little extra sweet to make up for that. You can also try the same amount of honey if a natural sweetener is more your style!

Looking for more Popsicle Recipes ? Try these (FABULOUS) Homemade Pudding Pops , Cookies and Cream Popsicles , and Red Wine Popsicles .
Ingredients
Special Equipment
- ▢ Blender
- ▢ Popsicle mold*
- ▢ Popsicle sticks
Strawberry Layer
- ▢ 1 1/2 cup strawberries fresh or frozen
- ▢ 1 (5 to 6-ounce) container sweetened yogurt (any complementary flavor*)
- ▢ 1 tablespoon sugar
- ▢ 1 teaspoon lemon juice
Blueberry Layer
- ▢ 1 cup blueberries fresh or frozen
- ▢ 1/2 cup strawberries fresh or frozen
- ▢ 1 (5 to 6-ounce) container sweetened yogurt (any complementary flavor)
- ▢ 1 tablespoon sugar
- ▢ 1 teaspoon lemon juice
Instructions
- Combine strawberry layer ingredients in the blender and blend until smooth. Divide among popsicle molds.
- Repeat with the blueberry layer, making sure to leave a little space at the top for the popsicles to expand. Add sticks and freeze for at least 4 hours.
- Run mold under warm water and gently remove popsicles. Wrap individually in freezer or parchment paper and store in an air-tight container or freezer bag. Enjoy!
Notes

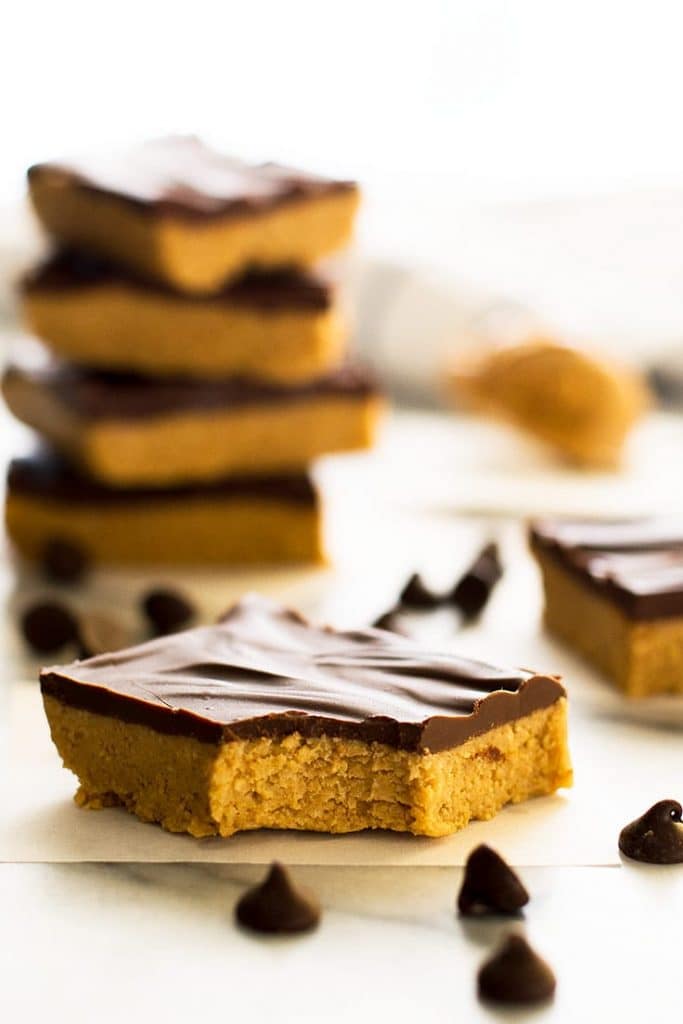
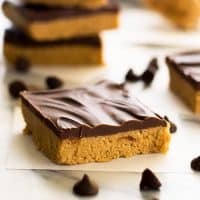
These fabulous Small-batch Peanut Butter bars are so easy to make–maybe too easy…

I’m not usually big on no-bake desserts. I love baking (I may have even written a whole book on the subject), so aside from some frozen desserts (remember last summer’s red wine popsicles? ), there actually aren’t any no-bake desserts on the entire blog–until today.
Guys, have you ever had a Peanut Butter Bar?
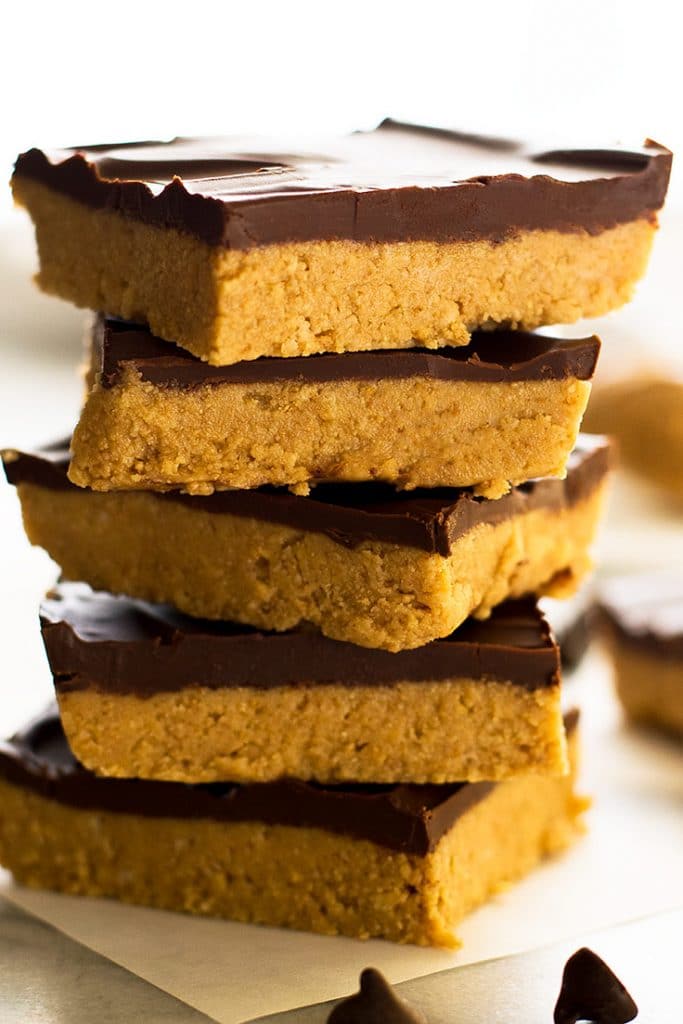

Oh, these beautiful, terrible things. If you’ve never had one, that should change today. They are SO good, like giant, more substantial Reese’s Peanut Butter Cups. They have a base layer of sweet and salty peanut butter and graham cracker and then they are covered in peanut butter chocolate. It’s preeeety spectacular.
And the terrible thing about these bars is that they are so easy to make. Like take you five minutes and 2% effort to make. There’s not a whole lot to stop you from making these all the time if you wanted to (and you will want to).

How to Make Peanut Butter Bars
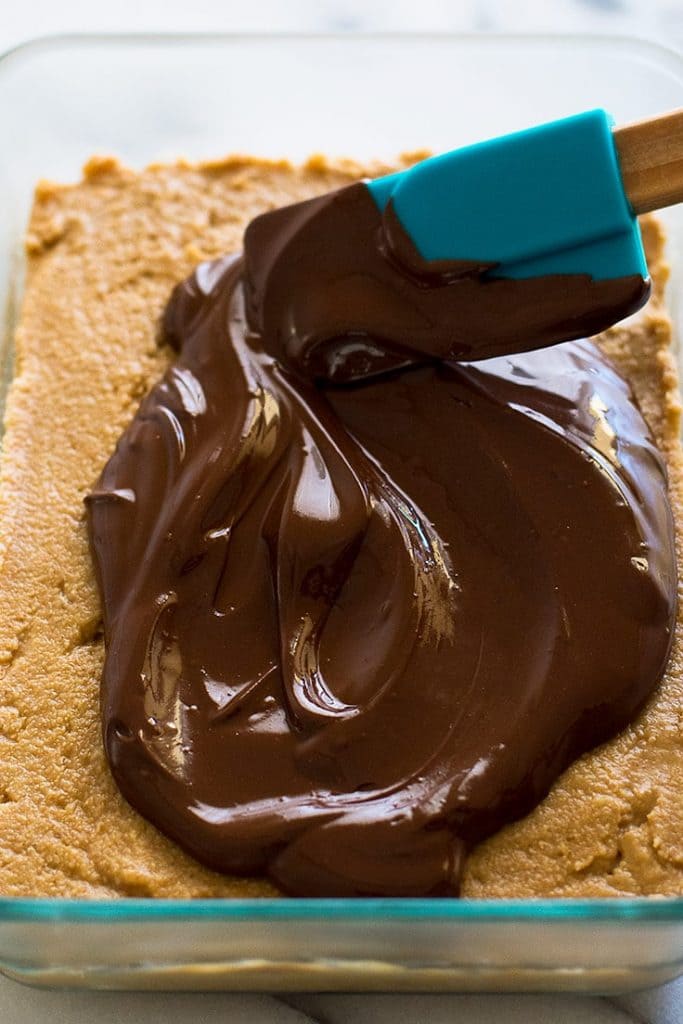
The process for making these Small-batch Peanut Butter Bars is just mix all of your peanut butter base ingredients together–you don’t even need a mixer, spread that out in a 7×5-inch baking dish (I used a Pyrex container), and then melt together some more peanut butter and chocolate and pour it over the top. Refrigerate and eat.
The most labor intensive part of making these bars is crushing some graham crackers for the base, and since this is a small-batch recipe, that’s like four crackers, so it’s more entertaining than tedious.
Since this is a small-batch recipe, it will make about six really generous bars, or you can cut them into much smaller, bite-sized pieces to spread the goodness around a little more. As with most things peanut butter, there’s really no wrong way to enjoy these.

Looking for more Peanut Butter Desserts? Try Peanut Butter Oatmeal Cookies , Peanut Butter Hot Chocolat e, and Peanut Butter Sauce .
Ingredients
Special Equipment
- ▢ 7x5-inch Baking Dish
Peanut Butter Layer
- ▢ 1/3 cup salted butter melted
- ▢ 2/3 cup graham cracker crumbs (4 full sheets)
- ▢ 2/3 cup ( 80g ) powdered sugar
- ▢ 1/3 cup ( 85g ) creamy peanut butter (not natural peanut butter)
Chocolate Layer
- ▢ 1/2 cup ( 3oz ) good-quality semi-sweet chocolate chips
- ▢ 1 ( 20g ) heaping tablespoon peanut butter
Instructions
- In a medium bowl, combine melted butter, graham cracker crumbs, powdered sugar, and peanut butter. Stir with a spoon until well mixed. Turn out into an ungreased 7x5-inch dish and smooth out. Place in the freezer for 5 minutes.
- In a small, microwave-safe bowl, combine chocolate and peanut butter. Microwave for 30 seconds and stir. If necessary, microwave for an additional 15 seconds and stir, repeating until chocolate is melted and smooth.
- Pour mixture over the cooled peanut butter and spread. Refrigerate for at least one hour before cutting. Enjoy!
Adapted From The Girl Who Ate Everything
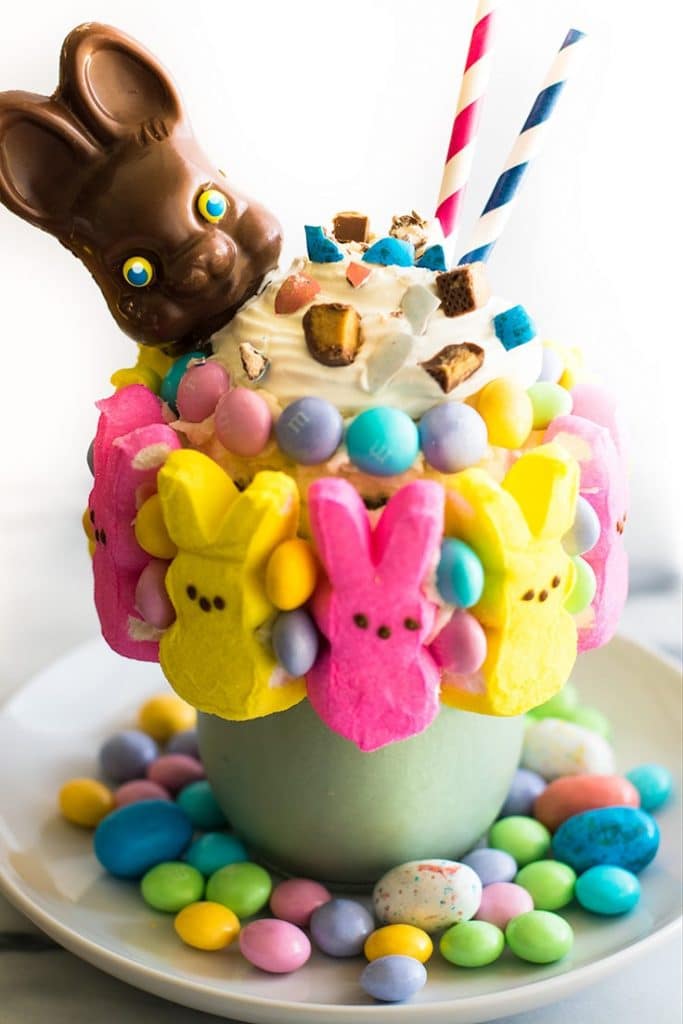
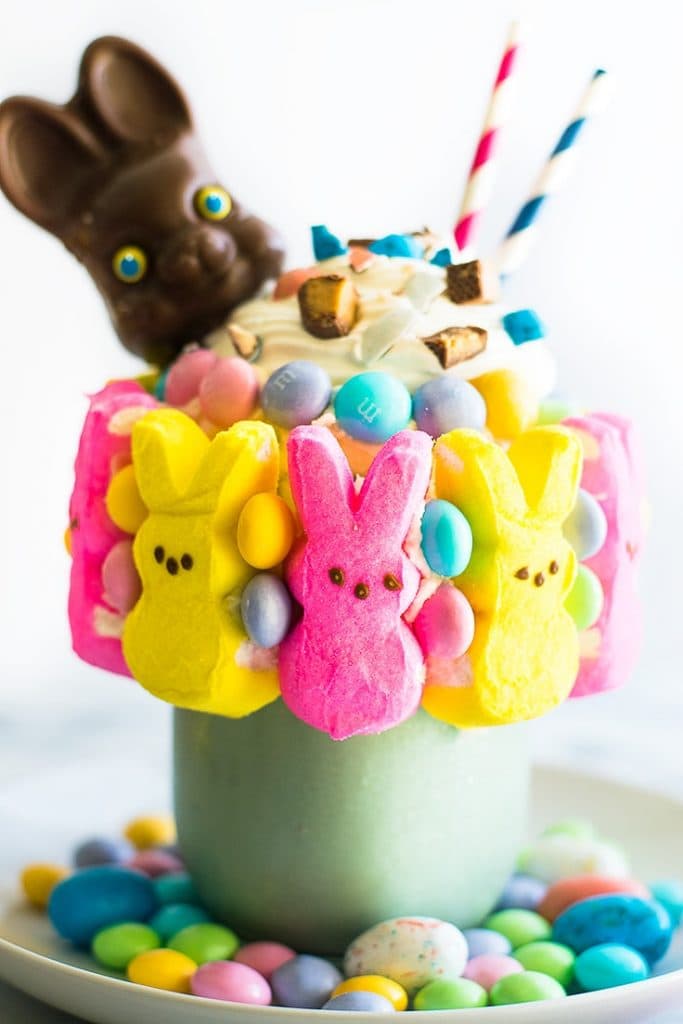
Wondering what to do with leftover Easter candy? Make an Easter Candy Freakshake. Ridiculously fun and ridiculously good!

As is the tradition here at Baking Mischief, I like to use this day not as a chance to play a trick on you, lovely readers, but for us all to play a trick on our bodies and make something terrible and ridiculous and insane.
Last year, I made a Salted Caramel Snickerdoodle Milkshake (I still have cinnamon and caramel dreams about that one), and this year, since Easter falls in April, I made an EASTER CANDY FREAKSHAKE!!!

Look at that ridiculous, stupid thing.
I love it so much.
And look, I don’t think there is ever really a good excuse for freakshakes, but I’m going to make an argument that this shake is actually a net positive in the world, because if you make it after Easter and make it to use up leftover Easter candy, you are actually recycling.
Recycling = good. Ergo, so must be this shake.
(I do not stand by this argument.)
Okay, let’s break this thing down because it’s a little overwhelming to take in all at once. The shake itself is a simple ice cream shake–use whatever flavor ice cream you like best– I used mint with a touch of blue coloring to give it a robin’s egg hue.
On the outside, you have vanilla buttercream studded with bunny Peeps and pastel M&Ms. Then you top it off with whipped cream , a chopped up Reese’s Egg, some crushed Robin Eggs, and a chocolate bunny head (because how could you not).
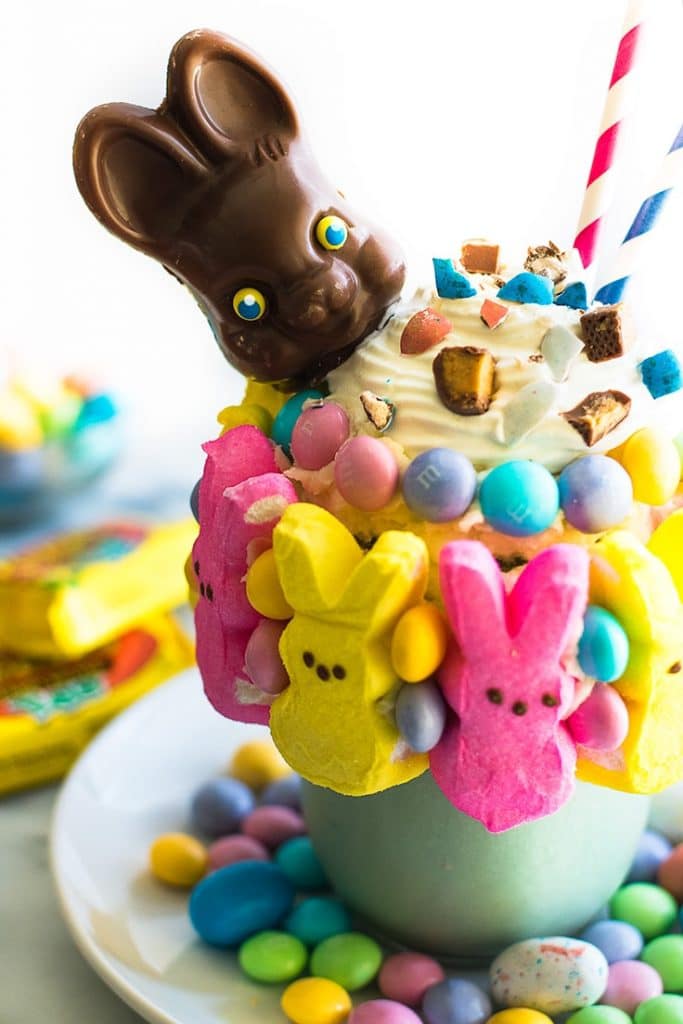

To say this Easter Candy Freakshake is an experience is an understatement, and it is way fun to make and drink.
So make your run this morning an extra long one, enjoy arts and crafts time, and dig in. I did. (And then sugar crashed hard. Drink responsibly, guys!)
Looking for more over-the-top desserts? Try these Buckeye Brownie Cookies , Rich and Thick Hot Chocolate , and Dutch Apple Pie .

Ingredients
Special Equipment
- ▢ Handheld electric mixer
- ▢ Blender
- ▢ Sturdy straw or skewer for the bunny head
Buttercream
- ▢ 4 tablespoons ( 2oz ) butter softened
- ▢ 1 cup ( 120g ) powdered sugar
- ▢ 1 teaspoon milk or heavy cream
- ▢ 1/4 teaspoon vanilla extract
Candy
- ▢ 12 Marshmallow Peeps
- ▢ 1/4 cup M&M’s
- ▢ 1 hollow chocolate bunny
- ▢ 1 Reese’s Egg chopped
- ▢ 4 Robin Eggs crushed
Milkshake
- ▢ 2 cups ice cream slightly softened
- ▢ 1/4 to 1/2 cup milk
- ▢ 1/2 cup whipped cream
Instructions
Buttercream
- In a medium bowl, combine butter, powdered sugar, milk (or cream), and vanilla. Use a handheld electric mixer to beat until smooth, adding a little extra milk if necessary.
Candy
- Spread a thick layer of buttercream around the top half of your jar or glass. Add a dollop of frosting to the backs of the peeps and place them over the buttercream. Repeat with the M&M’s, filling in any open space.
- Use a serrated knife to gently saw off the head of the chocolate bunny and set aside.
Milkshake
- In a blender, combine ice cream and 1/4 cup of the milk. Blend until smooth. Add up to 1/4 cup more of milk, until milkshake reaches your desired consistency. Pour into prepared jar.
- Top with whipped cream, chopped Reese’s Egg, and crushed Robin Eggs. Place a straw in the shake and mount the bunny head over it. Serve and enjoy!

Strawberry and Blueberry Yogurt Smoothie Popsicles
Ingredients
Special Equipment
- Blender
- Popsicle mold*
- Popsicle sticks
Strawberry Layer
- 1 1/2 cup strawberries fresh or frozen
- 1 (5 to 6-ounce) container sweetened yogurt (any complementary flavor*)
- 1 tablespoon sugar
- 1 teaspoon lemon juice
Blueberry Layer
- 1 cup blueberries fresh or frozen
- 1/2 cup strawberries fresh or frozen
- 1 (5 to 6-ounce) container sweetened yogurt (any complementary flavor)
- 1 tablespoon sugar
- 1 teaspoon lemon juice
Instructions
- Combine strawberry layer ingredients in the blender and blend until smooth. Divide among popsicle molds.
- Repeat with the blueberry layer, making sure to leave a little space at the top for the popsicles to expand. Add sticks and freeze for at least 4 hours.
- Run mold under warm water and gently remove popsicles. Wrap individually in freezer or parchment paper and store in an air-tight container or freezer bag. Enjoy!
