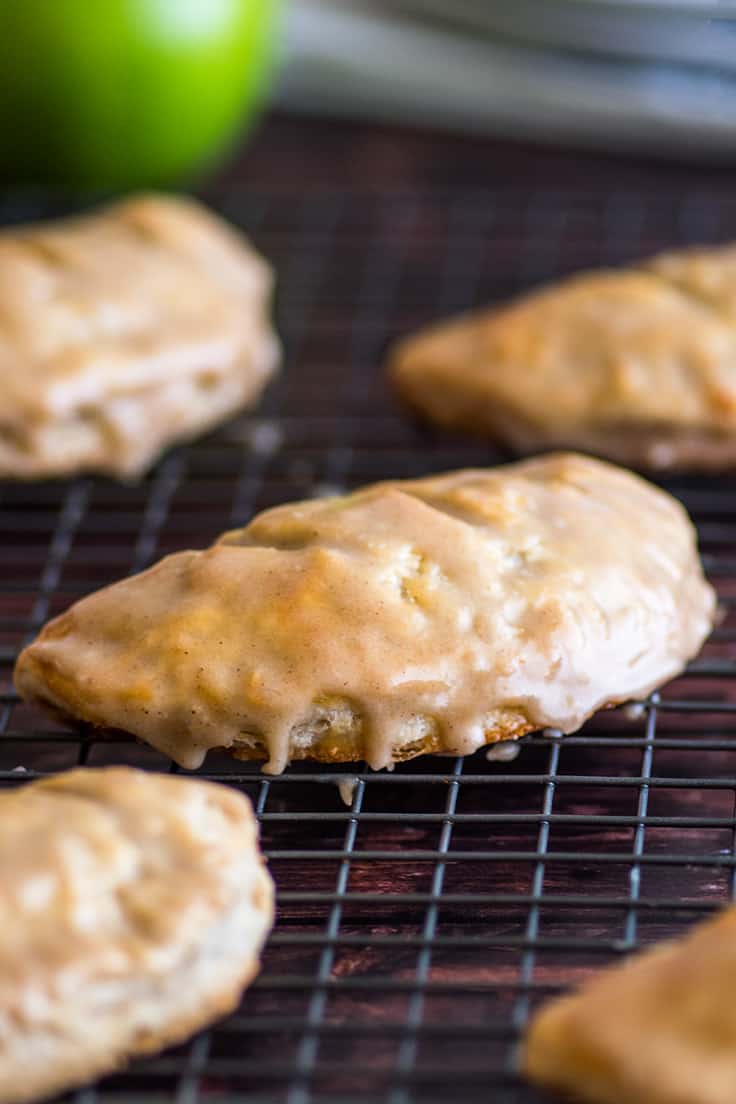
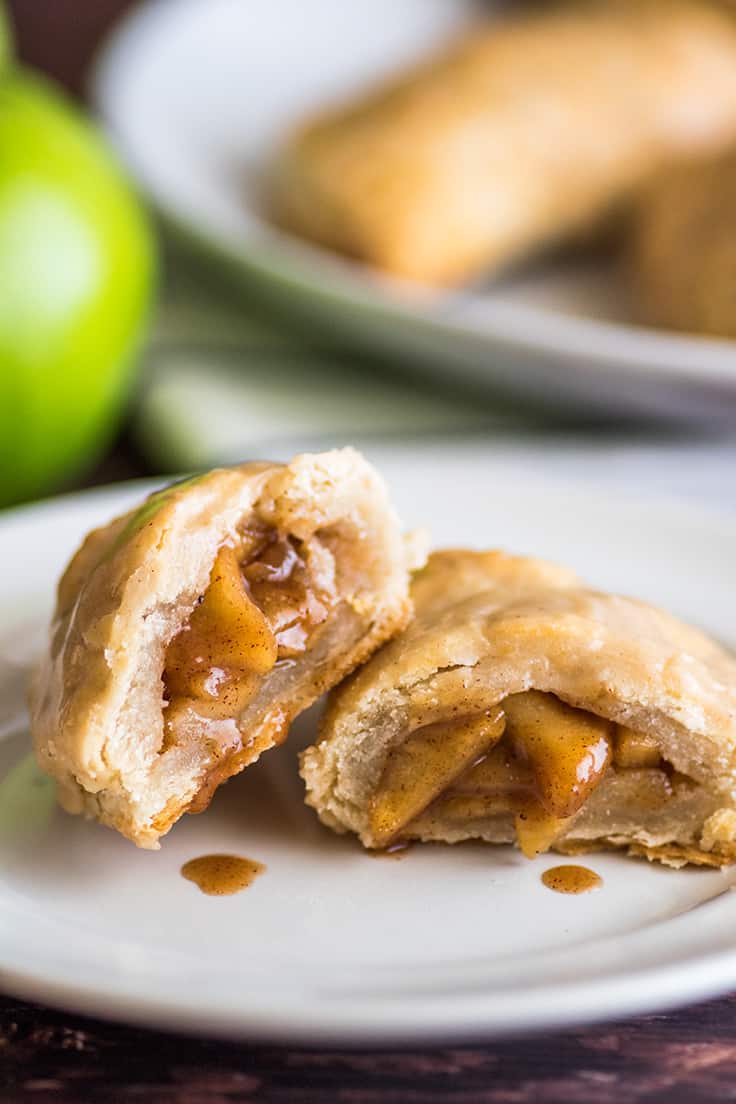
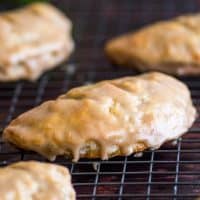
Small-batch Apple Hand Pies have all the joys of pie without the long cooking and cooling time. Gooey apples and cinnamon wrapped up in a flaky pie crust with a brown sugar and butter glaze over the top.

Happy Wednesday! How is your week going so far? I feel like mine is going by way too fast. I have an out of town wedding this weekend, and then I’m leaving the country next Thursday, so I’ve been running around, finishing up posts so you’ll still get new recipes while I’m traveling, and stress drinking enough coffee to eat a hole in my stomach–seriously, someone should probably take my coffee maker away from me now…
But I’m slowing down for a couple of minutes to chat a little about today’s recipe, Small-batch Apple Hand Pies, because I’ll always make time for pie, especially these ones.


Look how cute they are! I love them so much.
These hand pies start with a classic flaky pie crust. It’s simple to make and totally delicious. Inside of the pies is a mixture of apples, brown sugar, and cinnamon that you’ll really just want to eat with a spoon. They bake up all crispy and flaky on the outside and warm and gooey in the middle.

You can leave the hand pies naked if you want, just grab them from the pan and start chowing down as soon as they cool enough not to scald the roof of your mouth, but I like to add a brown sugar and butter glaze. It adds just this nice bit of crinkly, buttery sweetness on top of the pies and it’s basically perfect.
If you’re feeling like pie, but don’t want to wait all day for one bake and cool, these are the solution. You get all the joys of pie, but don’t need a fork to eat them and they bake up super quick. What’s not to love about that?
This recipe makes five 4-inch hand pies. They’ll stay fresh at room temperature for a couple of days, or you can freeze them. They freeze and reheat exceptionally well. Just pop the frozen pies on a plate and microwave for a couple minutes and the next thing you know, you have a hot sizzling pastry ready to be enjoyed.

More Apple Desserts
- Dutch Apple Pie
- Dutch Apple Galette for Two
- Apple Pie Sundae
- Apple Crumb Muffins
- Apple Cinnamon Cake
Small-batch Apple Hand Pie Recipe Tips
- If you have a preferred pie dough recipe, you can use your own. You need 1 9-inch crust worth of dough. I also LOVE making these with My Favorite Buttermilk Pie Crust . It gives you extra flaky pies and is a little bit easier to work with than traditional pie dough.
- Flour measurement is very important in this recipe. Too much will mess with the dry to liquid ingredients ratio and your dough won’t come together. Be sure to measure by weight or using the spoon and sweep method, as detailed in the recipe notes.
- If at any step your dough becomes difficult to handle, return it to the refrigerator for a few minutes. It will firm back up and be much easier to work with.
- You can substitute apple pie spice for the spices in this recipe. Replace the cinnamon and nutmeg with ¾ teaspoon of apple pie spice in place of the cinnamon and nutmeg.
- You will probably have a bit of leftover pie dough. See my post What to Do With Leftover Pie Dough for ideas to use up the leftovers.
Ingredients
Special Equipment
- ▢ Pastry blender optional but nice to have
- ▢ 4-inch biscuit cutter optional but nice to have
- ▢ Pastry brush
Pie Crust
- ▢ 6 tablespoons ( 3oz ) unsalted butter cut into 1/2-inch chunks and chilled
- ▢ 3 tablespoons ( 36g ) vegetable shortening chilled
- ▢ 1 1/2 cups ( 180g ) all-purpose flour measured using a scale or the spoon and sweep method*
- ▢ 1 tablespoon ( 12g ) granulated sugar
- ▢ 1/4 teaspoon salt
- ▢ 1/2 teaspoon apple cider vinegar optional
- ▢ 1/4 cup ice-cold water plus more, if needed
Apple Filling
- ▢ 2 large Granny Smith apples peeled, thinly sliced and slices cut in half
- ▢ 2 tablespoons ( 25g ) brown sugar
- ▢ 1 tablespoon ( 12g ) granulated sugar
- ▢ 1 tablespoon ( 1/2oz ) unsalted butter
- ▢ 1/4 teaspoon ground cinnamon
- ▢ 1/8 teaspoon ground nutmeg
- ▢ 1/8 teaspoon salt or to taste
Egg Wash
- ▢ 1 egg
- ▢ 1 tablespoon milk
Brown Sugar Glaze
- ▢ 1 tablespoon ( 1/2oz ) unsalted butter melted
- ▢ 2 tablespoons ( 25g ) brown sugar
- ▢ 1/2 cup ( 60g ) powdered sugar sifted
- ▢ Pinch of cinnamon
- ▢ Pinch of salt
- ▢ 1 tablespoon milk plus more as needed
Instructions
Pie Crust
- Before you start prepping your ingredients, place your butter and vegetable shortening in the freezer so they are very cold when you are ready to work with them.
- In a medium bowl, whisk together flour, sugar, and salt. Add chilled, cubed butter and shortening and use a pastry blender, 2 knives, or your fingers to cut the butter and shortening into the flour until no pieces larger than a pea remain.
- In a small cup, combine apple cider vinegar and the ice-cold water and then slowly drizzle the liquid into the dry ingredients stirring with a fork. Continue to stir until dough clumps and comes together. Add a little more cold water if necessary, but be careful not to add too much. Your dough should not be wet or sticky!
- Gather the dough and wrap tightly in plastic wrap, squishing the dough into a 1-inch thick disk. Refrigerate for an hour, up to 2 days.
Apple Filling
- In a medium pot, combine all the filling ingredients and bring to a simmer. Cook over medium heat, stirring occasionally, for 6 minutes, until apples are softened and juices begin to caramelize. Set aside to cool for at least 15 minutes.
Assemble
- Take pie dough out of the refrigerator and allow it to sit at room temperature for 5 to 10 minutes to soften just slightly so it doesn’t crack when you roll it out. Preheat your oven to 425°F. Line a baking sheet with parchment paper or silicone baking mat.
- Whisk together egg and milk for the egg wash and set aside.
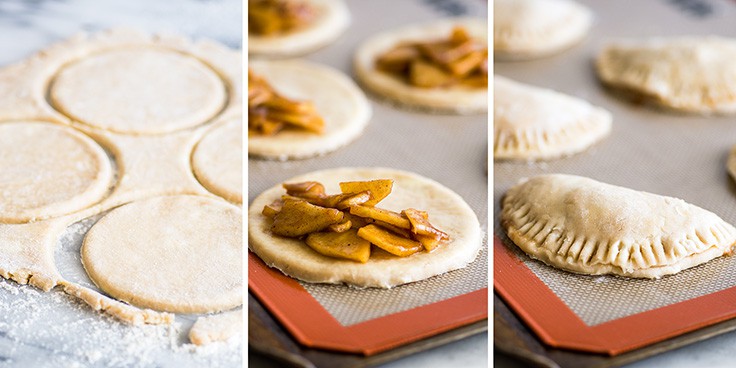
- Flour your work surface and rolling pin, and roll pie dough out to 1/4-inch thick. Cut out 5 4-inch rounds, gathering and re-rolling the dough scraps as necessary. Place each of the rounds on your prepared baking sheet as you cut them out. If at any time you feel like the dough is getting difficult to handle, place it in the refrigerator for a few minutes.
- Brush egg wash around the outer 1/2 inch of the rounds. One at a time, top half of each round with cooled apple filling (don’t overfill or you won’t be able to close them–you might have leftover filling), leaving at least 1/4-inch of space around the edge, and fold dough over. Crimp edge with a fork and repeat with remaining rounds and apples.
- Cut 3 slits in the top of each hand pie and then lightly brush the pastries with egg wash. Bake for 12 to 16 minutes until golden. Cool for 10 minutes before glazing.
- In a small bowl, whisk together all glaze ingredients. Add more milk by the 1/2 teaspoon until glaze reaches a drizzling consistency and brush or drizzle over pies. Allow to set for 5 minutes and enjoy!
Notes
Fall is here! Let’s celebrate with some of my favorite small-batch desserts to enjoy this time of year.

Hey, folks, FALL IS HERE!!
I’m sorry, that wasn’t enough exclamation marks. Let me try again: !!!!!!!!!!!!!!!!!!!!!!!!!!!!!!!!!!!!!!!!!!!!!!!!!!!!!!!!!!!!!!!!!!!!!!!!!!!!!!!!!!!!!!!!!!
I’m writing this post on our first rainy day here in SoCal, wearing a fuzzy sweater, new rain boots, and sitting in a tiny empty coffee shop with a cup of coffee at my elbow. This is basically peak happiness for me.
And, even better, since it’s officially fall, I don’t have to feel slightly silly sharing fall desserts with you here, so today, we are going all in, and I’ve put together a list of my favorite small-batch fall desserts for you. There’s lots of pumpkin, lots of apple, and all good things.
I love making small-batch desserts in the fall because when it starts getting cold outside, I want to bake EVERYTHING. I want to spend long, cozy weekends in the kitchen baking every apple and pumpkin dessert in existence (and maybe come up with a few new ones), but all those treats start to add up FAST.
Making mini versions like these lets me bake to my heart’s content, but I don’t start getting grumbles from friends and family that I’m making them gain weight, and I don’t end up eating my weight in streusel weekend (<– a legit concern).
All of these recipes make 1 to 6 servings, which is the perfect amount of food for one or two people, so you can to indulge in all the best flavors of fall in a (mostly) reasonable manner. 😉
Small-batch Apple Desserts
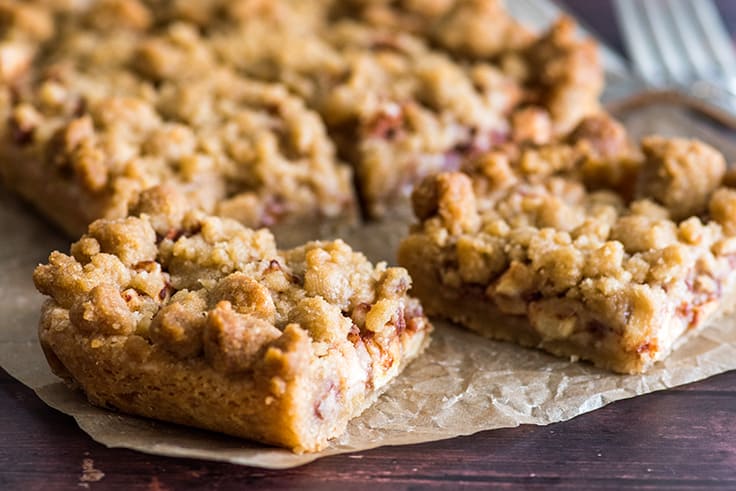
You will love these Small-batch Apple Pie Bars with their buttery shortbread base, gooey apple cinnamon center, and crunchy streusel topping.
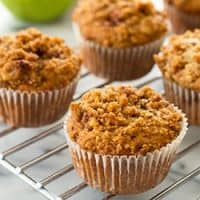

Cinnamon Apple Crumb Muffins
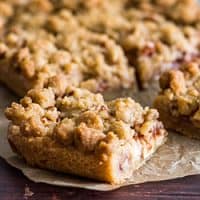

Small-batch Apple Pie Bars


Dutch Apple Galette for Two
Small-batch Pumpkin Desserts

These Pumpkin Donuts with Maple Glaze are moist, lightly spiced, and delicious.


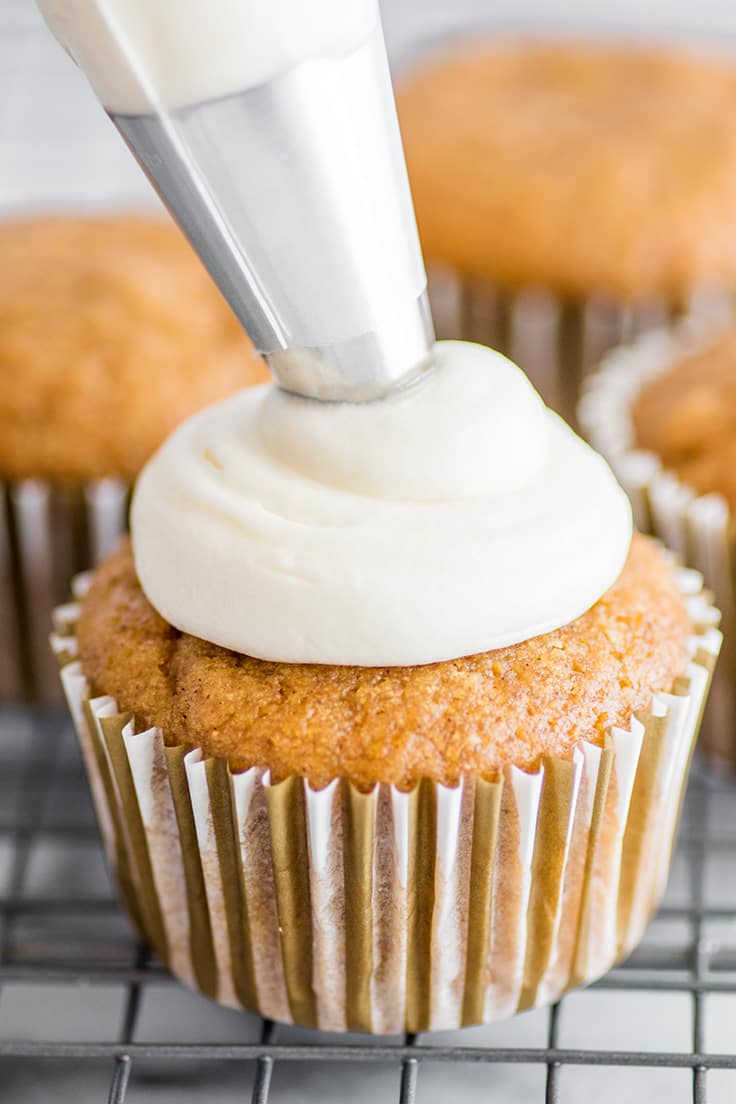
Small-batch Pumpkin Cupcakes With Cream Cheese Frosting


Small-Batch Mini Pumpkin Eclairs


Small-batch Shortbread Pumpkin Pie Bars


Small-batch Chocolate Chip Pumpkin Cookies

Mini Skinny Pumpkin Pie With Graham Cracker Crust
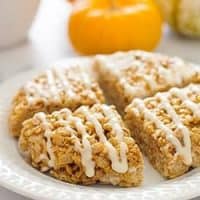

Small-batch Pumpkin Spice Rice Krispie Treats


Pumpkin Spice Latte Recipe Two Ways


Pumpkin Donuts with Maple Glaze


Pumpkin Shortbread Cookies
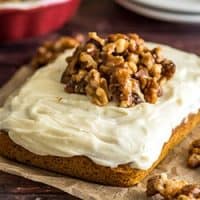

Mini Pumpkin Cake with Cream Cheese Frosting


Cinnamon Sugar Baked Pumpkin Donuts
Small-batch Maple Desserts
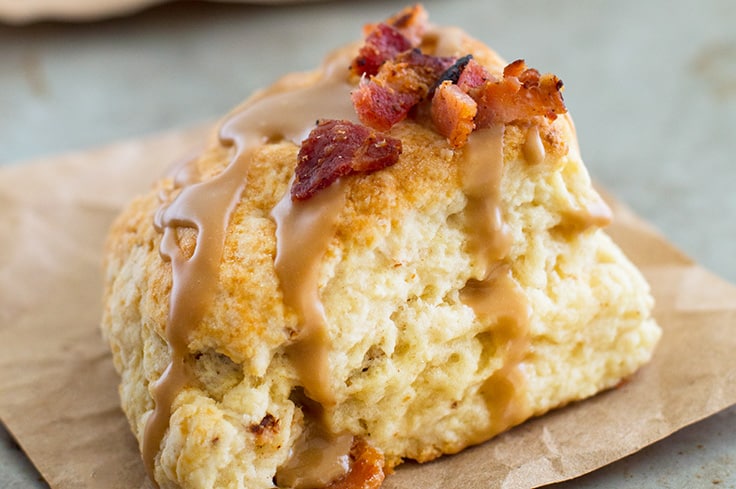
These small-batch Bacon Scones with Maple Glaze are one of my favorite recipes from Baking for Two!
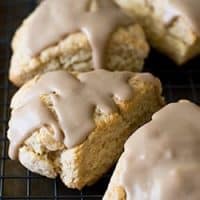

Small-batch Maple Scones (Maple Butter Scones)


Easy Baked Donuts Three Ways


Tammy’s Bacon Scones with Maple Glaze
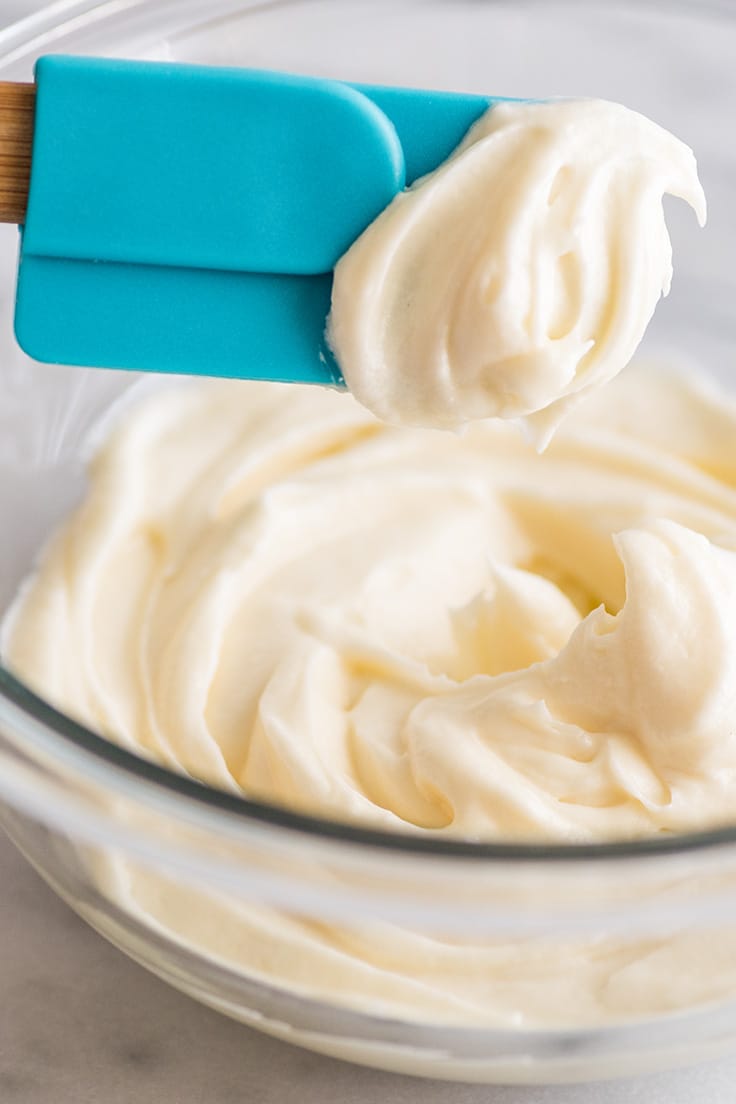
This Small-batch Cream Cheese Frosting recipe is silky smooth, tangy, and very cream cheesy, basically everything you could possibly want from cream cheese frosting!
I have another small-batch frosting recipe to share with you today, Small-batch Cream Cheese Frosting.
This frosting is smooth, tangy, and intensely cream cheesy, which I think is an absolute must for cream cheese frosting.


I hate it when I bite into something with a “cream cheese frosting” and the cream cheese is barely a whisper of a flavor.
This cream cheese frosting, you take a bite and you know immediately what you’re eating. It has a 1:1 ratio of cream cheese to butter, so you still get all the richness of a buttercream, but also the smooth tang of cream cheese, which is exactly what you want from a cream cheese frosting.
Ingredient Notes
- Cream cheese: Philadelphia cream cheese is my go-to cream cheese for desserts.
- Room temperature butter: Make sure you’re starting with room-temperature butter (and cream cheese) or you’ll struggle to get a smooth and creamy frosting. You’ll know your butter is at the right temperature when you can smoosh an indentation into it with your finger, but the butter around it should still hold its shape.
- Powdered sugar: I prefer my cream cheese frosting a little softer than traditional American buttercream, so this recipe uses only 2/3 cup powdered sugar. For a stiffer frosting that will pipe really cleanly, add up to 1/3 cup more of powdered sugar.

How to Make Cream Cheese Frosting
- In a medium bowl, combine cream cheese, butter, and vanilla extract. Beat until well-mixed and fluffy.
- Add powdered sugar and salt and continue to beat until sugar is completely incorporated and frosting is smooth and creamy.
- Pipe or spread over something delicious and enjoy!
Recipe Yield
This recipe makes between 3/4 and 1 cup frosting depending on how much sugar you use and how much air you beat into it. That will cover:
- 4 to 6 cupcakes with a piping bag
- 8 cookies
- 1 single-layer 6-inch or 7×5-inch cake or brownies (top and sides)
- 1 8-inch cake (a thin layer over top only) – This is for the folks who don’t LOVE frosting. Double the frosting if you’re a big fan.
Where to Use Cream Cheese Frosting
- Mini Carrot Cake
- Small-batch Vanilla Cupcakes
- Small-batch Chocolate Cupcakes
- Small-batch Pumpkin Cupcakes
- Mini Pumpkin Cake
- Small Banana Cake (double the frosting)
- Red Velvet Cake (double the frosting)

How do I avoid lumps in my cream cheese frosting?
To avoid lumps, starting with softened cream cheese and butter is essential. If they are too cold, they will not mix well.
When you start beating your cream cheese and butter together, if they are not mixing nicely, don’t add the sugar yet. Let everything sit for 5 to 10 minutes at room temperature and try again. This isn’t usually much of a problem in summer, but can be an issue in cold kitchens during the winter.
Can I freeze cream cheese frosting?
Yes. Cream cheese frosting freezes quite well. Store in a freezer bag in the freezer for up to 2 months. When you’re ready to use it, allow it to defrost in the fridge and then set it out on the counter until it comes up to room temperature for easy spreading.
Does cream cheese frosting need to be refrigerated?
Yes. Cream cheese frostings and desserts topped with them should be stored in the refrigerator in an airtight container.
Can you make this frosting in advance and store it in the refrigerator?
Yes. You can store this frosting covered in the refrigerator for about 48 hours, but the frosting is extremely firm cold, so you’ll need to let it come to room temperature on the counter before using.
Can I double this recipe?
Absolutely! You can scale up this recipe with no preparation changes needed. To change the recipe yield, hover over the serving size in the recipe card below or click if you’re on mobile, and slide the slider.
More Cream Cheese Desserts
- Easy Cheesecake
- Cheesecake Bites
- Oreo Cheesecake Bites
- Kahlua Cream Cheese Cup Pies
- Small-batch Cinnamon Rolls with Cream Cheese Frosting
More Small-batch Frosting Recipes
- Van illa Frosting
- Chocolate Frosting
- Chocolate Cream Cheese Frosting
- Cookie Dough Frosting
- Strawberry Frosting
- Oreo Frosting

Ingredients
- ▢ 2 ounces cream cheese softened
- ▢ 4 tablespoons ( 2oz ) unsalted butter softened*
- ▢ 1/4 teaspoon vanilla extract
- ▢ 2/3 cup ( 80g ) powdered sugar sifted, plus up to 1/3 cup more for stiffer frosting
- ▢ Pinch of salt
Instructions
- In a medium bowl, combine cream cheese, butter, and vanilla extract. Beat until well-mixed and fluffy.
- Add powdered sugar and salt and continue to beat until sugar is completely incorporated and frosting is smooth and creamy. For a stiffer frosting, add up to 1/3 cup more of powdered sugar. Enjoy!
Notes

Small-batch Apple Hand Pies With Brown Sugar and Butter Glaze
Ingredients
Special Equipment
- Pastry blender optional but nice to have
- 4-inch biscuit cutter optional but nice to have
- Pastry brush
Pie Crust
- 6 tablespoons ( 3oz ) unsalted butter cut into 1/2-inch chunks and chilled
- 3 tablespoons ( 36g ) vegetable shortening chilled
- 1 1/2 cups ( 180g ) all-purpose flour measured using a scale or the spoon and sweep method*
- 1 tablespoon ( 12g ) granulated sugar
- 1/4 teaspoon salt
- 1/2 teaspoon apple cider vinegar optional
- 1/4 cup ice-cold water plus more, if needed
Apple Filling
- 2 large Granny Smith apples peeled, thinly sliced and slices cut in half
- 2 tablespoons ( 25g ) brown sugar
- 1 tablespoon ( 12g ) granulated sugar
- 1 tablespoon ( 1/2oz ) unsalted butter
- 1/4 teaspoon ground cinnamon
- 1/8 teaspoon ground nutmeg
- 1/8 teaspoon salt or to taste
Egg Wash
- 1 egg
- 1 tablespoon milk
Brown Sugar Glaze
- 1 tablespoon ( 1/2oz ) unsalted butter melted
- 2 tablespoons ( 25g ) brown sugar
- 1/2 cup ( 60g ) powdered sugar sifted
- Pinch of cinnamon
- Pinch of salt
- 1 tablespoon milk plus more as needed
Instructions
Pie Crust
- Before you start prepping your ingredients, place your butter and vegetable shortening in the freezer so they are very cold when you are ready to work with them.
- In a medium bowl, whisk together flour, sugar, and salt. Add chilled, cubed butter and shortening and use a pastry blender, 2 knives, or your fingers to cut the butter and shortening into the flour until no pieces larger than a pea remain.
- In a small cup, combine apple cider vinegar and the ice-cold water and then slowly drizzle the liquid into the dry ingredients stirring with a fork. Continue to stir until dough clumps and comes together. Add a little more cold water if necessary, but be careful not to add too much. Your dough should not be wet or sticky!
- Gather the dough and wrap tightly in plastic wrap, squishing the dough into a 1-inch thick disk. Refrigerate for an hour, up to 2 days.
Apple Filling
- In a medium pot, combine all the filling ingredients and bring to a simmer. Cook over medium heat, stirring occasionally, for 6 minutes, until apples are softened and juices begin to caramelize. Set aside to cool for at least 15 minutes.
Assemble
- Take pie dough out of the refrigerator and allow it to sit at room temperature for 5 to 10 minutes to soften just slightly so it doesn’t crack when you roll it out. Preheat your oven to 425°F. Line a baking sheet with parchment paper or silicone baking mat.
- Whisk together egg and milk for the egg wash and set aside.
- Flour your work surface and rolling pin, and roll pie dough out to 1/4-inch thick. Cut out 5 4-inch rounds, gathering and re-rolling the dough scraps as necessary. Place each of the rounds on your prepared baking sheet as you cut them out. If at any time you feel like the dough is getting difficult to handle, place it in the refrigerator for a few minutes.
- Brush egg wash around the outer 1/2 inch of the rounds. One at a time, top half of each round with cooled apple filling (don’t overfill or you won’t be able to close them–you might have leftover filling), leaving at least 1/4-inch of space around the edge, and fold dough over. Crimp edge with a fork and repeat with remaining rounds and apples.
- Cut 3 slits in the top of each hand pie and then lightly brush the pastries with egg wash. Bake for 12 to 16 minutes until golden. Cool for 10 minutes before glazing.
- In a small bowl, whisk together all glaze ingredients. Add more milk by the 1/2 teaspoon until glaze reaches a drizzling consistency and brush or drizzle over pies. Allow to set for 5 minutes and enjoy!
