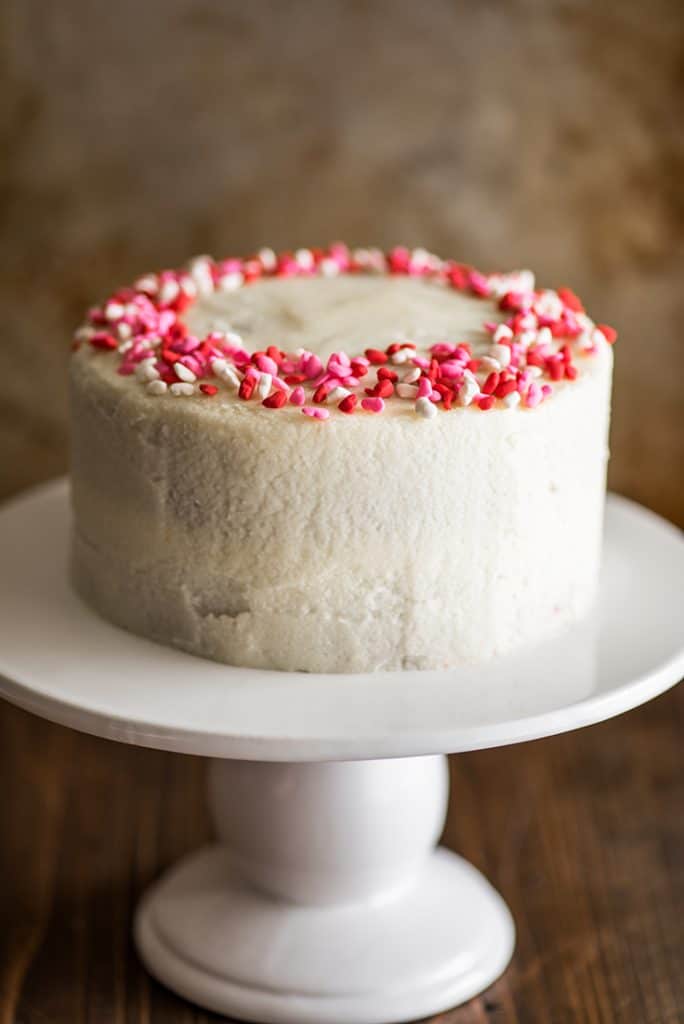
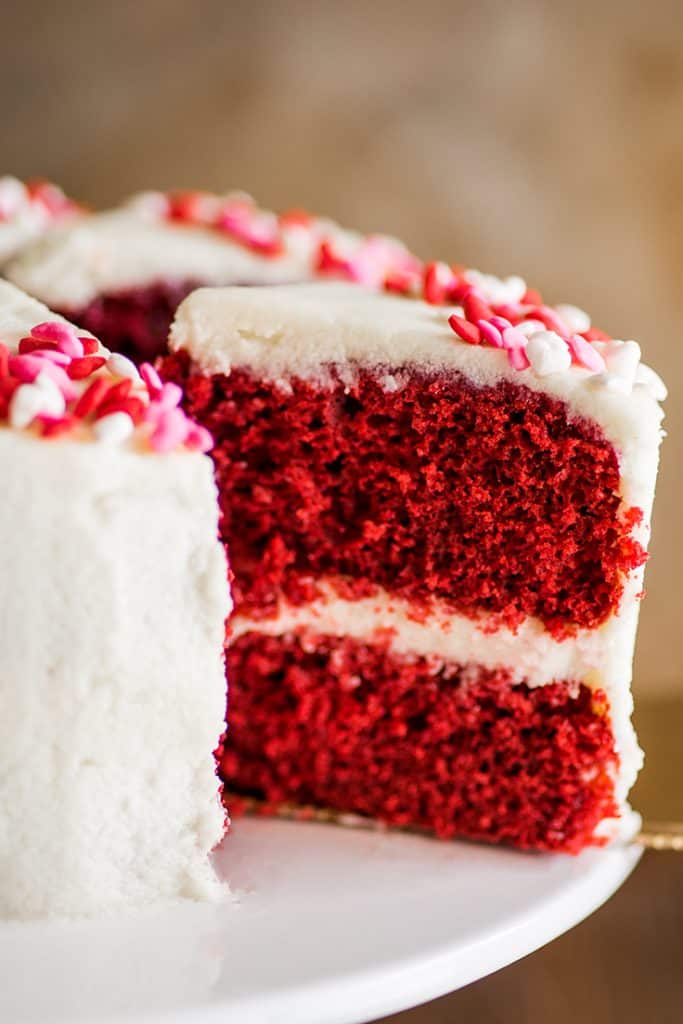
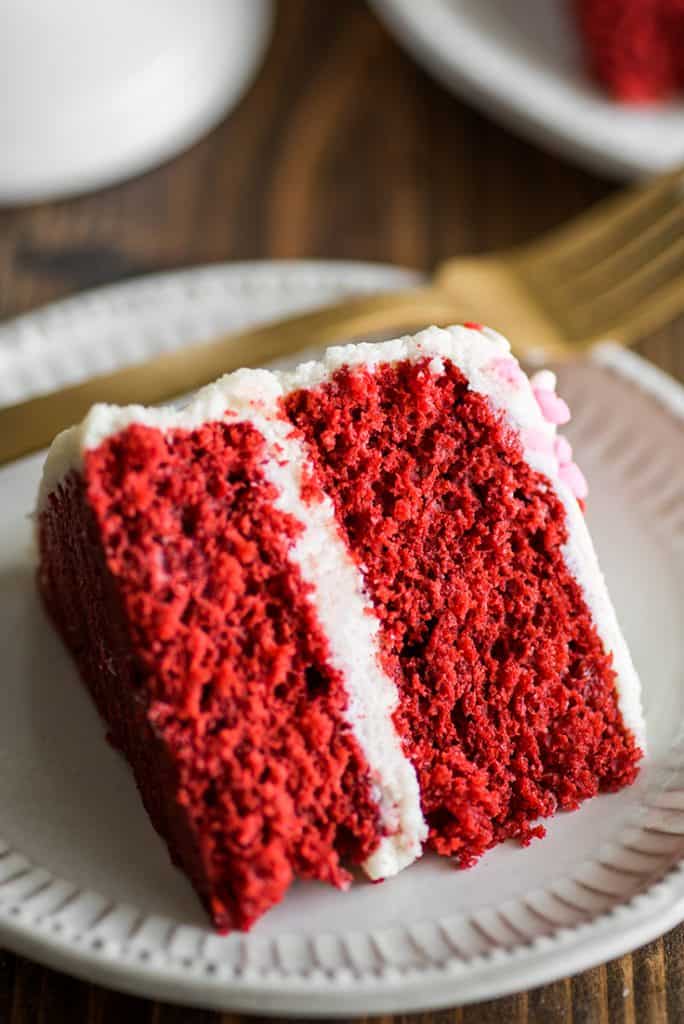
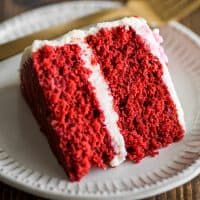
This soft and incredibly moist Small Red Velvet cake is a little chocolatey, buttery, and beautifully, boldly red. The recipe includes instructions for traditional Ermine Frosting and Cream Cheese Frosting.

Hey, friends, I have something a little different for you today, a reader-submitted recipe.
This recipe for a Small Red Velvet Cake was ever-so-kindly sent to me by ‘Becca Ashley, and I’m so excited for you guys to try it because this is a superb little cake.
A Six-inch Red Velvet Cake
This recipe makes a six-inch, two-layer red velvet cake, which can be cut into four to six cute little slices. It’s a good size for a couple to polish off over a weekend or if you’re having a friend or two over for dinner.
The cake is soft, incredibly moist, and totally adorable. Like any good red velvet cake, this one’s a little chocolatey, buttery, with a slight buttermilk tang, and beautifully, boldly red.

The cake itself is so good you could happily eat it on its own (I may have done that the first time I made this…), but it’s even better with frosting. And for the frosting, I’m giving you two options.
Ermine Frosting
Classic red velvet cake is made with ermine frosting, AKA boiled milk frosting, AKA flour buttercream. It’s a buttercream variation that is made with a milk, sugar, and flour pudding which gets cooled and beaten into room-temperature butter.
The result is a frosting that is much less sweet than American buttercreams (frosting made with butter, powdered sugar, and a little milk), with a texture that is similar to but heavier than whipped cream.
If you’ve ever complained about frosting being too sweet, this is the recipe for you. It’s amazing over red velvet cake and is what I used on the cake in the photos.
My taste-testers absolutely loved it, and all of them told me that they loved it because it was exactly the perfect level of sweet.

Cream Cheese Frosting
And don’t worry, cream cheese lovers, if for you, red velvet cake isn’t red velvet cake without cream cheese frosting, I’ve got you covered. I’ve included the recipe for my favorite Cream Cheese Frosting along with the ermine frosting, so you can make the red velvet cake that’s in your heart.

Small Red Velvet Cake Recipe Notes
- Ermine frosting has a slightly different texture than other buttercreams. It’s very smooth and creamy on the tongue but has a bit more texture when you spread it. If you’ve never made ermine frosting before, don’t be alarmed if your frosting looks a little different than American buttercreams.
- This recipe calls for 1 tablespoon of red food coloring , which is about half of a 1-ounce bottle (more than you’d think). Double check your red food coloring stock before you get started.
- For more small-batch desserts , try this Small Chocolate Cake , Small Banana Cake , Mini Chocolate Sheet Cake and Giant Chocolate Chip Cookie for Two .
Ingredients
Special Equipment
- ▢ 2 6-inch cake pans
- ▢ Parchment paper for cake pans
- ▢ Fine-mesh strainer for sifting dry ingredients and straining
- ▢ Handheld electric mixer
- ▢ Plastic wrap for Ermine Frosting
6-inch Red Velvet Cake
- ▢ 1/4 cup ( 2oz ) butter softened
- ▢ 3/4 cup ( 150g ) granulated sugar
- ▢ 1 large egg room temperature
- ▢ 2 tablespoons vegetable oil
- ▢ 1 tablespoon red food coloring
- ▢ 1 1/2 teaspoon white vinegar or apple cider
- ▢ 1 teaspoon vanilla extract
- ▢ 1 cup and 3 tablespoons ( 142g ) cake flour sifted
- ▢ 1 tablespoon ( 5g ) cocoa powder sifted
- ▢ 1/2 teaspoon baking soda
- ▢ 1/4 teaspoon salt
- ▢ 1/2 cup buttermilk
Ermine Frosting
- ▢ 3/4 cup ( 150g ) granulated sugar
- ▢ 3/4 cup milk preferably whole
- ▢ 3 tablespoons ( 23g ) flour all-purpose or cake flour is fine
- ▢ 3/4 teaspoon vanilla extract
- ▢ Pinch of salt
- ▢ 3/4 cup ( 6oz ) butter softened
Cream Cheese Frosting
- ▢ 4 ounces cream cheese softened
- ▢ 1/2 cup ( 4oz ) butter softened
- ▢ 1/2 teaspoon vanilla extract
- ▢ 1 1/2 cup ( 180g ) powdered sugar sifted, plus more as needed
- ▢ 1 tablespoon milk as needed
- ▢ Sprinkles optional
Instructions
- If making Ermine Frosting, skip to the frosting and complete steps 1-3 so pudding can cool while you make your cake.
Red Velvet Cake
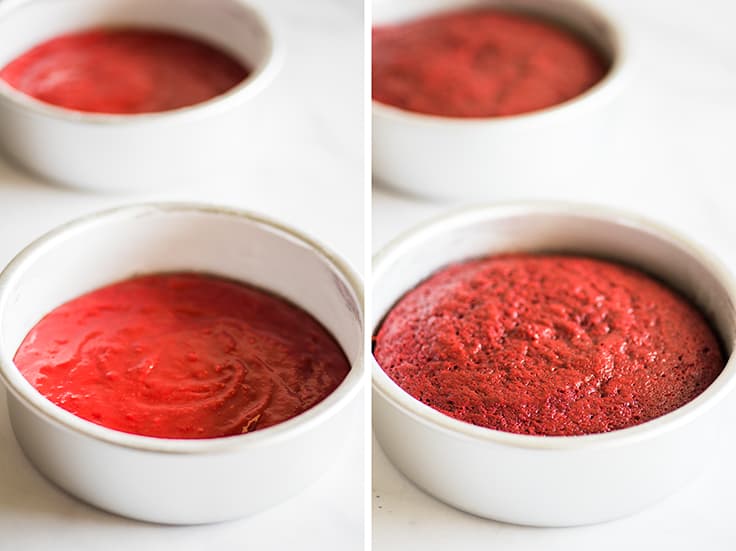
- Preheat your oven to 350°F. Butter and flour two six-inch cake pans and line the bottoms with parchment paper.
- In a medium bowl, beat butter until light and fluffy. Add sugar and beat until well-combined, about 2 minutes.
- Add egg, oil, food coloring, vinegar, and vanilla, and beat until well-combined.
- In a small bowl, whisk together sifted flour, cocoa podwer, baking soda, and salt.
- Add half of the flour mixture to the wet ingredients and beat until just-combined. Add all of the buttermilk, mixing until just-combined, repeating with the rest of the flour mixture. Use a rubber spatula to scrape down the edges and bottom of the bowl to make sure everything is mixed.
- Divide batter evenly between prepared cake pans.
- Bake for 21 to 26 minutes, until a toothpick inserted into the centers of the cakes comes out clean or with just a few crumbs.*
- Cool cakes in their pans for 10 to 15 minutes before running a plastic knife or spatula around the edges of the cakes to make sure they’re not stuck to the pan. Remove cakes from pans and transfer them to a cooling rack (discard parchment paper). Cool completely before frosting.
Ermine Frosting
- In a small saucepan, combine sugar, milk, and flour. Heat over medium heat, whisking frequently, until thick and bubbly, about the consistency of thin pudding. This should take 5 to 10 minutes.
- Set a fine-mesh strainer over a heat-proof bowl and pour milk mixture through the strainer to remove any lumps. Use a rubber spatula to make sure all of the mixture gets pushed through.
- Whisk in vanilla and salt. Cool on the counter for 10 minutes before covering with plastic wrap to prevent a skin from forming. Cool to room temperature while you bake and cool your cake.
- Once milk mixture is completely cooled (if it’s warm, it will melt your butter), in a medium bowl, beat butter until fluffy. Add milk mixture, 1 heaping tablespoon at a time, and beat well after each addition. Once all of the milk mixture has been added, beat frosting until it reaches your desired consistency.
Cream Cheese Frosting
- In a medium bowl, beat cream cheese, butter, and vanilla until light and fluffy.
- Add powdered sugar and beat until smooth and creamy. If frosting is too thick for your taste, add milk by the teaspoon until it reaches your desired consistency. For stiffer frosting, beat in sifted powdered sugar by the heaping tablespoon until it thickens.
To Frost the Cake
- If necessary, use a serrated knife to cut the dome off the bottom cake layer and level it. Place bottom layer on cake stand or plate, using a small dollop of frosting to anchor it.
- Spread 1/3 of the frosting over the bottom layer. Place second layer over the frosting and use the rest of the frosting over the body of the cake, starting at the top and spreading the frosting down the sides.
- Add sprinkles if desired. Serve and enjoy.
Notes
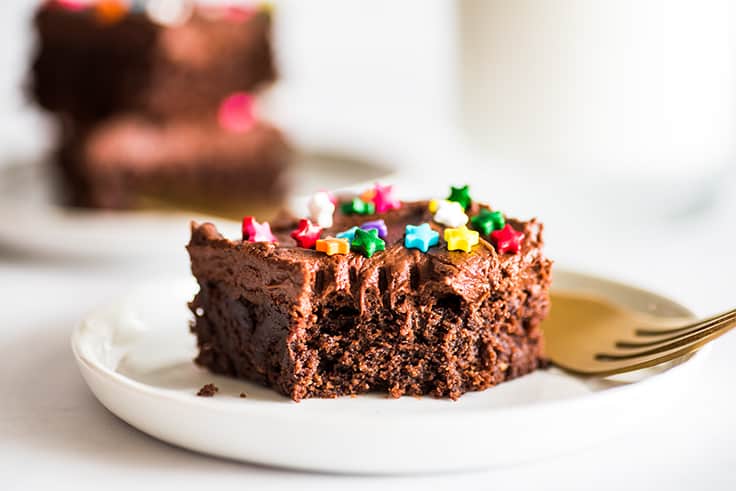
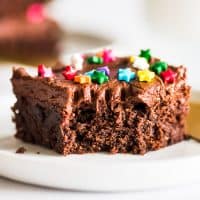
Completely decadent frosted brownies perfect for parties, potlucks, and bake sales.

Okay, you guys know I usually do small-batch desserts around here. But life isn’t all quiet nights in with your partner or a friend or two. Sometimes six cookies just aren’t going to cut it, and you need something sweet that will feed a crowd.
That’s what I have for you today, a big batch of completely decadent frosted brownies perfect for parties, potlucks, and bake sales.
These are a full-size version of my ever-popular small-batch brownies , which means they’re my favorite brownies in the world. They’re super rich with the ideal level of brownie fudginess: moist and decadent without feeling undercooked or too wet like some really fudgy brownies do.
They’re kind of going to knock your socks off.
A Big Batch of Brownies
This recipe makes a 9×13-inch pan of brownies, which translates to 24 good-sized brownies. They’re not huge, but these things pack such a sugary punch, you can’t really eat more than one at a time.

The Best Frosting for Brownies
To make these really good brownies even better, I’ve added a substantial layer of chocolate frosting . This chocolate frosting is an American buttercream , which means it’s made with softened butter, powdered sugar, and cocoa powder. No eggs required. I love American buttercream for brownies because it’s rich, buttery, very chocolatey AND it sets beautifully.

The frosting won’t get completely solid—you can still dent it if you press hard with your finger, but it will harden enough for stacking or wrapping, so if you’re looking for a frosting that hardens enough to package for gifts or bake sales, this is it.
Must Add Sprinkles
Because these brownies are so rich and chocolatey, I do recommend topping them with something with a bit of crunch. I used star sprinkles . Regular jimmies work too, and I think mini M&M’s or Reeses Pieces would be stellar.
I haaaaate nuts on brownies, but they’re your thing, you do you. 😉
Just make sure to add your toppings right after frosting the brownies, because they won’t stick as well once the frosting sets.

Frosted Brownies Recipe Notes
- The chocolate frosting recipe calls for espresso powder. It doesn’t make your frosting taste like coffee (unless you are very sensitive to the taste) and helps bring out the chocolate flavor. If you don’t have any, you can omit it or buy it on Amazon or in the coffee aisle at your grocery store. It’s usually sold in a small glass jar next to the instant coffee.
Ingredients
Brownies
- ▢ 1 cup ( 8oz ) salted butter melted and cooled to lukewarm
- ▢ 2 cups ( 400g ) granulated sugar
- ▢ 4 large eggs
- ▢ 2 teaspoons vanilla extract
- ▢ 1 cup ( 120g ) all-purpose flour
- ▢ 3/4 cup ( 60g ) unsweetened cocoa powder sifted
- ▢ 1/2 teaspoon baking powder
- ▢ 1/2 teaspoon salt
Chocolate Frosting
- ▢ 10 tablespoons ( 5oz ) butter softened
- ▢ 2 1/2 cups ( 300g ) powdered sugar sifted
- ▢ 2/3 cup ( 53g ) cocoa powder sifted
- ▢ 1 teaspoon vanilla extract
- ▢ 1/4 teaspoon espresso powder optional
- ▢ Pinch of salt
- ▢ 1/4 cup milk any percentage, plus more as needed
- ▢ Sprinkles
Instructions
Brownies
- Preheat your oven to 350°F. Line a 9x13-inch baking dish with parchment paper or foil and lightly grease.
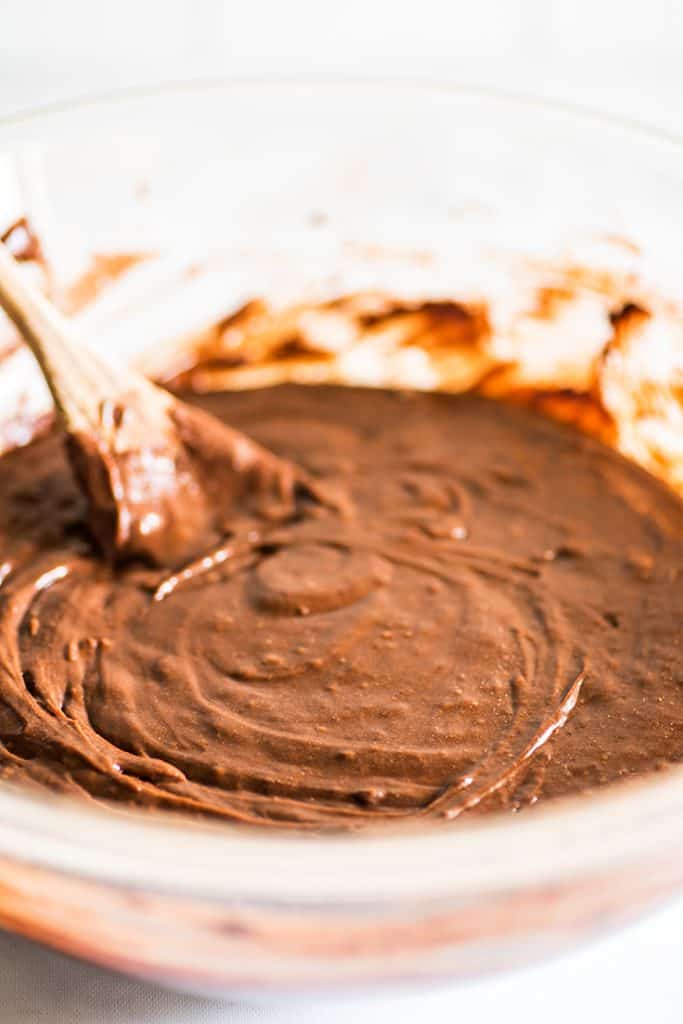
- In a large bowl, whisk together melted and cooled butter and sugar until well-mixed. Add eggs and vanilla extract and beat until well-combined.
- Add flour, sifted cocoa powder, baking powder and salt. Use a wooden spoon or spatula to stir until combined.
- Transfer batter to prepared baking dish, smoothing out the top slightly.
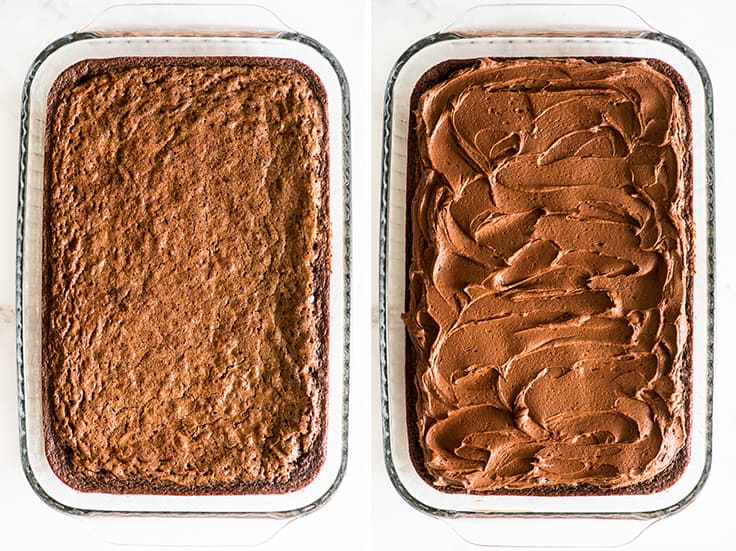
- Bake for 27-35 minutes, until a toothpick or cake tester inserted into the center of the brownies comes out with just a few moist crumbs.
- Cool completely before frosting.
Chocolate Frosting
- In a large bowl, beat butter until light and fluffy. Add powdered sugar, cocoa powder, vanilla, optional espresso powder, and salt. Pour in milk as you beat the frosting until it reaches your desired consistency, adding more milk by the 1/2 teaspoon if necessary.
- Spread frosting over completely cooled brownies and add sprinkles if desired. Slice and enjoy!
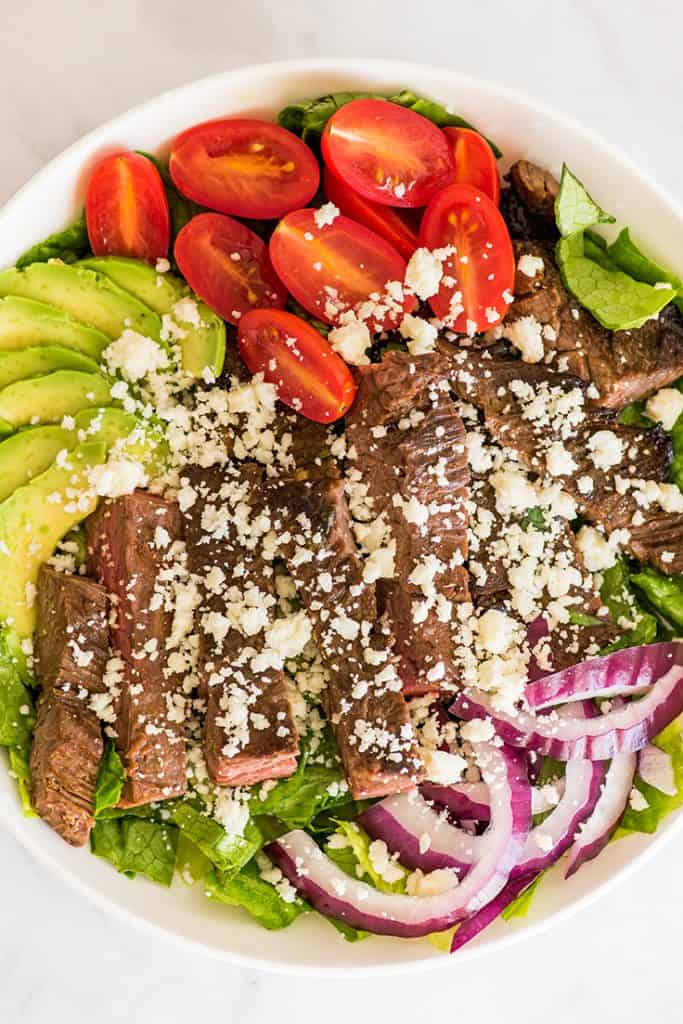
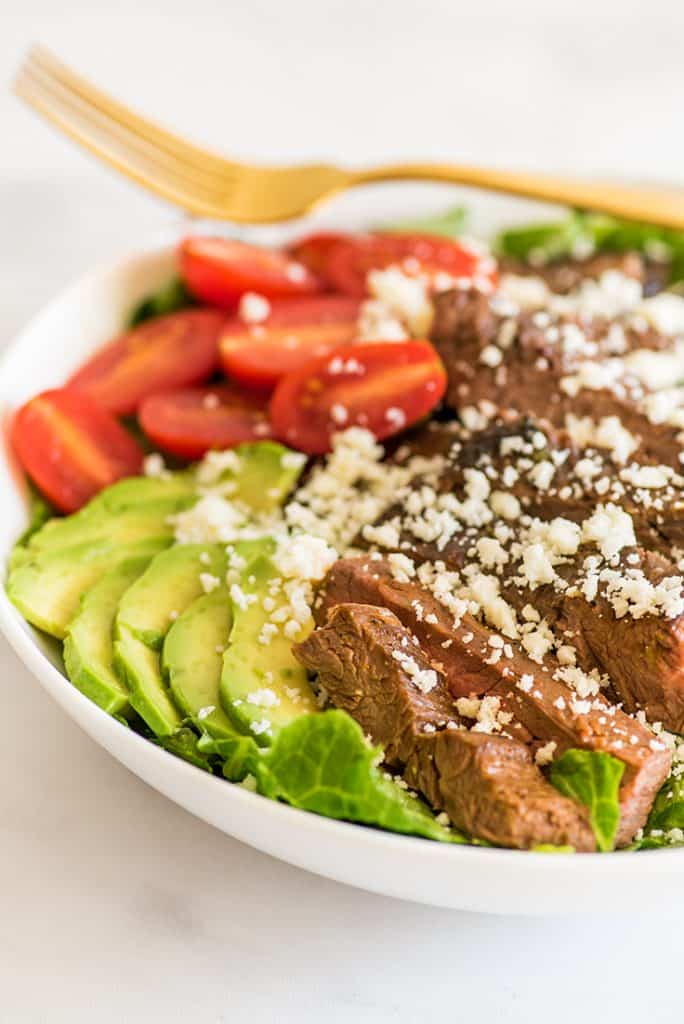
This simple Carne Asada Salad is made with my favorite homemade carne asada, a light chipotle lime yogurt dressing, red onions, and tomatoes served over a bed of crisp romaine lettuce.

Last week, I shared Carne Asada Burrito Bowls made with my favorite Carne Asada recipe . And friends, I’m still on a carne asada kick (the best, most delicious sort of kick), so today I have another carne asada recipe for you: Carne Asada Salad.
Carne Asada for Salad
I know it’s not necessarily the first meat that comes to mind when you think of a protein for salad, but carne asada is actually pretty perfect for the job. Cooked right, it’s plenty tender, so it’s great over a bed of crunchy romaine. And it packs a ton of flavor, so no sad, boring salads here.
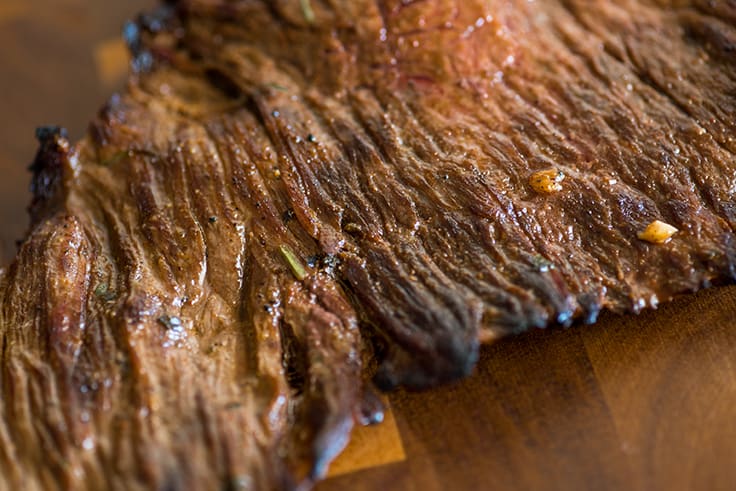

For this recipe, we’re using the same citrus-based carne asada marinade and broiler method that I shared in my favorite Carne Asada recipe. The meat needs at least four hours of marinating, but is at its best with a full twenty four, so I recommend starting the marinating process the night before.
And, if you marinate your meat the night before, everything else about this dish is so quick and easy that you can have dinner on the table in less than half an hour.

Chipotle Lime Yogurt Dressing
In the recipe below, I’ve included the recipe for chipotle lime yogurt dressing, a really simple dressing made of lime juice, chipotle chili powder, yogurt, and milk. Since it’s yogurt-based, it’s creamy, tangy, and satisfying, but very low in calories.
If you don’t like yogurt or don’t feel like making your own dressing, not a problem. Use whatever dressing sounds good to you. A Cilantro Ranch or South-western Style dressing would be top of my list.


Carne Asada Salad Recipe Notes
- This recipe calls for romaine lettuce, but you can use your favorite salad mix or whatever you have in your fridge. If you’re looking for a speedy way to chop romaine, take a look at How to Cut Romaine for Salads .
- You might also enjoy Chicken Shawarma Salad , Asian Chicken Salad , Chicken Fajita Salad , and BLT Salad .

Ingredients
Carne Asada
- ▢ 1/2 cup orange juice bottled is fine
- ▢ 1/2 cup soy sauce low-sodium is fine
- ▢ 1/4 cup lemon juice bottled is fine
- ▢ 1/4 cup olive oil
- ▢ 2 tablespoons lime juice bottled is fine
- ▢ 2 cloves garlic pressed or diced
- ▢ 1 teaspoon chili powder
- ▢ 1 teaspoon ground cumin
- ▢ 1 teaspoon paprika
- ▢ 1 teaspoon dried oregano
- ▢ 1 teaspoon black pepper
- ▢ 1/4 teaspoon ground chipotle chili pepper OR 1 teaspoon finely chopped canned chipotle pepper optional
- ▢ 1/2 bunch fresh cilantro chopped about 3/4-1 cup very loosely packed
- ▢ 1 1/2 pounds skirt, flank, or flap steak
Salad
- ▢ 1 large head romaine lettuce chopped
- ▢ 1 avocado sliced
- ▢ 1 cup sliced grape or cherry tomatoes or tomatoes of your choosing
- ▢ 1/4 red onion thinly sliced
- ▢ 1/2 cup crumbled cotija cheese OR shredded Mexican cheese blend
Chipotle Lime Yogurt Dressing
- ▢ 1 5-ounce container plain, unsweetened yogurt Greek is fine
- ▢ Juice from 1/2 lime about 1 1/2 teaspoons juice
- ▢ 1 teaspoon milk any percentage, plus more as needed
- ▢ 1/8 teaspoon chipotle chili powder or 1 teaspoon sauce from a can of chipotle peppers
- ▢ 1/4 teaspoon cumin
- ▢ 1/4 teaspoon chili powder
- ▢ 1/8 to 1/4 teaspoon salt
- ▢ Pepper to taste
Instructions
Carne Asada Marinade
- In a liquid measuring cup or medium bowl, stir together all marinade ingredients. Place beef in a gallon plastic bag or container and pour marinade over the top. Place in the refrigerator and marinate for at least 4 hours, preferably 24, flipping the meat halfway through.
Carne Asada
- Adjust the top rack in your oven so it’s about 4 inches from the broiler and heat broiler on high. Transfer meat to a foil-lined heavy-duty baking sheet or broiler pan. Broil for 4 to 6 minutes per side, until an instant-read thermometer reads 135°F for medium-rare, 145°F for medium.
- Allow meat to rest before slicing for 5 to 10 minutes while you assemble the rest of your salad.
Chipotle Lime Yogurt Dressing
- In a small bowl, stir together all dressing ingredients. Add milk by the teaspoon until your dressing reaches your desired consistency and add more salt and pepper to taste.
Salad
- Top romaine lettuce with sliced carne asada, avocado, tomatoes, and onion, and sprinkle crumbled cotija cheese over the top. Serve with the chipotle lime dressing and enjoy!
This soft and incredibly moist Small Red Velvet cake is a little chocolatey, buttery, and beautifully, boldly red. The recipe includes instructions for traditional Ermine Frosting and Cream Cheese Frosting.
Hey, friends, I have something a little different for you today, a reader-submitted recipe.
This recipe for a Small Red Velvet Cake was ever-so-kindly sent to me by ‘Becca Ashley, and I’m so excited for you guys to try it because this is a superb little cake.
A Six-inch Red Velvet Cake
This recipe makes a six-inch, two-layer red velvet cake, which can be cut into four to six cute little slices. It’s a good size for a couple to polish off over a weekend or if you’re having a friend or two over for dinner.
The cake is soft, incredibly moist, and totally adorable. Like any good red velvet cake, this one’s a little chocolatey, buttery, with a slight buttermilk tang, and beautifully, boldly red.
The cake itself is so good you could happily eat it on its own (I may have done that the first time I made this…), but it’s even better with frosting. And for the frosting, I’m giving you two options.
Ermine Frosting
Classic red velvet cake is made with ermine frosting, AKA boiled milk frosting, AKA flour buttercream. It’s a buttercream variation that is made with a milk, sugar, and flour pudding which gets cooled and beaten into room-temperature butter.
The result is a frosting that is much less sweet than American buttercreams (frosting made with butter, powdered sugar, and a little milk), with a texture that is similar to but heavier than whipped cream.
If you’ve ever complained about frosting being too sweet, this is the recipe for you. It’s amazing over red velvet cake and is what I used on the cake in the photos.
My taste-testers absolutely loved it, and all of them told me that they loved it because it was exactly the perfect level of sweet.
Cream Cheese Frosting
And don’t worry, cream cheese lovers, if for you, red velvet cake isn’t red velvet cake without cream cheese frosting, I’ve got you covered. I’ve included the recipe for my favorite Cream Cheese Frosting along with the ermine frosting, so you can make the red velvet cake that’s in your heart.
Small Red Velvet Cake Recipe Notes
- Ermine frosting has a slightly different texture than other buttercreams. It’s very smooth and creamy on the tongue but has a bit more texture when you spread it. If you’ve never made ermine frosting before, don’t be alarmed if your frosting looks a little different than American buttercreams.
- This recipe calls for 1 tablespoon of red food coloring , which is about half of a 1-ounce bottle (more than you’d think). Double check your red food coloring stock before you get started.
- For more small-batch desserts , try this Small Chocolate Cake , Small Banana Cake , Mini Chocolate Sheet Cake and Giant Chocolate Chip Cookie for Two .

Ingredients
Special Equipment
- ▢ 2 6-inch cake pans
- ▢ Parchment paper for cake pans
- ▢ Fine-mesh strainer for sifting dry ingredients and straining
- ▢ Handheld electric mixer
- ▢ Plastic wrap for Ermine Frosting
6-inch Red Velvet Cake
- ▢ 1/4 cup ( 2oz ) butter softened
- ▢ 3/4 cup ( 150g ) granulated sugar
- ▢ 1 large egg room temperature
- ▢ 2 tablespoons vegetable oil
- ▢ 1 tablespoon red food coloring
- ▢ 1 1/2 teaspoon white vinegar or apple cider
- ▢ 1 teaspoon vanilla extract
- ▢ 1 cup and 3 tablespoons ( 142g ) cake flour sifted
- ▢ 1 tablespoon ( 5g ) cocoa powder sifted
- ▢ 1/2 teaspoon baking soda
- ▢ 1/4 teaspoon salt
- ▢ 1/2 cup buttermilk
Ermine Frosting
- ▢ 3/4 cup ( 150g ) granulated sugar
- ▢ 3/4 cup milk preferably whole
- ▢ 3 tablespoons ( 23g ) flour all-purpose or cake flour is fine
- ▢ 3/4 teaspoon vanilla extract
- ▢ Pinch of salt
- ▢ 3/4 cup ( 6oz ) butter softened
Cream Cheese Frosting
- ▢ 4 ounces cream cheese softened
- ▢ 1/2 cup ( 4oz ) butter softened
- ▢ 1/2 teaspoon vanilla extract
- ▢ 1 1/2 cup ( 180g ) powdered sugar sifted, plus more as needed
- ▢ 1 tablespoon milk as needed
- ▢ Sprinkles optional
Instructions
- If making Ermine Frosting, skip to the frosting and complete steps 1-3 so pudding can cool while you make your cake.
Red Velvet Cake
- Preheat your oven to 350°F. Butter and flour two six-inch cake pans and line the bottoms with parchment paper.
- In a medium bowl, beat butter until light and fluffy. Add sugar and beat until well-combined, about 2 minutes.
- Add egg, oil, food coloring, vinegar, and vanilla, and beat until well-combined.
- In a small bowl, whisk together sifted flour, cocoa podwer, baking soda, and salt.
- Add half of the flour mixture to the wet ingredients and beat until just-combined. Add all of the buttermilk, mixing until just-combined, repeating with the rest of the flour mixture. Use a rubber spatula to scrape down the edges and bottom of the bowl to make sure everything is mixed.
- Divide batter evenly between prepared cake pans.
- Bake for 21 to 26 minutes, until a toothpick inserted into the centers of the cakes comes out clean or with just a few crumbs.*
- Cool cakes in their pans for 10 to 15 minutes before running a plastic knife or spatula around the edges of the cakes to make sure they’re not stuck to the pan. Remove cakes from pans and transfer them to a cooling rack (discard parchment paper). Cool completely before frosting.
Ermine Frosting
- In a small saucepan, combine sugar, milk, and flour. Heat over medium heat, whisking frequently, until thick and bubbly, about the consistency of thin pudding. This should take 5 to 10 minutes.
- Set a fine-mesh strainer over a heat-proof bowl and pour milk mixture through the strainer to remove any lumps. Use a rubber spatula to make sure all of the mixture gets pushed through.
- Whisk in vanilla and salt. Cool on the counter for 10 minutes before covering with plastic wrap to prevent a skin from forming. Cool to room temperature while you bake and cool your cake.
- Once milk mixture is completely cooled (if it’s warm, it will melt your butter), in a medium bowl, beat butter until fluffy. Add milk mixture, 1 heaping tablespoon at a time, and beat well after each addition. Once all of the milk mixture has been added, beat frosting until it reaches your desired consistency.
Cream Cheese Frosting
- In a medium bowl, beat cream cheese, butter, and vanilla until light and fluffy.
- Add powdered sugar and beat until smooth and creamy. If frosting is too thick for your taste, add milk by the teaspoon until it reaches your desired consistency. For stiffer frosting, beat in sifted powdered sugar by the heaping tablespoon until it thickens.
To Frost the Cake
- If necessary, use a serrated knife to cut the dome off the bottom cake layer and level it. Place bottom layer on cake stand or plate, using a small dollop of frosting to anchor it.
- Spread 1/3 of the frosting over the bottom layer. Place second layer over the frosting and use the rest of the frosting over the body of the cake, starting at the top and spreading the frosting down the sides.
- Add sprinkles if desired. Serve and enjoy.
Notes

Small Red Velvet Cake
Ingredients
Special Equipment
- 2 6-inch cake pans
- Parchment paper for cake pans
- Fine-mesh strainer for sifting dry ingredients and straining
- Handheld electric mixer
- Plastic wrap for Ermine Frosting
6-inch Red Velvet Cake
- 1/4 cup ( 2oz ) butter softened
- 3/4 cup ( 150g ) granulated sugar
- 1 large egg room temperature
- 2 tablespoons vegetable oil
- 1 tablespoon red food coloring
- 1 1/2 teaspoon white vinegar or apple cider
- 1 teaspoon vanilla extract
- 1 cup and 3 tablespoons ( 142g ) cake flour sifted
- 1 tablespoon ( 5g ) cocoa powder sifted
- 1/2 teaspoon baking soda
- 1/4 teaspoon salt
- 1/2 cup buttermilk
Ermine Frosting
- 3/4 cup ( 150g ) granulated sugar
- 3/4 cup milk preferably whole
- 3 tablespoons ( 23g ) flour all-purpose or cake flour is fine
- 3/4 teaspoon vanilla extract
- Pinch of salt
- 3/4 cup ( 6oz ) butter softened
Cream Cheese Frosting
- 4 ounces cream cheese softened
- 1/2 cup ( 4oz ) butter softened
- 1/2 teaspoon vanilla extract
- 1 1/2 cup ( 180g ) powdered sugar sifted, plus more as needed
- 1 tablespoon milk as needed
- Sprinkles optional
Instructions
- If making Ermine Frosting, skip to the frosting and complete steps 1-3 so pudding can cool while you make your cake.
Red Velvet Cake
- Preheat your oven to 350°F. Butter and flour two six-inch cake pans and line the bottoms with parchment paper.
- In a medium bowl, beat butter until light and fluffy. Add sugar and beat until well-combined, about 2 minutes.
- Add egg, oil, food coloring, vinegar, and vanilla, and beat until well-combined.
- In a small bowl, whisk together sifted flour, cocoa podwer, baking soda, and salt.
- Add half of the flour mixture to the wet ingredients and beat until just-combined. Add all of the buttermilk, mixing until just-combined, repeating with the rest of the flour mixture. Use a rubber spatula to scrape down the edges and bottom of the bowl to make sure everything is mixed.
- Divide batter evenly between prepared cake pans.
- Bake for 21 to 26 minutes, until a toothpick inserted into the centers of the cakes comes out clean or with just a few crumbs.*
- Cool cakes in their pans for 10 to 15 minutes before running a plastic knife or spatula around the edges of the cakes to make sure they’re not stuck to the pan. Remove cakes from pans and transfer them to a cooling rack (discard parchment paper). Cool completely before frosting.
Ermine Frosting
- In a small saucepan, combine sugar, milk, and flour. Heat over medium heat, whisking frequently, until thick and bubbly, about the consistency of thin pudding. This should take 5 to 10 minutes.
- Set a fine-mesh strainer over a heat-proof bowl and pour milk mixture through the strainer to remove any lumps. Use a rubber spatula to make sure all of the mixture gets pushed through.
- Whisk in vanilla and salt. Cool on the counter for 10 minutes before covering with plastic wrap to prevent a skin from forming. Cool to room temperature while you bake and cool your cake.
- Once milk mixture is completely cooled (if it’s warm, it will melt your butter), in a medium bowl, beat butter until fluffy. Add milk mixture, 1 heaping tablespoon at a time, and beat well after each addition. Once all of the milk mixture has been added, beat frosting until it reaches your desired consistency.
Cream Cheese Frosting
- In a medium bowl, beat cream cheese, butter, and vanilla until light and fluffy.
- Add powdered sugar and beat until smooth and creamy. If frosting is too thick for your taste, add milk by the teaspoon until it reaches your desired consistency. For stiffer frosting, beat in sifted powdered sugar by the heaping tablespoon until it thickens.
To Frost the Cake
- If necessary, use a serrated knife to cut the dome off the bottom cake layer and level it. Place bottom layer on cake stand or plate, using a small dollop of frosting to anchor it.
- Spread 1/3 of the frosting over the bottom layer. Place second layer over the frosting and use the rest of the frosting over the body of the cake, starting at the top and spreading the frosting down the sides.
- Add sprinkles if desired. Serve and enjoy.
