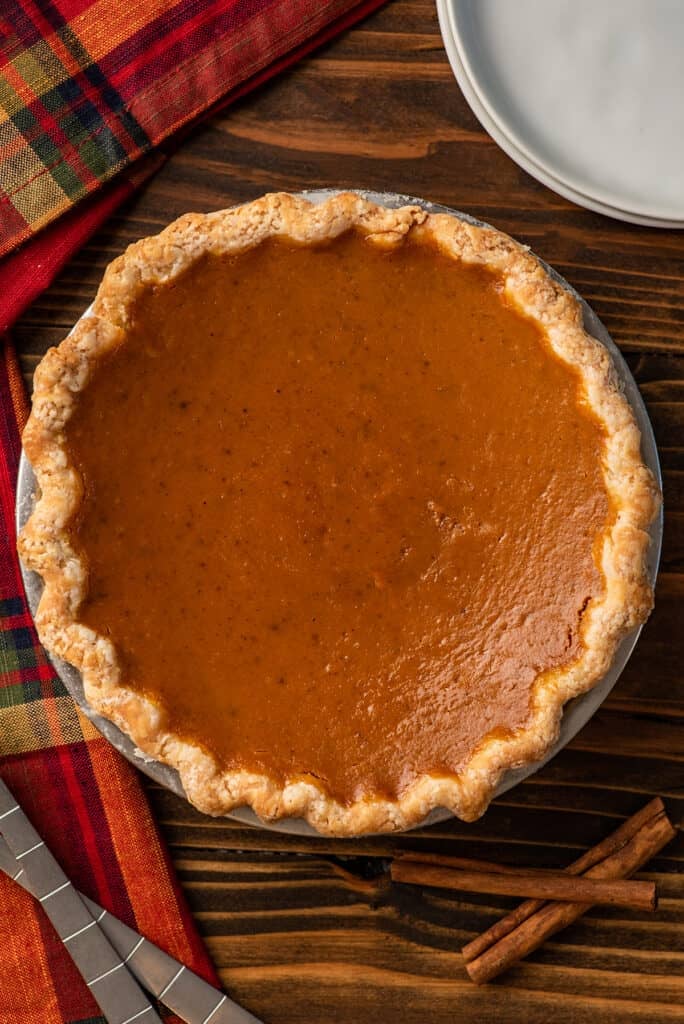
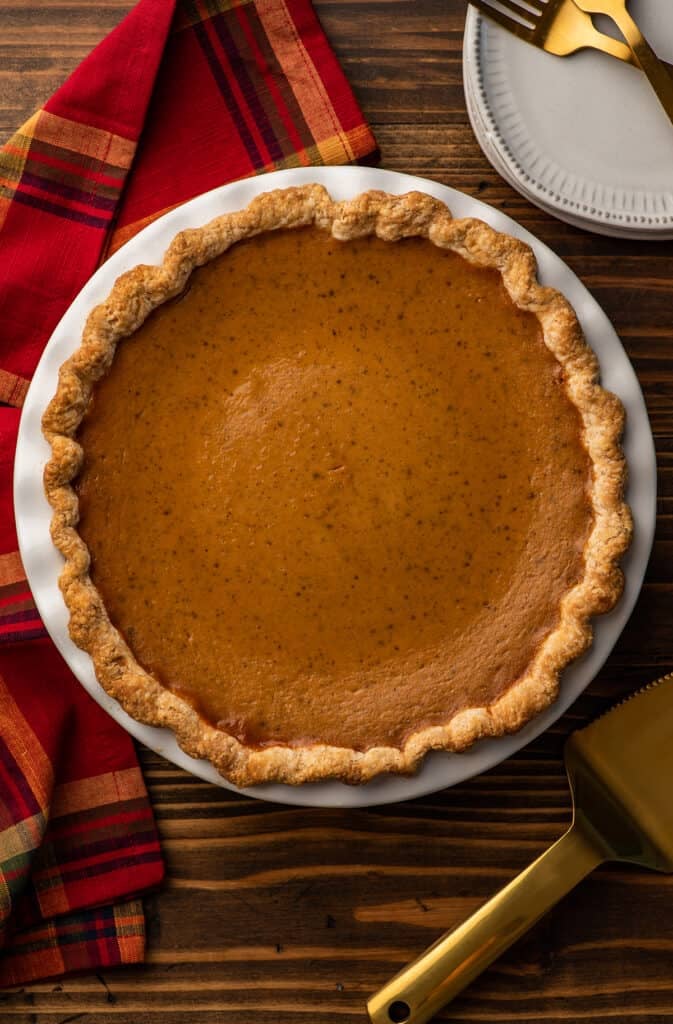
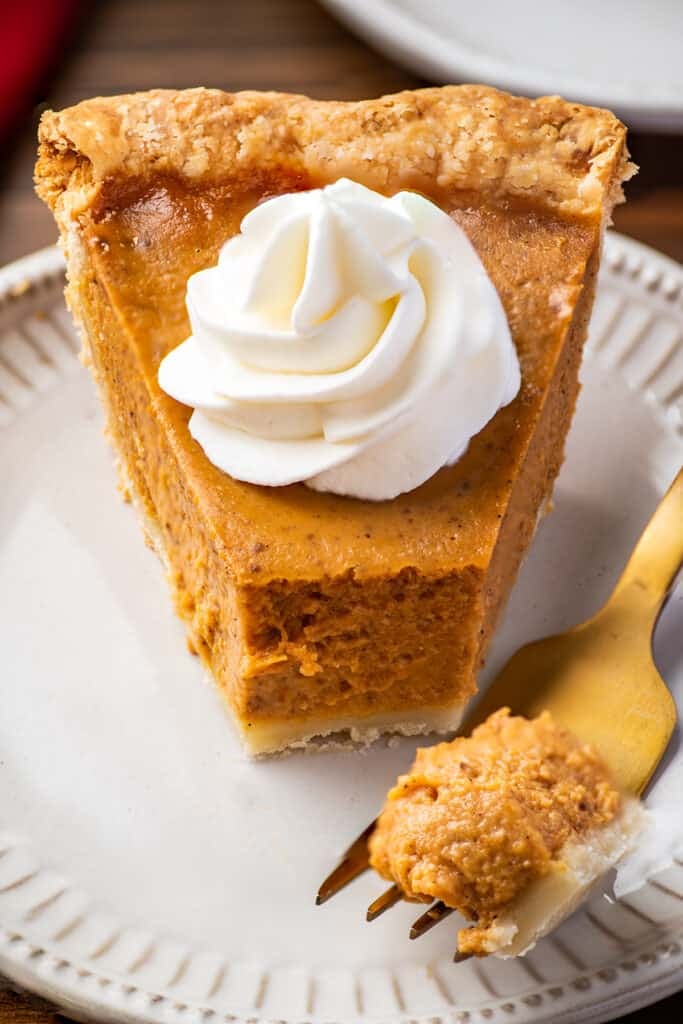
This adorable small pumpkin pie is sweet, creamy, and everything you love about pumpkin pie but miniaturized.
Craving pumpkin pie, but not quite sure you want an entire full-size pie sitting around the house? I have just the recipe for you.
This cute little 6-inch pumpkin pie is a scaled-down version of my perfect pumpkin pie recipe that I posted yesterday. It’s rich, super creamy, and packed with warming fall spices.


A 6-inch pie is almost exactly half the size of a 9-inch pie, so it makes 4 generous slices or 6 smaller ones and is the perfect size for a couple of people to enjoy over a weekend.
Ingredient Notes
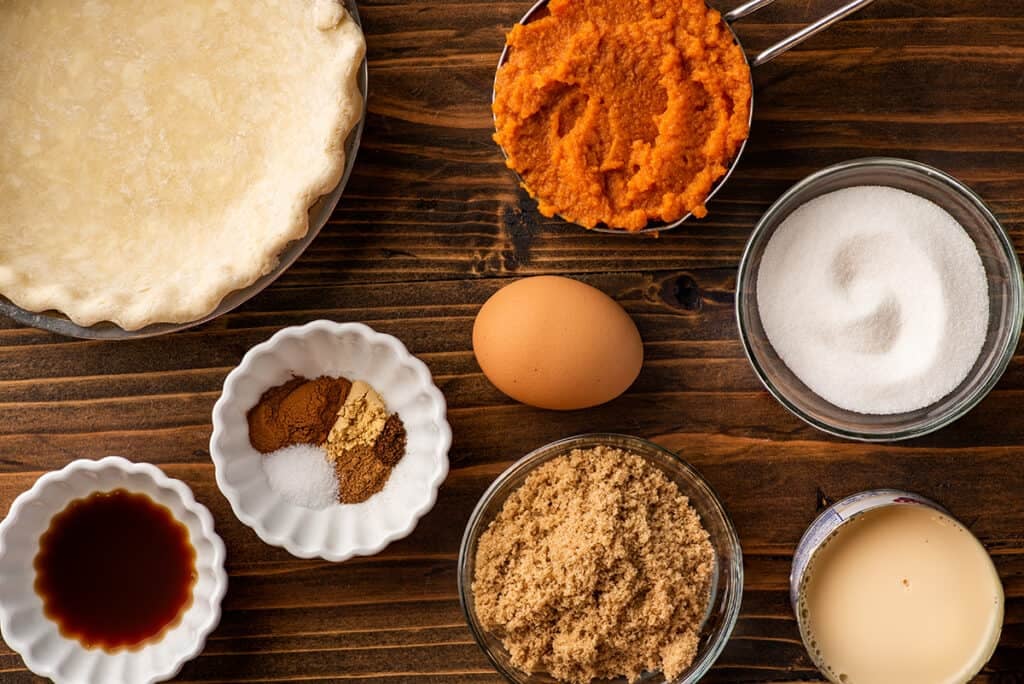

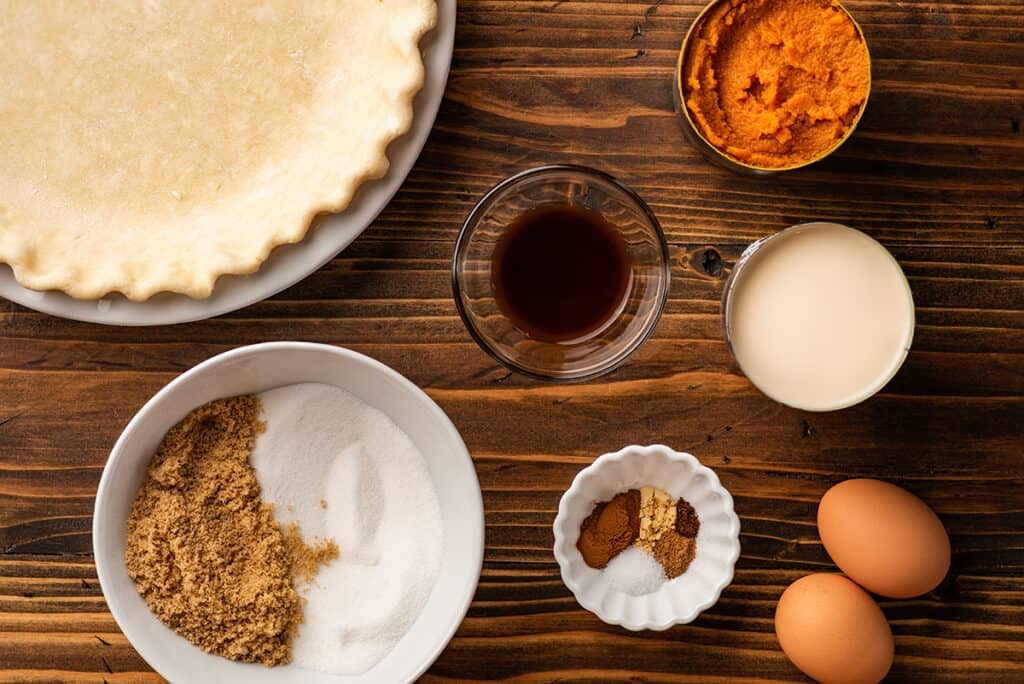
- Sugar: You can use any combo of granulated sugar/brown sugar here, but I like a 50/50 mix. For a less sweet pie, cut the sugar by up to 25%.
- Pumpkin puree: This recipe will use just over half a can of pumpkin puree. For storage tips and recipe ideas for the leftovers, go check out my post, What to Do With Pumpkin Puree (I recommend making a quick small batch of pumpkin muffins or a mini loaf of pumpkin bread ).
- Pumpkin pie spice: You can replace the pumpkin pie spices (not the salt) with 1 teaspoon pumpkin pie spice .
- Evaporated milk: You can find evaporated milk in the baking or coffee aisle of your grocery store. Most stores sell smaller, 5-ounce cans alongside the full-size ones, so try to find a mini can if you don’t have any use for evaporated milk leftovers (though it’s pretty good as a coffee creamer if can’t find a smaller can).
- Pie crust: Pre-made, refrigerated (not frozen) pie crusts from the grocery store work great here. Just drape the crust over your pie pan and cut it down to size. You can also use your favorite pie crust recipe. A 6-inch pie dish will use half the dough that a 9-inch pie does. So if you have a double crust recipe, quarter it. A single-crust recipe can be halved. I used my favorite buttermilk pie crust for the pie in the photos.
How to Make a Small Pumpkin Pie
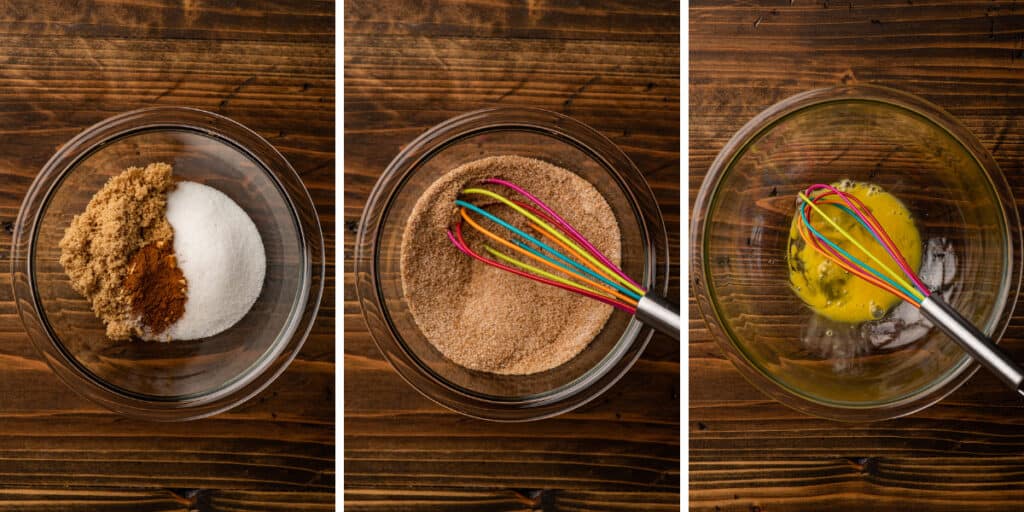

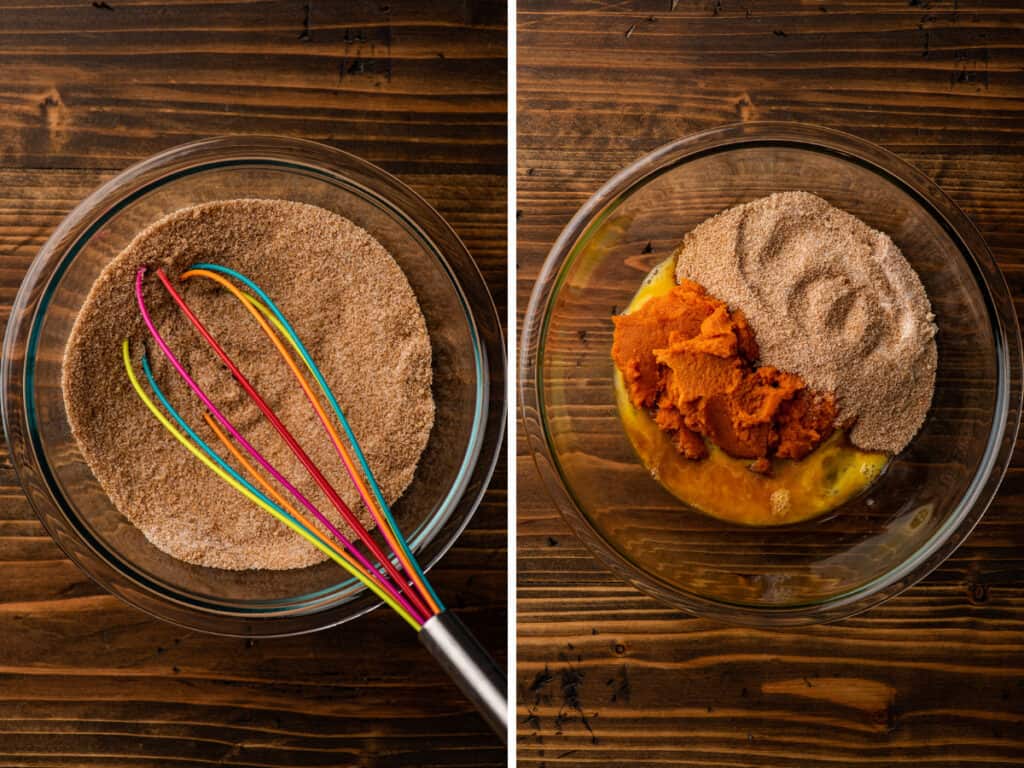
Combine dry ingredients: Combine granulated sugar, brown sugar, cinnamon, salt, ginger, nutmeg, and cloves. Whisk until well-mixed and no lumps remain.
Mix (almost) everything together: In a medium bowl, add the egg and beat lightly. Add the pumpkin puree, sugar and spice mixture, and vanilla extract. Whisk until well-combined.
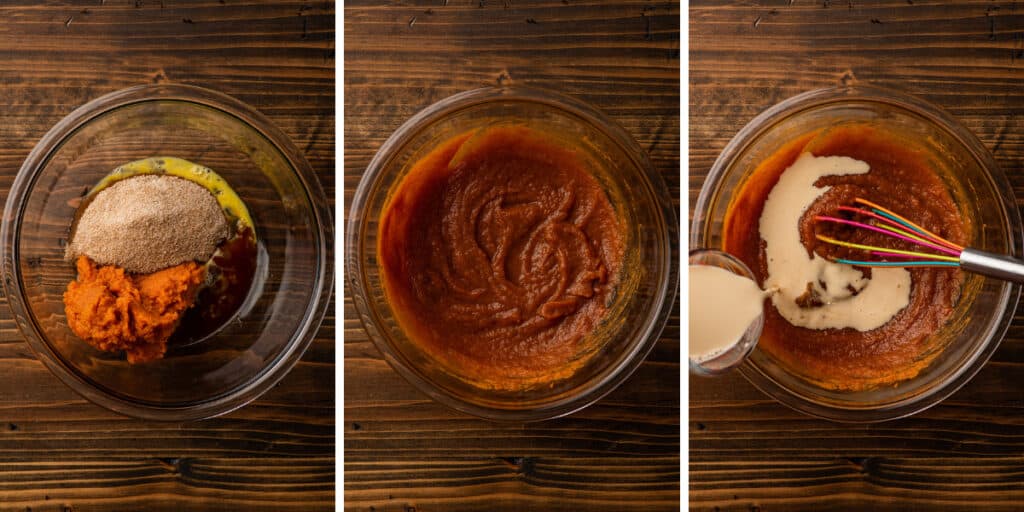

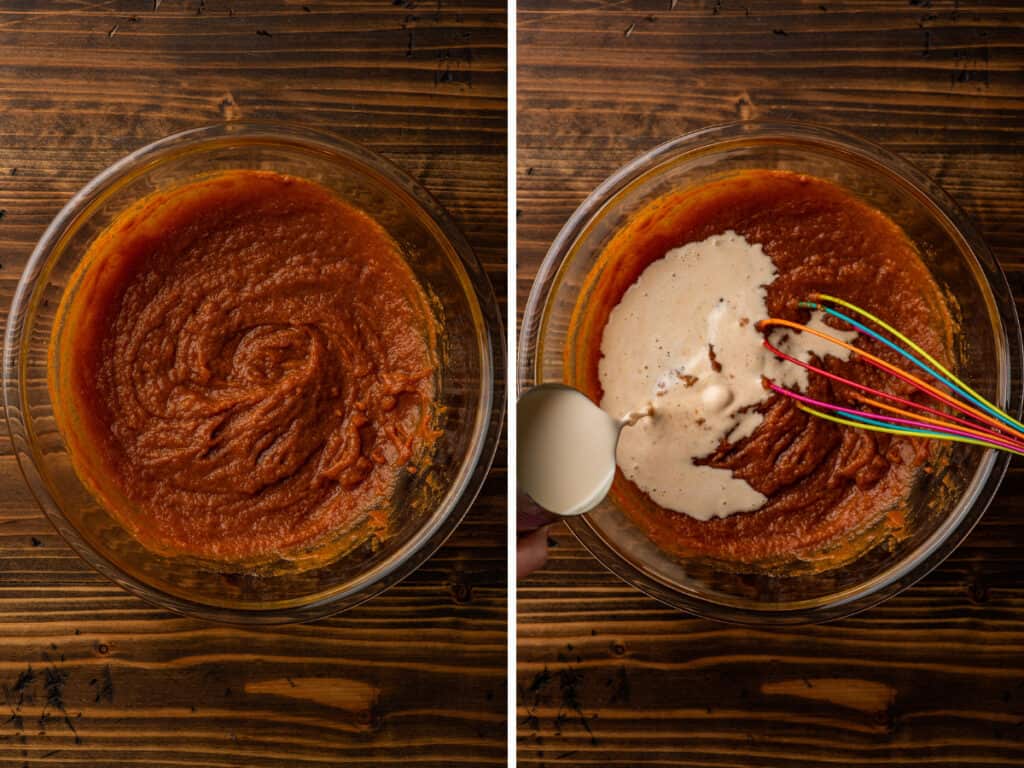
- Add the evaporated milk: Slowly whisk in the evaporated milk until mostly combined. Switch to a rubber spatula and finish mixing, being sure to scrape the bottom and edges of the bowl.
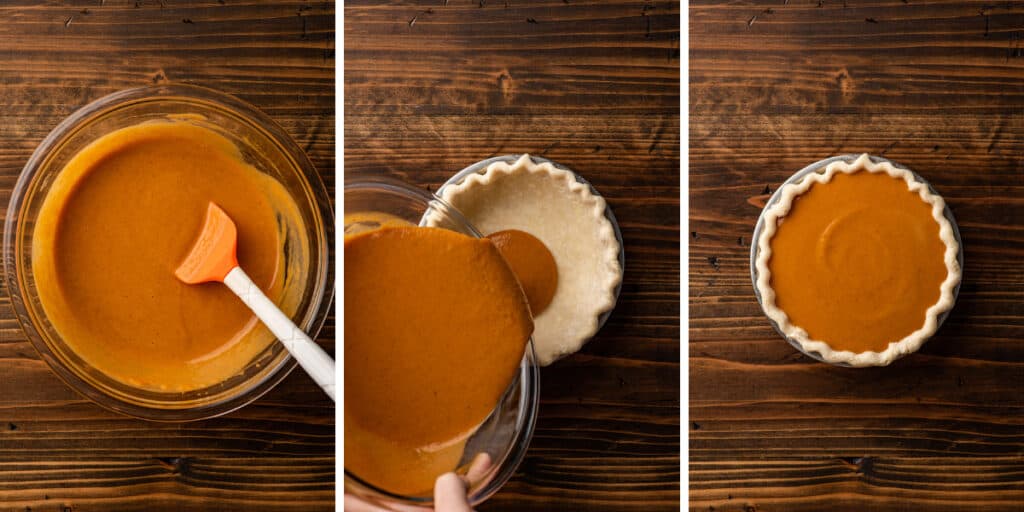

Add filling to crust: Pour pumpkin pie mixture into your prepared pie crust and place pie on a baking sheet. This will catch any drips if your pie overflows and save you the pain of having to scrape burnt pie filling off the bottom of your oven.
Bake: Bake on the lowest rack in your oven for 15 minutes so your crust can set. Change the temperature to 350°F, and bake for an additional 30 to 40 minutes, until the pie is set at least an inch and a half from the crust but the center still wobbles slightly or the pie reaches 175°F.
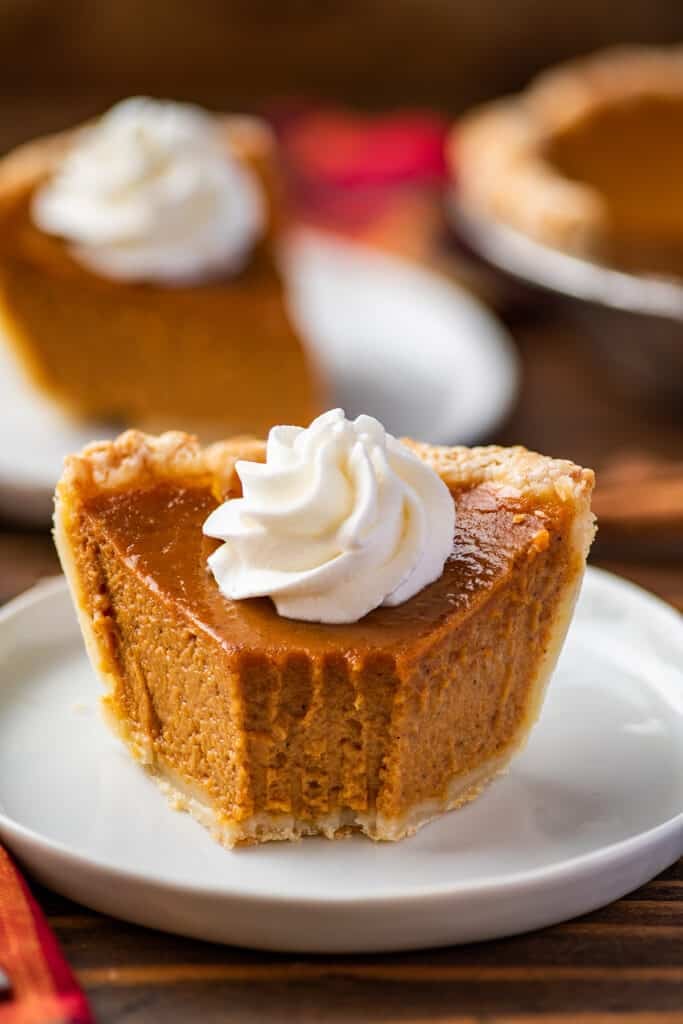
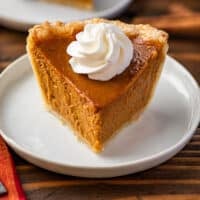
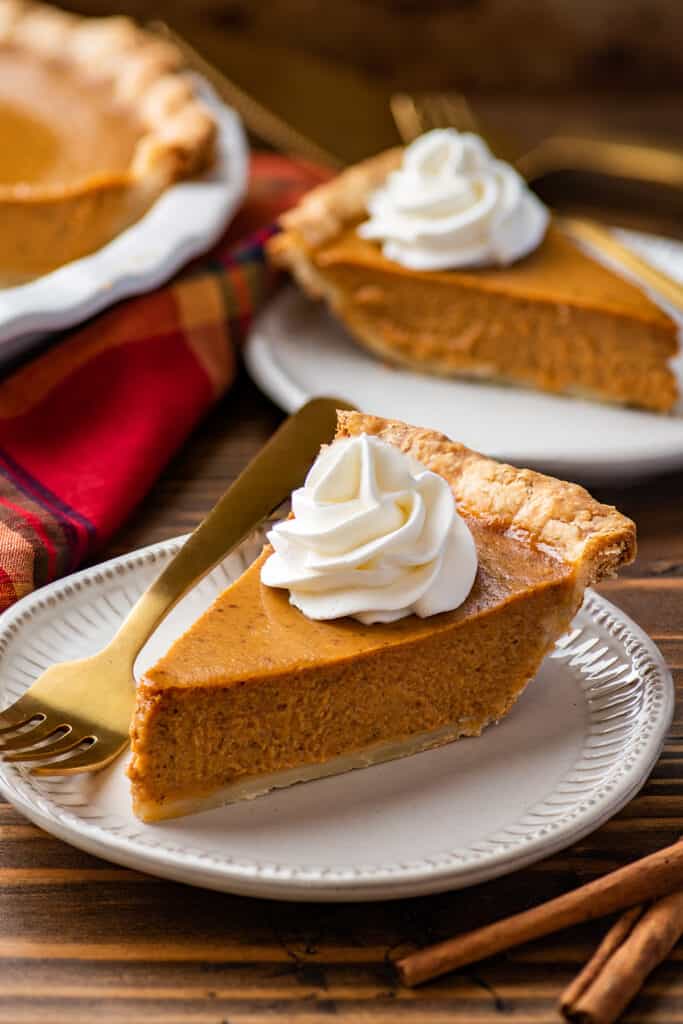
Cool: Cool on a wire rack for at least 2 hours and serve or cover and refrigerate overnight. Serve with whipped cream (try cinnamon whipped cream for a spicy twist), and enjoy!

How do I know my pumpkin pie is done?
You can tell your pie is done when the outer edges of the pie are set and look firm but the center still wobbles slightly.
Can you eat pumpkin pie right out of the oven?
No! The pie filling finishes cooking as it cools. Pumpkin pie right out of the oven should still be a little wobbly and not finished setting. You don’t want to try and eat that.
Can you freeze pumpkin pie?
Yes! Pumpkin pie leftovers freeze quite well. Freeze individual slices on a plate and then wrap them each in plastic wrap before storing them in a freezer bag. Store for up to two months. Allow slices to sit at room temperature for 20 to 30 minutes to thaw before eating.

More Small-batch Fall Favorites
- Pumpkin Cookies With Cream Cheese Frosting
- Hot Chocolate
- Cinnamon Sugar Pumpkin Donuts
- Small Apple Cinnamon Cake
- Cinnamon Sugar Mini Banana Bread
Recipe Notes
- Storage: Store pie covered in the refrigerator for up to 4 days.
- Make-ahead instructions: Filling can be made up to 24 hours in advance. Store filling in the mixing bowl (do not fill the pie crust in advance) tightly covered in the refrigerator. When ready to use, whisk gently, pour into prepared pie crust, and bake according to recipe instructions.
Ingredients
- ▢ ¼ cup ( 50g ) granulated sugar
- ▢ ¼ cup ( 50g ) lightly packed brown sugar
- ▢ ½ teaspoon ground cinnamon
- ▢ ¼ teaspoon salt
- ▢ ⅛ teaspoon ground ginger
- ▢ ⅛ teaspoon ground nutmeg
- ▢ Pinch of ground cloves
- ▢ 1 large egg preferably room temperature
- ▢ 1 cup ( 244g ) pumpkin puree
- ▢ 2 teaspoons vanilla extract
- ▢ ⅔ cup ( 1 5-ounce can) evaporated milk
- ▢ 1 6-inch unbaked deep-dish pie crust
- ▢ Whipped cream optional for topping
Instructions
- Preheat your oven to 425°F.
- In a small bowl, combine granulated sugar, brown sugar, cinnamon, salt, ginger, nutmeg, and cloves. Whisk until well combined and no lumps remain.
- In a medium bowl, add the egg and beat lightly. Add the pumpkin puree, sugar and spice mixture, and vanilla extract. Whisk until well-combined.
- Slowly whisk in the evaporated milk until mostly combined. Switch to a rubber spatula and finish mixing, being sure to scrape the bottom and edges of the bowl.
- Pour pumpkin pie mixture into your prepared pie crust and place pie on a baking sheet.
- Bake on the lowest rack in your oven for 15 minutes. Change the temperature to 350°F, and bake for an additional 30 to 40 minutes, until the pie is set at least an inch and a half from the crust but the center still wobbles slightly or the pie reaches 175°F.
- Cool on a wire rack for at least 2 hours and serve or cover and refrigerate overnight. Serve with whipped cream, and enjoy!
Notes
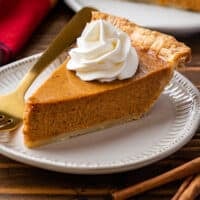
This outrageously good pumpkin pie is silky smooth, perfectly spiced, and so easy to make.
What’s your go-to holiday pie? First in my heart is usually Dutch apple , but pumpkin pie is a very, very close second.
Yet despite its high marks in my personal pie rankings, I didn’t have a tried and true favorite pumpkin pie recipe in my arsenal.
So this year, I set out to change that. I have tested and tasted so many pumpkin pies over the last couple of months, and can now officially share with you, my favorite pumpkin pie.

The Best Pumpkin Pie Recipe
Most pumpkin pie recipes making a classic pie are going to look fairly similar. The dairy they use might vary, you might have an extra egg or yolk in there, maybe there’s a little flour in the custard, but overall the ratios and ingredients for a good pumpkin pie won’t change a whole lot.
So when designing your perfect pie, you’re really tweaking the ingredient levels for optimum deliciousness.
This pie has just the right level of sweetness, with a mix of brown and white sugars. It’s generously spiced, but not in a way that overwhelms the pumpkin flavor the way the spices in some pumpkin pie recipes can.
And the texture is absurdly creamy, smooth and firm (but not too firm!). In short, this pie is perfect, and pretty much everything you want a pumpkin pie to be.
Ingredient Notes

- Sugar: I used a mix of brown and white sugar here because I like the darker molasses flavor the brown sugar gives the pie, but you can use all white or all brown sugar if you’d like. If you prefer a less sweet pie, you can reduce the sugar to ¾ cup.
- Pumpkin pie spices: I really like this particular blend/ratio of spices for pumpkin pie, but if you have pumpkin pie spice in your drawer, you can replace the spices (not the salt) with 1¾ teaspoons of pumpkin spice. If you’ve made my pumpkin pie spice blend , it’s pretty much the same ratio as the spices in this pie, so you can use that and get the same effect.
- Pumpkin puree: Pumpkin puree is pure pureed pumpkin. If you don’t regularly purchase it, double check the can to make sure you’re not accidentally getting pumpkin pie filling, which is already sweetened and spiced.
- Evaporated milk: Same goes for evaporated milk. You can usually find this in a can in the baking or coffee aisle sold alongside condensed sweetened milk. Make sure when you grab it off the shelf, you’re picking the right thing.
- 9-inch unbaked deep dish pie crust: Use your favorite pie crust recipe here. I used a half batch of my favorite buttermilk pie crust (if you are a pie crust novice, this is such a great recipe to start with because it’s suuuuuuper easy to work with). Frozen, store-bought crusts work great as well.
A note on pie crust: If making and rolling out pie dough does not bring you joy, I urge you to just grab a frozen pie crust at the grocery store. They absolutely get the job done and with a pie this good, no one’s going to complain you didn’t make the crust yourself.
How to Make Homemade Pumpkin Pie

Mix your dry ingredients: Whisk together granulated sugar, brown sugar, cinnamon, salt, ginger, nutmeg, and cloves until well-mixed and no lumps remain. If you get some stubborn brown sugar lumps, run them between your fingers until they break apart.
Add eggs and puree: In a large bowl, lightly beat eggs. Add pumpkin puree, vanilla, and the sugar and spice mixture. Whisk until well-combined.

- Add evaporated milk: Drizzle in the evaporated milk while whisking gently. Once milk is mostly incorporated, switch to a silicone spatula and stir a few more times, making sure to scrape the edges and bottom of the bowl so the mixture is uniform in color, but do not over mix.
Don’t go crazy with the whisking. You don’t want to whip a lot of air into the mixture because you can get air bubbles that will leave little craters in the top of your pie.


Fill your pie crust: Pour mixture into prepared pie crust. If you’re using a store-bought crust, you’ll probably have some filling leftover. This is normal.
Bake: Place pie on a baking sheet to catch any drips and set on the lowest rack in your oven. Bake for 15 minutes before setting the oven temperature to 350°F. The high starting temperature will help the bottom of the pie set up quickly so you don’t get a soggy crust.
Continue to bake: Bake for an additional 40 minutes to 1 hour, until the pie is set at least two inches from the crust but the center still wobbles slightly or the pie reads 175°F when tested with an instant-read thermometer.
If at any time your crust begins to get too dark, shield the crust with pie shields or foil. During testing, none of my smaller store-bought crusts needed this, but the pie in the photos got one for the last 10 minutes of baking time.
Pie shield note: If you’ve never made a pie shield before, I really like this simple method .
- Cool: Cool on a wire rack for at least 2 hours before serving. Serve topped with whipped cream, and enjoy!

How do I know my pumpkin pie is done?
Pumpkin pie can be a little tricky to test for doneness because a perfectly baked pie always looks undercooked, and if the pie looks fully set in the oven, it’s absolutely been overcooked.
You can tell the pumpkin pie is done when the pie is set (not wobbling) at least two inches from the crust, but the center still wobbles slightly.
Some people swear by using a knife to check for doneness (insert a knife and it should come out mostly clean), but I find this method unreliable and the place where the pie was pierced often develops into a larger crack.
How do I keep my pie from cracking?
Don’t overcook your pumpkin pie. Cracks are caused when the eggs in the custard become overcooked and begin to contract, making the pie pull away from the edges of the pie crust or crack in the center.
To prevent cracking, bake your pie just until the outer edges of the pie look set. The center should still wobble slightly.
And real talk, sometimes though, cracking is just a part of pumpkin pie life. If your pie cracks as it cools, don’t sweat it. It’s still going to be delicious.
Do I have to let pumpkin pie cool for 2 hours?
Yes. The custard will finish cooking and set as it cools. If you try to eat pumpkin pie right out of the oven, it will be a hot liquidy mess and no one’s idea of a good time.
Is it OK to not refrigerate pumpkin pie?
As long as it has sufficient cooling time, you don’t need to refrigerate pumpkin pie before eating it. But custard pies like pumpkin pie should be stored in the refrigerator overnight or if you’re not eating them as soon as they’ve cooled.
Do I need to defrost my store-bought crust before baking it?
Probably not. If using a store-bought, frozen pie crust, follow the instructions on the packaging. Most of them are designed to go straight from the freezer to the oven. There is no need to defrost them first, and starting with a frozen crust will not change the cooking time.
More Pumpkin Recipes
- Pumpkin Bread With Streusel
- Pumpkin Pancakes
- Cinnamon Sugar Baked Pumpkin Donuts
- Small-batch Pumpkin Streusel Muffins

Recipe Notes
- Evaporated Milk Substitutions: You can replace the evaporated milk with a 14-ounce can of sweetened condensed milk, simply reduce the sugar to 3 tablespoons (any mix of brown/white sugar is fine) or omit it completely. You can also use 1¼ cups heavy cream (the amount of sugar will stay the same).
- Storage: Store the pie tightly wrapped in the refrigerator for up to 4 days.
- Freezing Whole Pumpkin Pies: Pumpkin pie freezes well. If you’re planning on freezing your pie, bake it in a disposable aluminum pie tin. Once cooled, double wrap the pie with plastic wrap and then an additional layer of aluminum foil if you have it. Freeze for up to 3 months. Defrost overnight in the refrigerator.
- Freezing Pumpkin Pie Slices: Flash freeze slices on a plate or baking sheet that will fit in your freezer. Once frozen, wrap each slice individually in plastic wrap and then store in a freezer bag for up to 2 months. Defrost overnight or at room temperature for about 20 minutes.
Ingredients
- ▢ ½ cup ( 100g ) granulated sugar
- ▢ ½ cup ( 100g ) lightly packed brown sugar
- ▢ 1 teaspoon ground cinnamon
- ▢ ½ teaspoon salt
- ▢ ¼ teaspoon ground ginger
- ▢ ¼ teaspoon ground nutmeg
- ▢ Pinch to ⅛ teaspoon ground cloves
- ▢ 2 large eggs preferably room temperature
- ▢ 1 15-ounce can (scant 2 cups ) pumpkin puree
- ▢ 1 tablespoon vanilla extract
- ▢ 1 12-ounce can ( 1½ cups ) evaporated milk
- ▢ 1 9-inch unbaked deep dish pie crust
Instructions
- Preheat your oven to 425°F.
- In a medium bowl, whisk together granulated sugar, brown sugar, cinnamon, salt, ginger, nutmeg, and cloves until well-mixed and no lumps remain.
- In a large bowl, lightly beat eggs. Add pumpkin puree, vanilla, and the sugar and spice mixture. Whisk until well-combined.
- Drizzle in the evaporated milk while whisking gently. Once milk is mostly incorporated, switch to a silicone spatula and stir a few more times, making sure to scrape the edges and bottom of the bowl so the mixture is uniform in color, but do not over mix.
- Pour mixture into prepared pie crust. Place pie on a baking sheet to catch any drips and set on the lowest rack in your oven. Bake for 15 minutes before setting the oven temperature to 350°F. Bake for an additional 40 minutes to 1 hour, until the pie is set at least two inches from the crust but the center still wobbles slightly or the pie reads 175°F when tested with an instant read thermometer.
- Cool on a wire rack for at least 2 hours before serving. Serve topped with whipped cream, and enjoy!
Vodka sauce is a restaurant favorite that is so, so easy to make at home. You just need a handful of ingredients and 15 minutes to make this ultra rich and creamy pasta sauce.
Have you ever made vodka sauce at home? If not, friend, say hello to your new favorite quick and easy pasta sauce.
Pasta tossed with a quick vodka sauce is perfect for busy weeknights when you need something that feels a little (a lot) indulgent but don’t want to spend a ton of time in the kitchen.


15-minute Pasta Sauce With a Special Ingredient
From start to finish, this sauce takes about 15 minutes. When you factor in boiling time for water and cooking the pasta, you can have a big bowl of pasta drenched in vodka sauce on the table in around 20 minutes.
Many vodka sauces use canned tomatoes, but this recipe uses tomato paste, so you get an ultra-concentrated tomato flavor and a luxuriously rich and creamy texture without having to blend the sauce in a food processor or blender.
Ingredient & Equipment Notes
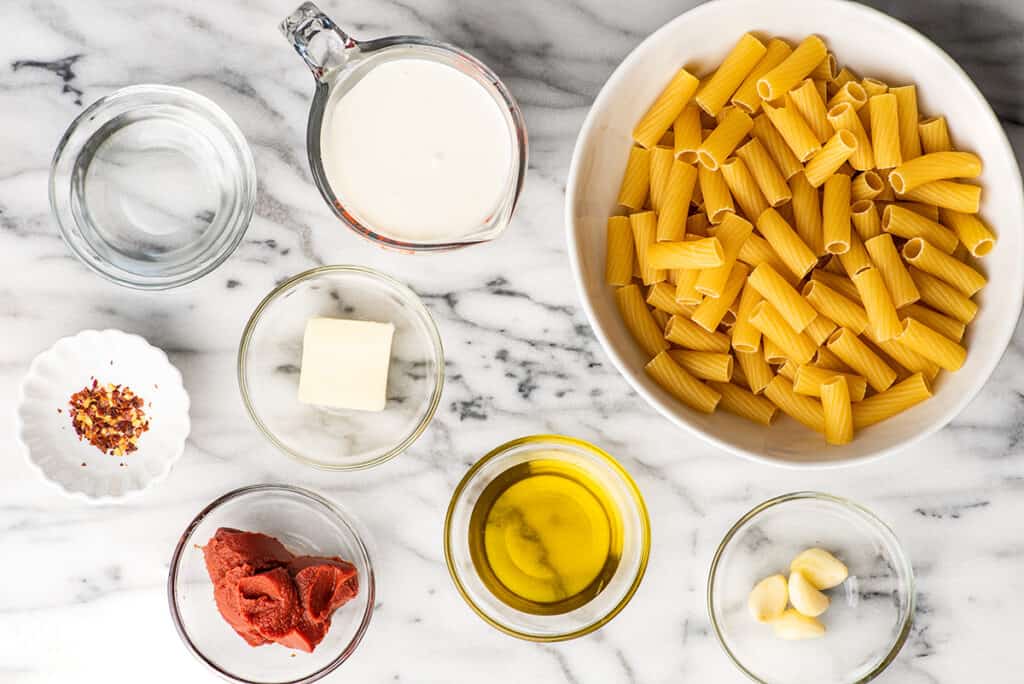

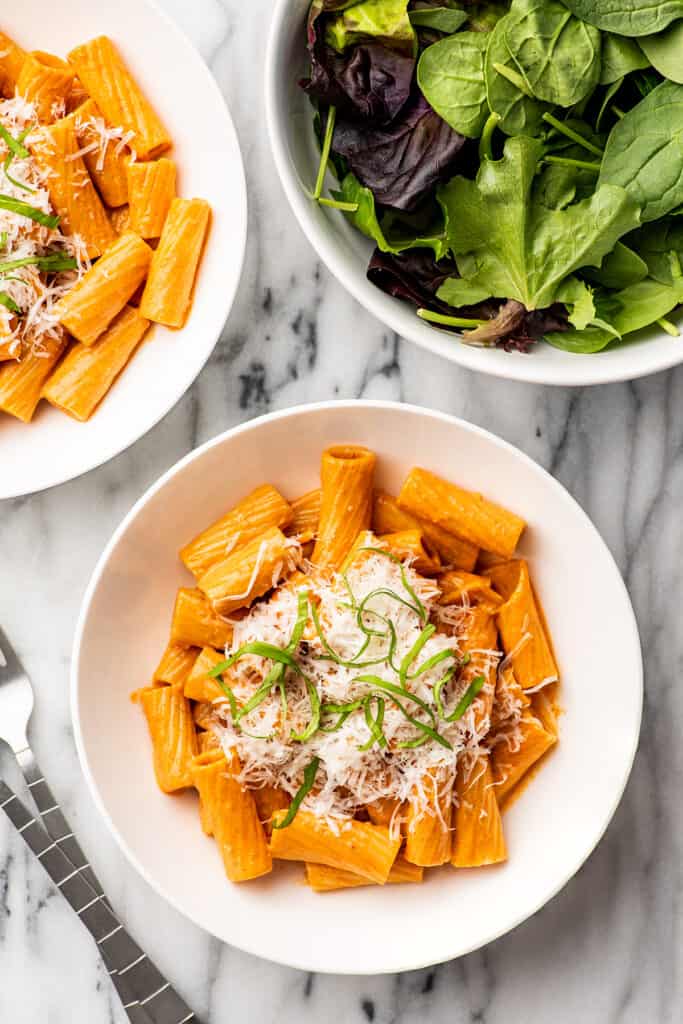
- Pasta: You can serve vodka sauce over whatever pasta you’d like. Penne alla vodka is the classic, but rigatoni (which I used in these photos) is fast becoming the go-to pasta for vodka sauce.
- Tomato paste: This recipe won’t use an entire can of tomato paste. Check out my post What to Do With Leftover Tomato Paste for storage tips and recipe ideas for the rest of the can. P.S. Measure your tomato paste by weight if you have a kitchen scale ! It’s way faster and easier than scooping sticky paste in out out of a measuring cup.
- Heavy cream: And if you have leftover heavy cream, go check out What to Do With Leftover Whipping Cream .
- A large pot: While you can technically make vodka sauce in a skillet, use a large pot because it will help contain splatters while making the sauce.
- A spider skimmer: If you have one, a spider skimmer/strainer is really helpful for scooping up the pasta out of the pasta water.
How to Make Vodka Sauce

Boil water and assemble ingredients: Bring a medium pot of water to boil and salt generously. While your water comes to a boil, assemble your ingredients. Parts of this sauce come together pretty quickly, and assembly will go more smoothly if your ingredients are ready to go.
Start pasta: Once the water is boiling, add pasta and cook until al dente.
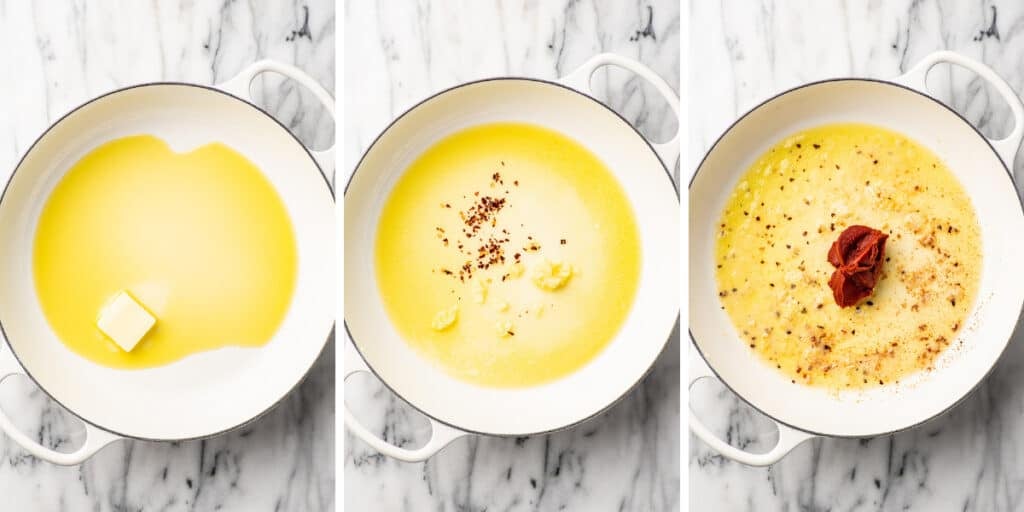
Brown garlic: For optimal timing, immediately begin cooking your sauce when you start your pasta. Cook garlic and red pepper flakes in a mixture of butter and oil until the garlic begins to turn lightly golden.
Add tomato paste: Stir in the tomato paste and whisk until paste darkens in color and begins to caramelize on the bottom of the pan, 3 to 5 minutes.
This cooks the raw taste out of the tomato paste and really deepens its flavor. Once the sauce reaches this point, you’ll actually be able to smell the difference.
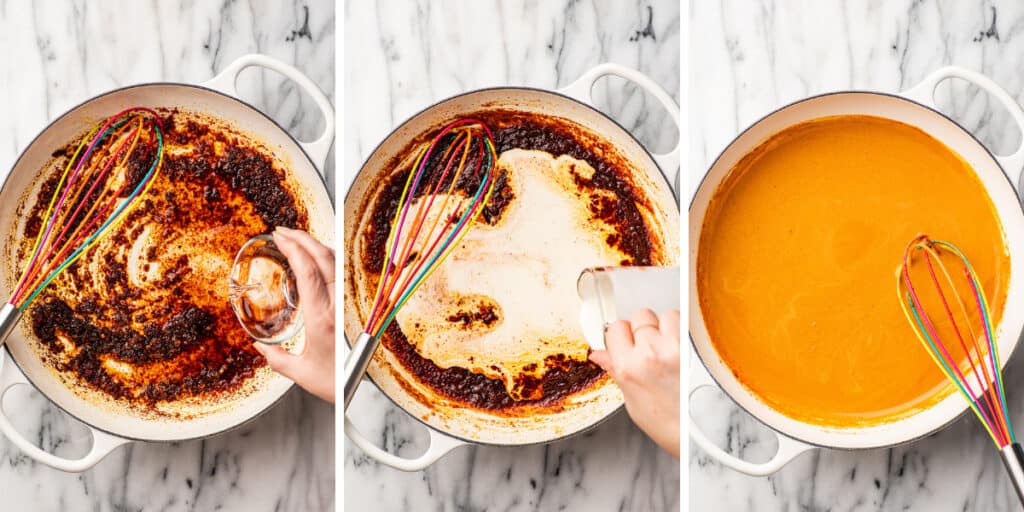

Add vodka: Turn the heat down and carefully add the vodka. When the vodka hits the pan, the sauce will begin to simmer and pop quite aggressively. It will settle down within a few seconds. Just whisk the mixture, scraping any cooked-on bits from the bottom of the pan until the vodka is incorporated into the sauce.
Add heavy Cream: Keep the sauce over low heat and whisk in heavy cream. Bring the sauce up to just barely a simmer, and let it cook, stirring frequently, for 5 minutes. Keep a close eye on the sauce and do not allow it to come to a full boil.


Add pasta water: When the pasta is a minute or two from being done, use a heat-proof measuring cup and scoop out ¼ cup of the cooking water and whisk it into your sauce. At this point, your sauce is definitely going to need some salt. Taste, and add salt as needed. Don’t skip this step!
Add pasta: Use a slotted spoon or spider skimmer to scoop cooked pasta out of the pasta water and add it your sauce. Stir to combine. The sauce is going to seem a little thin at first, but it will thicken as it sits. Serve up the pasta topped with parmesan and fresh basil if desired, and enjoy!
Variations
Many vodka sauce recipe contain onions and/or cheese. While developing this recipe, I tested variations containing both and preferred the ease, texture, and flavor of the vodka sauce without them. But you might differ from me! If you’d like to include them, here’s how to do it:
- Onions: Finely dice ½ small onion and cook over medium heat in 1 tablespoon of the oil (use 1 tablespoon less oil later in the recipe so you still use 3 tablespoons total). Cook for 5 minutes or until the onions soften and begin to turn translucent. If at any time the onions begin to brown, turn down the heat. Once onions are softened, follow the rest of the recipe as written.
- Parmesan: After you stir in the pasta, add cheese and an additional 2 tablespoons of pasta water and stir until the cheese melts into the sauce and becomes smooth, adding more pasta water as needed.
- Chicken: If you’d like to make Penne alla Vodka with chicken , cut 1 pound boneless skinless chicken breasts into 1-inch pieces and season with salt and pepper. Cook in 1 tablespoon olive oil until cooked through. Transfer the chicken to a plate and deglaze and wipe out your pan before starting the sauce. Once the sauce is finished and pasta added, add the chicken back to the pot and let it sit with the rest of the hot ingredients for a couple of minutes to reheat.


What does the vodka do in vodka sauce?
While vodka is technically flavorless, alcohol helps bring out the flavors or the other ingredients in the sauce. If you compare this sauce made with and without vodka, the sauce with vodka is a little brighter, a little sweeter and more aromatic.
What can I use instead of vodka in vodka sauce?
If you don’t have vodka on hand, you can omit the vodka in vodka sauce. Use a bit of pasta water instead of the vodka to deglaze the pan before adding the cream, but otherwise, make the sauce as written. The flavor of the sauce will be a little muted, with less depth of flavor, but it will still be a good time.
Can I double this recipe?
Yes. This recipe is written to make 2-ounce servings of pasta. If you want to make big restaurant-sized portions, you’ll want to double the recipe. To change the recipe yield, in the recipe card, hover over the servings or click if you’re on mobile and slide the slider.
More Easy Pasta Dishes
- Creamy Chicken Pasta
- Easy Lasagna
- Baked Ziti
- Creamy Sausage Pasta

Recipe Notes
- Recommended sides: With a sauce this rich, serve it with something simple like a green salad, roasted zucchini , butter and garlic green beans , or roasted broccoli . And don’t forget a slice of garlic bread!
- Reheating: Vodka sauce does not reheat particularly well once it’s been mixed with pasta. It tends to separate and become oily when reheated. If you know you’re not going to eat a full pot of pasta, make only half of the pasta and mix it with half of the sauce. Store the remaining sauce in the refrigerator and reheat and toss with freshly made pasta when you’re ready for leftovers.
- Reheating II: If you do happen to end up with leftover pasta that’s been tossed with sauce, you can improve the texture of the reheated sauce by adding a generous splash of heavy cream while reheating.
- Freezing: I do not recommend freezing this sauce with or without pasta.

Ingredients
- ▢ 8 ounces penne or rigatoni pasta
- ▢ 3 tablespoons olive oil
- ▢ 1 tablespoon ( 14g ) butter
- ▢ 4 cloves garlic pressed or minced
- ▢ ¼ teaspoon red pepper flakes optional
- ▢ ¼ cup ( 66g ) tomato paste
- ▢ ¼ cup vodka
- ▢ 1 cup heavy cream
- ▢ Salt
- ▢ Grated parmesan optional for topping
- ▢ Fresh basil optional for topping
Instructions
- Bring a medium pot of generously salted water to boil for the pasta. Once boiling, add pasta and cook until al dente.
- While your pasta is boiling, in a large pot, heat olive oil and butter over medium heat. Once the butter is melted, add garlic and red pepper flakes. Cook until the garlic begins to turn golden and aromatic, about 1 minutes.
- Add tomato paste and cook, stirring often, until paste darkens in color and begins to caramelize on the bottom of the pan, 3 to 5 minutes.
- Turn heat to low and switch to a heat resistant whisk. Carefully add the vodka (the sauce will sizzle and pop aggressively for a few seconds). Whisk, scraping any cooked-on bits from the bottom of the pan, until the vodka is incorporated into the sauce.
- Whisk in heavy cream. Bring the sauce up to just barely a simmer, and let it cook, stirring frequently, for 5 minutes. Do not allow it to come to a full boil.
- When the pasta is nearly done, use a heat-proof measuring cup to scoop out ¼ cup of the cooking water and whisk it into your sauce. Taste the sauce and add salt as needed.
- Once the pasta is al dente, scoop out and reserve another ¼ cup of the cooking water. Drain pasta or use a spider skimmer to scoop pasta out of the water and add pasta to the sauce. Stir to combine.
- The sauce will seem a little thin at first. Allow it to sit for about 5 minutes to thicken. If the sauce gets too thick, stir a bit more of the reserved pasta water into the sauce.
- Serve topped with grated Parmesan and basil if desired and enjoy!
Notes

Small Pumpkin Pie
Ingredients
- ¼ cup ( 50g ) granulated sugar
- ¼ cup ( 50g ) lightly packed brown sugar
- ½ teaspoon ground cinnamon
- ¼ teaspoon salt
- ⅛ teaspoon ground ginger
- ⅛ teaspoon ground nutmeg
- Pinch of ground cloves
- 1 large egg preferably room temperature
- 1 cup ( 244g ) pumpkin puree
- 2 teaspoons vanilla extract
- ⅔ cup ( 1 5-ounce can) evaporated milk
- 1 6-inch unbaked deep-dish pie crust
- Whipped cream optional for topping
Instructions
- Preheat your oven to 425°F.
- In a small bowl, combine granulated sugar, brown sugar, cinnamon, salt, ginger, nutmeg, and cloves. Whisk until well combined and no lumps remain.
- In a medium bowl, add the egg and beat lightly. Add the pumpkin puree, sugar and spice mixture, and vanilla extract. Whisk until well-combined.
- Slowly whisk in the evaporated milk until mostly combined. Switch to a rubber spatula and finish mixing, being sure to scrape the bottom and edges of the bowl.
- Pour pumpkin pie mixture into your prepared pie crust and place pie on a baking sheet.
- Bake on the lowest rack in your oven for 15 minutes. Change the temperature to 350°F, and bake for an additional 30 to 40 minutes, until the pie is set at least an inch and a half from the crust but the center still wobbles slightly or the pie reaches 175°F.
- Cool on a wire rack for at least 2 hours and serve or cover and refrigerate overnight. Serve with whipped cream, and enjoy!
