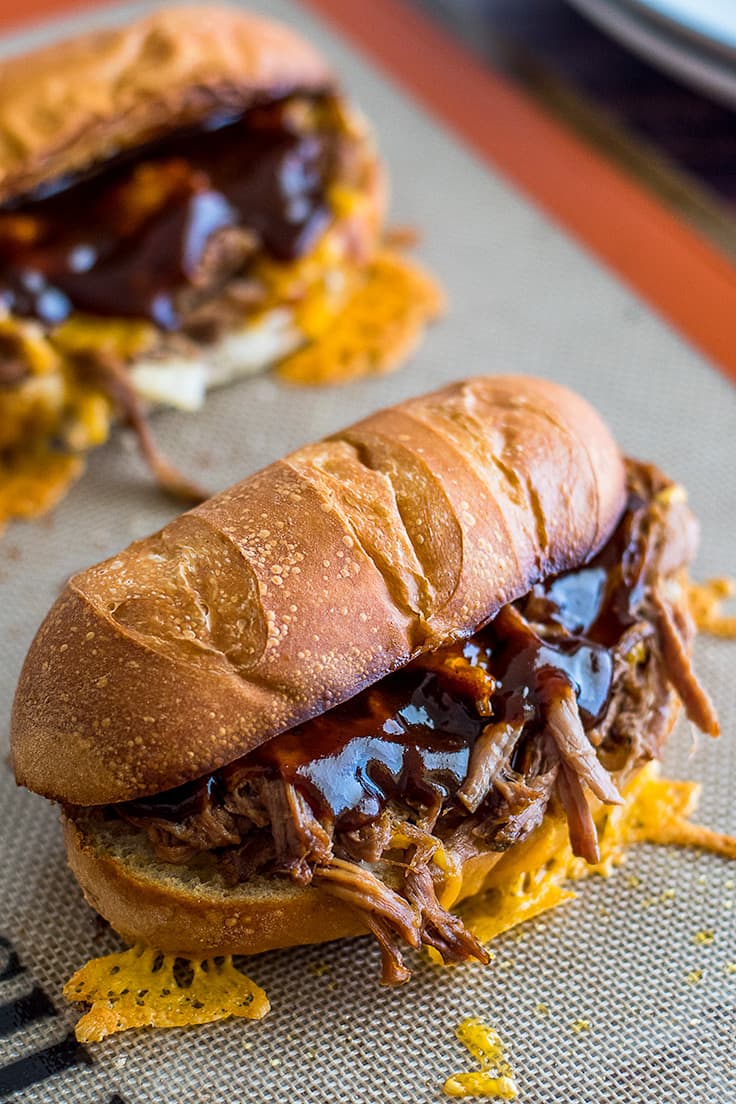
These Slow Cooker Tri-Tip Sandwiches are made with fall-apart tender tri-tip on toasty bread and topped with cheese and sweet, tangy BBQ sauce.
Tri-tip is a great cut of meat, and when you make it in the slow cooker, it comes out fabulously tender and perfect for making into sandwiches.
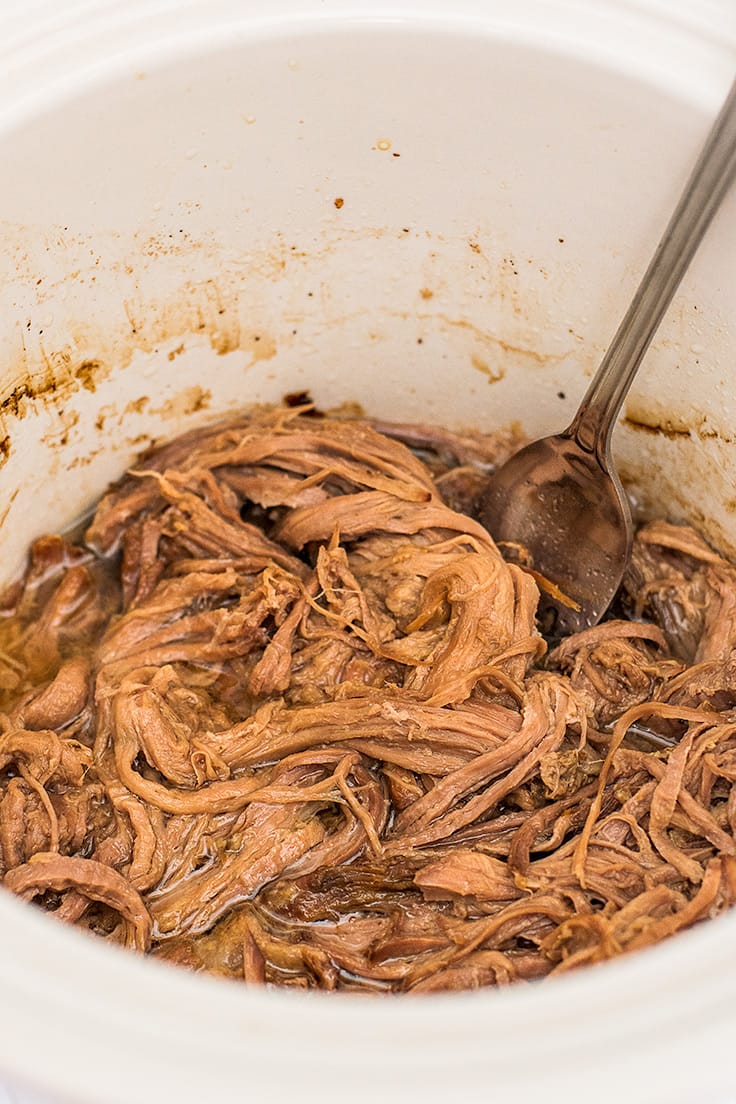
It’s also incredibly simple to make. In the morning, you just rub your tri-tip with seasoning salt and then let the tri-tip hang out in your crockpot on low for 8 hours.
At the end of the day, your house will smell amazing, and you just shred the meat and pile it onto sandwiches topped with BBQ sauce and cheese. With almost no effort, you get to enjoy homemade BBQ without ever having to step foot outside. And that’s living the BBQ dream if you ask me. 😉

Ingredient Notes
- Tri-tip: Unlike my Oven-baked Tri-tip , I recommend using a trimmed tri-tip roast in this recipe but if untrimmed is all that’s available, that will work too. Just roughly (it doesn’t need to be beautiful) trim away and discard the fat cap (the thick layer of fat over one side of the meat) before cooking. While fat is usually delicious, in the crockpot it does nothing but make a blobby mess.
- French rolls: A good-sized soft French roll is my favorite for tri-tip sandwiches, but any soft white bread will do. Hot dog or hamburger buns are great as is sliced French bread or even plain, sliced sandwich bread.
- Seasoning salt: If you don’t have seasoning salt, not a problem. Mix together 2 teaspoons each of salt, pepper, and garlic powder, and use it in place of the seasoning salt.
A Note on Tri-tip: Tri-tip is most popular in California and along the west coast. If you are outside of California and having trouble finding tri-tip in the store, you might find it under other names like “The California Cut” or “Bottom Sirloin Tip.”

How to Make Tri-tip Sandwiches
- Sprinkle seasoning salt over the entire tri-tip. Place tri-tip and water or broth in the slow cooker and cook on high for 3 to 4 hours or low for 6 to 8.
- Assemble sandwiches with mayonnaise, cheese, and cooked tri-tip.
- Bake until bread is toasted and cheese bubbly.
- Add BBQ sauce and enjoy!
Can I freeze tri-tip sandwiches?
You don’t want to freeze assembled bbq sandwiches (they will get soggy), but the cooked tri-tip is a great candidate for freezing. Just store portions of cooked meat in freezer-safe plastic bags with some of the juices and freeze for up to 3 months.

How many sandwiches will this make?
A standard 1 1/2 to 2 1/2 pound tri-tip is enough meat to make about 5 to 8 sandwiches. If you’re a small household, and that’s too many for you, freeze the extra tri-tip. You can also use it in salads, burritos , or burrito bowls .
Can I sear the tri-tip before cooking it in the slow cooker?
Absolutely. If you’d like to brown your meat before slow cooking, heat 1 tablespoon of oil in a large skillet over medium-high heat, and brown both sides before transferring to the slow cooker.
This step is optional as it does deepen and improve the beefy flavor, but isn’t super noticeable when being eaten in a sandwich and requires you to wash another dish.


What to serve with tri-tip sandwiches?
- Microwave Corn on the Cob
- Butter and Garlic Green Beans
- Small Macaroni Salad
- Smashed Red Potatoes with Garlic Aioli
- Baked Potato Salad
More Slow Cooker Favorites
- Slow Cooker Beef Ribs
- Crispy Slow Cooker Carnitas
- Easy Barbacoa
- Crockpot Hot Chocolate

Ingredients
Special Equipment
- ▢ Slow cooker
Slow Cooker Tri-Tip Sandwiches
- ▢ Seasoning salt *
- ▢ 1 trimmed tri-tip *
- ▢ 1 cup water, beef, or chicken broth
- ▢ 5 french rolls sliced open
- ▢ 5 tablespoons mayonnaise
- ▢ 1 1/4 cup ( 5 ounces ) shredded cheddar cheese
- ▢ 3/4 cup barbecue sauce warmed in the microwave if desired
Instructions
- Sprinkle seasoning salt over the entire tri-tip. Place tri-tip and water or broth in the slow cooker and cook on high for 3 to 4 hours or low 6 to 8. The meat is done when you can easily pull it apart with a fork. Use two forks to shred the meat in the slow cooker.
- Preheat the oven to 400°F. Spread mayonnaise over the inside of the rolls and top with the shredded tri-tip and shredded cheese. Bake for 5 to 6 minutes until bread is toasted and cheese bubbly.
- Add BBQ sauce and enjoy!
Notes
This nacho cheese sauce is sharp and creamy, and everything you ever dreamed of smothering over nachos, veggies, or a giant pretzel.
Hey, friend, you ever marvel at that super creamy nacho cheese sauce you get at restaurants and movie theaters and wish you could make it at home? I have just the recipe for you.

This nacho cheese sauce is sharp and creamy, just as spicy (or not) as you want it to be, and everything you ever dreamed of smothering over nachos, veggies, or a giant pretzel (<–my fav).
To make it, you just need 5 minutes, AND my secret creamy cheese sauce weapon: evaporated milk.
And I know this might not be something you keep in your pantry. If that’s the case, and you need cheese sauce NOW, no worries, go make my classic Homemade Cheese Sauce . It’s made with butter, milk, and flour, so you probably have the ingredients, and it’s GREAT.
But if you have evaporated milk in your pantry or are going shopping before making this, grab a can and give this recipe a try. You will not be disappointed.
What’s the Deal With Evaporated Milk?
Evaporated milk is just milk that’s been simmered over low heat until more than half of the water content has evaporated , so it’s extra creamy. It’s perfect for giving you extremely creamy cheese sauces without the heaviness of using half and half or heavy cream .
When heated together with cheese and a dash or two of hot sauce, you get something pretty magical.


How to Make Nacho Cheese Sauce
Toss shredded cheese and cornstarch together so your cheese gets coated and you don’t end up with any big cornstarch lumps in your sauce. The cornstarch will help thicken your nacho sauce and prevent it from curdling.
Heat evaporated milk over medium heat until milk just begins to simmer.
Remove the milk from heat and stir in the cheese, a handful at a time, until all the cheese has been incorporated and it has completely melted into the sauce.
Add hot sauce, salt, and cayenne, and then taste and add more if needed.
And the final, most important step: drizzle your homemade nacho cheese over something delicious, and try not to eat the entire pot. 😉
Can I make this in advance?
Yes. Unlike a lot of cheese sauces, this sauce reheats pretty well (though it will get a little lumpy if reheated too hot and as it cools). It will solidify in the refrigerator but returns to its pourable state when reheated. To reheat:
- On the stove: Transfer sauce to a small saucepan and reheat gently over medium-low heat, stirring frequently. Do not allow to come to a boil.
- In the microwave: Microwave in a microwave-safe dish, stopping to stir sauce every 10-15 seconds as needed until just heated through. Heads up, the sauce will pop and sizzle in the microwave.
Nacho Cheese Sauce for Parties
This recipe makes a little over 2 cups of sauce, but if you would like to make an even bigger batch, the recipe doubles with no preparation changes.
You can transfer your prepared nacho sauce to a slow cooker and keep it set to warm for a couple of hours. Fair warning, it will do that cheese sauce thing where the top sets and gets kind of sad and ugly looking, but if you give it a quick whisk, it returns to looking smooth and beautiful.


What to serve with nacho sauce?
Looking for more things to drizzle nacho cheese over? Try:
- Steamed Broccoli
- Steamed Cauliflower
- Carnitas Nacho Fries
- Chili Baked Potatoes
Nacho Cheese Recipe Notes
You should be able to find evaporated milk in the baking aisle next to the condensed milk. Double check the can that you’re putting in your cart and make sure that you’re getting evaporated and not condensed milk, because the two CANNOT be used interchangeably. (Though you can and should use condensed milk to make dulce de leche …)
You Might Also Enjoy
- Easy Barbacoa
- Carne Asada
- Homemade Carnitas
- Chicken Enchiladas
- Cilantro Lime Rice

Ingredients
- ▢ 3 cups ( 12oz ) freshly shredded sharp cheddar cheese *
- ▢ 1 1/2 teaspoons cornstarch
- ▢ 1 12-ounce can ( 1 1/2 cups ) evaporated milk
- ▢ 2 teaspoons hot sauce optional
- ▢ 1/8 teaspoon salt
- ▢ 1/8 teaspoon ground cayenne pepper plus more as needed
Instructions
- In a large bowl, combine shredded cheese and cornstarch and toss to coat.
- To a medium saucepan, add evaporated milk. Heat over medium heat, stirring occasionally until milk just begins to simmer.
- Remove the milk from heat and stir in the cheese, a large handful at a time, until all the cheese has been incorporated and it has completely melted into the sauce.
- Add hot sauce, salt, and cayenne, and then taste and add more if needed. Serve over nachos, fries, or steamed vegetables and enjoy!
Notes
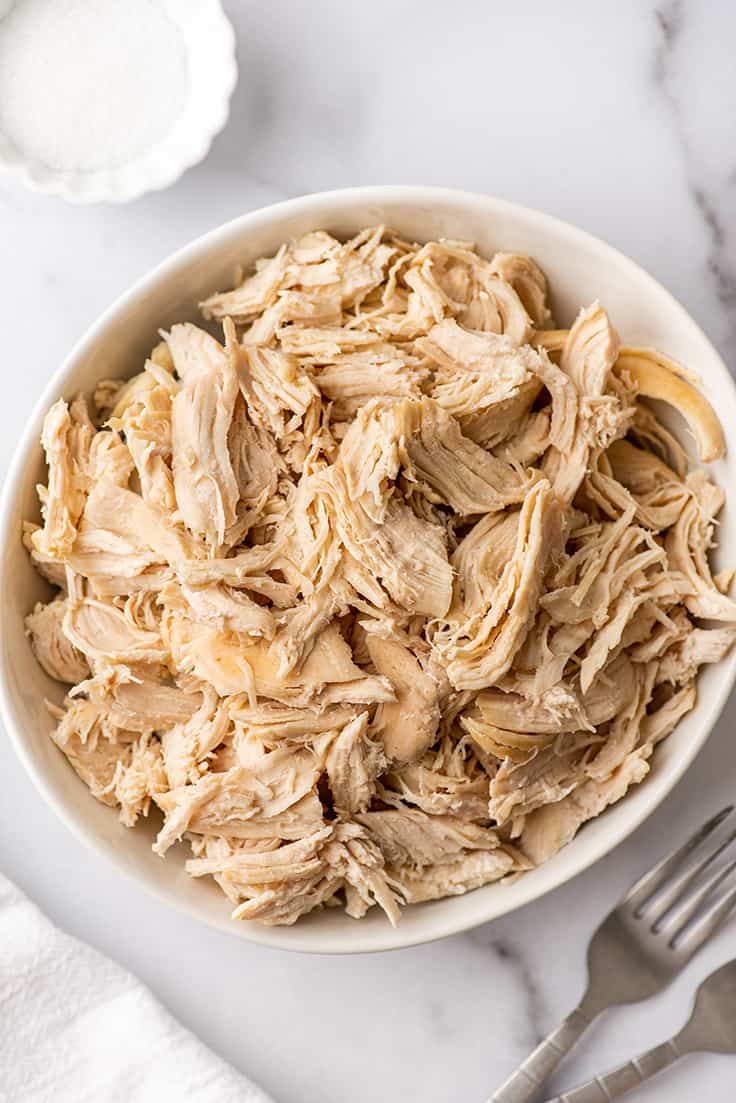
Want to know how to cook shredded chicken the best and easiest way possible? Look no further! This method is so quick and simple, and your chicken will come out moist and flavorful every time.
This is the quickest, easiest, BEST way to cook shredded chicken.
Whether you need a batch for soup , a sandwich, or are filling something delicious like shredded chicken enchiladas , this method works wonderfully and will save you a ton of time and trouble in the process.

The Best Way to Cook Shredded Chicken
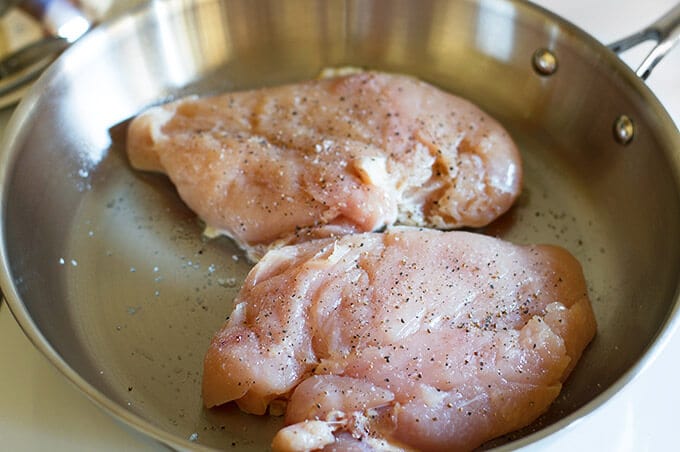
This cooking method is a mix between pan-frying and something similar to poaching. You first sear seasoned chicken breast in a little bit of oil which adds a ton of flavor (as we know, browned foods are delicious).
Then cook the chicken in a covered pan with a little bit of simmering water or chicken broth. The liquid keeps the chicken from burning so you don’t have to babysit it and helps keep it moist as it cooks.
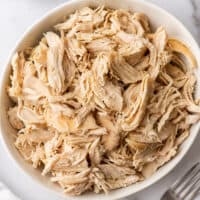
The chicken comes out perfectly cooked, tender, and flavorful every single time.
Ingredient Notes
- Boneless skinless chicken breasts: Any size chicken breast will work for this recipe. You’ll just need to adjust the cooking time for very large or very small ones.
- Salt and pepper or seasoning: Before cooking, season your chicken breast with either a bit of salt and pepper, seasoning salt, or whatever seasonings will complement the final dish it’s being used in, like taco seasoning or Italian seasoning.
How to Make Shredded Chicken
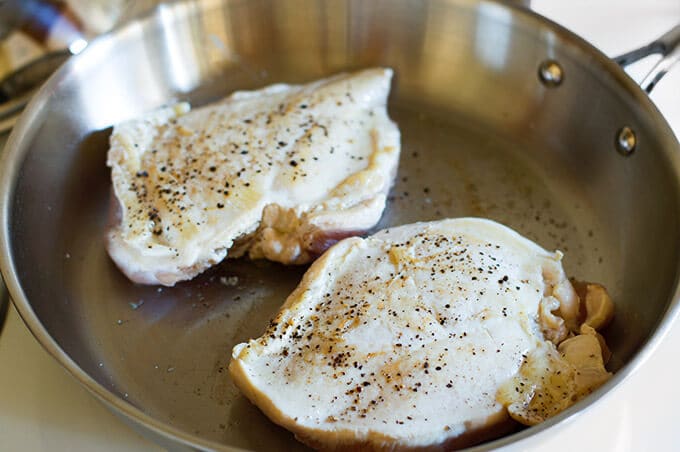
Generously season both sides of the chicken breasts.
Heat a skillet with a lid over medium-high heat. Spray with cooking spray or drizzle on a bit of your favorite cooking oil. Add chicken to the pan and cook until browned, 3 to 4 minutes.

- Flip and repeat.

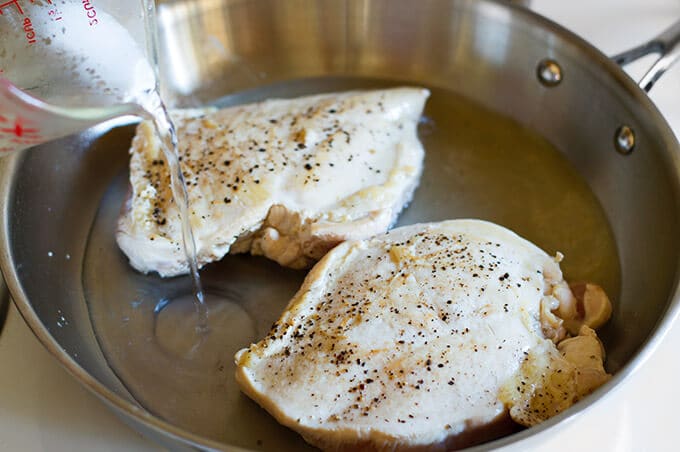
Once browned, add about 1/2 inch of water to the pan (the amount of water this requires will vary depending on how large your pan is, but it should come about halfway up the sides your chicken breasts).
Cover, turn heat down to medium, and cook for 5 to 8 minutes (or longer if you have large chicken breasts), until an instant-read thermometer * inserted into the center of the breasts reads 165°F. If at any time all the water has evaporated from your pan, add more as is needed.

- Remove from heat and allow to rest for 5 minutes.
How to Shred Chicken
There are a number of ways to shred chicken. Some of the most popular are:
Shredded Chicken Method 1: Two Forks and Arm Power
No need to invest in shredding claws (though they do look fun), a pair of forks works perfectly well for shredding chicken and is the simplest method.
- Just hold one fork in each hand, and use one fork to hold the chicken breast down and the other to tear away pieces of meat and shred them into smaller sections.
Best For: When you don’t want to do extra dishes or don’t own a stand mixer or handheld electric mixer.

Shredded Chicken Method 2: A Stand Mixer
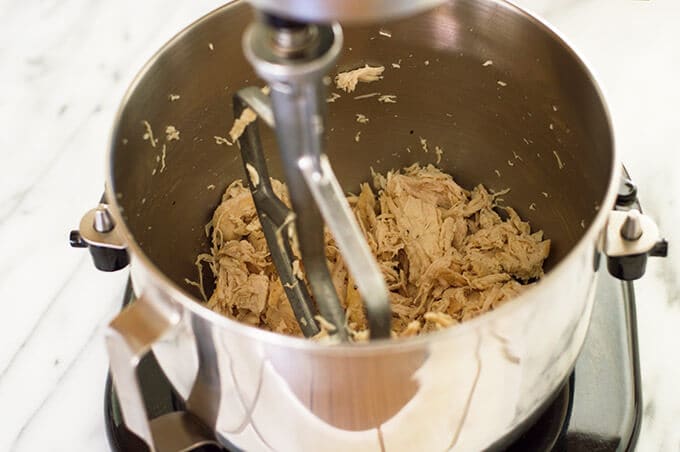
The easiest way to shred chicken is with a stand mixer. (I know it sounds a little silly, but it works!) Even when you factor in cleaning time, a mixer can process a ton of chicken much faster than you can shred it by hand.
- Once slightly cooled, transfer chicken breasts to your stand mixer.
- With the paddle attachment, set mixer to low, working up to medium and process chicken until mostly shredded. Don’t over process–there will be a couple of pieces you will need to finish pulling apart by hand.
Best For: Big batches of shredded chicken.
Shredded Chicken Method 3: A Handheld Electric Mixer and a Bowl
You can also use a handheld electric mixer the same way you would a stand mixer. It doesn’t break up the chicken quite as effectively as a powerful stand mixer–you’ll have to pull apart a few more larger pieces by hand, but it’s still quicker than the fork method.
It’s also less clean up than using a stand mixer, so I typically use this method if I’m only working with a couple of small chicken breasts.
- Cool chicken slightly and place it in a large bowl.
- Turn the mixer on medium-low and press the beaters into the chicken breasts. They will break up the meat as they spin. Continue until the chicken is mostly shredded and the beaters don’t seem to be breaking anything up any longer.
- Use your hands to tear apart any remaining larger pieces of chicken.
Best For: Smaller batches of shredded chicken.
How to freeze shredded chicken?
Shredded chicken freezes very well. To freeze cooked, shredded chicken, store it in a freezer bag and press all the air out. Label the bag with the date and amount of chicken and store in the freezer for 2 to 3 months.
When you’re ready to use it, defrost chicken overnight in the refrigerator.
How long will shredded chicken last?
Shredded chicken will stay good in the fridge in an airtight container for 3-4 days, according to the USDA .
Shredded chicken will keep in the freezer for 2 to 3 months. After that, it will begin to dry out and be more susceptible to freezer burn.
What do you eat with shredded chicken?
You can use shredded chicken in all sorts of recipes. Here are a few to start:
- Quick Chicken Tortellini Soup
- BBQ Chicken Pizza
- Easy Chicken Parm Soup
- Chicken and Broccoli Orzo
More Chicken Tutorials
- Roasted Chicken Guide
- How to Cook Chicken for Salads and Sandwiches
- How to Cook Chicken Breasts
- How to Make Chicken Stock
Ingredients
- ▢ Cooking spray or your favorite cooking oil
- ▢ Boneless skinless chicken breasts
- ▢ Salt and pepper
Instructions
- Generously salt and pepper both sides of the chicken.
- Heat a skillet (with a lid) over medium-high heat. Spray with cooking spray or drizzle on a bit of your favorite cooking oil. Once hot, add chicken to the pan and cook until browned, 3 to 4 minutes.
- Flip and repeat. Once browned, add about 1/2 inch of water to the pan, cover, turn heat down to medium, and cook for 5 to 8 minutes (longer if breasts are large), until an instant-read thermometer inserted into the center of the breasts reads 165°F. If at any time all the water evaporates from the pan, add more as needed.
- Remove from heat and allow to cool for 5 minutes. Once cooled, transfer chicken breasts to your stand mixer. With the paddle attachment, set mixer to low, working up to medium, and process chicken until mostly shredded. Don’t over process–there will be a couple larger pieces you will need to finish pulling apart by hand.
- Wash up and use your moist, shredded chicken in something delicious.
Notes

Slow Cooker Tri-Tip Sandwiches
Ingredients
Special Equipment
- Slow cooker
Slow Cooker Tri-Tip Sandwiches
- Seasoning salt *
- 1 trimmed tri-tip *
- 1 cup water, beef, or chicken broth
- 5 french rolls sliced open
- 5 tablespoons mayonnaise
- 1 1/4 cup ( 5 ounces ) shredded cheddar cheese
- 3/4 cup barbecue sauce warmed in the microwave if desired
Instructions
- Sprinkle seasoning salt over the entire tri-tip. Place tri-tip and water or broth in the slow cooker and cook on high for 3 to 4 hours or low 6 to 8. The meat is done when you can easily pull it apart with a fork. Use two forks to shred the meat in the slow cooker.
- Preheat the oven to 400°F. Spread mayonnaise over the inside of the rolls and top with the shredded tri-tip and shredded cheese. Bake for 5 to 6 minutes until bread is toasted and cheese bubbly.
- Add BBQ sauce and enjoy!
