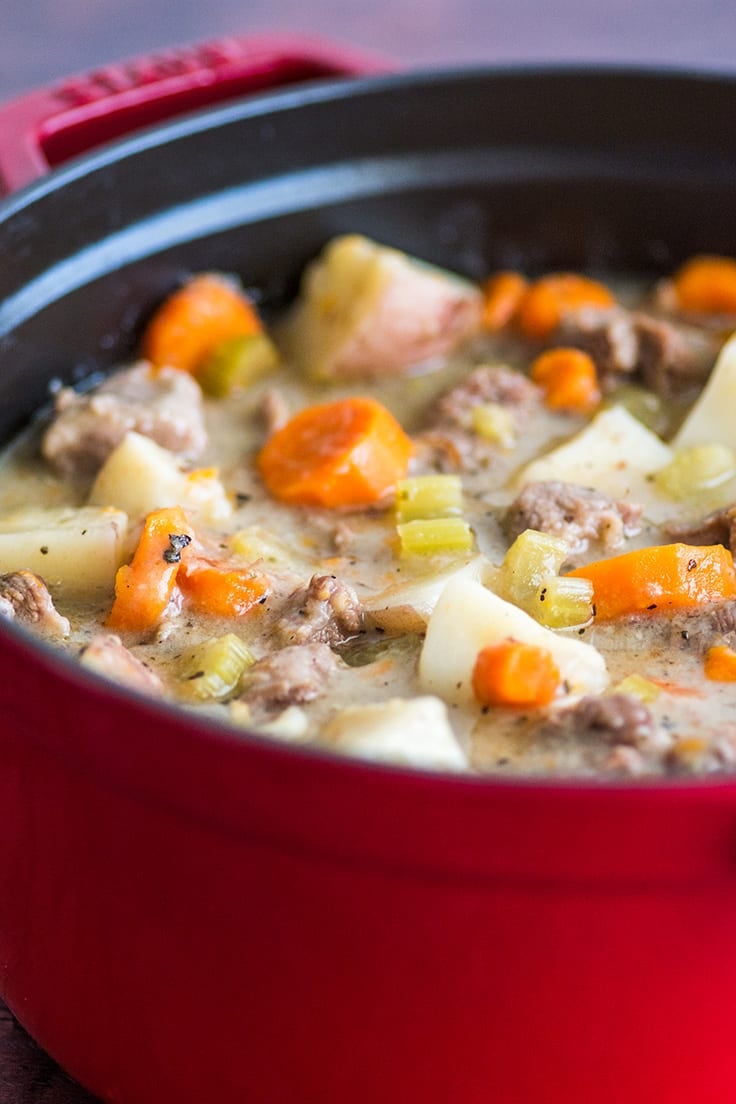
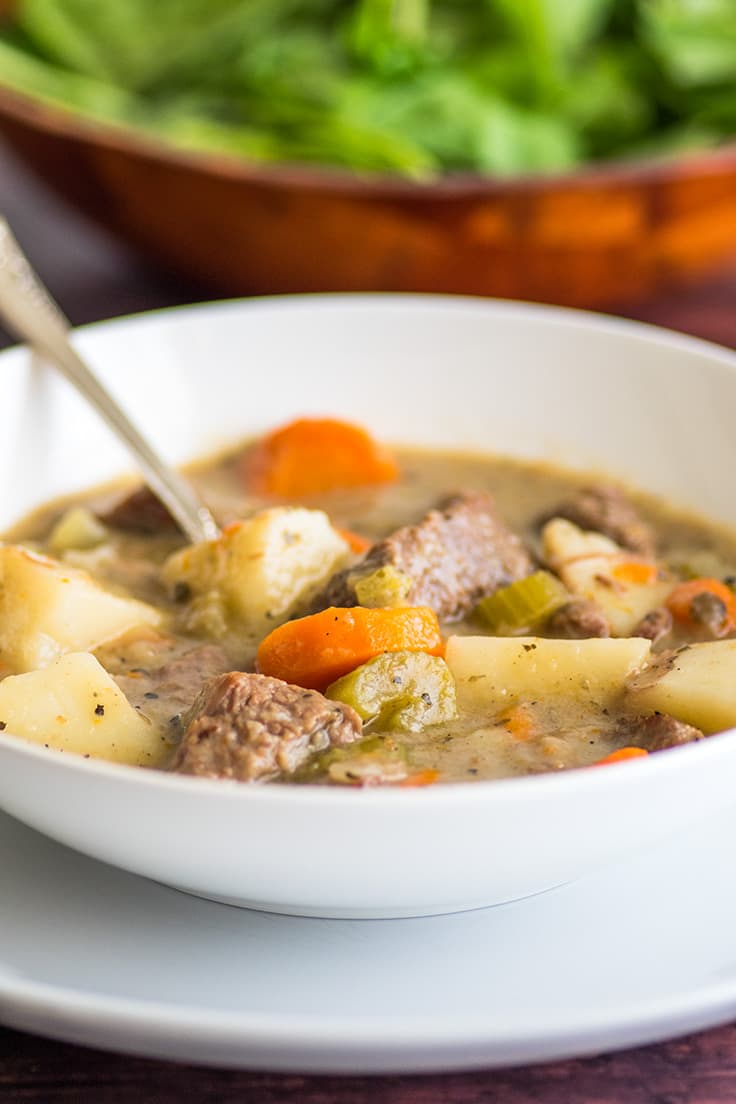
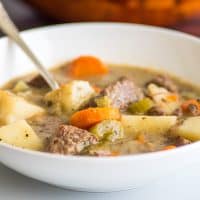
This hearty and simple beef stew is made completely from scratch and is absolutely delicious, just like Mom used to make it.
Today’s recipe is one of my absolute favorite comfort foods, my mom’s simple and easy, completely from scratch homemade beef stew.
And when I say completely from scratch, I mean from scratch. There’s no beef broth, no packets of flavoring mix, no consommé in here. It’s chunks of beef chuck, vegetables, and spices, and a couple hours of long, low simmering time.
You can add all the artificial flavor in the world, but nothing is going to beat the rich flavor of a stew that is given time to cook the way stew was meant to be cooked.

Ingredient Notes
- Flour: Dusting the beef with flour before browning helps to thicken the stew as it simmers.
- Beef chuck roast: I always recommend using a beef chuck roast for stew, but the price can vary quite wildly especially around the holidays. Keep an eye on the price and stock your freezer when you see it at a good one.
- Vegetables: Onions, carrots, and celery are my classic go-to stew veggies, but feel free to add whatever veggies sound good to you!
- Red potatoes: I prefer the flavor and texture of red potatoes for stew, but you can also use Russet potatoes if that’s what you have on hand.
What is a good meat for beef stew?
For the best (and usually cheapest) stew meat, skip the package of cut up “stew meat” in the meat department (you never know what odds and ends you are getting in those) and buy a cheap 2-pound chuck roast.
Trim the roast of silverskin (the thin silvery-blue membrane that sticks tightly to the meat) and any large pieces of fat, and then cut it into 1 to 2-inch cubes. It takes a bit of extra time, but you will end up with tender chunks of meat that practically melt in your mouth after cooking, so I think it’s so worth it.
If you’re in a hurry, you can also use boneless beef short ribs (NOT bone-in short ribs) in your stew. Boneless short ribs are just chuck that has already been trimmed and processed . They’re usually pricier than a chuck roast but much less work.

How to Make the Best Beef Stew
- Toss beef chunks with flour and brown them in olive oil in a large pot. Browning the meat helps deepen and enhance the beefy flavor of the stew.
- Add filtered water and use a wooden spoon to scrape all the cooked-on bits from the bottom of the pot. Bring to a simmer and cook, adjusting the temperature as necessary, for 80 minutes.
- Add onions, carrots, celery, and salt and simmer for 20 minutes.
- Add potatoes and remaining spices and cook until potatoes are fork-tender, about 15 to 20 minutes.
- Taste and add more salt/pepper if necessary. Allow stew to cool for at least 15 minutes.
- Serve and enjoy!
How do you make beef stew tender?
To make tender beef stew, use the correct cut of meat (beef chuck) and let it cook low and slow. Stew meat needs a couple of hours at a low simmer for the connective tissue in the muscle to break down, but once you hit that sweet spot, the meat becomes fall-apart, meltingly tender.
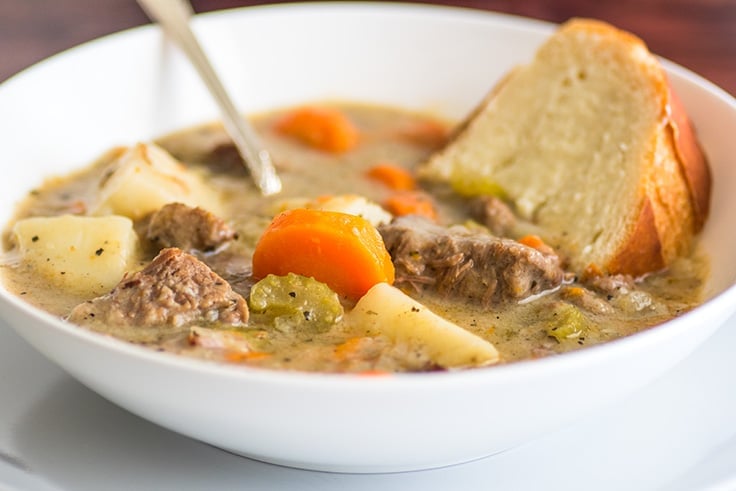

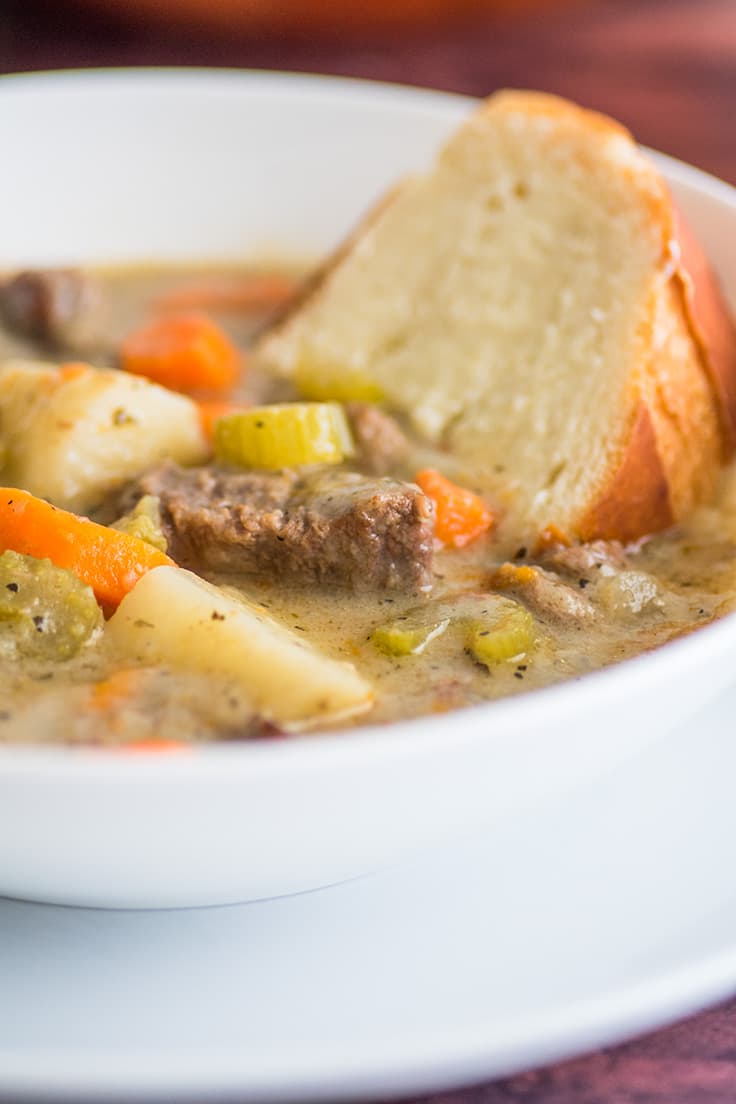
What to serve with homemade beef stew?
If you want to cook more veggies to go with the stew, you can’t go wrong with roasted broccoli or roasted green beans . But since you have vegetables in the stew already, I usually serve this as an all-in-one meal with just a couple slices of crusty bread or cheddar scones and good-quality butter.
Can I use water instead of beef broth for beef stew?
In this stew, yes. This recipe is designed to use water since the long slow cooking time with flavor-rich beef chuck makes it beefy and delicious without using beef broth or stock.
How do you spice up a bland stew?
Salt!!! Alongside the basil, oregano, and bay leaves this recipe calls for, using the right amount of salt makes a huge flavor difference for beef stew.
Once you add your vegetables, check your salt level at every step. You will be surprised at how much you need, especially once you add the potatoes.
More Soup & Stew Recipes
- Creamy Chicken Noodle Soup
- Ham and Potato Soup
- Chicken Carcass Soup
- Chicken Parm Soup
- Broccoli Chowder
- Tomato Tortellini Soup

Simple Beef Stew Recipe Notes
LET YOUR STEW COOL BEFORE EATING! This sounds silly to write, but I have this fight with friends and family every time I make stew for them. I know it smells heavenly and you want to try it NOW, but when your stew is done cooking, turn it off, remove it from heat and walk away for at least 15 minutes.
You cannot appreciate the flavors of the stew when it is also scalding the taste buds off your tongue. 😉
Ingredients
Brown
- ▢ 1/3 cup ( 40g ) all-purpose flour
- ▢ 2 teaspoons salt divided
- ▢ 1 teaspoon pepper divided
- ▢ 2 pound beef chuck roast trimmed and cut into 1 to 2-inch cubes
- ▢ 2 tablespoons olive oil
Simmer
- ▢ 10 cups filtered water divided
- ▢ 1/2 large onion diced
- ▢ 3-4 medium carrots peeled and sliced 1-inch thick*
- ▢ 3-4 celery stalks sliced 1/2-inch thick
- ▢ 2 pounds red potatoes cubed
- ▢ 1/2 teaspoon dried basil
- ▢ 1/2 teaspoon dried oregano
- ▢ 1 bay leaf
Instructions
Brown the Meat
- In a large bowl, mix flour, 1 teaspoon of the salt and 1/2 teaspoon of the pepper together. Dredge stew meat in the flour, coating completely. Set meat and flour aside.
- Heat oil over medium-high heat in a large pot or dutch oven. Add the meat (reserve the remaining flour in the bowl) and cook until just browned. If necessary, you can add a little more oil to the pot or a bit of water to keep the meat from burning.
- While meat is browning, whisk 1 cup of filtered water into whatever flour was left in the bowl until no lumps remain. Once the meat is browned, pour in flour and water mixture and an additional 7 cups of water.
- Bring to a boil and reduce temperature so your meat is cooking at a simmer.
Cook for a Really Long Time
- Set your timer for 80 minutes and walk away. Check on the stew every 20 minutes or so, giving it a stir to make sure nothing is sticking to the bottom.
Veggie Time
- Add your onion, celery, and carrots. Stir, bring back to a simmer, and cook for 20 minutes.
- Add potatoes, basil, oregano, whole bay leaf, and remaining 1 teaspoon salt and 1/2 teaspoon pepper. Check salt and water level. If stew seems too thick, add up to 2 cups of water until it reaches your prefered consistency.
- Simmer for about 15 minutes, until potatoes are fork tender. Taste and add more salt if necessary (you might need to add quite a lot). Remove bay leaf. Dish up and allow to cool in bowls for at least 5 minutes (or on the stove for at least 15) before serving.
- Enjoy!
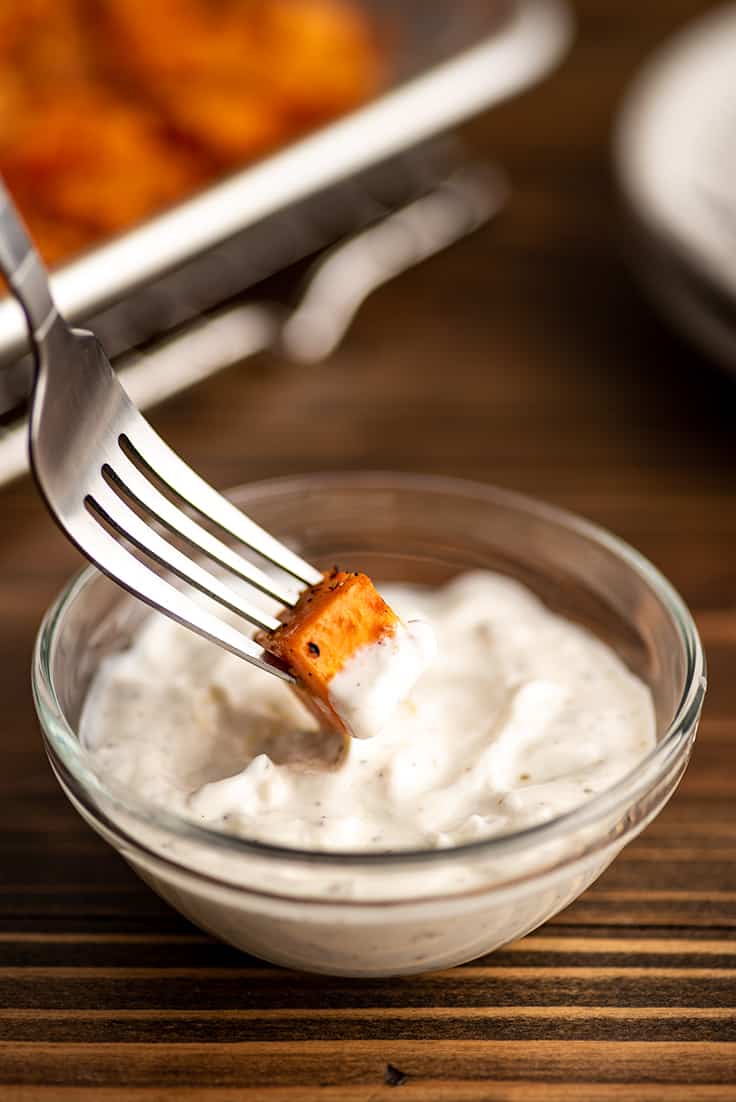
Greek yogurt aioli is a light and simple 3-ingredient dipping sauce you can make in just 5 minutes. It’s tangy, garlic-y, and perfect for serving with vegetables, fries, and chicken strips.
I shared my quick mayonnaise-based garlic aioli here a couple of years ago, and today, I have another aioli recipe for you that I use just as often, yogurt aioli.
Yogurt aioli is a fantastic lighter alternative to classic aioli that packs a huge flavor punch with very little work.

Ingredient Notes
- Fresh garlic: Make sure not to use sprouted garlic in your aioli. While you can usually get away with using sprouted garlic to some degree in cooking, when using it raw, it can give your aioli a slightly “off” flavor even if you cut away the sprouted portion.
- Full-fat Greek yogurt: Full-fat Greek yogurt is my go-to for aioli (I typically use Fage 5% these days), but any plain unsweetened yogurt can be used.
- Lemon juice: I like to use fresh lemon juice if I have lemons on hand, but bottled works just fine.


How to Make Yogurt Aioli
- In a small bowl, combine all ingredients and stir until well mixed.
- Taste and add more salt or pepper as needed.
- That’s it! Aioli’s made. Time to eat!


Variations
Chipotle aioli : Make chipotle yogurt aioli by stirring 1/8 teaspoon chipotle powder OR 1/2 to 1 teaspoon of adobo sauce from a can of chipotle peppers for a smokey, spicy flavor. Salad dressing: This aioli makes a fantastic creamy but still light dressing. Add milk by the 1/2 teaspoon until the aioli reaches your desired consistency. Richer aioli: If you find the aioli isn’t giving you the dipping experience you’re looking for, stir in a spoonful of mayonnaise. The mayonnaise adds a bit of extra fat that is extremely delicious.
Serve Aioli With
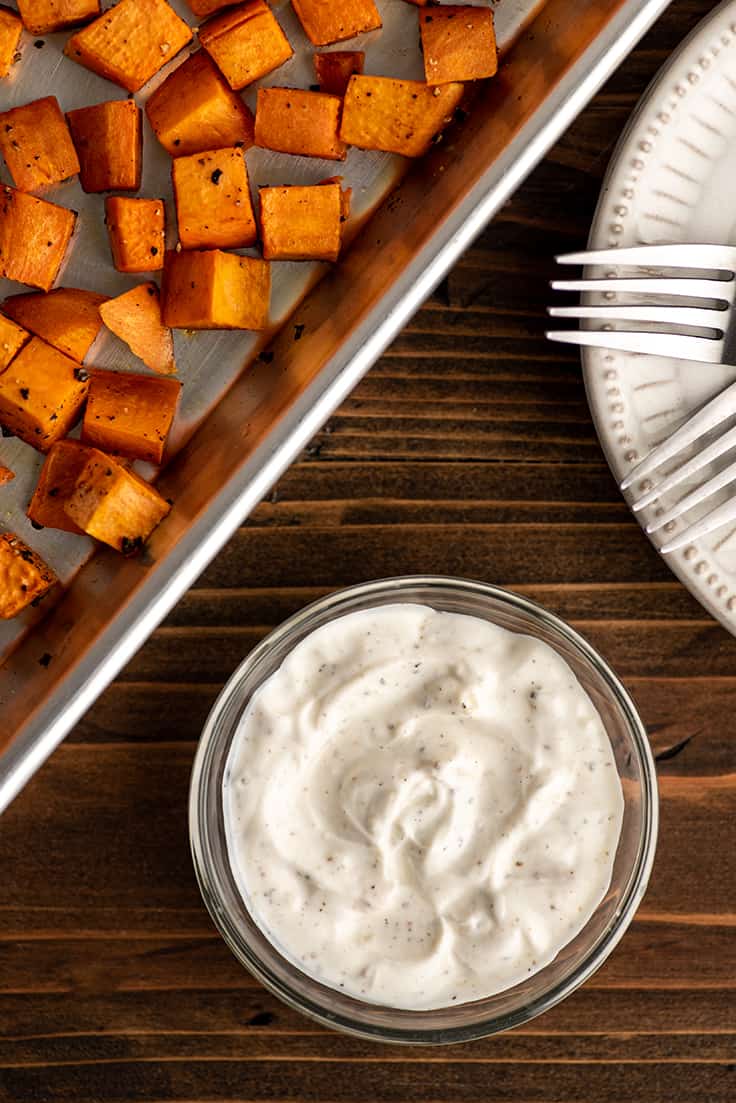
- Roasted Sweet Potatoes
- Smashed Red Potatoes
- Roasted Red Potatoes
- Roasted Broccoli
I don’t have a garlic press. What can I use instead?
Consider buying one! They’re one of the few single-use kitchen tools that I actually recommend. But if you want to make this aioli today, you can crush garlic without a garlic press.
If you own a microplane , use it to grate the garlic into a paste.
If you don’t own a microplane, finely dice the clove of garlic. Sprinkle with a little salt (the salt is abrasive and will help break down the pieces). Use the flat of your knife blade to smash/scrape the garlic into a paste.
Scrape that paste into the bowl with the rest of your aioli ingredients, and make the rest of the recipe as written, using slightly less salt since you’ve already salted the garlic. If you want to see this process, here’s a good video of this being done .

Do I have to use full-fat/Greek yogurt?
Nope. You can use any plain yogurt you like. I recommend full-fat Greek yogurt because it produces a richer, thicker aioli than non-fat regular yogurt, but use whatever unsweetened yogurt you have on hand/prefer.
Can I use this on sandwiches?
It’s up to you! I love yogurt aioli, but I don’t love it on sandwiches. My little sister on the other hand uses it on her sandwiches all the time. Try it out, and see what you think.
Can I double this recipe?
Yes. This recipe scales up with zero recipe changes needed. To double the recipe ingredients, in the recipe card below, hover over the serving size or click if you’re on mobile, and slide the slider. No other cooking changes are needed.
Can I make this ahead of time?
You can make this aioli up to 48 hours in advance. Store it in an airtight container in the refrigerator. However, because of the raw garlic, aioli not used within 2 days of being made should be discarded.
You Might Also Enjoy
- Chicken Shawarma with Yogurt Sauce
- Chipotle Chicken Tacos with Yogurt Sauce
- Loaded Baked Potato Salad With Yogurt

Ingredients
Special Equipment
- ▢ Garlic press
Small-batch Aioli
- ▢ ¼ cup ( 57g ) unsweetened whole milk Greek yogurt *
- ▢ 1 garlic clove crushed
- ▢ 1 teaspoon lemon juice
- ▢ ⅛ teaspoon salt
- ▢ ⅛ teaspoon pepper
Instructions
- In a small bowl, combine all ingredients and stir until well-combined.
- Taste and add more salt and pepper if needed.
- Serve and enjoy!
Notes
This Easy Pork Ragu is incredibly meaty red sauce that’s tangy, a little garlicky, and just a tiny bit sweet. Spoon it over a big pile of noodles, and it’s the perfect comfort food.
Hey friends, we’re halfway into November, and if I had my way, it would be all comfort food all the time for dinner around here. I have a ton of comfort food recipes on the site, Ham and Potato Soup , Beef Stroganoff , Classic Roasted Chicken , and today I’m sharing one of my newest comfort food favorites, Pork Ragu.
This is one of those dishes that is perfect for lazy, overcast Sundays. It’s easy to make, but has just enough steps and requires a long enough braising time, that you feel like you accomplished something great when it’s done (even though you mostly just left it alone in the oven). 😉

Ingredient Notes
- Pork shoulder: Not only is pork shoulder a fantastic cut of meat for braising, but it’s also quite inexpensive. Keep an eye on deals at your local store, and you can often find it for 1.99/pound.
- Carrots, celery, onion: Finely diced carrots, celery, and onions help make the flavor base for the sauce.
- Dry red wine: I like to use Cabernet Sauvignon here, but Merlot and Pinot Noir are also good options.
- Crushed tomatoes: If you only have diced or whole tomatoes, you can use them. Just pulse them in their juices with an immersion blender, food processor, or countertop blender a few times until they resemble chunky salsa.
A Note on Pork Shoulder for Ragu
This recipe calls for a pork shoulder roast, sometimes called Boston butt or pork butt roast. It’s the cut of meat you use for carnitas and country-style pork ribs and is a perfect cut for braising because it becomes fall-apart tender when given a long, slow cooking time.
Best of all, pork shoulder is usually pretty cheap, so if you’re looking for a dinner-to-impress that won’t break the bank, this is a great option.
Boneless vs bone-in shoulder roast: I called for a boneless roast here, because bone-in pork shoulder has a y-shaped bone that is annoying to remove, but if bone-in is all you can find, it will work just fine. Use a sharp knife to slice around the bone to remove it, and don’t stress too much if you leave a bit of meat on the bone when cutting it out.
How to Make Pork Ragu
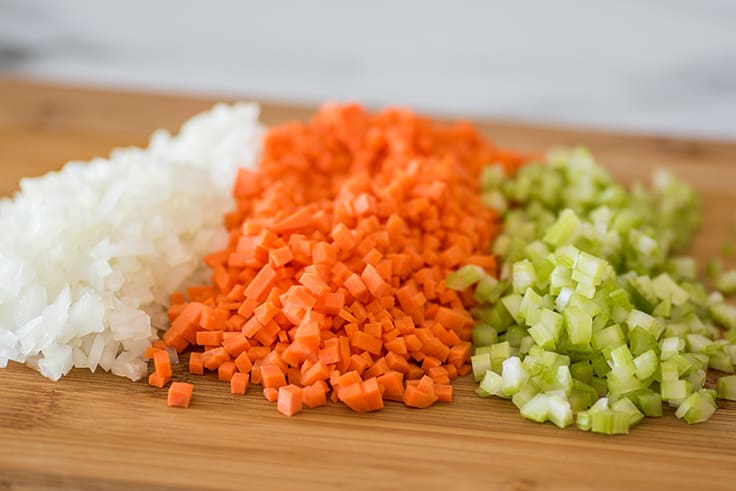

- This recipe starts with a soffritto, a combination of celery, carrot, and onion, finely diced. After the long, slow cooking time, the vegetables practically melt into the sauce, so you won’t really see them in the finished dish, but they add a ton of base flavor to the ragu.
Make sure to cut your veggies and measure out the rest of your ingredients before you begin cooking because there won’t be a ton of time to do it once you start.


- Once your ingredients are prepped, you’ll trim your roast of any huge pieces of fat and cut it into (about) four evenly sized pieces. Don’t worry if there is still some fat in your pieces. You can pick it out while shredding the meat at the end.
Generously salt and pepper all sides of your pork chunks, and then brown them in a Dutch oven or large oven-safe pot. Browning your meat will help to enhance and deepen the flavor of your sauce, so don’t skip this step.
Once the meat is browned, use tongs to transfer it to a plate. If the pork rendered a lot of fat into the pan, spoon off all but about 2 tablespoons.
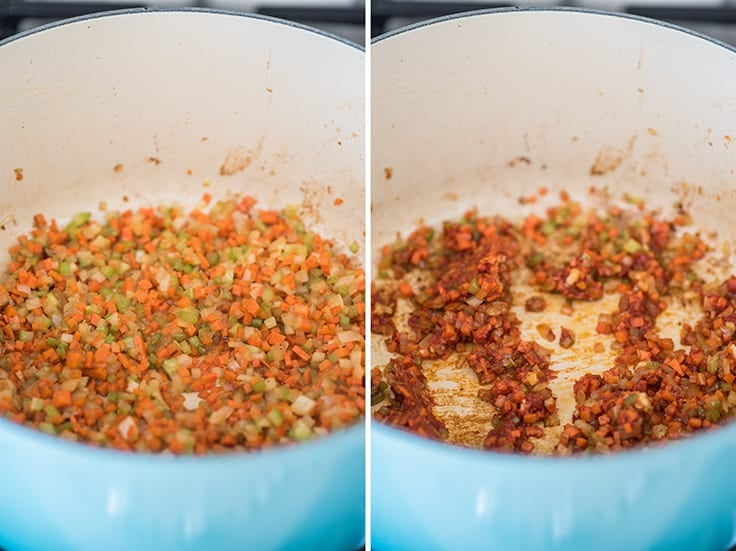

- Turn heat down to medium-low, and add your veggies. These get cooked down until they begin to soften, and then add the garlic, followed by your tomato paste.
Like the meat, you want to give the tomato paste a chance to really cook so you fully develop that flavor.
Let it cook until it begins to caramelize on the bottom of the pot (it will begin to stick and look like it wants to burn). Once it reaches that point, add the red wine and scrape the bottom of the pan to remove anything that’s stuck.
Kitchen Tip: Freeze leftover tomato paste in 1-tablespoon servings and store in an airtight container or bag in the freezer for later.
You’ll bring the wine to a simmer and cook until it reduces by half. If you feel like you’re bad at eyeballing this, dip the top of a wooden spoon into the sauce to see where you started, and then check against that line occasionally.
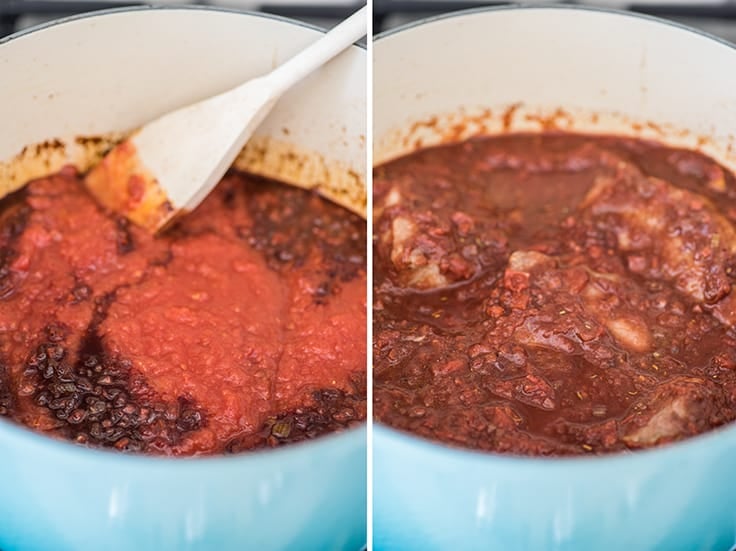

- Add in your crushed tomatoes and spices and then the pork and any juices that have accumulated on the plate. Nestle the pieces so that they are submerged, and bring the mixture back to a simmer, cover and transfer it to your oven.
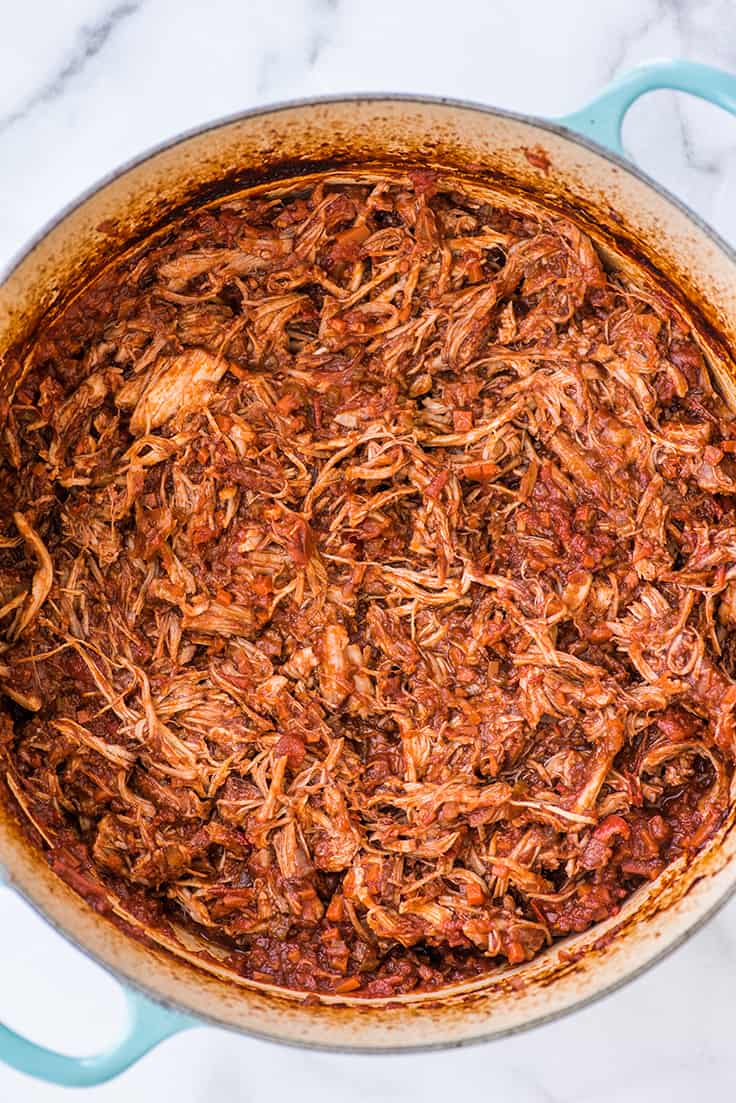
Cook for about 2 1/2 to 3 hours, until the pork is fall-apart tender. Once the pork is done, transfer the meat to a cutting board and shred it, picking out any pieces of fat or silver skin as you go.
Add half of the shredded meat back to the pot and stir. Continue to add meat to the pot until it reaches your preferred meat to sauce ratio. Any leftover shredded pork can be frozen and used for pulled-pork sandwiches or on pizza.
And your sauce is done! Time to spoon over pasta and enjoy.

What pasta to use for pork ragu?
Wide pasta ribbons that are really going to pick up the sauce are best, but other pasta variations including rigatoni and even egg noodles will work just fine.
Pappardelle is my favorite pasta to use here, but I rarely see it in stores, so you might need to plan ahead and order it . Tagliatelle is what I used for these photos (because I didn’t plan ahead 😉 ).
Can I use pork loin roast instead of pork shoulder?
Unfortunately no. Pork loin is a much leaner roast which won’t cook as well using this low and slow method.
What to serve with pork ragu?
This is a dish that is pretty rich, so it’s best served with simple sides. Some garlic bread and a simple salad or butter and garlic green beans are my go-to.
Can I make this in advance?
Yes! This sauce can be made up to 2 days in advance. When ready to serve, simply reheat the sauce, make the pasta, and you’re good to go.


Can I freeze pork ragu?
Absolutely. Braised pork ragu is fabulous for freezing. It tastes just as good after being frozen as it does fresh, and it’s always comforting knowing you have some good meals stashed in the freezer for busy weeknights.
Freeze portions in airtight containers or freezer bags, and they’ll last up to 3 months in the freezer. Defrost the sauce overnight in the fridge and then heat in the microwave or on the stove. Cook 2 to 3 ounces of pasta per serving, top with warmed ragu, and enjoy.
More Low and Slow Dishes
- Hungarian Goulash
- Easy Braised Short Ribs
- Slow Cooker Tri-tip Sandwiches
- Beef Barbacoa
- Slow Cooker Beef Ribs
Recipe Notes
If you purchase a roast larger than 2-3 pounds, you can cook the entire thing in the sauce and then use the extra cooked pork in other things like sandwiches, nachos , or burritos .

Equipment
- Dutch oven or large oven-safe pot
Ingredients
Special Equipment
- ▢ Dutch oven or large oven-safe pot with a lid *
Pork Ragu
- ▢ 2 to 3 pound boneless pork shoulder roast
- ▢ Salt and pepper
- ▢ 2 tablespoons vegetable oil
- ▢ 1 large carrot peeled and finely diced
- ▢ 1 celery rib finely diced
- ▢ 1/2 small onion finely diced
- ▢ 4 cloves garlic pressed or diced
- ▢ 2 tablespoons ( 33g ) tomato paste
- ▢ 1 cup dry red wine *
- ▢ 1 28-ounce can crushed tomatoes
- ▢ 1 teaspoon dried oregano
- ▢ 1/2 teaspoon crushed rosemary
- ▢ 1/4 teaspoon ground thyme
- ▢ 2 bay leaves
- ▢ 8 to 10 ounces pappardelle, tagliatelle, or other wide pasta
- ▢ Parmesan for topping
Instructions
- Adjust your oven racks so that your Dutch oven will fit inside. Preheat oven to 325°F.
- Trim any large pieces of fat from roast and cut it into 4 evenly sized pieces. Generously salt and pepper all sides.
- In a Dutch oven or large oven-safe pot with a lid, heat oil over medium-high heat. Brown pork on all sides and transfer to a plate.
- If pork has rendered a lot of fat in the pot, spoon off all but 2 tablespoons and turn heat to medium-low. Add carrot, celery, and onion, and cook for 5 minutes.
- Add garlic and cook until garlic begins to turn golden, 30 seconds to 1 minute.
- Turn heat up to medium and add tomato paste. Cook until sugars in the paste begin to caramelize on the bottom of the pot, about 3 minutes.
- Add red wine, and use a wooden spoon to scrape the bottom of the pot, removing anything stuck. Bring to a simmer, and cook until reduced by half, 3 to 5 minutes.
- Stir in tomatoes, oregano, rosemary, thyme, and bay leaves. Return pork and any juices on the plate to the sauce and submerge. Bring to a simmer, cover and cook in the oven for 2 1/2 to 3 hours, until meat is pull-apart tender.
- Put a pot of generously salted water on the stove to boil for pasta. Cook pasta according to package instructions.
- While your pasta cooks, transfer meat to a plate or cutting board, and use two forks to shred, removing any fat or silver skin as you go.
- Add half of the meat back to the sauce, and stir. Continue to add meat into the sauce until it reaches your desired sauce to meat ratio. If there is any shredded pork remaining, save it and use it for pulled pork sandwiches or topping pizza.
- Taste sauce, and add salt if necessary.
- Serve sauce over pasta, top with freshly grated parmesan, and enjoy!
Notes
Recipe Adapted from Andy Ward & Jenny Rosenstrach’s Pork Shoulder Ragu on Food52

Simple Beef Stew
Ingredients
Brown
- 1/3 cup ( 40g ) all-purpose flour
- 2 teaspoons salt divided
- 1 teaspoon pepper divided
- 2 pound beef chuck roast trimmed and cut into 1 to 2-inch cubes
- 2 tablespoons olive oil
Simmer
- 10 cups filtered water divided
- 1/2 large onion diced
- 3-4 medium carrots peeled and sliced 1-inch thick*
- 3-4 celery stalks sliced 1/2-inch thick
- 2 pounds red potatoes cubed
- 1/2 teaspoon dried basil
- 1/2 teaspoon dried oregano
- 1 bay leaf
Instructions
Brown the Meat
- In a large bowl, mix flour, 1 teaspoon of the salt and 1/2 teaspoon of the pepper together. Dredge stew meat in the flour, coating completely. Set meat and flour aside.
- Heat oil over medium-high heat in a large pot or dutch oven. Add the meat (reserve the remaining flour in the bowl) and cook until just browned. If necessary, you can add a little more oil to the pot or a bit of water to keep the meat from burning.
- While meat is browning, whisk 1 cup of filtered water into whatever flour was left in the bowl until no lumps remain. Once the meat is browned, pour in flour and water mixture and an additional 7 cups of water.
- Bring to a boil and reduce temperature so your meat is cooking at a simmer.
Cook for a Really Long Time
- Set your timer for 80 minutes and walk away. Check on the stew every 20 minutes or so, giving it a stir to make sure nothing is sticking to the bottom.
Veggie Time
- Add your onion, celery, and carrots. Stir, bring back to a simmer, and cook for 20 minutes.
- Add potatoes, basil, oregano, whole bay leaf, and remaining 1 teaspoon salt and 1/2 teaspoon pepper. Check salt and water level. If stew seems too thick, add up to 2 cups of water until it reaches your prefered consistency.
- Simmer for about 15 minutes, until potatoes are fork tender. Taste and add more salt if necessary (you might need to add quite a lot). Remove bay leaf. Dish up and allow to cool in bowls for at least 5 minutes (or on the stove for at least 15) before serving.
- Enjoy!
