This roasted bacon and butternut squash side dish is the perfect easy, no-fail fall side.
A couple years ago, I shared this bacon and butternut squash mac and cheese . One of the steps calls for roasting the butternut squash in bacon grease and during testing I kept running into a problem with the recipe…
Every time I made it, the squash would come out of the oven roasted and beautiful, and I would want to eat it all instead of pureeing it for cheese sauce.
I may have had to make a couple of the test batches more than once because the squash just disappeared.

So this year I’m skipping the mac and cheese and just making bacon and butternut squash the star of the show because it totally deserves it.
This is one of my favorite fall side dishes. It’s so simple, so good, and so easy.
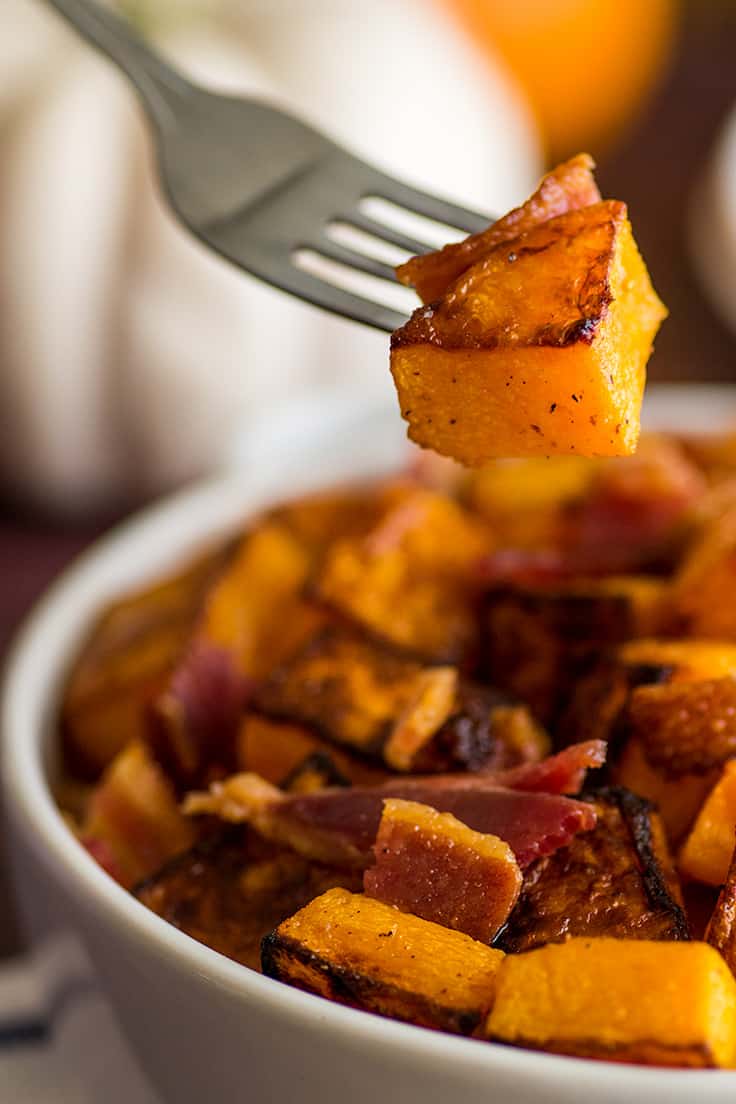
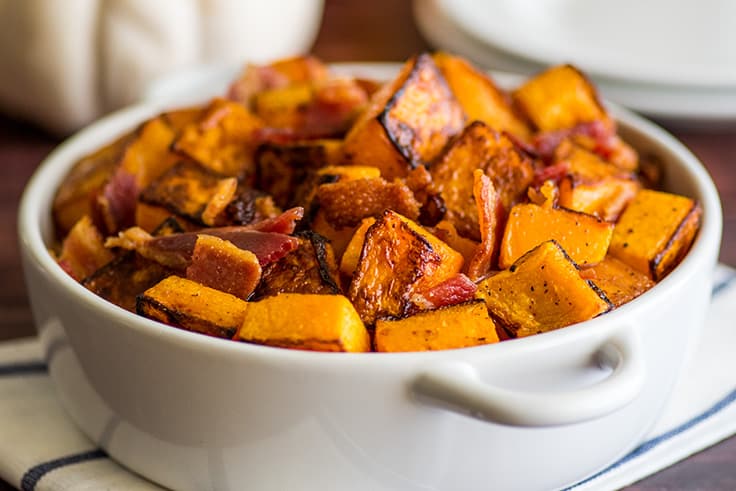
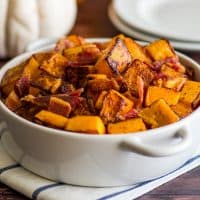
The butternut squash is rich and a little sweet and the bacon gives the whole thing an irresistible salty, smoky flavor.
You might be tempted to skip the main dish and just eat this for dinner, and I can guarantee that you’ll be sneaking pieces of it off the pan as soon as it comes out of the oven.
Ingredient Notes
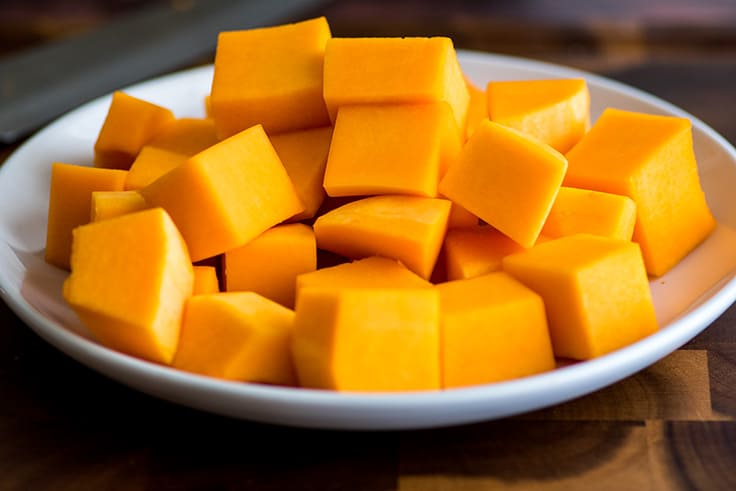
- Butternut squash: If you’ve never cut up a butternut squash before, don’t worry, it’s super easy. Go check out my post How to Cut Butternut Squash for a full tutorial.
- Bacon: Use your favorite bacon here. Regular, thick-cut, and even bacon ends will all be delicious.

How to Make Bacon Butternut Squash
Cook bacon: Cook bacon on a baking sheet in your oven until it reaches your preferred level of crispiness and then transfer it to a plate.
Toss butternut squash in bacon grease: Add your cubed squash to the pan and toss it with the grease until it is well coated with the drippings. Sprinkle lightly with salt and pepper.
Roast squash: Roast the squash until it is fork-tender and then crumble the bacon and add it back to the pan. Bake everything for another minute or so to give the bacon a chance to heat up, and then serve and enjoy!!

Can I make this ahead of time?
Roasted veggies are always best right after roasting, but you can make this up to 48 hours in advance. Store tightly covered in the refrigerator and reheat in the microwave.
More Easy Sides
- Butter and Garlic Green Beans
- Roasted Broccoli
- Roasted Zucchini
- Corn on the Cob in the Microwave
- Roasted Sweet Potatoes
- Microwave Sweet Potato

Ingredients
- ▢ 6 slices bacon
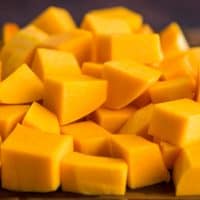
- ▢ 1 butternut squash peeled and cubed 1-inch
- ▢ Salt and pepper
Instructions
- Preheat your oven to 400°F. Line a rimmed baking sheet with foil (for easy cleanup).
- Bake bacon slices for 10 to 14 minutes, until they reach your preferred level of crispiness.
- Transfer bacon to a plate and add cubed squash to the baking sheet. Stir the cubes so they get coated in the bacon drippings and sprinkle with salt and pepper.
- Bake for 20 to 30 minutes, until squash is fork tender. Chop or crumble bacon and add it back to the hot pan. Bake for 1 additional minute to reheat and serve.
How to Cut Butternut Squash, a quick and simple tutorial.
Now that it’s fall, I can’t wait to bust out all my fall favorites, Ham and Potato Soup , Beef Stew , Baked Potatoes with Cheese Sauce –okay, admittedly I eat these all year long, but they all feel extra special this time of year.
But, one of my favorite comfort foods that I only get to enjoy this time of year is butternut squash. I love cooking with it because it’s fabulous on its own, tossed with a little oil and salt, but it also adds such a nice, slightly sweet richness to everything you put it in (like, for example, Butternut Squash Bacon Mac and Cheese ).
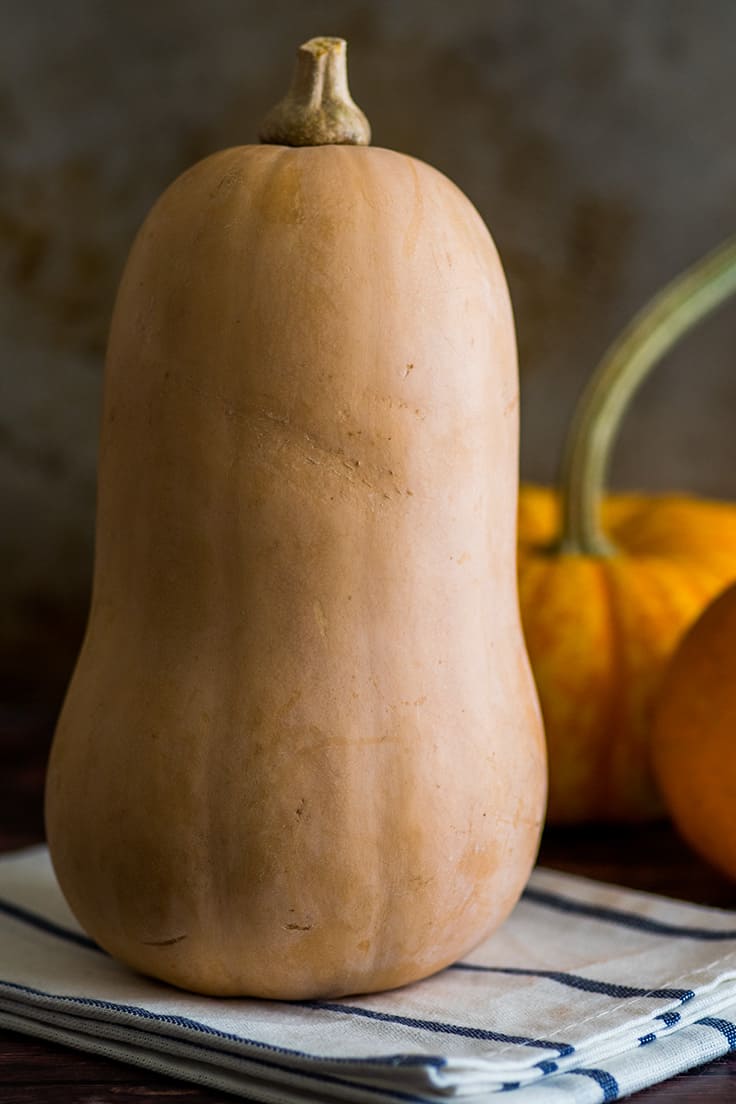

Before you can enjoy butternut squash though, you have to chop them up, and if you’ve never done that before, it can be a little intimidating. So today, I’m posting a quick little tutorial on how to cut butternut squash.
It’s super easy and fast, and once you learn, you can enjoy butternut squash all season long.


How to Cut Butternut Squash
- Use a sharp knife to cut ½-inch off both ends of the squash.
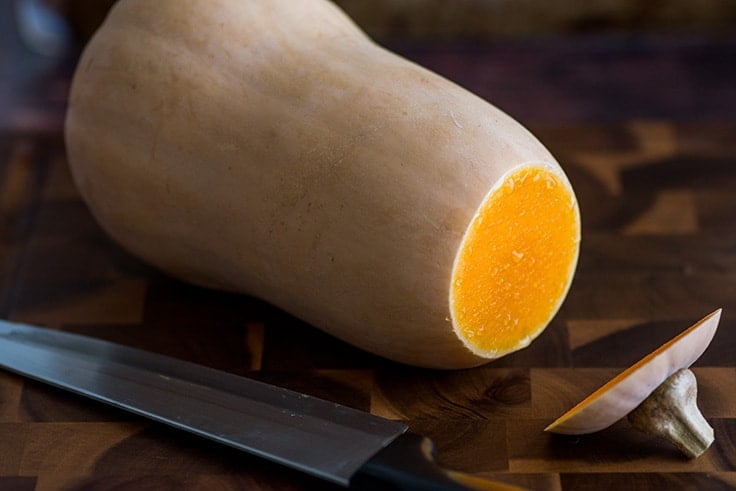

- Use a vegetable peeler to remove all of the skin.


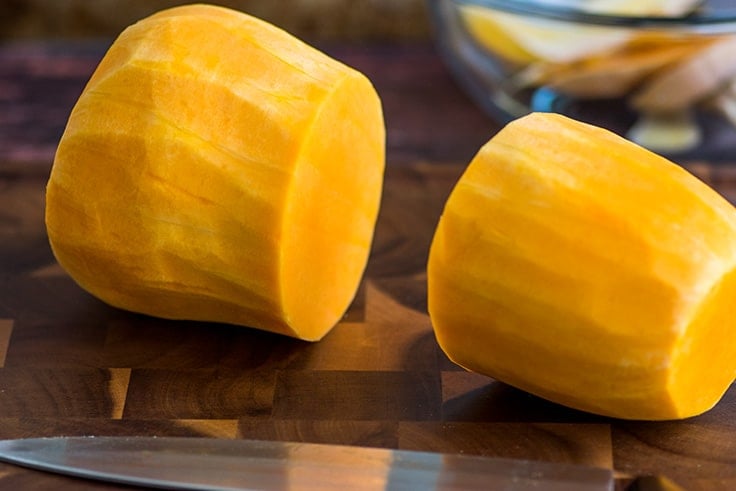
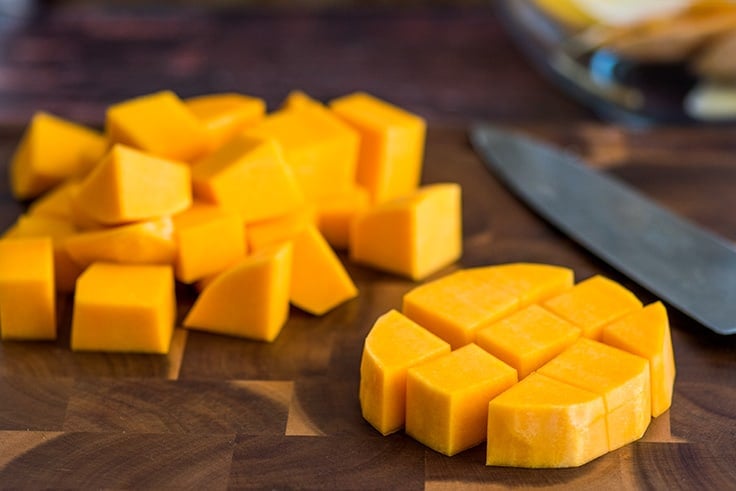
- Cut the squash in two at the neck where the squash begins to flair out. Set the body (the thicker part) aside.

- Slice the neck into rounds.
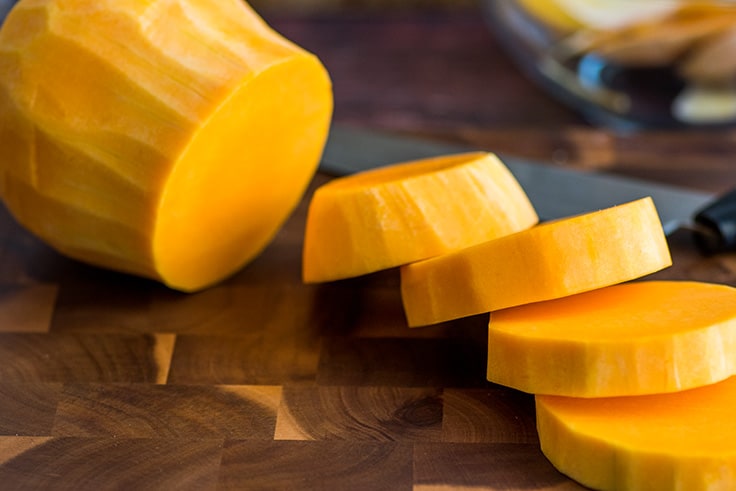

- Cube each of the rounds.

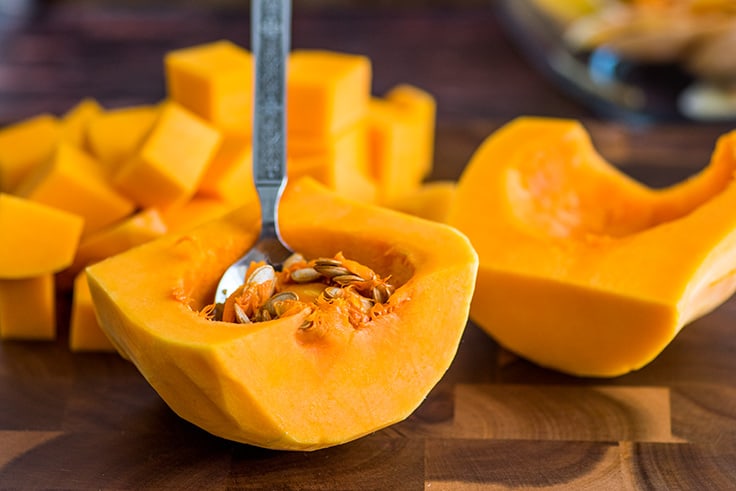
- Turn the body on its end and slice it in half vertically. Scoop out the seeds and innards with a spoon.

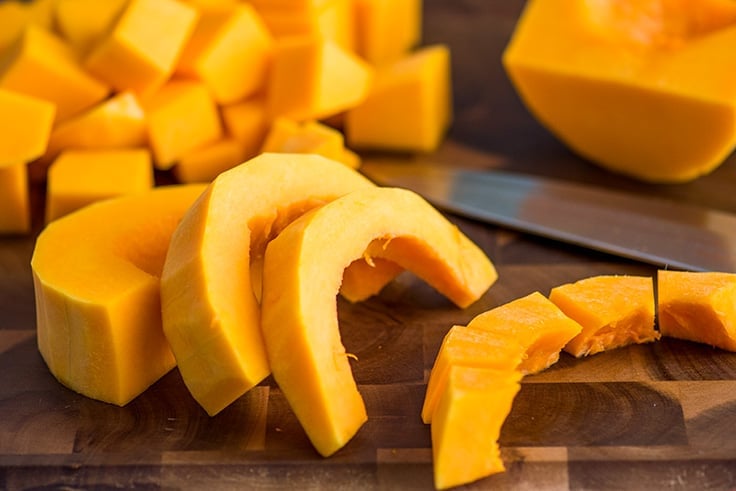
- Lay one-half of the squash on its flat cut side and cut into slices so you have half-moons.


- Cut those slices into cubes and repeat with the other half of your squash.

And done!


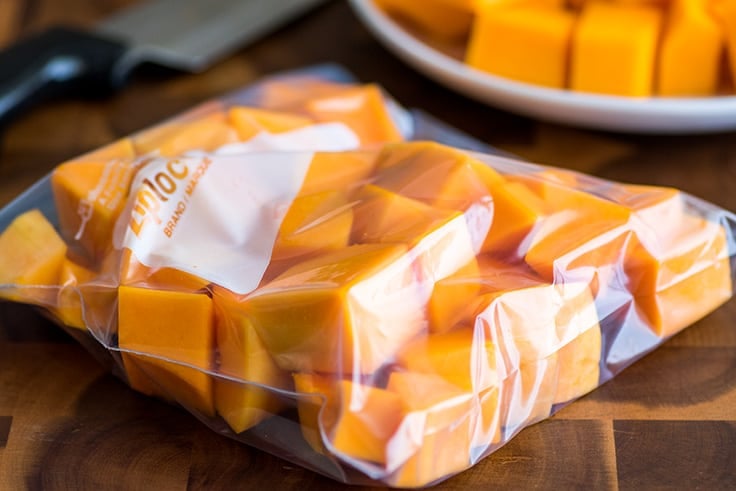
Cook as desired and store any leftovers in an airtight bag in the refrigerator for up to 4 days.

More Vegetable Tutorials
- How to Steam Broccoli in the Microwave
- How to Cook Broccoli in the Oven
- How to Cook Corn on the Cob in the Microwave
- How to Steam Green Beans in the Microwave
Ingredients
Special Equipment
- ▢ Vegetable peeler
Squash
- ▢ 1 butternut squash
Instructions
- Use a sharp knife to cut 1/2 inch off both ends of the squash and use a vegetable peeler to remove the skin.
- Cut the squash in two at the neck where the squash begins to flair out. Set the body aside.
- Slice the neck into rounds and then cube them.
- Turn the body on its end and slice in half vertically. Use a spoon to scrape out the seeds from both sides.
- Lay one-half of the squash on its flat cut side and cut into slices so you have half-moons. Cut those slices into cubes and repeat with the other half of your squash.
- Cook as desired and store any leftovers in an airtight bag in the refrigerator for up to 5 days.
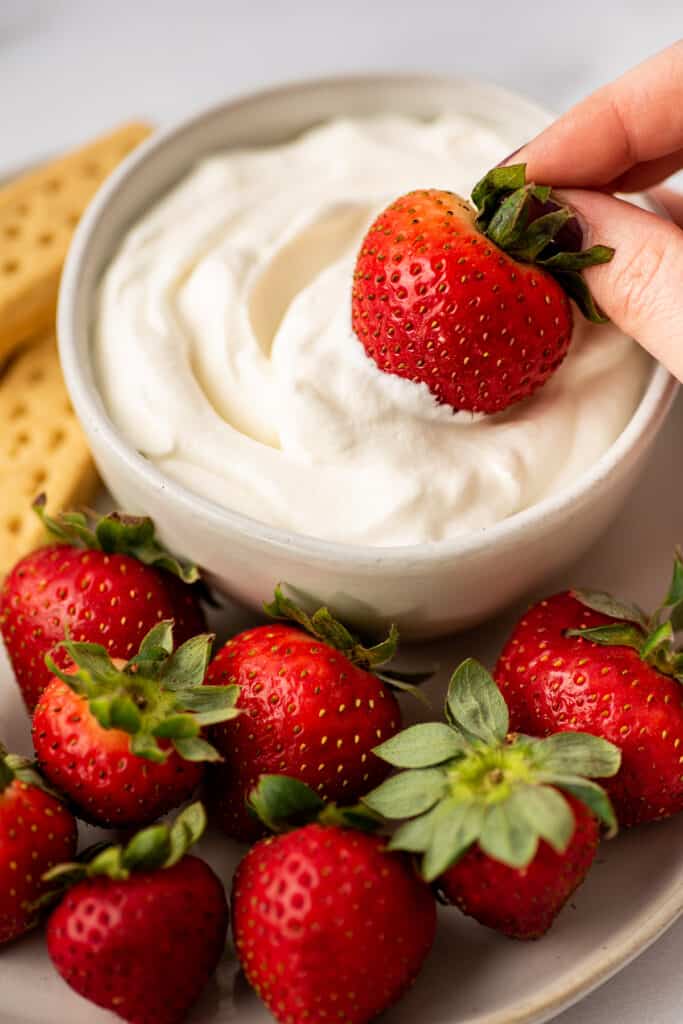
Three different ways to make delicious, easy homemade whipped cream.
Whipped cream is one of those things you don’t really need a recipe for. You get some cream, add some sugar, and agitate the mixture until it resembles something that usually comes out of a spray can.
But it’s nice to have a starting point, especially if you’re like me and can never remember the ideal ratios, so let’s have a little chat about homemade whipped cream.

Ingredient Notes
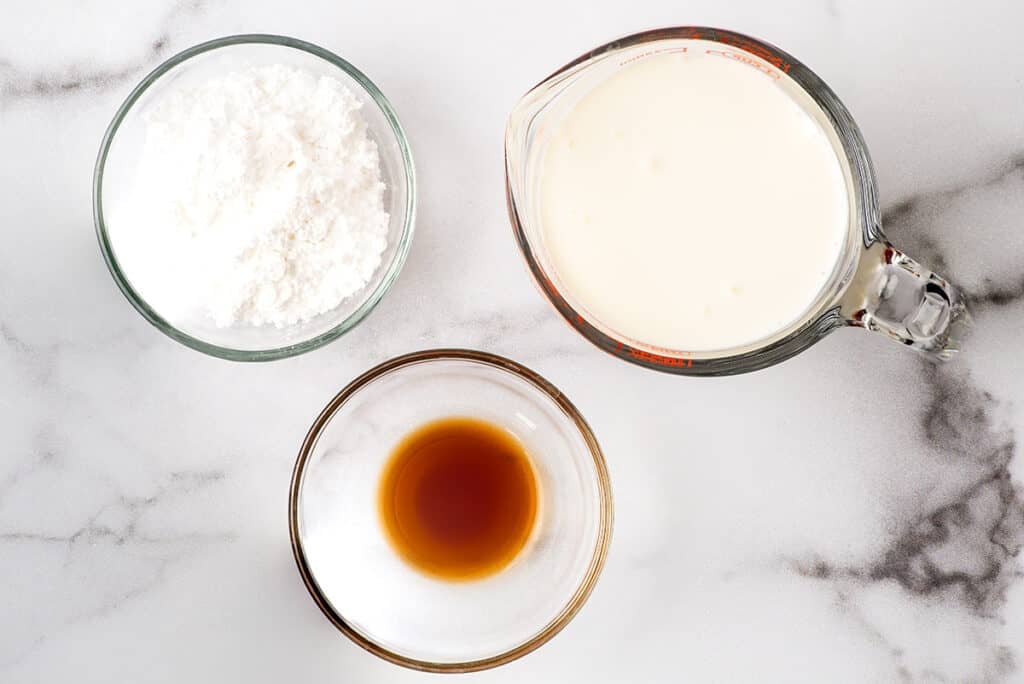

- Heavy cream/heavy whipping cream: You can use heavy cream (30–36% milk fat) and heavy (whipping) cream (36%+ milk fat) interchangeably when making whipped cream. Heavy whipping cream with its higher milk fat content will give you a slightly more stable whipped cream, but the difference is negligible. Have leftover whipping cream? Check out What to Do With Leftover Whipping Cream for ideas on using up the leftovers.
- Granulated or powdered sugar: I prefer to use powdered sugar in whipped cream because it contains cornstarch which also helps stabilize whipped cream (makes it less prone to slumping and weeping), but use whichever sugar you have on hand. Just keep in mind that by weight, 1 tablespoon of granulated sugar is almost twice as much as 1 tablespoon of powdered sugar, so whipped cream made with the same volume of granulated sugar will be much sweeter than whipped cream made with powdered sugar.
- Extracts and additional flavorings: Extra flavoring is optional, but a little vanilla is always a welcome addition. Other good options are citrus extracts, peppermint extracts, or even a bit of alcohol (more on that later).
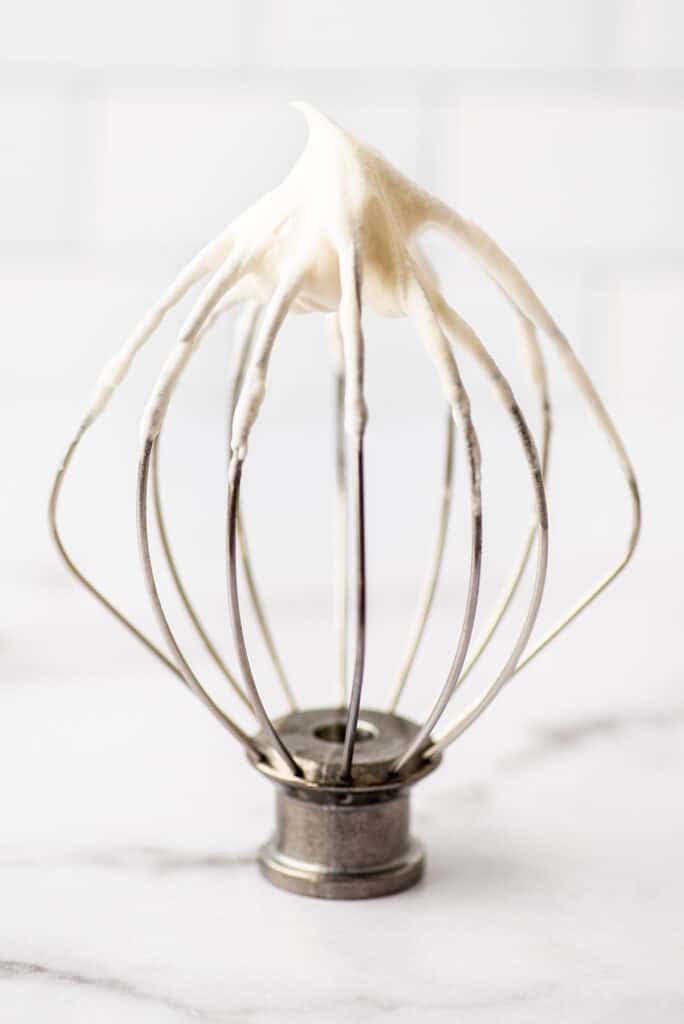
How to Make Whipped Cream (3 Ways)
There are three main ways to make whipped cream at home, using a stand mixer, a bowl and whisk (or handheld mixer ), or using a mason jar, and while your tools may vary, the method is pretty much the same for all of them.
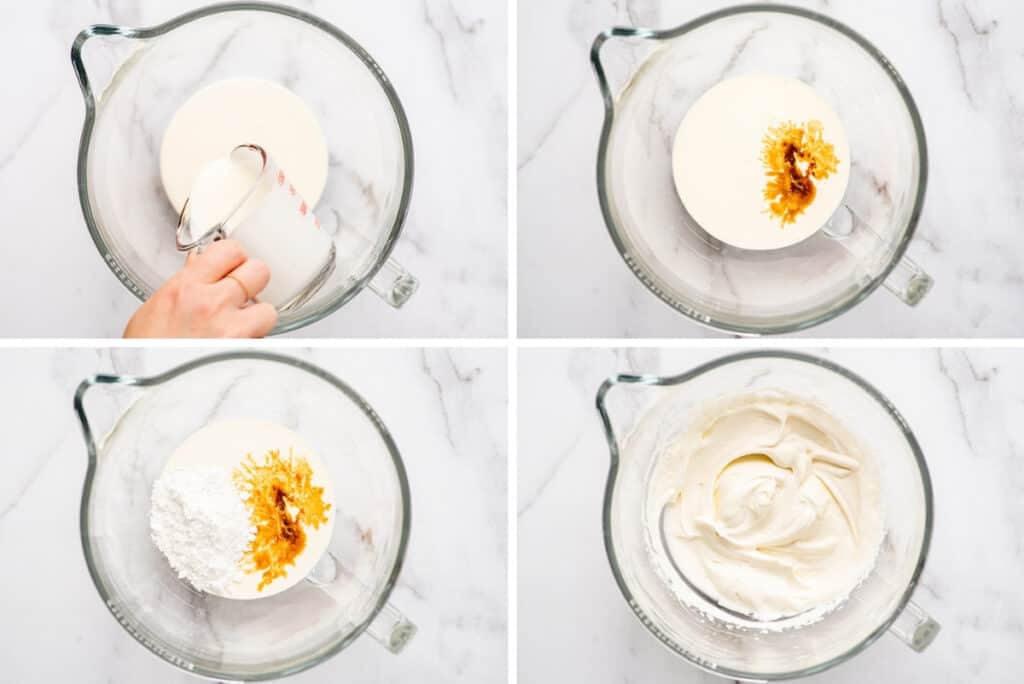

Combine all your ingredients in a bowl (or jar).
Vigorously mix ingredients until the whipped cream reaches your desired consistency. This could take as little as 2 minutes for a small amount of cream in your stand mixer or up to 15 minutes using the mason jar method.
Making Whipped Cream With a Stand Mixer
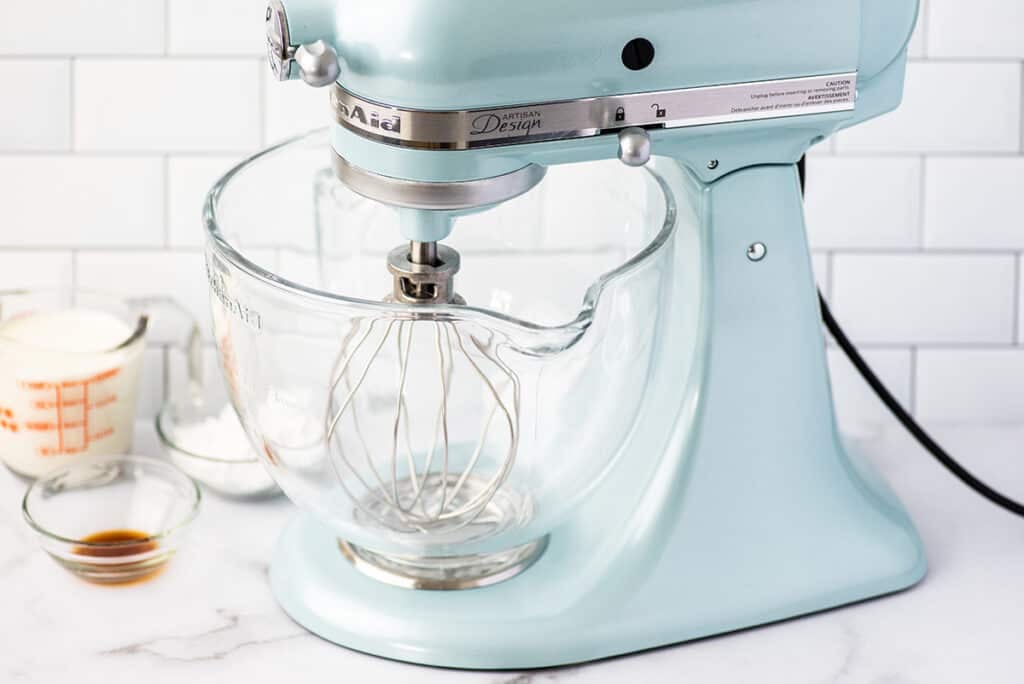

This is my favorite method, especially if I’m whipping a large amount of cream.
- Pros: This is the fastest way to make whipped cream, and the high sides of a stand mixer bowl mean that you won’t splatter cream around your kitchen while making it.
- Cons: Stand mixers are expensive and not everyone has (or needs!) one. It’s easy to whip your cream too much and accidentally start to make butter. Depending on your stand mixer, it may not be able to handle whipping small amounts of cream. My model’s limit is anything under about ½ cup of cream.
Making Whipped Cream With a Bowl and Whisk (or Handheld Mixer)
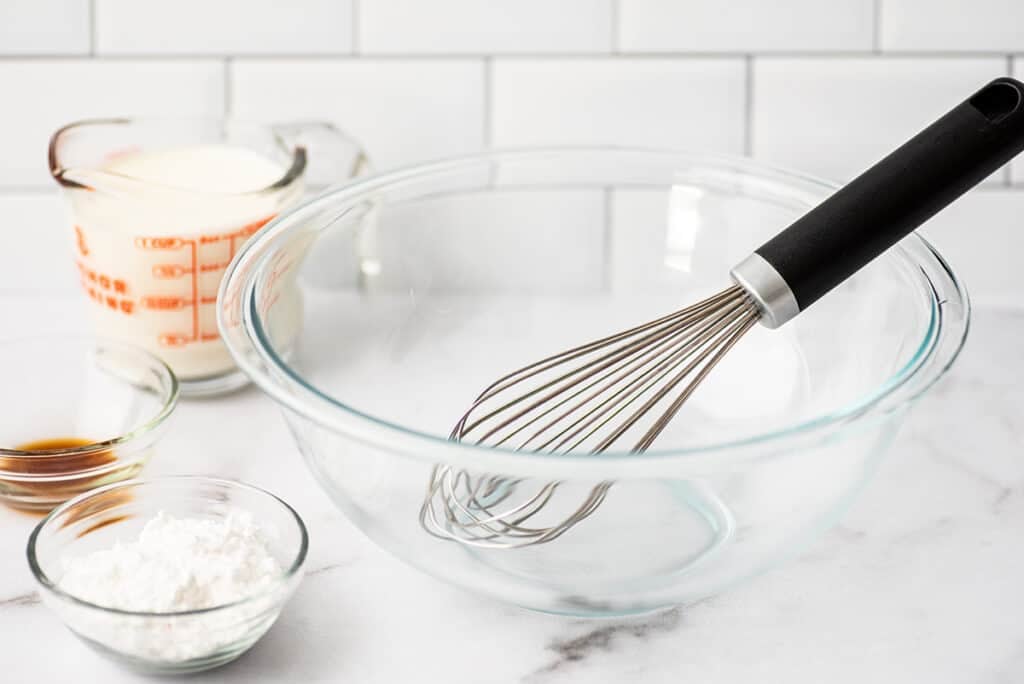

Because I make so many small-batch recipes, this is actually the method I use most often since it works well with almost any amount of cream.
- Pros: More convenient to pull out than a bulky stand mixer and much cheaper. Can whip even small amounts of cream and you have better control over the consistency of the final product since you can monitor it more closely.
- Cons: Takes longer, especially when using just a whisk. Your arm’s probably going to get tired. 😉
Making Whipped Cream With a Mason Jar
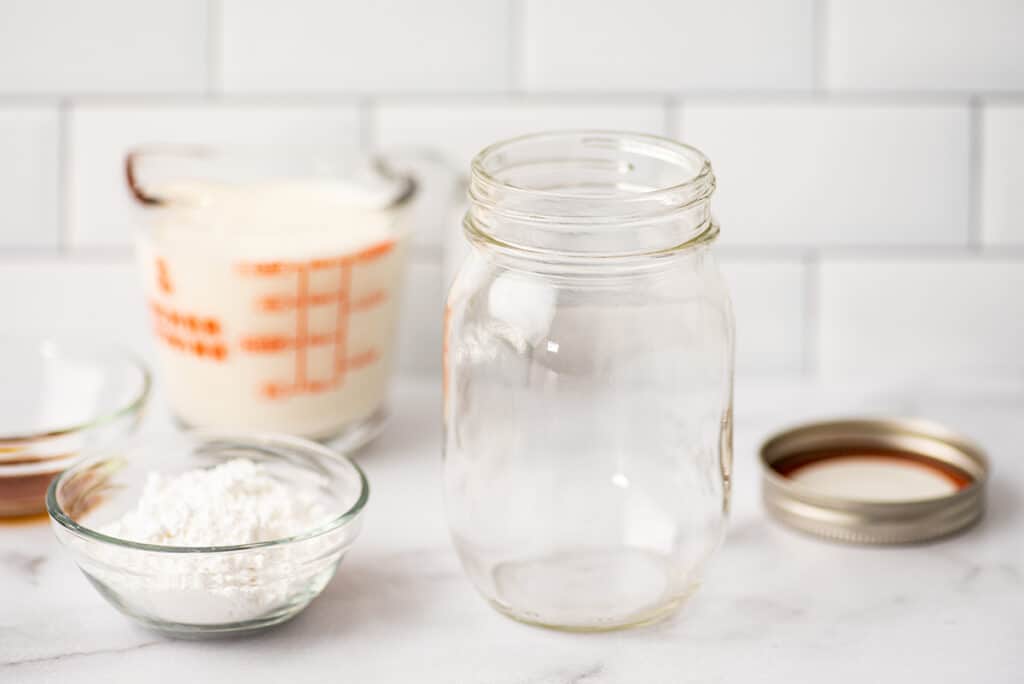

The mason jar method, where you put heavy cream in a jar, seal it, and then shake to whip it, technically works, but it’s definitely my least favorite of the bunch, and I only recommend it under pretty specific circumstances.
- Pros: Great for occupying tiny kitchen “helpers” or as a fun afternoon project. A solid backup in the unlikely event that you find yourself in a kitchen with no bowls and no whisks.
- Cons: A lot of work and not at all time-efficient. It’s difficult to get the cream past very soft peaks, so whipped cream made this way is best for spooning over drinks. You definitely will not be able to pipe it.
Variations
Customize your whipped cream with the following modifications (all mix-in measurements are for the full batch of whipped cream using 1 cup of heavy cream).
- Cream cheese whipped cream: Use 4 ounces of cream cheese. Beat the sugar and vanilla into softened cream cheese until well-mixed. In a separate bowl, whip heavy cream into stiff peaks and then fold the whipped cream into the cream cheese mixture until uniform in color.
- Chocolate whipped cream: Sift 3 tablespoons of cocoa powder in along with the sugar before whipping.
- Peanut butter whipped cream: Add ¼ cup of peanut butter before whipping.
- Coffee whipped cream: Add 2 teaspoons instant espresso powder along with the rest of the ingredients.
- Cinnamon Whipped Cream: Add ½ teaspoon ground cinnamon along with the rest of the ingredients.

How much whipped cream will this make?
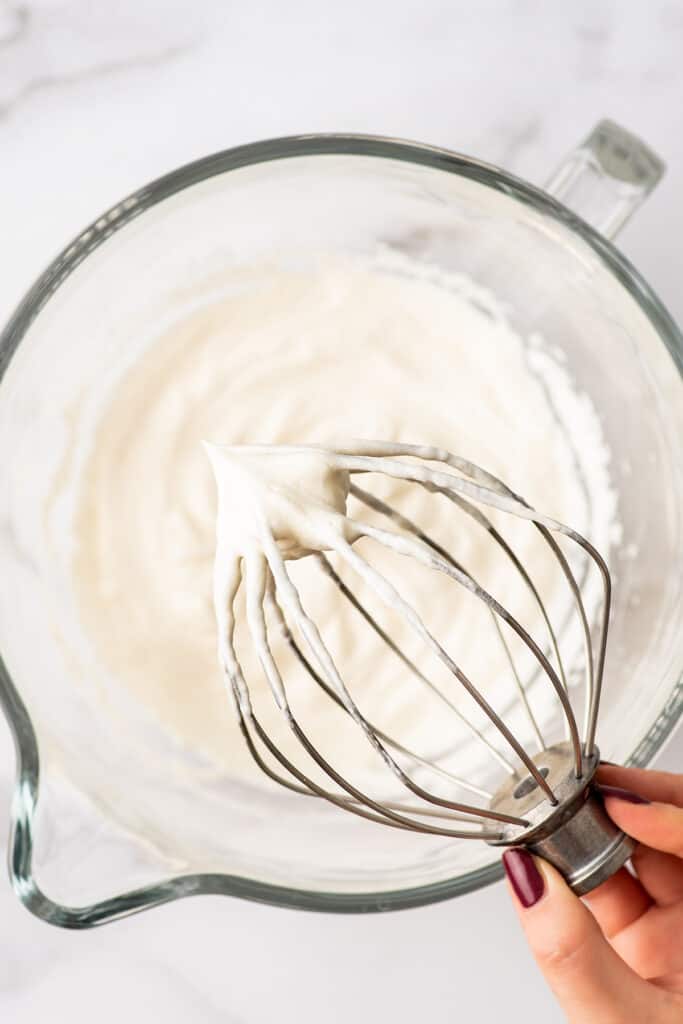
A good rule of thumb is that whipping cream will double its volume. So whipping 1 cup of heavy cream will make (about) 2 cups of whipped cream.
Can you make whipped cream with half and half?
No. Cream must contain at least 30% milk fat to whip. Half and half, which contains 10.5–18% milk fat will not whip into whipped cream no matter how long you work at it.
Can you freeze leftover whipped cream?
Yes (but…). Whipped cream freezes pretty well. I like to freeze leftovers to use in my hot chocolate or for topping quick desserts, but I wouldn’t make whipped cream just to freeze it because it can separate and begin to deflate after being frozen and thawed.
It’s also prone to picking up an “off” taste from the freezer, so you want to use it fairly quickly, within a couple of weeks.
To freeze whipped cream , pipe or spoon individual servings onto a parchment paper-lined plate or baking sheet and freeze until solid. Once solid, cut the parchment paper into squares and transfer the whipped cream (still on the paper) to a freezer bag.
When you’re ready to use the whipped cream, you can add it frozen straight to warm drinks or allow it to sit at room temperature for 15 to 20 minutes to thaw.
Can I double this recipe?
Absolutely. To change the recipe yield, hover over the serving size in the recipe card below or click if you’re on mobile, and slide the slider.
Doubling note: If doubling the recipe and using the mason jar method, you’ll need to size up to a quart-size mason jar.
Recipe Notes
- Soft, medium, or stiff peaks: This refers to the what happens to the cream when you lift the whisk straight out. Soft peaks will start to stand up and then sort of collapse back into the cream. Medium peaks will stand but flop over at the tip. Stiff peaks will stand straight up. In different recipes, you’ll see instructions out there for all three because it’s really up to you and your personal preference. If I’m spooning whipped cream over a drink, soft peaks are fine. If you are going to pipe the whipped cream or pile berries on top of it, you are going to want to beat it to stiff peaks. Stiff peaks also seem to hold up better if you are not serving the whipped cream right away. Just be careful not to over-beat and turn your cream into butter!
- Infusing with alcohol: I usually find that 1 tablespoon of alcohol to 1 cup of cream is a good amount–too much liquid and your cream might not whip up. Make sure the alcohol is very cold and add it to the cream and sugar before whipping.

Drink Recipes to Top With Whipped Cream
- Hot Chocolate
- Crockpot Hot Chocolate
- The Best Chocolate Milkshake
- Homemade Mocha
Recipes to Top With Whipped Cream
- The Best Waffles
- Banana Pudding
- Oreo Cheesecake Bites
- Mini Pumpkin Pie

Ingredients
Full Batch
- ▢ 1 cup heavy cream
- ▢ ½ teaspoon vanilla extract optional
- ▢ 2 tablespoons to ¼ cup (15-30g ) powdered sugar *
Single Serving
- ▢ 2 tablespoons heavy cream
- ▢ A couple drops vanilla extract
- ▢ 1 to 2 teaspoons ( 3-5g ) powdered sugar *
Instructions
Stand Mixer
- Combine ingredients in the bowl of your stand mixer and using the whisk attachment, mix, starting on low, working up to medium-high, until cream reaches your desired consistency, 3 to 6 minutes.
Bowl and Whisk/Handheld Electric Mixer
- Place bowl and whisk in the freezer for 15 minutes.
- Once bowl is cold, remove from the freezer and combine heavy cream, vanilla, and sugar.
- Whisk vigorously until cream reaches desired consistency, 5 to 15 minutes depending on the amount of cream.
Mason Jar
- Place your mason jar and lid in the freezer for at least 15 minutes, until it is very cold.
- Pour ingredients into the mason jar, top tightly with the lid, and shake until the contents of the jar no longer sound like liquid, 5 to 7 minutes. Check consistency and continue to shake if it is not done.
Notes

Roasted Bacon and Butternut Squash Side Dish
Ingredients
- 6 slices bacon
- 1 butternut squash peeled and cubed 1-inch
- Salt and pepper
Instructions
- Preheat your oven to 400°F. Line a rimmed baking sheet with foil (for easy cleanup).
- Bake bacon slices for 10 to 14 minutes, until they reach your preferred level of crispiness.
- Transfer bacon to a plate and add cubed squash to the baking sheet. Stir the cubes so they get coated in the bacon drippings and sprinkle with salt and pepper.
- Bake for 20 to 30 minutes, until squash is fork tender. Chop or crumble bacon and add it back to the hot pan. Bake for 1 additional minute to reheat and serve.
