A quicker way to make creamy and delicious homemade Dulce de Leche.

Hey, friends, I have a useful little recipe for you today, a quicker Dulce de Leche.
If you’ve ever made dulce de leche at home, you know that while it’s super easy (just heat a can of sweetened condensed milk), unless you have a pressure cooker, it takes a full 3 to 8 hours depending on the cooking method for that can of milk to caramelize.
A Quicker, Easier Dulce de Leche
I first found this method in a recipe for Banoffee Pie , and it’s kind of a game changer. Instead of cooking a whole unopened can of sweetened condensed milk, you pour the contents into a pan and bake it in a water bath.
Not only do you not have to worry about exploding cans, you can actually check on your sauce to see if it’s caramelized enough instead of guessing what’s happening inside of the can.
And the best part, since the sauce cooking over a larger surface area, the cooking time is cut by an hour or more.
What is Dulce de Leche?
If you’ve never tried dulce de leche, it’s is a dessert/sauce probably originating in Argentina ( some people claim otherwise ). Traditionally, it’s made by cooking milk and sugar until the mixture caramelizes and reduces down to produce a thick, creamy sauce, but most modern recipes start with a can of sweetened condensed milk to cut down on the cooking time.
It can be eaten on its own as a pudding, as a topping for ice cream, or filling for pastries.
What does dulce de leche taste like? Dulce de leche is similar to but different from caramel (the way butterscotch is similar to but different from caramel). It has a milkier sweetness that seems mild at first but is actually quite strong once it really hits you.
You can use it almost anywhere you’d use caramel sauce, and unlike caramel sauce, you don’t have to worry about melting or burning any sugar when making it, so it is about 10x’s easier and less stressful to make.
How to Make Dulce de Leche in the Oven
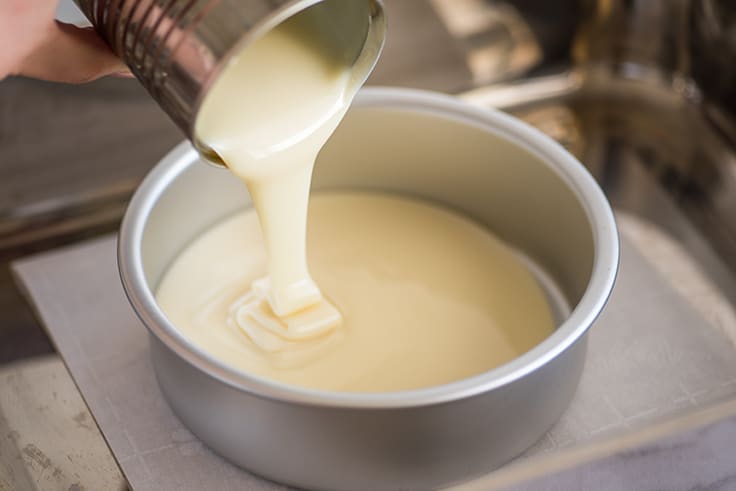
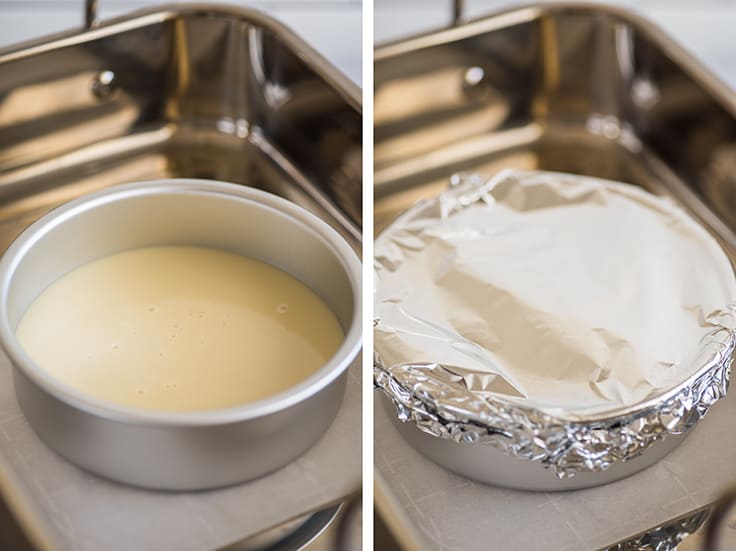
- Preheat your oven to 425°F and start with a medium oven-safe pan. I’m using a six-inch cake pan here, but a loaf pan or pie dish are also great options. Open a can of sweetened condensed milk, pour that in, and cover the pan tightly with foil.

- Next, take a larger oven-safe dish like a broiler pan or casserole dish (not pyrex, see recipe notes) and place a sheet of parchment paper over the bottom. The parchment paper is optional, but sometimes different metals react and leave marks when cooked against each other, so this should help protect your pans.

Place the foil-covered dish inside of the larger one and fill the larger dish with boiling water until it comes halfway up the side of the smaller dish (or at least an inch or two if you are using a very tall dish).
Bake for 1 1/2 to 2 1/2 hours , checking every 45 minutes or so to add more boiling water if too much has evaporated. Open your oven just long enough to check/add water, because you are cooling it down every time you open the door.
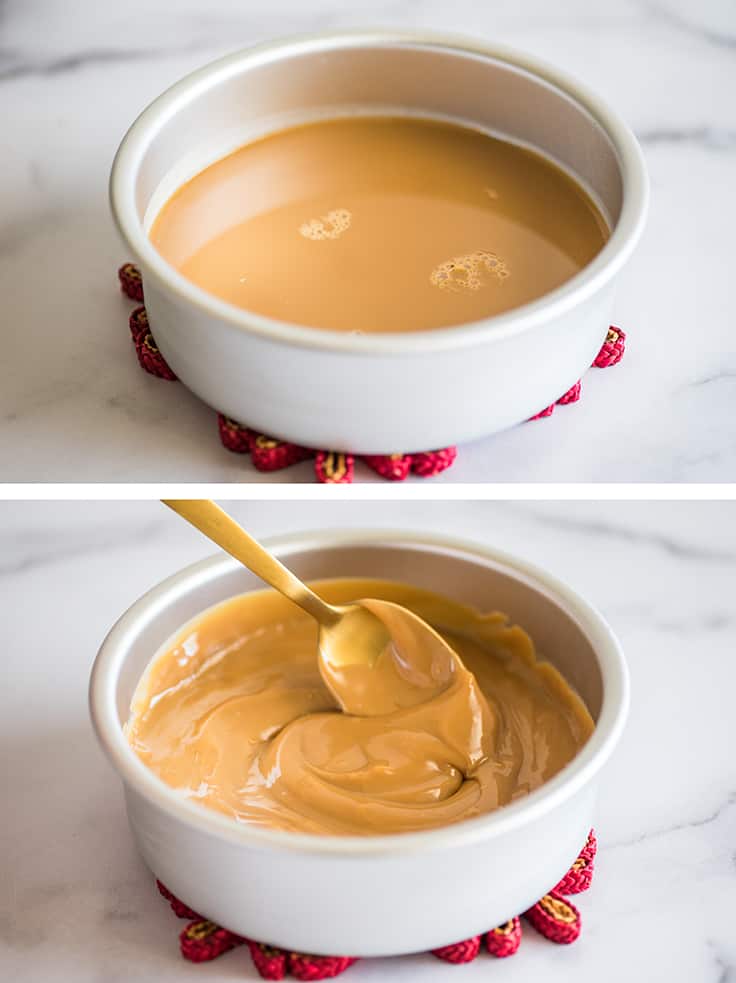
Begin checking under the foil after 1 1/2 hours. The larger your smaller pan, the faster your dulce de leche will cook. It’s done when the condensed sweetened milk has turned golden brown.

Recipe Trouble Shooting
Dulce de leche is pretty simple to make, so you shouldn’t run into many problems, but these were some of the issues I had when I first started making it at home.
Dulce de leche not getting dark: Keep cooking it. Your oven may run cooler than the temperature reads (I recommend investing in a cheap oven thermometer to check) or the oven temp may have been cooled down too much when you opened the door to add water. Just keep going. It’ll turn eventually.
Dulce de leche is lumpy: I believe this happens when some of the edges get overcooked. It’s not going to hurt anything, especially if you’re just going to pour it over some ice cream, but if you want perfectly smooth sauce, it’s easy to fix.
Just scrape the sauce into a food processor or the chopper attachment of an immersion blender (you guys know how much I love these things) and pulse until smooth.
Dulce de leche is too thick: If it’s too thick while warm, this also happens when the sauce is overcooked and too much liquid has evaporated. Pulse in the food processor/blender with a tiny bit of cream or milk (start with 1/2 teaspoon; a little goes a long way) until it reaches your desired consistency.
If it’s too thick once it cools, that’s totally normal. You can microwave the sauce for a few seconds, give it a stir, and it will return to its pourable consistency.
How to Store Dulce de Leche
Store your dulce de leche in an airtight container, like a mason jar, in the refrigerator. It will keep for up to about a month.
What to do With Dulce de Leche
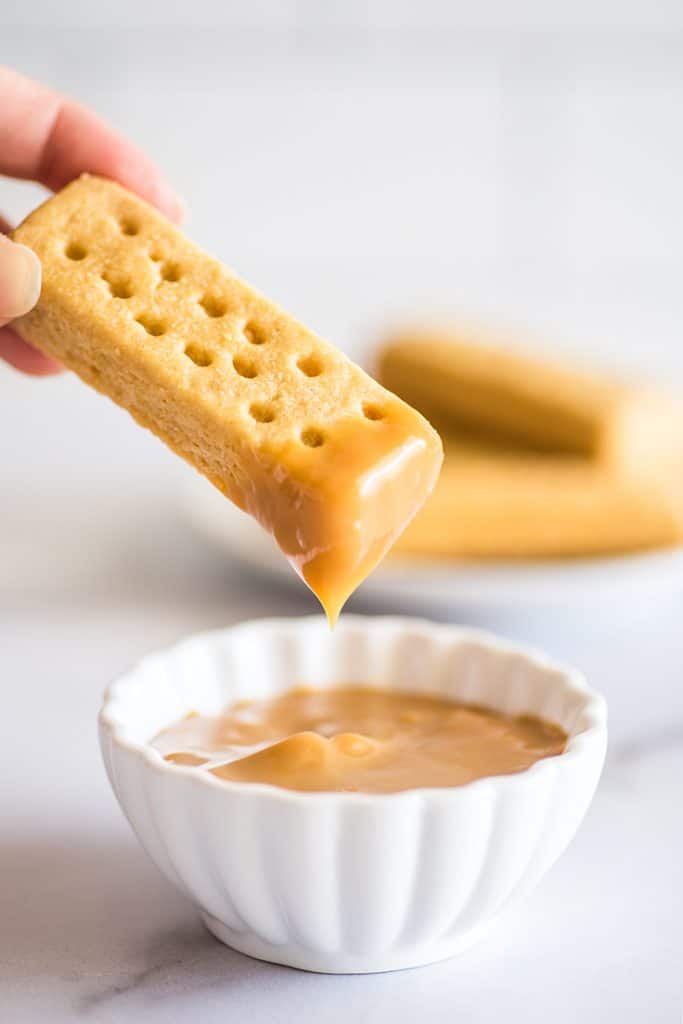
As mentioned above, this sauce is fabulous over ice cream. You can also stir it into coffee to make a Dulce de Leche Latte , spread it on toast, or drizzle it over fruit or pancakes . My personal favorite is to eat it with shortbread and a sprinkle of flaky sea salt.

Recipe Notes
- I don’t recommend using Pyrex for your water bath container. I love and use Pyrex for lots of other things, but after having a Pyrex pie plate spontaneously shatter on me this year, I don’t feel comfortable telling you to pour boiling water into one.
- If you don’t usually buy sweetened condensed milk , you can typically find it in the baking aisle next to the evaporated milk. Make sure to double check your can though, as it’s easy to mix up the two!

Ingredients
Special Equipment
- ▢ Foil
- ▢ Parchment paper optional
Dulce de Leche
- ▢ 1 (14-ounce can) sweetened condensed milk
Instructions
- Preheat your oven to 425°F. Bring a kettle or medium pot of water to boil.
- Pour condensed milk into a small to medium baking dish like a 6-inch cake pan, loaf pan, or pie tin. Cover tightly with foil, making sure the foil is not touching the milk.
- Place a sheet of parchment paper in a second, larger pan like a roasting pan or 9x13-inch baking dish, and set your smaller baking dish on top.
- Place pans in the oven and pour boiling water into the larger baking dish until it comes halfway up the side of the smaller one or at least an inch.
- Cook for 1 1/2 to 2 1/2 hours, checking every 45 minutes and adding more boiling water as necessary if the water level has dropped too much.
- Your dulce de leche is done when it is caramel-colored. Very carefully remove pans from the oven and cool until cool enough to handle or use tongs or a couple of spatulas to remove the smaller dish from the water so it cools more quickly.
- Once cool enough to handle, stir dulce de leche until smooth*.
- Serve and enjoy!
Notes
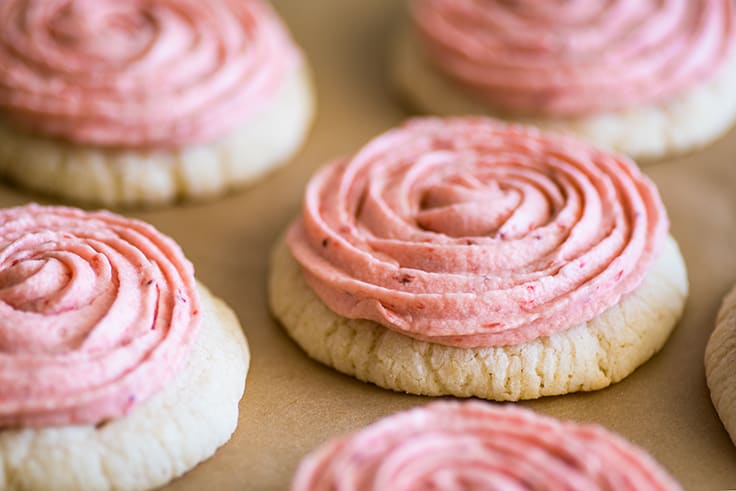
These Small-batch Lemon Sugar Cookies With Strawberry Frosting have a smooth and subtle lemon flavor and are topped with sweet and tangy homemade strawberry frosting.

Remember that Small-batch Strawberry Frosting I posted a couple of weeks ago? Well, when I was shooting it, I needed a cookie to smother it over for the post photos, so I threw together some lemon sugar cookies to be my frosting models.
Long story short, I ended up liking those cookies so much that I couldn’t not give them their own post. So here we go: Lemon Sugar Cookies With Strawberry Frosting.


A Small-Batch of Lemon Sugar Cookies
These cute little cookies are my super simple Small-batch Frosted Sugar Cookies with a bit of lemon zest baked in, which gives them a bright (but not overwhelming), citrusy flavor.
They’re soft and a little bit cakey, with a texture that almost melts in your mouth. When paired with the tangy strawberry buttercream layered on top, they’re divine.
The recipe will make six good-sized cookies. If that’s too few, you can double the recipe. If it’s too many, these cookies freeze well. Just freeze them on a plate for 20 minutes or until the frosting is frozen solid and transfer to an airtight container or freezer bag.

More Small-batch Cookie Recipes
- Small-batch Chocolate Chip Cookies
- Small-batch Peanut Butter Cookies
- Small-batch Sugar Cookies
- Small-batch Peanut Butter Oatmeal Cookies
Recipe Notes
- This recipe makes exactly enough frosting to frost the cookies as shown. Don’t make your roses too large or you won’t have enough frosting for all the cookies.
- Like lemon but not strawberries? Use my small-batch Vanilla Frosting or Cream Cheese Frosting , and add a little extra lemon zest in with it.
- For more strawberry recipes, try Strawberry Milk , Strawberry Shortcake Sundaes , and Strawberry Sauce .
Ingredients
Special Equipment
- ▢ Handheld electric mixer optional but helpful
- ▢ Microplane optional but helpful
- ▢ Piping bag optional
- ▢ Large open-star pastry tip optional
Homemade Strawberry Frosting
- ▢ 4 medium strawberries hulled, plus more if needed*
- ▢ 1 teaspoon ( 4g ) granulated sugar
- ▢ 4 tablespoons ( 2oz ) unsalted butter softened
- ▢ 1 cup ( 120g ) powdered sugar sifted
- ▢ 1/4 teaspoon vanilla extract
- ▢ Pinch salt
Lemon Sugar Cookies
- ▢ 3/4 cup + 2 tablespoons (105g ) all-purpose flour measured by weight or using the spoon and sweep method*
- ▢ 1/2 teaspoon baking powder
- ▢ 1/4 teaspoon salt
- ▢ 1/3 cup ( 76g ) unsalted butter softened
- ▢ 1/4 cup + 2 tablespoons (75g ) granulated sugar
- ▢ 1 large egg white
- ▢ 1/2 teaspoon vanilla extract
- ▢ 1 teaspoon lemon zest loosely packed
- ▢ 1/3 cup ( 40g ) powdered sugar
Instructions
Start Frosting
- Puree strawberries in a blender or food processor or using the chopper attachment of an immersion blender. Measure out 1/4 cup of puree and add to a small pot. Discard the rest.
- Add granulated sugar to the pot and bring to a simmer over medium heat. Cook, stirring frequently, until reduced to 1 1/2 to 2 tablespoons, 2 to 3 minutes. Remove from heat. Cool on the counter until completely cool to the touch while you make your cookies.
Lemon Sugar Cookies
- Preheat your oven to 350°F and line a baking sheet with parchment paper or silicone baking mat.
- In a small bowl, whisk together the flour, baking powder, and salt. Set aside.
- In a medium bowl, cream together softened butter and sugar until light and fluffy. Add egg white and vanilla extract and beat until well-mixed.
- Add lemon zest and beat until mixed.
- Beat in flour mixture until mixed and a slightly sticky down forms.
- Place powdered sugar in a small bowl and drop heaping (about 1 1/2-ounce) spoonfuls of dough into the powdered sugar. Roll to coat and form the dough into a ball before transferring it to your prepared baking sheet. This should make 6 cookies.
- Use a glass or the palm of your hand to smash the dough to 1/2-inch thick.
- Bake for 9 to 12 minutes, just until the cookies look set and bottom edges are very slightly starting to turn golden. Do not overbake.
- Cool cookies on the baking sheet for 10 minutes before transferring to a cooling rack. Allow to cool completely before frosting.
Finish Strawberry Frosting
- Once your puree and cookies are cool, in a medium bowl, beat softened butter until light and fluffy. Add powdered sugar, 1 teaspoon of completely cooled puree, vanilla extract, and salt. Beat for 30 seconds.
- Add 2 more teaspoons of the puree, one at a time, beating well after each. After the final teaspoon, continue to beat until the frosting is light and fluffy. Discard remaining cooked puree.*
- Use a knife or piping bag fitted with an open-star tip to frost cookies. To make a rose shape, start piping at the center of the cookie and spiral outward. (If piping, don’t go all the way to the edges of the cookies or you will run out of frosting before finishing). Serve and enjoy!
Notes
This Iced White Chocolate Mocha is creamy, sweet, and perfect for sipping on a hot summer day.

Last week I shared this Iced Mocha recipe and told you that since I’ve been getting a lot of requests for different iced coffee recipes recently, there’d be a bunch more of them hitting the site soon(ish).
As promised, today, I have another one for you, an Iced White Chocolate Mocha.
A Quick and Easy Iced White Chocolate Mocha
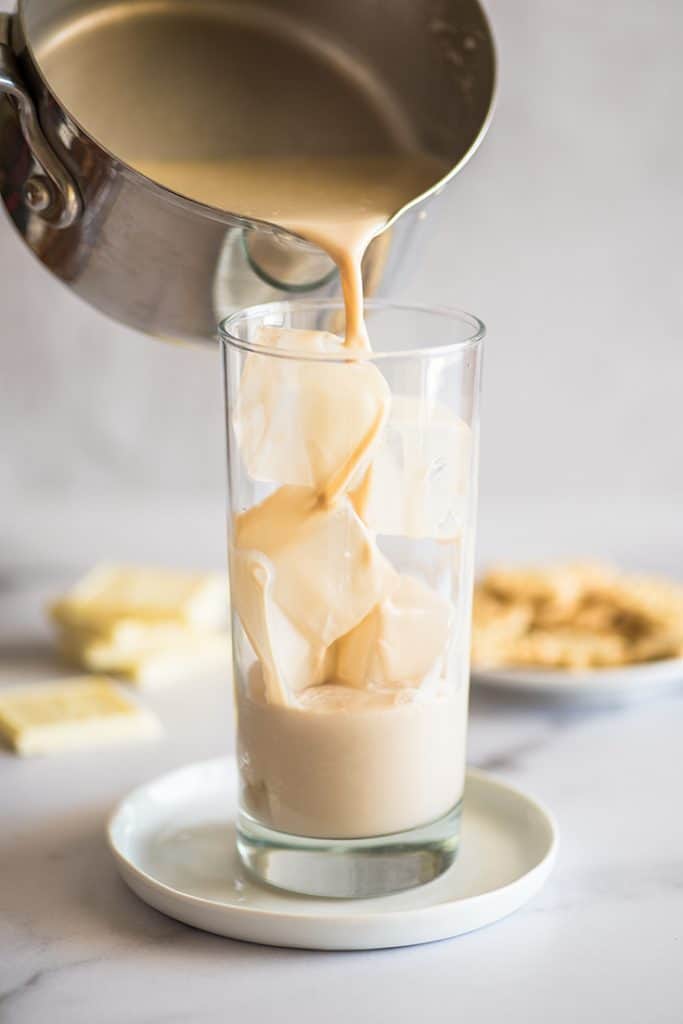
Like my (hot) White Chocolate Mocha , this recipe is a cinch to throw together and only requires a few ingredients. You’ll just need white chocolate, cold coffee, milk, and sugar.
Poured over ice, you end up with a mocha that is creamy, sweet, and perfect for sipping on a hot summer day.

How To Make an Iced White Chocolate Mocha
First, you’ll melt white chocolate and sugar in a small amount of milk. (If you have one, a butter warmer works great for this.)
Then, combine your white chocolate mixture with cold coffee, a little more milk, and optional heavy cream (for added richness).
If you don’t have cold coffee on hand, you can put a cup of hot coffee in the freezer for 10 to 20 minutes until it cools down to room temperature or brew a pot at double strength, pour 1 cup of coffee over 1 heaping cup of ice, and let it melt.
- Once your mocha is assembled, pour it over a cup of ice and enjoy! Also maybe top it with some whipped cream and white chocolate shavings…
A Note on White Chocolate
If you’ve made any of my other white chocolate drinks (like my White Hot Chocolate , Peppermint White Chocolate Mocha , Pink Hot Chocolate , and Chai Hot Chocolate ) you’re probably getting tired of seeing this PSA, but it’s super important when you’re making drinks with white chocolate, so here we go again. 🙂
Be sure to use good-quality white chocolate that you like the flavor of. Cheap white chocolate chips are great in cookies but don’t always have the best flavor for drinks, so if you wouldn’t eat a handful of them, don’t melt them down for coffee.
White Chocolate Mocha Frappuccino
And before we go, if you’d prefer something a little icier, making your mocha into a frappe is as easy as adding a blender to the mix. You’ll get the best results with a high-powered blender , but almost any blender can get the job done.
Just double the sugar in the white chocolate mocha base, since blending it with ice will make it less sweet, and blend the ice and mocha together. Done!


Ingredients
- ▢ 3/4 cup milk any percentage, divided
- ▢ 2 tablespoons ( 1oz ) chopped white chocolate (high-quality chips are fine)
- ▢ 2 teaspoons granulated sugar
- ▢ 1/2 cup strong cold coffee
- ▢ 1 tablespoon heavy cream optional
- ▢ 1 1/2 cup ice
- ▢ Whipped cream optional, for topping
Instructions
- In a small pot, combine 1/4 cup of the milk, white chocolate, and sugar and heat over medium heat, stirring frequently, until chocolate and sugar are completely melted.
- Remove pot from heat and add in remaining 1/2 cup of milk, cold coffee, and optional heavy cream.
- Pour over ice, top with whipped cream if desired, and enjoy.
Notes

Quicker Dulce de Leche
Ingredients
Special Equipment
- Foil
- Parchment paper optional
Dulce de Leche
- 1 (14-ounce can) sweetened condensed milk
Instructions
- Preheat your oven to 425°F. Bring a kettle or medium pot of water to boil.
- Pour condensed milk into a small to medium baking dish like a 6-inch cake pan, loaf pan, or pie tin. Cover tightly with foil, making sure the foil is not touching the milk.
- Place a sheet of parchment paper in a second, larger pan like a roasting pan or 9x13-inch baking dish, and set your smaller baking dish on top.
- Place pans in the oven and pour boiling water into the larger baking dish until it comes halfway up the side of the smaller one or at least an inch.
- Cook for 1 1/2 to 2 1/2 hours, checking every 45 minutes and adding more boiling water as necessary if the water level has dropped too much.
- Your dulce de leche is done when it is caramel-colored. Very carefully remove pans from the oven and cool until cool enough to handle or use tongs or a couple of spatulas to remove the smaller dish from the water so it cools more quickly.
- Once cool enough to handle, stir dulce de leche until smooth*.
- Serve and enjoy!
