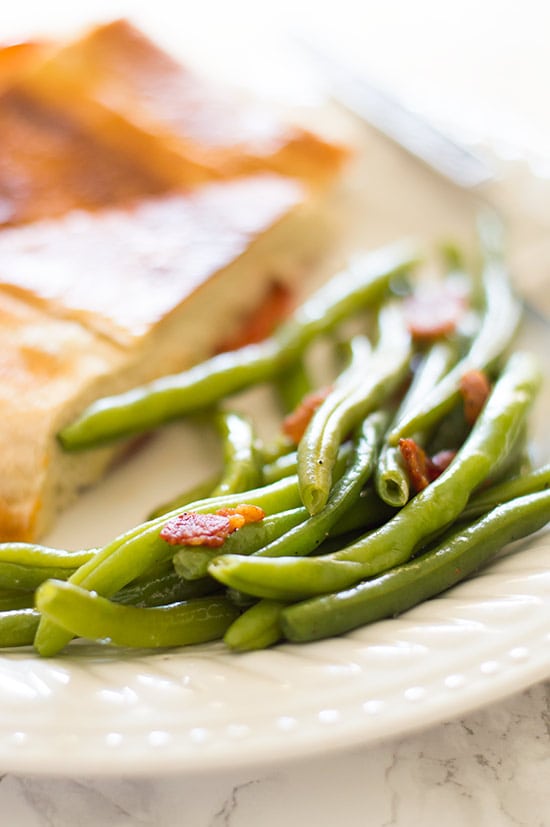
Fresh green beans with chopped bacon, tossed in bacon drippings make an easy, tasty, and surprisingly low-calorie side dish.

Looking for a tasty veggie side? Well, look no further, because I’ve got a good one for you, my favorite Bacon and Green Beans Side Dish.
A couple months ago, I shared my No-fail Butter and Garlic Green Beans and those have ended up being one of the most popular recipes on the site. These are the same easy peasy deal, but instead of tossing home-cooked green beans in butter and garlic, you cook up a couple slices of bacon and toss the beans in the bacon drippings.
And yes, it is exactly as tasty and easy as it sounds.
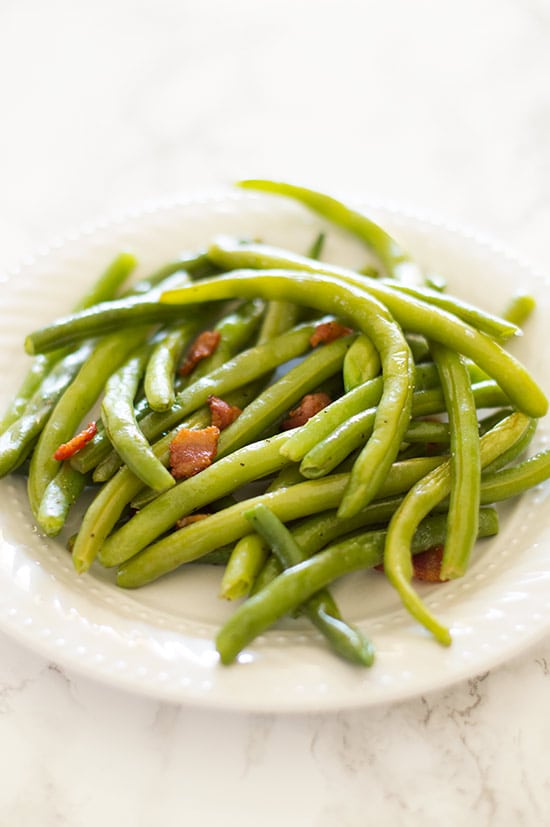

These babies come in at under 100 calories a serving, can be made in 15 minutes, and are completely delicious. I could totally eat these every night of the week and never tire of them.
If you have a significant other or a kiddo who doesn’t like to eat their greens, give these a try, it might make a convert out of them!

More Easy Veggie Sides
- Roasted Green Beans
- Green Beans in the Microwave
- Roasted Broccoli
- Roasted Zucchini
- Corn on the Cob in the Microwave

Ingredients
- ▢ 1 pound green beans trimmed
- ▢ 2 slices of bacon cut into 1/2-inch pieces
- ▢ Salt and pepper
Instructions
- Place green beans in a medium pot and cover with lightly salted cold water. Bring to a simmer. Simmer the green beans over medium low to medium for 5 to 10 minutes until beans reach your desired level of doneness. Drain.
- While your green beans are cooking, add bacon pieces to a large skillet. Cook until done. If your bacon gets done before your green beans are ready, simply remove pan from heat until they are ready to go. Once green beans are done and drained, add them to the pan of bacon and toss to coat in bacon drippings.
- Sprinkle with salt and pepper to taste.
- Serve and enjoy!
Notes
Nutritional Information
Make-ahead Instructions: Uncooked bacon can be chopped and green beans trimmed, up to two days in advance. Store separately, in airtight containers, and make sure your beans are dry when storing. Recipe for Two Instructions: The recipe halves cleanly. No cooking changes are needed.
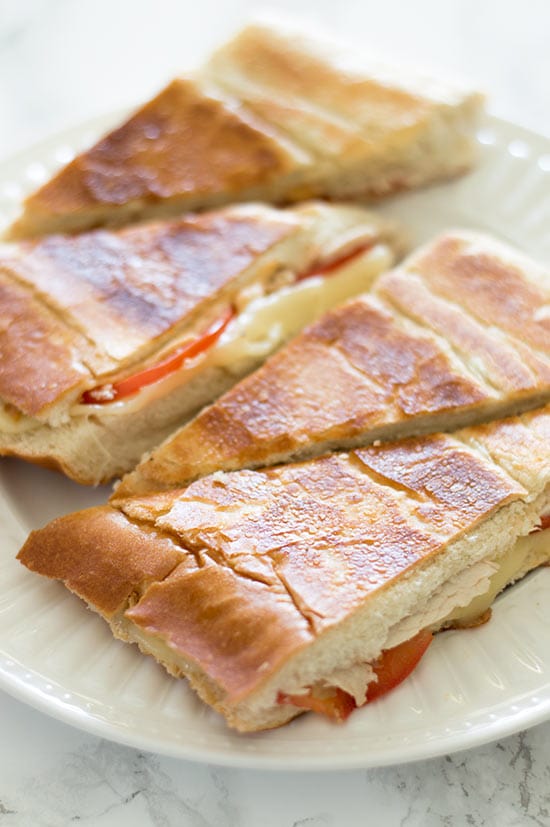
Perfectly cooked panini without a panini press, crunchy and toasted on the outside, warm, gooey, and cheesy on the inside!

It’s time for a new monthly series on the blog! Last month, we conquered Meatless Monday Meals, this month, we are tackling one of my favorite dinners, hot sandwiches. I have four really good ones coming at you this month, but we are going to kick April off with the one I make most often, delicious, fantastic homemade panini without a panini press.
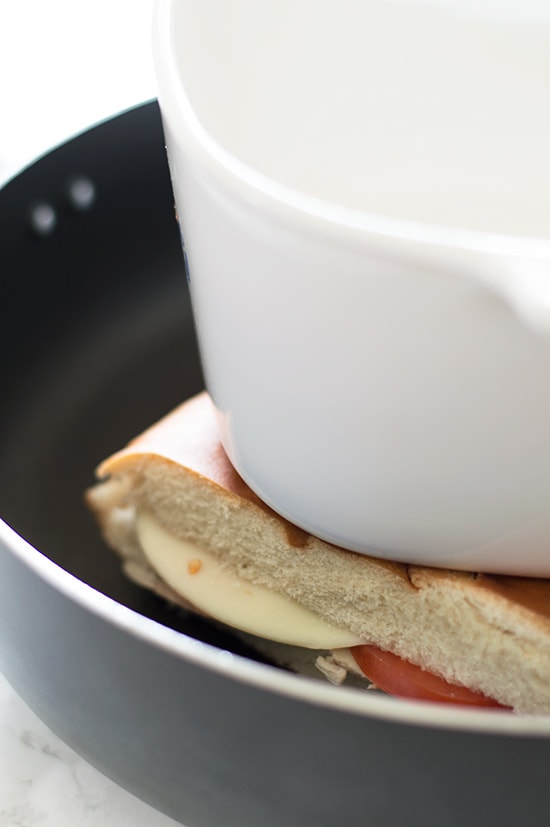
I didn’t make panini at home for the longest time because I didn’t have a panini press, and then I learned this trick, and oh, the panini I have made since then. You don’t need an expensive press to make a good panino. All you need is a skillet and a heavy piece of cookware like, for example, an ancient piece of your grandmother’s CorningWare.

Making panini without a panini press is quick, easy, and honestly, less trouble to clean up afterwards. The resulting sandwiches are not as attractive as panini made with a press, but they taste just as good and are fantastic options for easy dinners. I make this quick weeknight version at least twice a month.
These panini involve tangy garlic aioli spread over French bread, paired with turkey, tomatoes, and your favorite melty cheese. They take 15 minutes from start to finish and are so, so good.
Add a quick and easy side (coming Wednesday), and it’s a perfect dinner for a busy weeknight that you can feel good about!


Ingredients
Garlic Aioli
- ▢ 1/4 cup ( 56 g) mayonnaise
- ▢ 1 garlic clove pressed
- ▢ 2 teaspoons lemon juice
- ▢ 1/8 teaspoon salt
- ▢ 1/8 teaspoon pepper
Panini
- ▢ 1 loaf French bread
- ▢ 4 ounces chicken or turkey deli meat
- ▢ 4 slices cheese of choice
- ▢ 1 tomato optional
- ▢ 1 to 2 tablespoons butter
Instructions
Aioli
- In a small bowl, mix aioli ingredients together. Set aside.
Panini
- Cut bread into four even sections and slice those in half from end to end.
- Spread aioli on both sides of bread and assemble sandwiches with meat, cheese, and optional tomato.
- Give each sandwich a little press with the palm of your hands to flatten slightly.
- Heat a large skillet over medium heat for a minute or two, so it has time to heat fully.
- While skillet is heating, butter the bottoms of two of the sandwiches and place into the hot pan.
- Place a heavy piece of cookware over the panini (cast iron works great for thiand press down firmly. Allow to cook for 1 to 2 minutes until golden and crunchy.
- Butter the tops of the panini and flip. Set cookware back on top, pressing down to flatten further. Cook for a minute or so and remove from heat.
- Repeat with the other two panini. Slice diagonally if desired. Enjoy!
Nutritional Information
Make-ahead Instructions : Aioli can be made up to 2 days in advance. Recipe For Two Instructions: Half of 1/4 cup of mayonnaise is 2 tablespoons. No cooking changes are needed.

Adorable buttermilk jam scones baked with your favorite jam inside and brushed with a buttery vanilla glaze.

I realized today as I was putting this post together, that for a blog that’s barely four months old, Baking Mischief sure does have a lot of tea-party ready recipes. There are my Perfectly Pretty Lemon Bars , my Sherlock Tea Bag Cookies , Victoria Sponge Cupcakes , etc.
Am I subconsciously trying to tell myself something? Am I as an adult trying to create on the blog, the perfect tea party I never had as a child? Who knows?
But guess what. I have another perfect tea party recipe for you today. Big shocker, I know.
These Jam Scones are just about the most adorable things to come out of my kitchen in a while and so tasty. They are my favorite basic buttermilk scone base baked up with the jam of your choice (I’m partial to raspberry) with a buttery vanilla glaze.
They can be served warm and gooey or cooled, with the glaze crunchy and set.


In the oven, the jam cooks down and becomes thick and syrupy and is the perfect complement to the soft, slightly crumbly scone.
I make these whenever I want a dessert that’s a little different and distribute the extras to various friends and family members. After the initial WTF is a jam scone response, they are always a hit.


Who knows, maybe someday, I’ll throw that tea party of five-year-old me’s dreams and serve these Jam Scones (and all those other aforementioned treats) to my guests.
Though to live up to my fantasies, the guest list would have to include at least one Disney princess, a muppet, and Rainbow Brite. So if anyone has any of their contact information, it would be much appreciated…

Quick Green Beans With Bacon Side Dish
Ingredients
- 1 pound green beans trimmed
- 2 slices of bacon cut into 1/2-inch pieces
- Salt and pepper
Instructions
- Place green beans in a medium pot and cover with lightly salted cold water. Bring to a simmer. Simmer the green beans over medium low to medium for 5 to 10 minutes until beans reach your desired level of doneness. Drain.
- While your green beans are cooking, add bacon pieces to a large skillet. Cook until done. If your bacon gets done before your green beans are ready, simply remove pan from heat until they are ready to go. Once green beans are done and drained, add them to the pan of bacon and toss to coat in bacon drippings.
- Sprinkle with salt and pepper to taste.
- Serve and enjoy!
