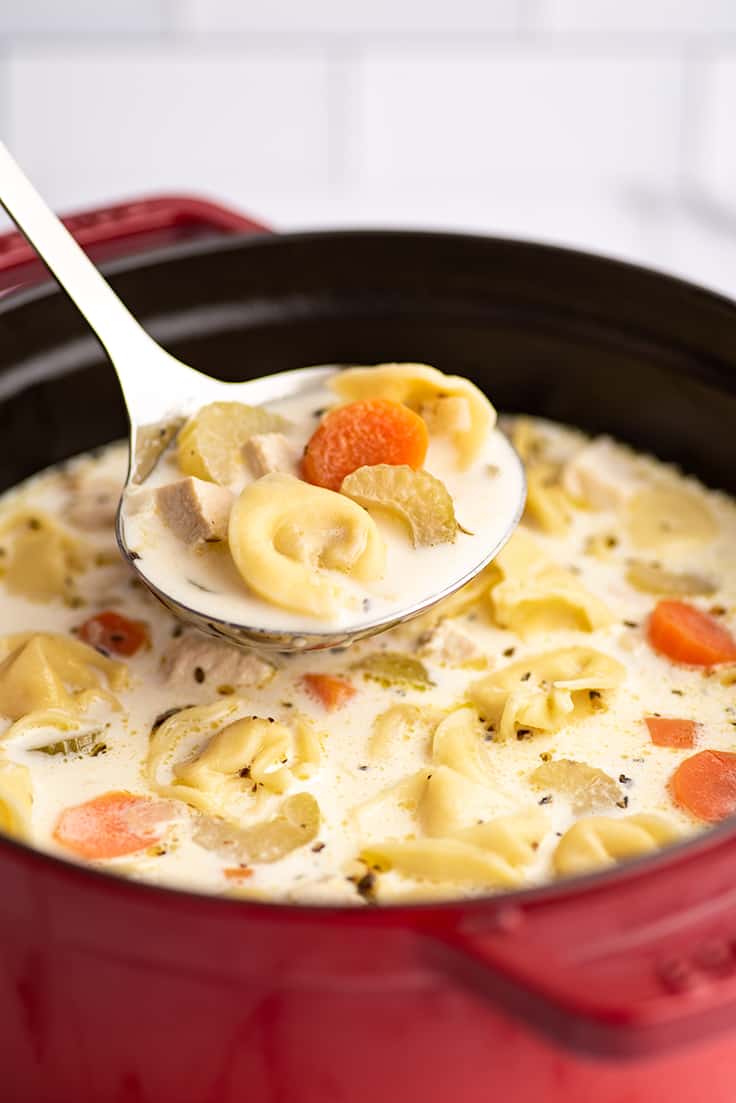
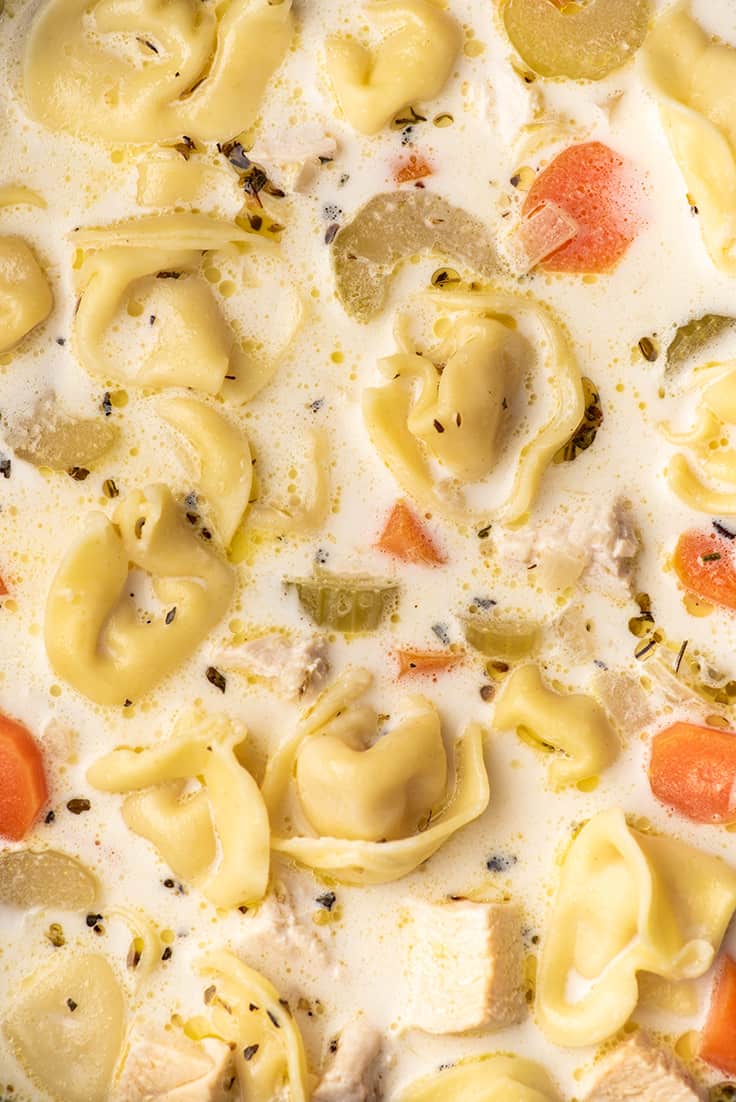
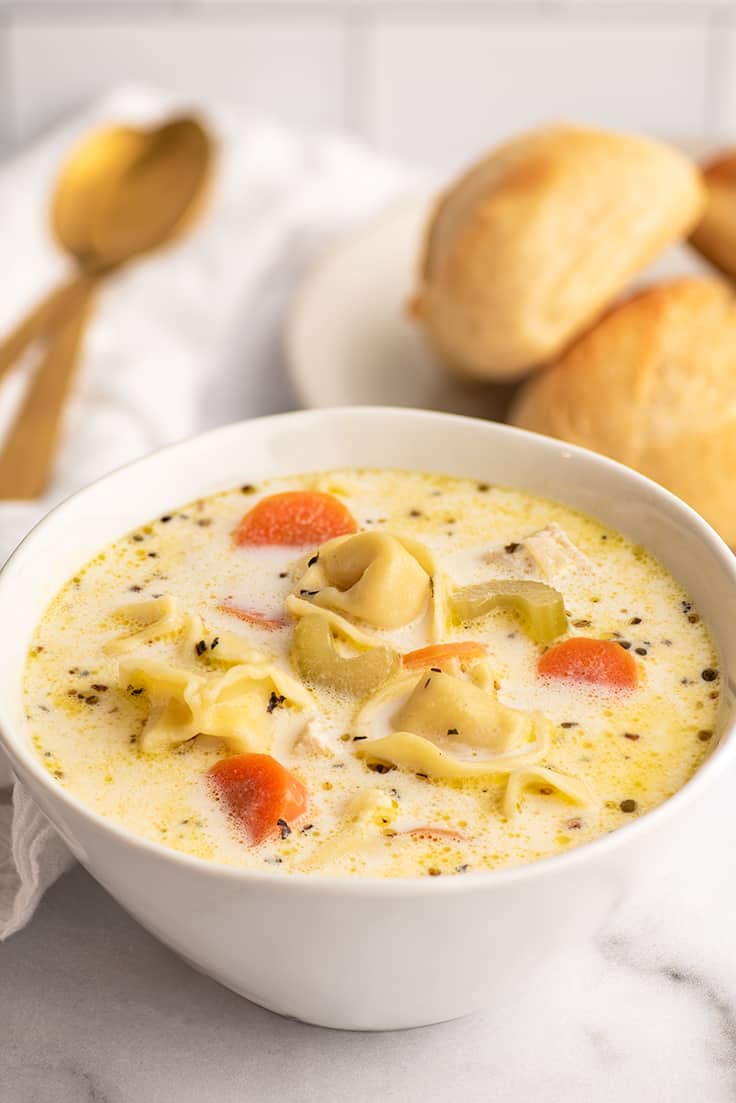
This dreamy chicken tortellini soup with tender chunks of chicken, cheesy tortellini, and rich and creamy broth is quick, easy, and perfect for chilly weeknight meals.
You all keep asking me for easy weeknight meals, and as long as you keep asking, I’ll keep making them. Today’s entry in the quick and easy dinner category is creamy chicken tortellini soup.
This soup cooks in a little over half an hour with minimal fuss or effort and turns out so creamy and satisfying. It’s a total crowd-pleaser for hardly any effort.

Ingredient Notes
- Cooked chicken: This recipe calls for shredded or chopped cooked chicken . You can use the meat from a rotisserie chicken or roast chicken leftovers. But, as always, if you don’t have cooked chicken on hand, no worries. There are instructions in the recipe notes for cooking your own.
- Chicken broth: Homemade chicken stock is so good in this soup, but the canned stuff works just fine.
- Tortellini: Fresh, refrigerated tortellini works best for this soup. You can usually find it in the cheese and lunch meat aisle next to the ravioli. It’s typically sold in packages of 9-12 ounces. I recommend using about 9 ounces in this soup, but up to 12 works.
- Heavy cream: A cup of heavy cream in the broth makes this soup extra delicious. You can substitute half and half here, but it won’t add the same richness. If you are watching calories, you can also cut the amount of cream by half. For storage tips and more heavy cream recipes, check out my post What to Do With Leftover Whipping Cream .

How to Make Chicken Tortellini Soup
- To make the soup, melt the butter in a large pot and cook the onions until they just begin to turn translucent around the edges.
- Cook the garlic until it begins to turn golden and smells amazing. Watch it closely to make sure it doesn’t burn.
- Add vegetables and chicken broth, bring to a simmer , and then cook for 20 minutes, until the vegetables have begun to soften. If you like your soup veggies quite soft, cook them for 30 minutes.
- Add the tortellini and spices , and cook until the pasta is al dente. Add your cooked chicken and stir in heavy cream.
- Check the salt and add pepper to taste. Different brands of chicken broth have different salt levels, so you may need very little or quite a lot. Heat just until chicken is heated through, serve and enjoy.

What to serve with chicken tortellini soup?
Serve with a simple roasted vegetable like broccoli or green beans and crusty bread with butter. If you’re feeling a little more ambitious, cheddar scones are ALWAYS a hit when paired with soup.
Can I freeze this soup?
Yes and no. I wouldn’t freeze this soup with the cooked tortellini—they will become bloated and soggy. But uncooked tortellini and the rest of the soup freeze quite well.
- To freeze, cook the soup without the tortellini, stir in the cream and chicken and then freeze the soup either all together or in single-serving portions. Separately, freeze the uncooked tortellini.
- When you’re ready to eat, defrost the soup in the refrigerator and then reheat in either the microwave or on the stove.
- Cook the tortellini separately, and then drain and add them to the heated soup.
See my post How to Freeze Soup for more tips and tricks.
Can I make this soup ahead of time?
You can, but tortellini will begin to get a little soggy the longer it sits in broth, so for best results, omit the tortellini while cooking. When you’re ready to serve the soup, warm the soup and cook the tortellini separately. Drain and add the tortellini to the soup. Stir and serve.
Can I add spinach?
Yes! If you’d like to add spinach to the soup, toss in a couple handfuls, up to about 2 cups. Add the spinach just before the cream and chicken.
Can I make this without the heavy cream?
You can. The soup won’t be creamy, but it will still be delicious!

More Easy Dinners
- Creamy Chicken Noodle Soup
- Chicken Parm Soup
- Salsa Chicken
- Sausage Pasta
- Buttered Noodles
- Cheesy Sausage Potato Soup

Ingredients
- ▢ 2 cups shredded or chopped cooked chicken *
- ▢ 1 tablespoon ( 14g ) butter salted or unsalted is fine
- ▢ ½ large onion diced, about ¾ cup
- ▢ 3 large cloves garlic minced or pressed
- ▢ 2 large carrots peeled and sliced
- ▢ 2 celery ribs sliced
- ▢ 6 cups chicken broth
- ▢ 9 ounces ( about 2½ cups ) refrigerated cheese tortellini
- ▢ ¼ heaping teaspoon dried oregano
- ▢ ¼ heaping teaspoon dried basil
- ▢ 1 cup heavy cream
- ▢ Salt and pepper
Instructions
- In a large pot, melt butter over medium heat. Add onions and cook for 3 to 5 minutes, until edges begin to turn translucent. Add garlic and cook for 30 seconds to one minute, until it just begins to turn golden.
- Add carrots, celery, and broth. Bring to a simmer and cook for 20 minutes.
- Add tortellini, oregano, and basil, and cook according to tortellini package instructions, until pasta is just al dente.
- Add shredded or chopped chicken to the pot along with the heavy cream. Add salt and pepper to taste.
- Cook until chicken is heated through. Serve and enjoy!
Notes
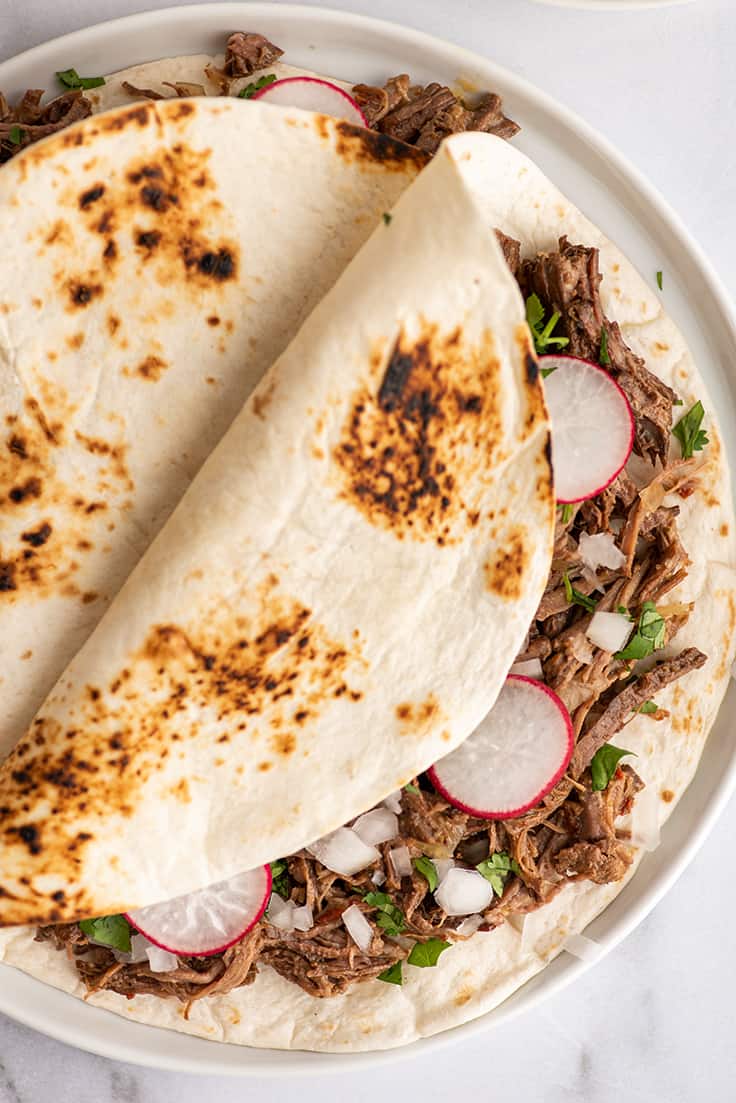
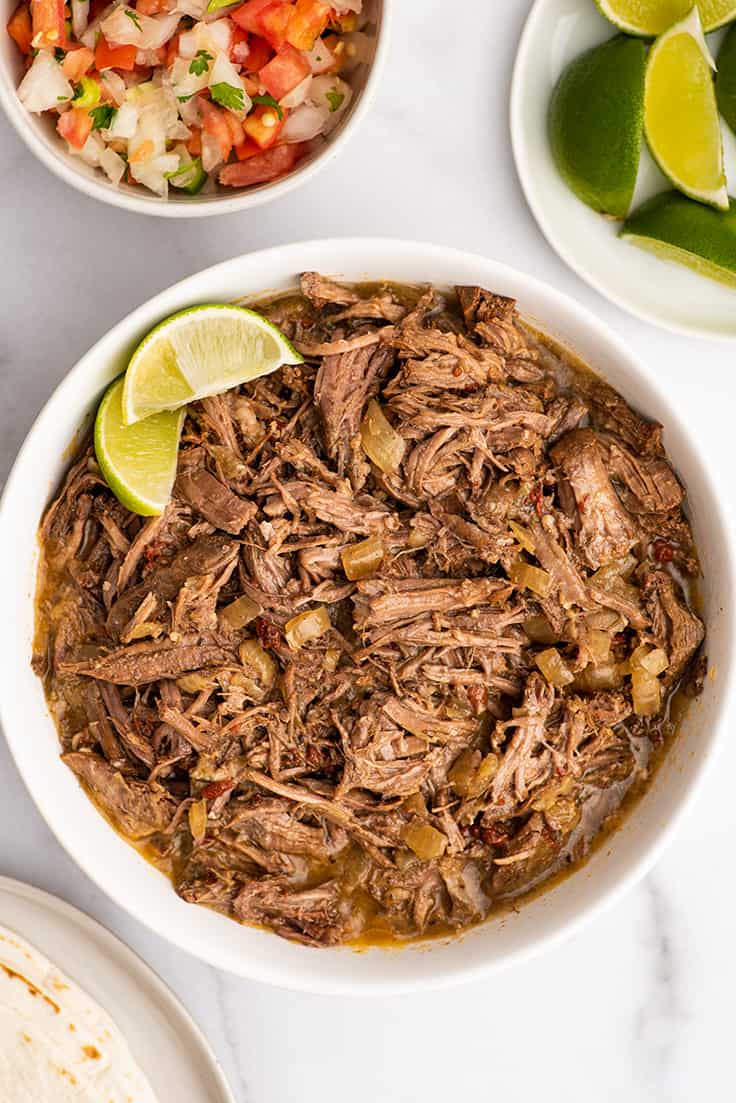
Simple and delicious barbacoa tacos loaded with tangy, fall-apart tender barbacoa beef, chopped cilantro, and onions.
A few weeks ago, I shared my favorite barbacoa recipe with you, and today, I’m sharing one of my favorite ways to eat barbacoa, in tacos!
Barbacoa tacos are the perfect way to use barbacoa beef because they really let all the fabulous flavor of the meat shine through. You don’t need to add tons of sour cream or cheese or salsa (though you can if you want to).
These tacos are really about a few simple ingredients whose flavor and texture complement the incredibly good barbacoa and let it be the star of the show.

Ingredients
- Barbacoa: This barbacoa recipe can be made on the stovetop or in the slow cooker (there are instructions for both in the recipe card below). It’s made with cut up chuck roast, so it comes out incredibly tender and rich.
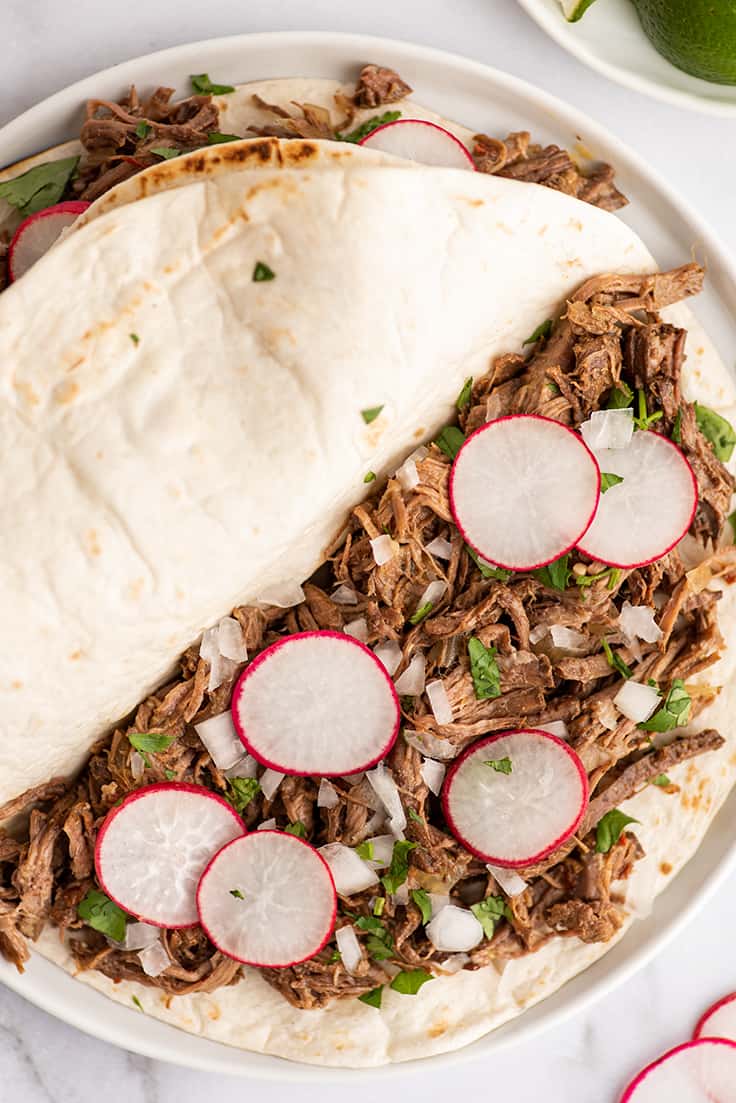
- Tortillas: Use your favorite taco-size flour or corn tortillas.
- Cilantro and onion: Cilantro and finely diced onion add the perfect boost of flavor to these tacos. I prefer white onions here, but yellow will work if that’s what you’ve got.
- Radishes: If you don’t care for radishes, you can skip them, but they add a terrific crunch to the tacos that you might just love.
- Lime juice: A squeeze on lime juice adds the perfect tangy finishing touch before serving.
More Barbacoa Tacos Toppings
As I said, these tacos don’t need additional toppings, but if you want to add them, go for it. You might enjoy:
- Fajita veggies
- Sour cream
- Cheese
- Chipotle yogurt sauce
- Beans

How to Make Barbacoa Tacos
- To make the barbacoa for the tacos, start by browning your cut up chuck roast and then add the rest of the barbacoa ingredients to the pot or slow cooker. Simmer the meat until tender and then remove from the cooking liquid and shred.
- Heat the tortillas either wrapped in a slightly damp towel in the microwave or carefully on the stove.
- Fill each taco with barbacoa, a sprinkle of onions and cilantro, a few radish slices, and a squeeze of lime juice, and enjoy!
Can you freeze barbacoa tacos?
I don’t recommend freezing assembled tacos, but barbacoa beef freezes extremely well.
To freeze: Freeze shredded barbacoa in some of its juices in an airtight container or freezer bag for up to 3 months.
To reheat: Defrost meat in the refrigerator and reheat in the microwave. For larger servings, you can also reheat the beef gently on the stove as long as there is enough liquid saved with it.

What to serve with barbacoa tacos?
I love to serve these tacos with a side of cilantro lime rice and a simple veggie side like roasted green beans or zucchini .
You Might Also Enjoy
- Carne Asada Tacos
- Carnitas Tacos Three Ways
- Carnitas
- Steak Fajitas
- Carne Asada
- Chicken Enchiladas

Ingredients
- ▢ 1 boneless 3-4 pound chuck roast trimmed and cut into fist-size chunks
- ▢ Salt and pepper
- ▢ 3 tablespoons vegetable oil
- ▢ 1-6 cups beef or chicken broth
- ▢ 1 medium white or yellow onion diced
- ▢ 1/4 cup lime juice bottled is fine
- ▢ 1/4 cup apple cider vinegar
- ▢ 2 chipotle peppers in adobo sauce minced, optional
- ▢ 4 cloves garlic pressed or minced
- ▢ 1 tablespoon ground cumin
- ▢ 1 tablespoon dried oregano
- ▢ 1/4 teaspoon ground cloves optional
- ▢ 3/4 teaspoon salt
- ▢ 3 bay leaves
Tacos
- ▢ 10 taco-size tortillas flour or corn are fine
- ▢ 1/2 white onion finely diced
- ▢ 2 radishes sliced, optional for topping
- ▢ 1/2 bunch cilantro chopped, optional for topping
- ▢ 3 limes quartered, optional for topping
Instructions
Prepare the Meat
- Generously salt and pepper meat on all sides.
- In a large dutch oven with a lid (or skillet if you’ll be using a slow cooker), heat oil over medium-high heat. Brown meat on all sides, in batches if necessary. This may take up to 15 minutes.
On the Stovetop
- Add onion and just enough chicken or beef broth to mostly submerge the meat. Stir, scraping the bottom of the pan to remove any stuck-on bits. Stir in remaining barbacoa ingredients and bring mixture to a low simmer. Cover and cook, stirring occasionally for 2 1/2 to 3 hours, until meat is very tender and can be pulled apart with a fork.
In the Slow Cooker
- Transfer meat and any drippings remaining in the pan to the slow cooker. Return the pan to medium-high heat and add a splash of broth or water to deglaze the pan. Scrape off any cooked-on bits in the pan and then pour the liquid over the meat in the slow cooker.
- To the slow cooker, add 1 cup of broth and remaining barbacoa ingredients. Cook on high for 3 to 4 hours, low for 7 to 8 hours, until the beef is tender and can be easily shredded with a fork.
Shred
- Once meat is done, use a slotted spoon to transfer the pieces to a cutting board. Use two forks to shred the meat, discarding any large pieces of fat as you go.
Assemble the Tacos
- Gently warm tortillas by wrapping them in a slightly damp towel and microwaving them until heated through, about 30 seconds to 1 minute.
- Top the tortillas with barbacoa, onions, radish slices, and cilantro. If desired, add a squeeze of lime juice, and enjoy!
Notes
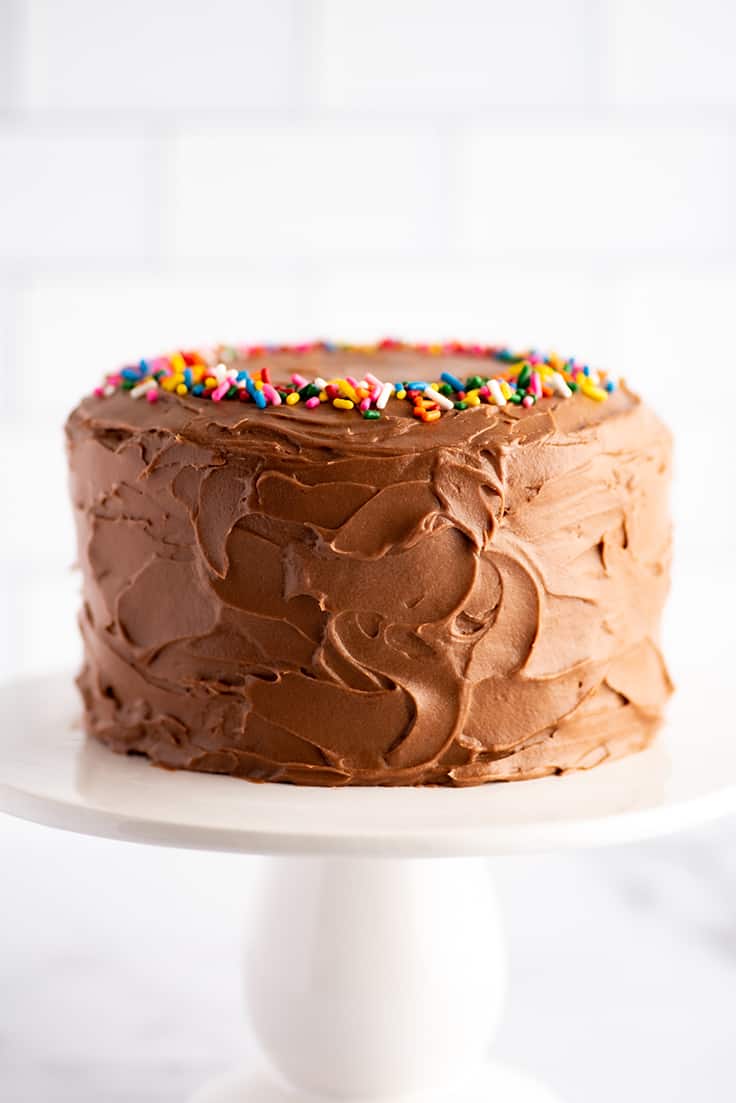
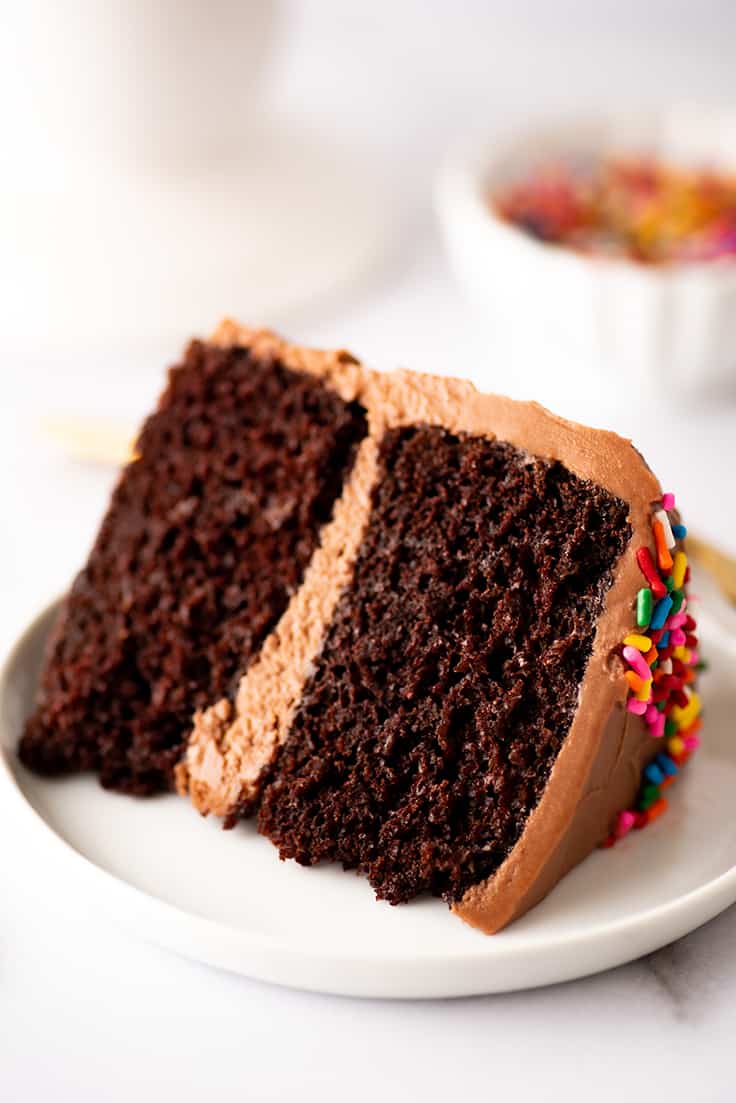
This small chocolate cake with silky smooth chocolate cream cheese frosting makes a decadent but surprisingly easy dessert.
For quite a while, a small chocolate cake has been the number-one most requested Baking Mischief recipe.
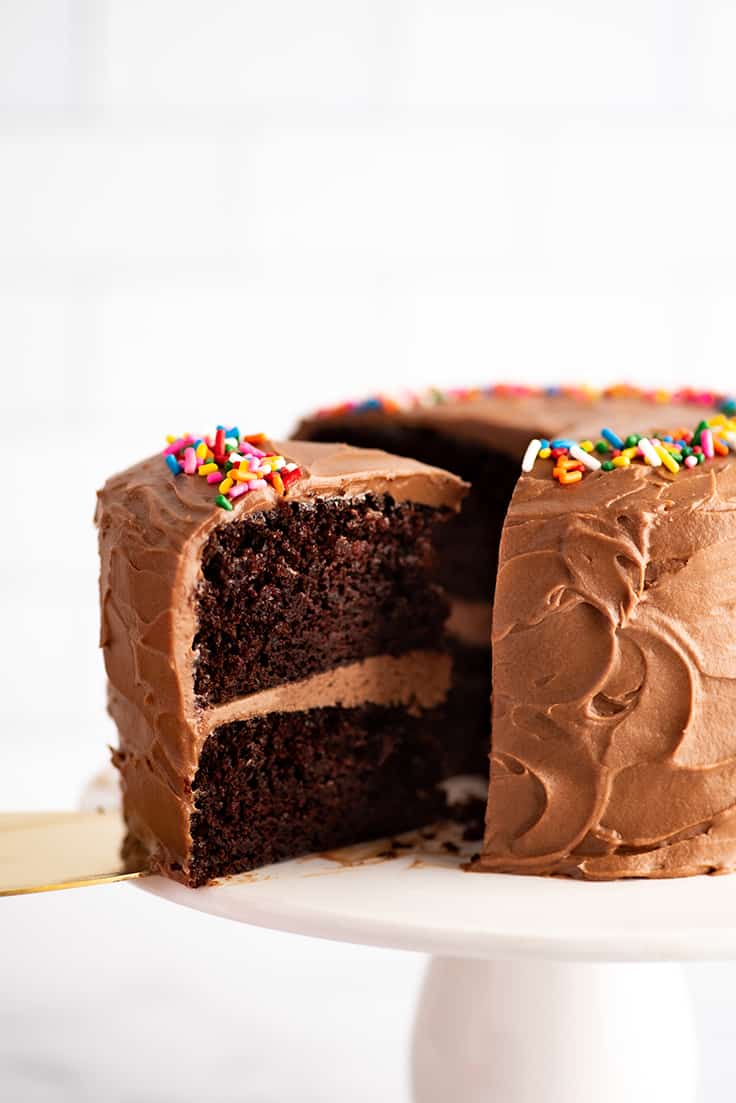
Well, friends, it’s finally here, and I think this soft and moist, intensely chocolatey little layer cake was totally worth the wait.

The Best Small Chocolate Cake
This cake is adapted from the famous Hershey’s Chocolate Cake Recipe , a personal favorite of mine. And it’s everything great about the original, but mini. It’s quick, easy, and so, so good.
It makes an incredibly soft and luxurious cake that practically melts in your mouth. And to make things even more decadent, we’re using a luscious chocolate cream cheese frosting over the top.
Ingredients of Note
- Baking staples: This cake and the frosting use your standard baking staples, sugar, flour, unsweetened cocoa powder, baking soda and baking powder, an egg, milk, vegetable oil, butter, and vanilla.
- Hot water or hot coffee: The hot liquid in this recipe helps “bloom” the cocoa powder, which means it helps to release as much flavor as possible and to dissolve any cocoa powder lumps that remain after mixing. Water will work just fine here, but coffee will help give your cake a deeper, more intense chocolate flavor without making your cake taste like coffee.
- Cream cheese: Using cream cheese in the frosting instead of making a standard butter-and-powdered-sugar American chocolate buttercream makes the frosting extra creamy and smooth and gives it an added cream cheese tang that is such a flavor boost.

How to Make a Small Chocolate Cake
- In a large bowl, whisk together all your dry ingredients. And then add all the wet ingredients except the water. You’ll beat it all together for 2 minutes to make sure everything is well-mixed.
- Add the boiling water or coffee and mix until completely incorporated. The batter will look very thin at this point, but don’t worry. It’s supposed to look like that.
- Divide batter between greased and floured cake pans and tap the pans on the counter once or twice so that any air bubbles in the batter come to the surface and release. Bake the cakes on the center rack of your oven. You’ll know your cakes are getting close to being ready when your kitchen begins to smell like chocolate.
- Cool cakes for 10 minutes before very, very carefully removing cakes from pans and finish cooling on a cooling rack. These cakes are so soft that they are easy to break, so work slowly and be gentle with them.
- Cool cakes completely before frosting. If you try to frost a warm cake, the frosting will literally melt off the sides, and no one wants that.
How to Prepare Cake Pans
Because this cake is so delicate, you want to make extra sure it’s not going to stick to your pans. So we’re going to grease and flour AND line the bottom of the pans with parchment paper.
To grease and “flour” your cake pans: Take a stick of butter and rub it around the interior of both of your cake pans so the entire surface has a light coating of butter.
Since this is a chocolate cake, we’re going to use cocoa powder to “flour” the pan, so add a couple of tablespoons of cocoa powder, and shake them around the bottom of the pan until it’s coated. Rotate the pan so the cocoa powder falls to the sides of the pan, and continue to rotate and shake the pan until the sides are completely covered. Dump the excess cocoa powder into the second cake pan and repeat. Discard the cocoa powder when done.
To line the pans: Simply trace the bottom of the pans on parchment paper and cut the circles out inside the line (so there are no pencil marks remaining). Place parchment paper in the pans with the curling edges facing down.
And your pans are ready to go!
A Note on Cake Pans
Make sure you’re using 6-inch cake pans that are at least 2-inches tall. This cake rises quite a lot, so if using shorter cake pans, fill them no more than half full so they don’t overflow in your oven.
How many will a 6-inch layer cake serve?
This cake will serve 4-6 people pretty generously. If you really want to stretch it, you can serve 8 smaller slices.
I don’t have six-inch cake pans. What else can I use?
If you don’t have six-inch cake pans, you can also make:
- A single-layer 9-inch round or 8-inch square cake (extend the baking time to about 30 minutes)
- About 15 cupcakes (shorten the baking time to around 22 minutes)

How to Store Chocolate Cake
Since this cake has a cream cheese frosting, store it covered in the refrigerator.
What other frostings can I use?
If you want to try a different frosting, use any of my other small-batch frosting recipes, but you’ll need to 2.5 or 3x the recipe so you have plenty of frosting.
- Vanilla Frosting
- Chocolate Frosting
- Strawberry Frosting
- Oreo Frosting
- Cream Cheese Frosting
- Cookie Dough Frosting
Can I freeze this cake?
Yes! If a small chocolate cake is still a little too big, this cake freezes fantastically. To freeze slices, place them on a parchment paper-lined baking sheet or cutting board that will fit in your freezer. Freeze until solid, 20 minutes to half an hour, and then wrap each piece individually in plastic wrap and store all together in a freezer bag.
More Small Cake Recipes
- Small Red Velvet Cake
- Small Carrot Cake
- Small Banana Cake
- Small Lemon Pound Cake
- Small Pumpkin Cake

Equipment
- Parchment paper
- 2 6-inch cake pans
Ingredients
Chocolate Cake
- ▢ 1 cup ( 120g ) all-purpose flour
- ▢ 3/4 cup + 2 tablespoons ( 175g ) granulated sugar
- ▢ 1/4 cup + 2 tablespoons ( 30g ) natural unsweetened cocoa powder
- ▢ 1/2 teaspoon baking soda
- ▢ 1/2 teaspoon baking powder
- ▢ 1/2 teaspoon salt
- ▢ 1 large egg
- ▢ 1/2 cup milk any percentage
- ▢ 1/4 cup vegetable oil
- ▢ 1/2 teaspoon vanilla extract
- ▢ 1/3 cup very hot water or coffee
Chocolate Cream Cheese Frosting
- ▢ 4 ounces cream cheese softened
- ▢ 1/2 cup ( 114g ) salted butter* softened
- ▢ 1 teaspoon vanilla extract
- ▢ 2 1/2 cups ( 300g ) powdered sugar sifted
- ▢ 1/4 cup ( 20g ) unsweetened cocoa powder sifted
- ▢ 1 tablespoon milk as needed
Instructions
Chocolate Cake
- Preheat your oven to 350°F. Grease and “flour” your cake pans with cocoa powder and line bottom with parchment paper.
- In a large bowl, stir together flour, sugar, cocoa powder, baking soda, baking powder, and salt.
- Add egg, milk, vegetable oil, and vanilla and beat for 2 minutes. Add hot water and stir until well-combined.
- Divide batter between prepared cake pans. Tap pans on the counter once to remove any air bubbles in the batter. Bake on the center rack for 22 to 27 minutes, until a toothpick inserted into the center of the cakes comes out clean or with just a few dry crumbs.
- Cool for 10 to 15 minutes before running a knife around the edge of the cakes and carefully removing them from their pans. Transfer cakes to a wire rack and cool completely before frosting.
Chocolate Cream Cheese Frosting
- In a medium bowl, combine cream cheese and butter. Beat together until well-combined and there are no individual streaks of cream cheese or butter remaining.
- Add vanilla and mix well.
- Add sifted powdered sugar and cocoa powder and beat, starting on low, working up to medium-high, until frosting is smooth and creamy. If necessary, add milk by the half teaspoon until frosting reaches your desired consistency.
Frosting the Cake
- Anchor cake to cake stand or plate with a dollop of frosting. Spread about 1/4 of the frosting over the bottom cake layer. Place second layer over the frosting and use the rest of the frosting over the top and body of the cake, starting at the top and spreading the frosting down the sides.
- Add sprinkles if desired. Serve and enjoy!
Notes

Quick Chicken Tortellini Soup
Ingredients
- 2 cups shredded or chopped cooked chicken *
- 1 tablespoon ( 14g ) butter salted or unsalted is fine
- ½ large onion diced, about ¾ cup
- 3 large cloves garlic minced or pressed
- 2 large carrots peeled and sliced
- 2 celery ribs sliced
- 6 cups chicken broth
- 9 ounces ( about 2½ cups ) refrigerated cheese tortellini
- ¼ heaping teaspoon dried oregano
- ¼ heaping teaspoon dried basil
- 1 cup heavy cream
- Salt and pepper
Instructions
- In a large pot, melt butter over medium heat. Add onions and cook for 3 to 5 minutes, until edges begin to turn translucent. Add garlic and cook for 30 seconds to one minute, until it just begins to turn golden.
- Add carrots, celery, and broth. Bring to a simmer and cook for 20 minutes.
- Add tortellini, oregano, and basil, and cook according to tortellini package instructions, until pasta is just al dente.
- Add shredded or chopped chicken to the pot along with the heavy cream. Add salt and pepper to taste.
- Cook until chicken is heated through. Serve and enjoy!
