You can throw these Easy Chicken Fajitas together in about half an hour, no marinating or planning ahead needed.
A couple of months ago, I shared my favorite Steak Fajitas with you, and as much as I love (LOVE) that recipe, it requires a pretty long marinating time, so it’s not exactly something you can whip up after work on a busy weeknight without planning ahead.
Today’s recipe, on the other hand, is perfect for no-plan weeknights. This is a fajita recipe that you can throw together in about half an hour, no marinating, no planning ahead. If you have some chicken thighs, bell peppers, and an onion, you can make these easy chicken fajitas right now.

Ingredient Notes
- Boneless, skinless chicken thighs: I love using chicken thighs for fajitas because they cook up golden and beautiful on the stovetop with little fuss or trouble, and unlike chicken breasts, you have to work pretty hard to overcook them. But if you prefer cooking with chicken breasts, they’ll work just fine here as well.
- Taco or fajita seasoning: Instead of a marinade, this recipe uses taco seasoning or fajita seasoning on the meat so you still get tons of great flavor without the wait time. If you don’t have any taco seasoning in your spice drawer, not a problem. A little chili powder, cumin, salt, and pepper will get the job done.
How to Make Easy Chicken Fajitas
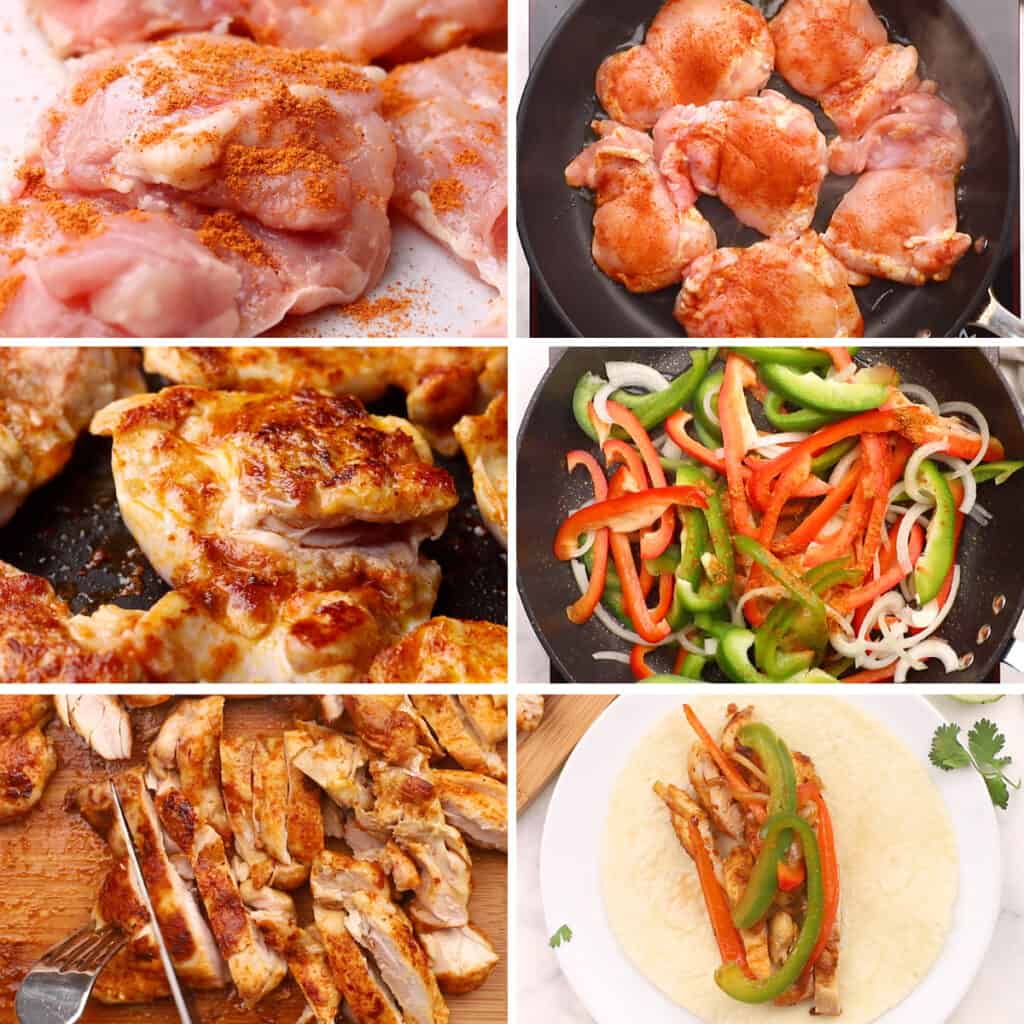

Generously sprinkle the thighs with taco or fajita seasoning or a bit of chili powder, cumin, salt, and pepper. You really don’t need to waste time measuring, just make sure all of the meat is lightly coated and you’re good to go.
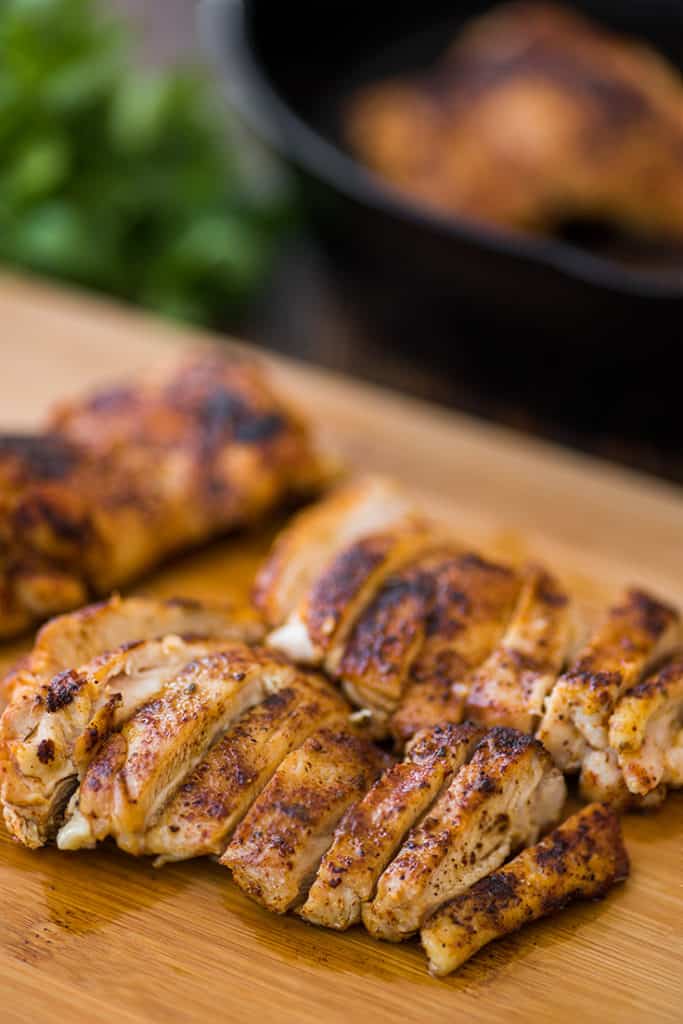
Cook the thighs on the stove over medium-high heat until an instant-read thermometer inserted into the center of the meat reads 165°F, about 3-5 minutes per side depending on their size.
Thighs cooked on the stove will pop and sizzle more than chicken breasts, so if they’re making too much of a mess, you can turn down the heat a bit or cover your pan with a splatter screen .
While your thighs cook, in another pan, you’ll throw together the fajita veggies , a couple bell peppers and an onion. These get sprinkled with a little taco seasoning of their own or that mix of chili powder, cumin, salt, and pepper and cooked until the vegetables are tender-crisp.
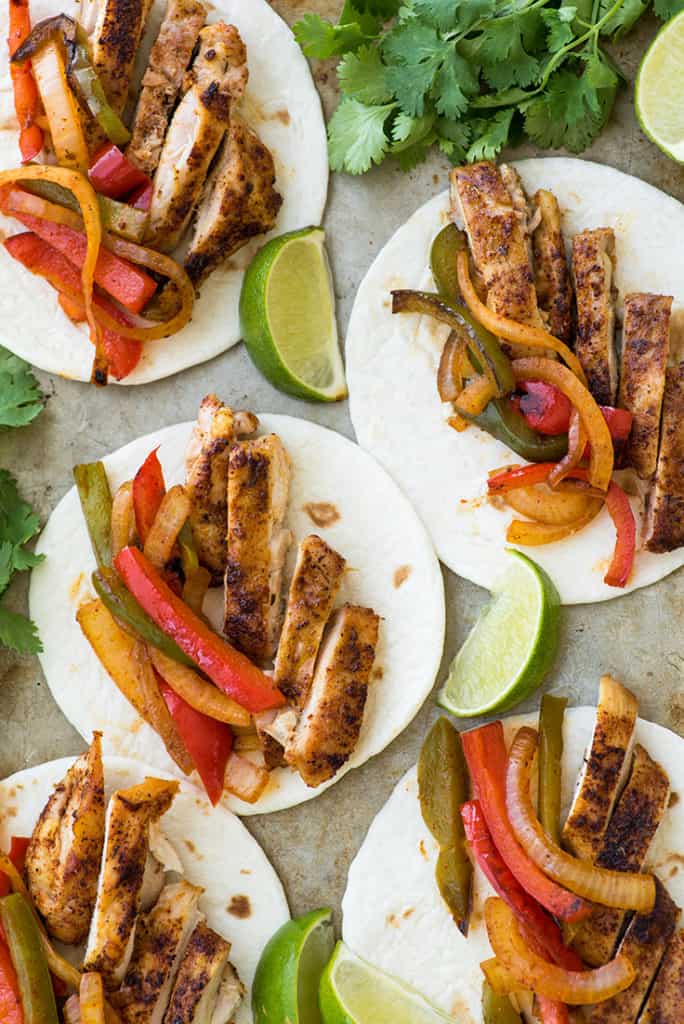
Once everything’s done, slice the chicken thighs, and serve with the fajita veggies on warmed tortillas with a squeeze of lime and your favorite fajita toppings.

What should I serve with chicken fajitas?
Cilantro rice and beans are always a good option. If you want to really make a night of it, I love tortilla chips and nacho cheese , but if you’re looking for something a little lighter, go with a batch of easy oven-roasted broccoli or roasted zucchini.
Then maybe add a small batch of Chocolate Chip Cookies for dessert.
Can I make chicken fajitas with chicken breasts?
Sure. If you would like to use chicken breasts rather than thighs, go for it, but the cooking method will vary a tiny bit. Season the chicken as described in this recipe, and then go follow my Cooking Chicken Breast for Salads and Sandwiches tutorial.
Can I make this dish in advance?
Absolutely. You can cook your chicken and veggies up to 24 hours ahead of time. Store them tightly covered in the refrigerator, and when you’re ready to serve the fajitas, reheat the meat and veggies, warm the tortillas, and serve.

Recipes Notes
- Have fajita leftovers? Make them into Chicken Fajitas Sandwiches or Fajita Salads on day 2!
You Might Also Love
- Homemade Carnitas
- Easy Carne Asada
- Barbacoa
- Carnitas Enchiladas
- Easy Chicken Enchiladas

Ingredients
Chicken and Veggies
- ▢ 4 to 8 boneless skinless chicken thighs *
- ▢ Taco or fajita seasoning
- ▢ 2 tablespoons vegetable oil divided
- ▢ 2 bell peppers (any color) sliced
- ▢ 1/2 large onion sliced
Fajita Toppings
- ▢ 8 fajita-size tortillas
- ▢ 2 limes quartered
- ▢ Sour cream optional for topping
- ▢ Guacamole optional for topping
Instructions
- Sprinkle chicken thighs with taco/fajita seasoning until coated on all sides.
- On the stove, heat 1 tablespoon of oil in a large skillet over medium-high heat. Once hot, add chicken thighs and cook for 3 to 5 minutes per side, until the internal temperature reaches 165°F. If at any time the outside of the chicken begins to cook too quickly and burn, turn the heat down.
- While your meat cooks, in another large skillet, heat remaining 1 tablespoon of oil over medium-high heat. Once oil is hot, add bell pepper and onion slices. Sprinkle 1/2 teaspoon of taco seasoning or 1/4 teaspoon each of cumin and chili powder over the top. Cook, stirring occasionally, for 4 to 8 minutes, until edges are lightly browned and vegetables are tender-crisp. Salt and pepper to taste.
- For softer vegetables, turn heat down to medium once the vegetables begin to brown so they don’t burn, and continue to cook until vegetables reach your desired level of doneness. For very soft vegetables, add 1/4 cup of water to the pan at this point, and cook until veggies are soft and water has evaporated, adding more water as necessary.
- Slice cooked chicken thighs and serve over warmed tortillas with the vegetables, a squeeze of lime juice, and your favorite fajita toppings.
Video
Notes
This deliciously decadent caramel milkshake is quick and easy to make at home. You’ll just need three ingredients: vanilla ice cream, milk, and caramel–homemade or store-bought is just fine.
Hey, friend. Have some caramel sauce in your fridge and some vanilla ice cream in your freezer? You should definitely make a caramel shake right now.
The Perfect Caramel Milkshake
This caramel shake is a total sweet caramel dream, and all you need to make it is the perfect milkshake ratio (three scoops of vanilla ice cream and 1/2 cup of milk) and some caramel.

Ingredient Notes
- Caramel: If caramel sauce isn’t something you keep stocked at home, pick some up the next time you’re at the store, make my quick shortcut caramel sauce , or you can whip out a heavy-bottom pot, melt some sugar, and make some traditional caramel sauce yourself. If you have dulce de leche , you can also substitute it for the caramel and make a dulce de leche milkshake .
- Vanilla Ice Cream: Vanilla ice cream pairs well with the caramel flavor in this shake. For best results, use a high-quality vanilla ice cream you enjoy.
- Milk: Any milk will work for your milkshake, but the higher fat your milk, the richer your shake will be. You can even substitute a little half and half or heavy cream for some of the milk for an extra rich and creamy shake.
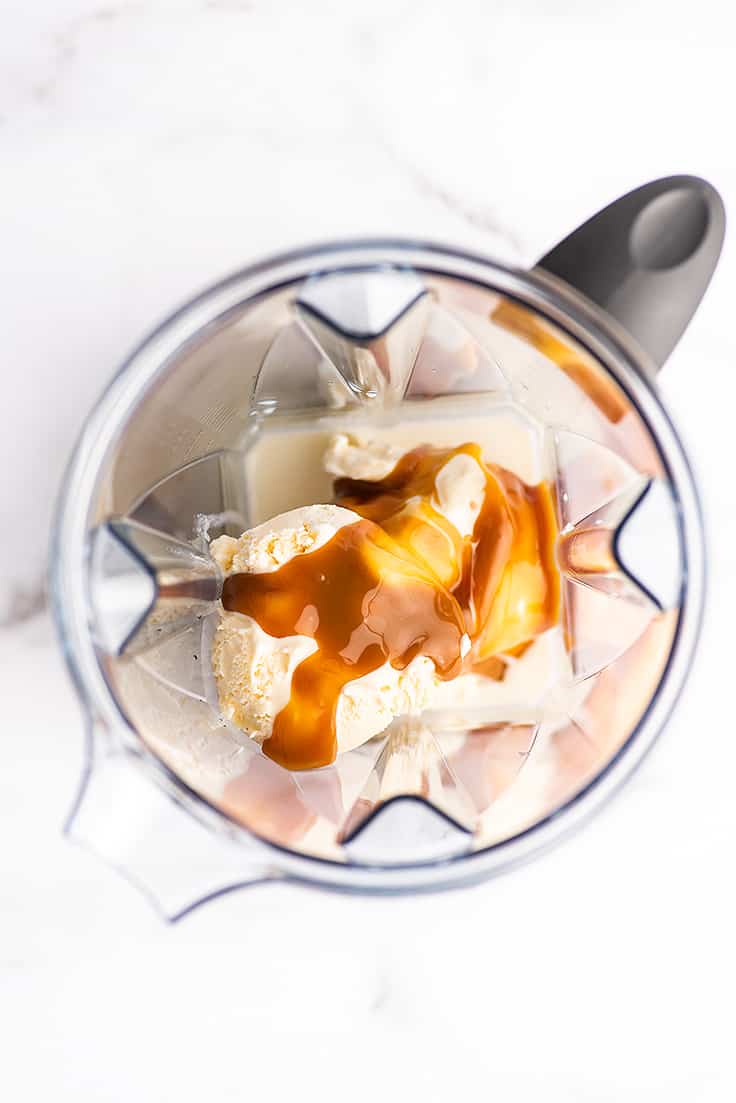

How to Make a Caramel Milkshake
- Combine all your ingredients in a blender and blend until smooth. If your blender is struggling to blend the shake, let everything sit at room temperature for 10 minutes before trying again. This will allow the ice cream to soften slightly and blend more easily without having to add additional milk which can water down the shake.
- Drizzle extra caramel sauce around the inside of a glass (if desired) and add the shake. Top with whipped cream and more caramel and enjoy!
Caramel Shake Variations
For more caramel shake combos, try adding some mix-in to this recipe:
- Banana Caramel Milkshake: Add 1/2 to 1 whole ripe banana before blending. Use a frozen banana for a creamier shake.
- Vanilla Bean Caramel Milkshake: Add the seeds scraped from 1/2 of a vanilla bean before blending.
- Coffee Caramel Milkshake: Replace the milk with the same amount of cold coffee.
How can I make this a salted caramel milkshake?
If you’re craving a salted caramel shake, not a problem. You can use salted caramel if you have it in place of regular OR add a generous pinch of salt to your shake before blending. Taste the shake and add more as needed.
To be a little extra, you can also dip the rim of your cup in more caramel and sprinkle flakey sea salt over the top, but that’s totally optional.
Do I have to use vanilla ice cream for a caramel shake?
Nope. You can use whatever ice cream you have on hand as long as the flavor goes well with caramel. I just like vanilla as a base because it really lets the caramel flavor shine through and be the star of the show.


Can I make my milkshake in advance?
I don’t recommend it. Milkshakes are always best right after they’ve been made. Even when stored in the fridge, they will begin to melt and be less thick and creamy the longer they sit.
More Milkshake Recipes
- Banana Milkshake
- The Best Chocolate Milkshake
- Strawberry Milkshake
- Oreo Milkshake
- The Best Vanilla Milkshake
Recipe Notes
- This will make approximately 1 1/2 to 2 cups, enough for one restaurant-sized shake or two smaller ones.

Ingredients
- ▢ 1½ cups vanilla ice cream about 3 scoops
- ▢ ½ to ¾ cup milk *
- ▢ 2 tablespoons caramel sauce plus optional more for drizzling
- ▢ Whipped cream optional for topping
Instructions
- In your blender, combine ice cream, milk, and caramel. Blend until caramel is incorporated and shake is pourable.
- Pour into glass(es), top with optional whipped cream and more caramel if desired. Serve and enjoy!
Notes
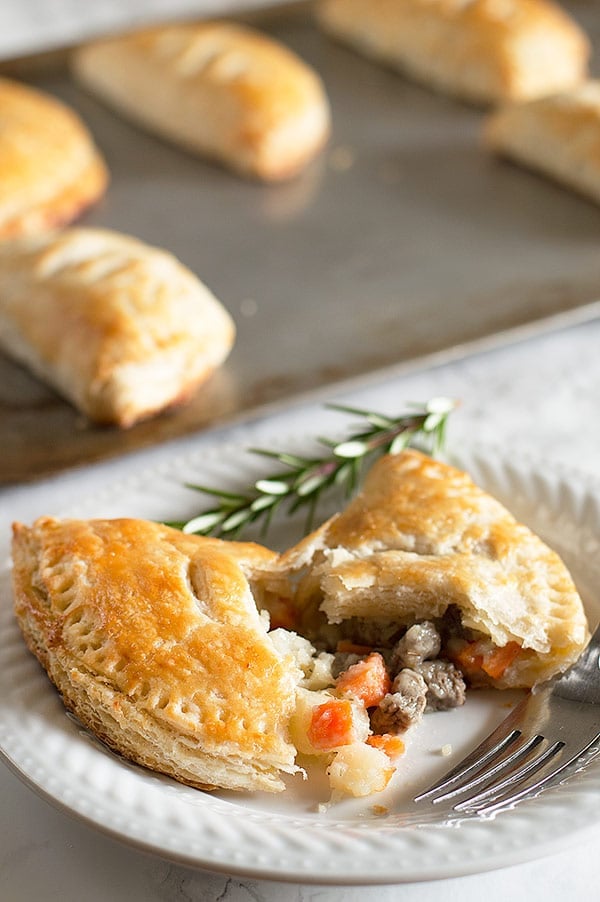
These easy beef pasties are made with a buttery, flaky buttermilk pie crust wrapped around a savory mixture of beef, carrots, potatoes, and onions in a quick homemade gravy.
Have you ever had a pasty before? If not, friend, let’s change that today.
Unless you don’t like/eat beef, I dare you to try not to fall in love with these things. The shell is made from my favorite buttermilk pie crust, so it’s flaky and buttery and perfect.
And the filling is so good you’ll want to eat it with a spoon before you can bake it into the pasties.

Beef Pasties Made Easy
Meat pies like these can be a little intimidating, but I think this recipe is pretty straightforward and simple.
There’s always a degree of difficulty when it comes to making stuffed pastries from scratch, but this recipe does as much to eliminate that as possible.
The buttermilk pie crust is made in a food processor and is really beginner-friendly when it comes to handling and rolling.
And unlike a lot of pasty recipes I’ve seen, this stuffing is fully cooked before the pies go into the oven, so you don’t have to worry about whether your meat is cooked through or vegetables tender before they come out of the oven.
Ingredient Notes
- Pie crust: If you have a favorite pie crust recipe, you can use it or store-bought crusts instead of the buttermilk pie crust in the recipe below, but I really love this particular crust. It’s extremely easy to work with and bakes up SO flakey and beautiful. If you’ve never made pie crust before or just want a more detailed tutorial, I wrote an entire post dedicated to this crust with step-by-step pictures .
- Diced carrots and potatoes: I like to keep the filling simple with just meat, carrots, potatoes, and onions, but feel free to throw in extra veggies like parsnips, peas, or rutabagas.
How to Make Pasties
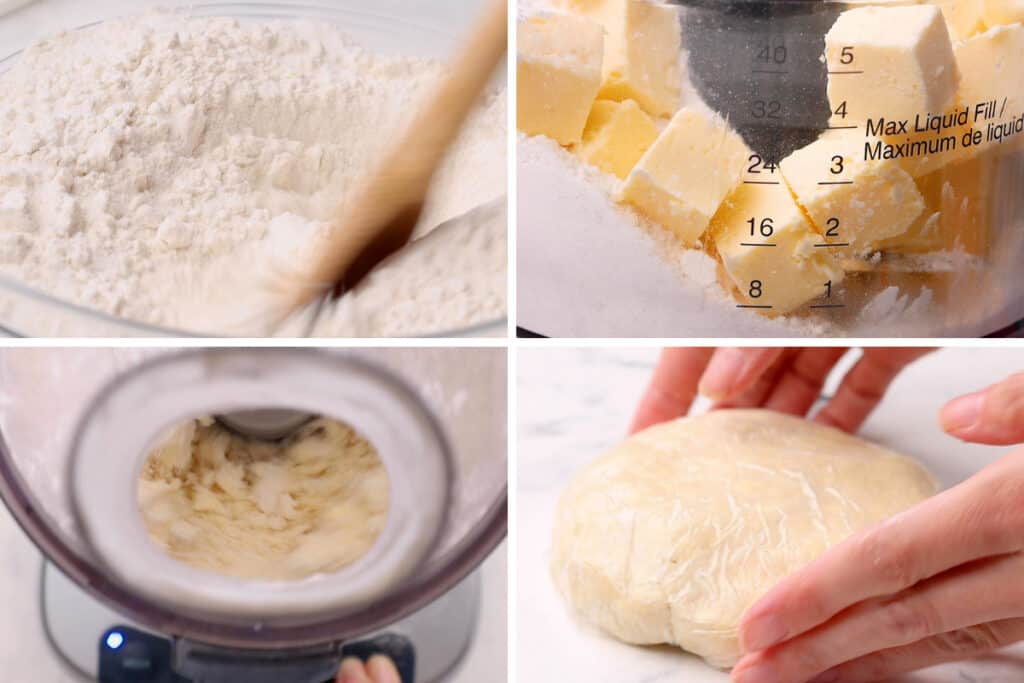

- Make the pie dough by pulsing together flour, butter, and buttermilk in a food processor until it forms crumbs that just begin to clump together. Turn half the crumbs out on a piece of plastic wrap and press them into a 1-inch thick disk. Repeat with the rest of the dough and refrigerate for at least an hour.
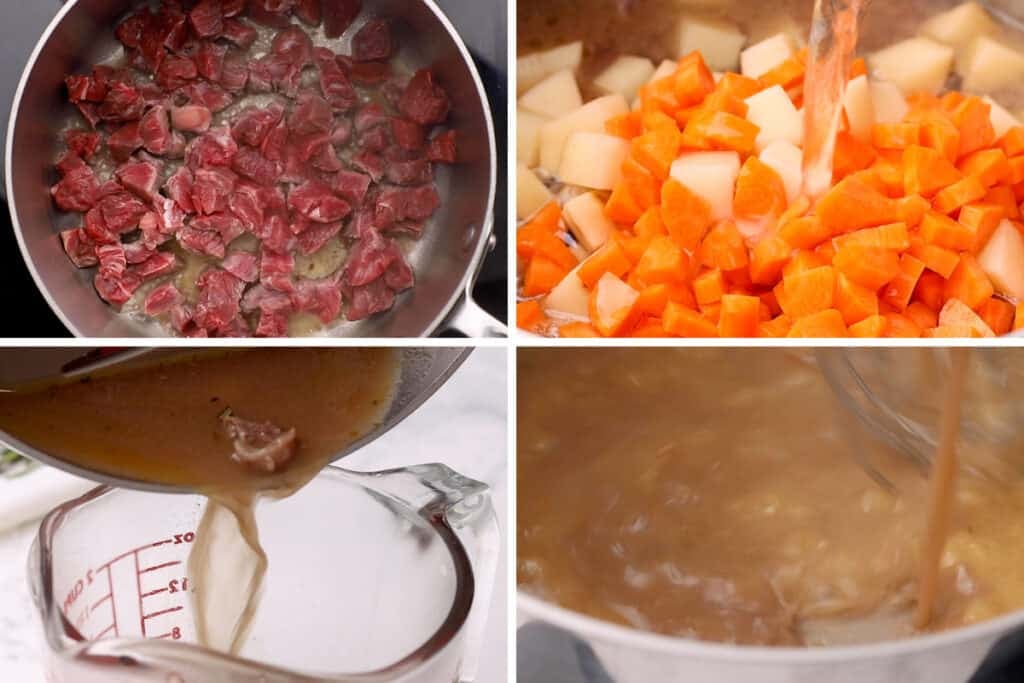

- Make the filling by browning your beef and then adding vegetables and covering with water. Add spices and bring everything to a simmer until potatoes begin to soften. Once cooked, use 1 cup of the cooking liquid along with a little flour and butter to make a quick gravy. Stir gravy, meat and vegetables together and set aside to cool slightly.
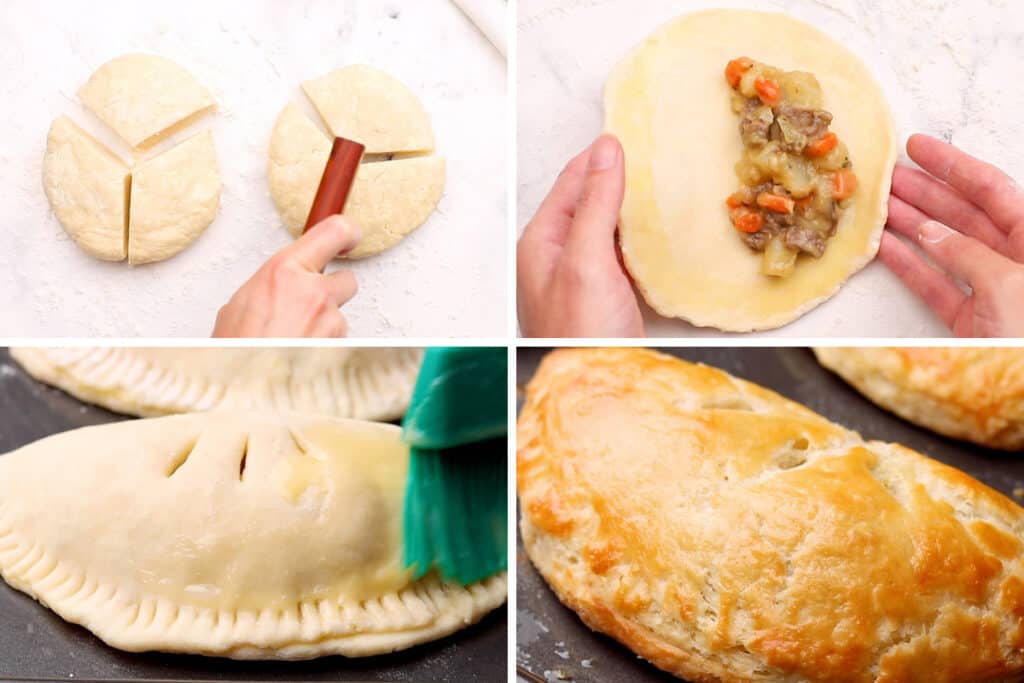

- Assemble the pasties. Divide each dough disk into 3 equal pieces, roll each out and fill with prepared filling. Fold the tops over and use a fork to crimp the edges closed before brushing with egg wash. Bake until golden brown, and enjoy!
Can you freeze pasties?
Yes! One of my favorite things about pasties is that they freeze and reheat amazingly. All you have to do is pull one out of the freezer, pop it right in the microwave, and one to two minutes later, you have a sizzling hot pasty that tastes like it just came out of the oven!
To freeze: Wrap individually in plastic wrap and store in an airtight container or freezer bag.
To reheat: Unwrap pasty and place on a microwave-safe plate. Reheat from frozen in the microwave for 1 to 2 minutes until steaming and hot all the way through.

Can these be made ahead of time?
Sure. Beef pasties make great make-ahead lunches and dinners. You can bake the pasties in advance and simply reheat in the microwave when you’re ready to eat them.
If you’d like to make the crust and the filling in advance and then assemble and bake them just before eating, you can do that too. Pie dough will keep in the refrigerator for up to 48 hours and in the freezer for up to 2 weeks. Filling can be made up to 48 hours in advance.
Can I double this recipe?
Yes. The recipe doubles just fine BUT you’ll probably need to make the crust in two batches. Not all food processors are large/powerful enough to handle a double batch of this dough.
To double the recipe ingredients, hover over the serving size in the recipe card below or click if you’re on mobile, and slide the slider.


More Freezer-friendly Recipes
- Naan Pizza
- Freezer Burritos
- Freezer Meatballs
- Creamy Chicken Noodle Soup

Ingredients
Crust
- ▢ 1 cup ( 8 oz, 2 stick cold unsalted butter cut into 1/2-inch chunks
- ▢ 2 1/2 cups ( 300 g) all-purpose flour
- ▢ 1 tablespoon granulated sugar
- ▢ 1 teaspoon salt
- ▢ 1/2 to 2/3 cup buttermilk
Filling
- ▢ 1 tablespoon unsalted butter
- ▢ 12 ounces beef chuck (stew meat) diced 1/2-inch
- ▢ 1 1/2 cups diced potatoes 1/2-inch dice
- ▢ 3/4 cup diced carrots 1/4-inch dice
- ▢ Water
- ▢ 1 1/2 teaspoon salt*
- ▢ 1/2 teaspoon crushed rosemary
- ▢ 1/4 teaspoon pepper
- ▢ 1/4 teaspoon oregano
Gravy
- ▢ 3 tablespoons unsalted butter
- ▢ 1/2 cup finely diced onion
- ▢ 2 tablespoons all-purpose flour
Egg Wash
- ▢ 1 egg
- ▢ 1 tablespoon milk
Instructions
Prepare Crust
- Before you begin measuring everything out, place the cubed butter in the freezer to chill.
- Stir together flour, sugar, and salt, and pour into the food processor. Add butter and pulse until butter is cut into the flour, but still has visible chunks.
- While pulsing, slowly pour in 1/2 cup of the buttermilk and continue to pulse until the buttermilk is incorporated into the dough. At this point, your dough should look like rough crumbs and hold their shape if squeezed together. If dough does not hold its shape, drizzle in a little more buttermilk, up to 2½ additional tablespoons, until it does. The dough will look a little scary at this point, but don’t worry. It’s supposed to look like that!
- Lay a sheet of plastic wrap on the counter and dump half of your dough crumbs onto the sheet. Gather the edges of the plastic wrap and press tightly together to form a 1-inch thick disk. Do the same with the rest of the dough. Place in a plastic bag and refrigerate for at least an hour, up to 24.
Prepare Filling
- Preheat oven to 400°F.
- In a medium saucepan, melt butter over medium-high heat (watch closely, you don’t want to burn the butter) and add the meat. Cook until well browned.
- Add potatoes and carrots and cover with just enough water that the meat and vegetables are submerged. Add salt, rosemary, pepper, and oregano.
- Bring to a boil, turn down to medium and simmer for five minutes. Meat should be cooked through and potatoes should be softened, but still have a bit of a bite to them.
- Remove from heat and drain the cooking liquid into a separate container for later use. Set liquid and meat and veggies aside.
- In a medium saucepan, melt remaining 3 tablespoons of butter over medium heat. Add onions and cook until they begin to soften, about 2 to 3 minutes. Add flour and whisk continuously for 1 minute until a sticky paste forms and flour turns golden. Whisk in 1 cup of the reserved cooking liquid from your meat and potatoes (discard the rest). Simmer for 2 to 4 minutes, whisking continuously, until a thick gravy forms. Remove from heat and stir in the meat and vegetable mixture, making sure everything is well coated.
Assemble Pasties
- Whisk together egg and milk in a small bowl to make your egg wash.
- On a well-floured surface, divide your dough into 4 to 6 equal-size pieces and roll into balls. If you are slow at rolling out pastry dough, place all the balls, but one, back in the fridge and work with one at a time so the dough stays chilled and easy to work with.
- Re-flour your work surface and roll first ball out to 3/8 inch thick with a floured rolling pin, forming as round of a circle as you can manage (trim edges with a knife to make a perfect circle if necessary). Pick up your dough to make sure it is not stuck to your work surface. If it is, use a metal spatula to dislodge it before filling.
- Brush egg wash around the edges of your pie crust to help seal it and spoon beef mixture over slightly less than half of the dough, leaving a 1/2-inch border. Fold dough over the filling and use a fork to crimp the edges closed. Cut 3 slashes in the top and transfer to baking pan.
- Repeat with remaining dough balls. You may have a bit of meat mixture left over, depending on how thin you rolled out your dough. You can eat it with a spoon.
- Brush pasties with egg wash and and bake for 15 to 20 minutes, until they are beautiful and golden.
- Allow to cool slightly and enjoy.
Notes
Pie Crust Adapted From: B.Britnell

Quick and Easy Chicken Fajitas
Ingredients
Chicken and Veggies
- 4 to 8 boneless skinless chicken thighs *
- Taco or fajita seasoning
- 2 tablespoons vegetable oil divided
- 2 bell peppers (any color) sliced
- 1/2 large onion sliced
Fajita Toppings
- 8 fajita-size tortillas
- 2 limes quartered
- Sour cream optional for topping
- Guacamole optional for topping
Instructions
- Sprinkle chicken thighs with taco/fajita seasoning until coated on all sides.
- On the stove, heat 1 tablespoon of oil in a large skillet over medium-high heat. Once hot, add chicken thighs and cook for 3 to 5 minutes per side, until the internal temperature reaches 165°F. If at any time the outside of the chicken begins to cook too quickly and burn, turn the heat down.
- While your meat cooks, in another large skillet, heat remaining 1 tablespoon of oil over medium-high heat. Once oil is hot, add bell pepper and onion slices. Sprinkle 1/2 teaspoon of taco seasoning or 1/4 teaspoon each of cumin and chili powder over the top. Cook, stirring occasionally, for 4 to 8 minutes, until edges are lightly browned and vegetables are tender-crisp. Salt and pepper to taste.
- For softer vegetables, turn heat down to medium once the vegetables begin to brown so they don’t burn, and continue to cook until vegetables reach your desired level of doneness. For very soft vegetables, add 1/4 cup of water to the pan at this point, and cook until veggies are soft and water has evaporated, adding more water as necessary.
- Slice cooked chicken thighs and serve over warmed tortillas with the vegetables, a squeeze of lime juice, and your favorite fajita toppings.
