My favorite popsicle tips and tricks plus some of the best popsicle recipes on the internet!

Hey folks, I’ve been a little obsessed with popsicle recipes this summer. On the blog these last couple of months, I’ve shared Cookies and Cream Popsicles , Homemade Pudding Pops , and even some Frozen Pupsicles for our four-legged friends. I don’t have any more popsicle recipes to share with you this summer, but before I completely put away the popsicle mold, I wanted to share a few of my favorite tips and tricks for popsicle making.
Tip #1: Get a good popsicle maker!


Look, that twenty-year-old popsicle mold you stole from your parents’ kitchen when you moved away to college (what, am I the only one?) works fine, BUT, popsicle making is so much easier and your popsicles look so much more professional when you have a quality mold.
This is the one I have , and I love it. It doesn’t pick up odors or colors and is easy to clean. Mine gets a TON of use and it still looks brand new. There’s also another highly rated mold with a metal lid that I know a lot of bloggers are a fan of, if that’s more your speed.
Mini Tip: Buy some popsicle sticks to go with it. Most molds come with twenty or so, but that’s like two batches of popsicles. If you have sticks, you are far more likely to actually use your popsicle mold.
Tip #2: How to keep sticks from tipping over


The one major complaint I see from people with the type of mold I have is that they make their popsicles, put the sticks in, the sticks tilt, freeze that way, and it is almost impossible to get the lids off. That is an EASY fix, and you have a couple of good options:
- Put your popsicles in the freezer without sticks, wait 40 minutes or so, until popsicles are slushy and then insert the sticks. They’ll say where you put them. Just make sure to set a timer so you don’t forget because you’ll be in trouble if you forget to add the sticks!
- Use mini alligator clips on either side of each popsicle stick. It keeps them perfectly straight.
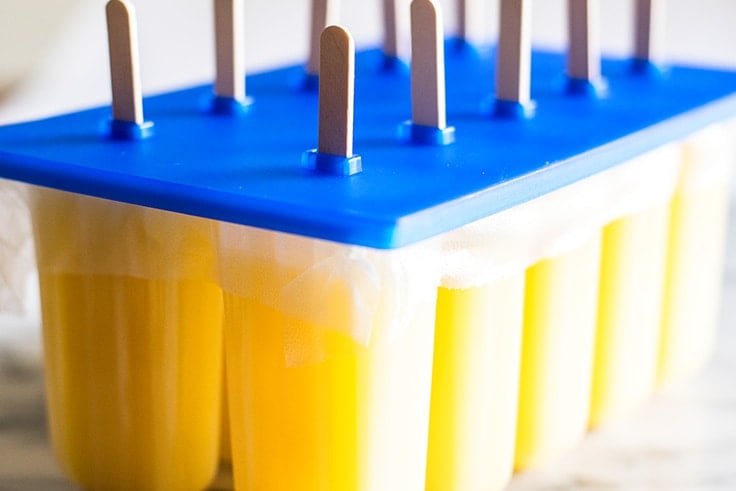
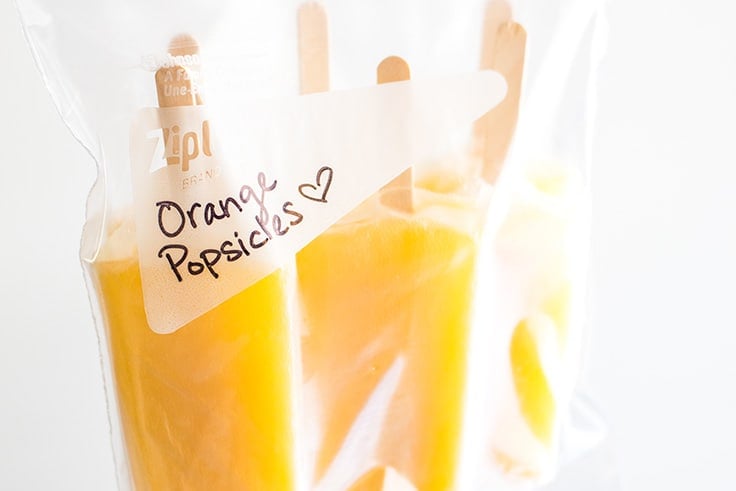
- My favorite: Stretch a sheet of plastic wrap over the top of the popsicle mold before adding the lid. Then use a paring knife through the slits in the lid to poke a small opening where each of the sticks should go. Insert the sticks, and they will stand straight up and only go down as far into the popsicle as you want them too. I also like this trick because if your popsicles freeze over, it adds a layer between the popsicle and lid so nothing sticks and you can just peel the plastic off.

Tip #3: The best way to store popsicles

Yes, you can just leave your popsicles in the mold and take them out one by one when you are ready for them, but unless you are eating them within a day or two, they can start to pick of freezer smells and the bottoms can become freezer-burned. You’ll keep your popsicles tastier longer using one of these methods.
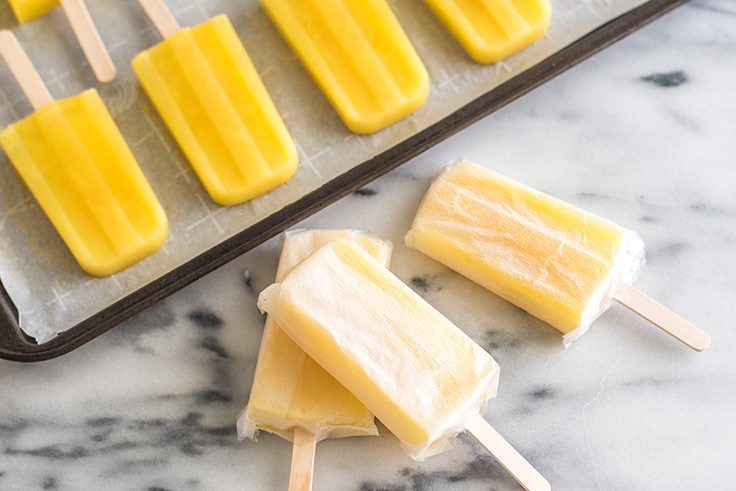
- Store in a plastic freezer bag or airtight container. This is the easiest option. Once you remove your popsicles from their mold, lay them on a parchment or wax-paper-covered baking sheet (or plate if that’s what will fit in your freezer) and refreeze for 15 to 20 minutes until completely re-frozen. This will keep them from sticking together when stored. Then just place them in the air-tight container. This works best for popsicles you plan on finishing within a couple of days as the container won’t keep them completely fresh for very long.
- For longer storage, wrap each individually in plastic wrap before storing in an airtight bag or container. You don’t have to refreeze them before wrapping since they won’t be able to stick together. This will keep your popsicles fresh and fabulous for a week or two, and it makes the whole experience of eating one feel just a little more special since you get to unwrap it before eating.

The BEST Popsicle Recipes
Finally, I asked some blogger friends to recommend their BEST popsicle recipe to me so you have bunches of recipes to try these tips out on. There’s still a month of summer left, so I bet you can get through a ton of them!


Homemade Pudding Pops
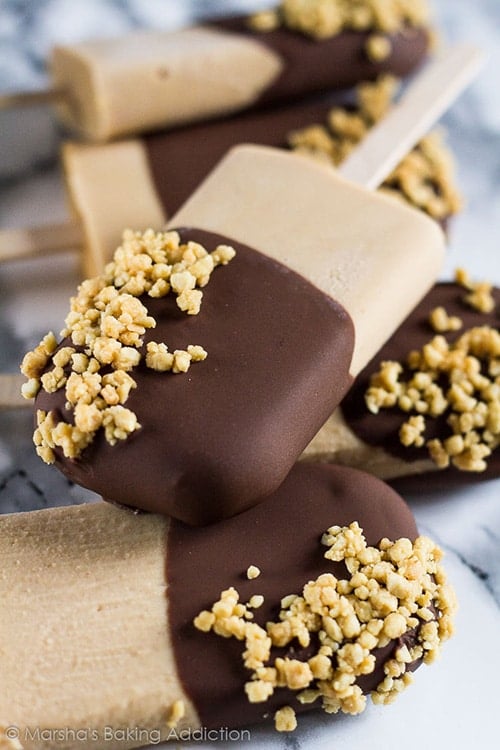

Chocolate Peanut Butter Yoghurt Popsicles from Marsha’s Baking Addiction

Fully Loaded Vegan Oreo Coconut Milk Popsicles from A Side of Sweet
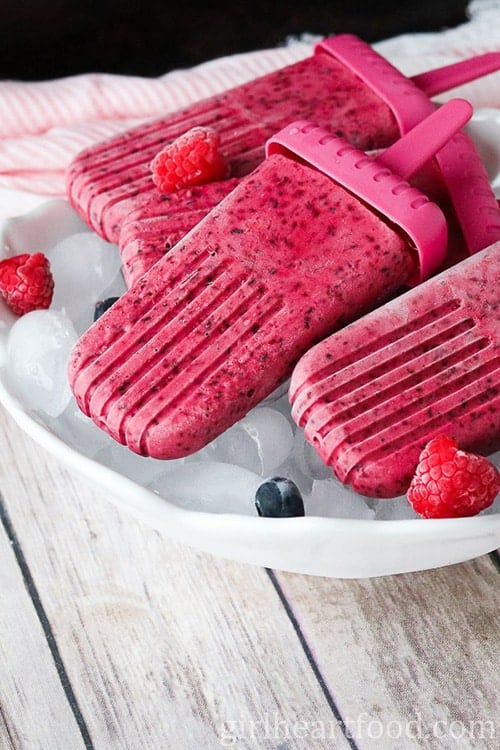

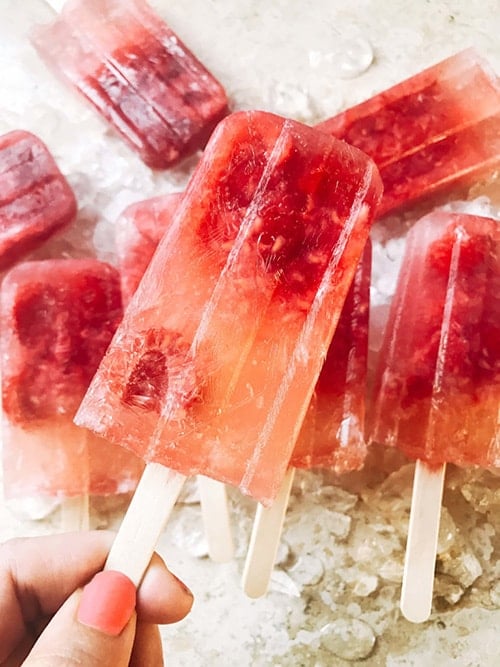
Triple Berry Ice Pops from Girl Heart Food

Coconut Pineapple Popsicles from Saving Room for Dessert

Watermelon Margarita Popsicles from Salt and Lavender
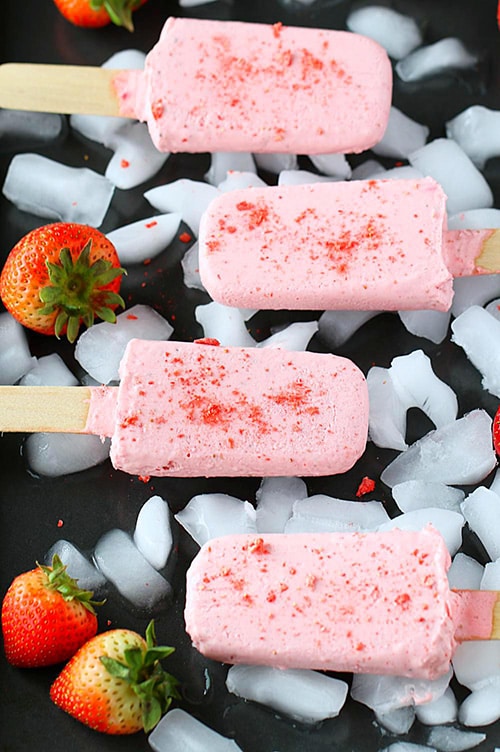

Creamy Strawberry Popsicle from Ruchi’s Kitchen
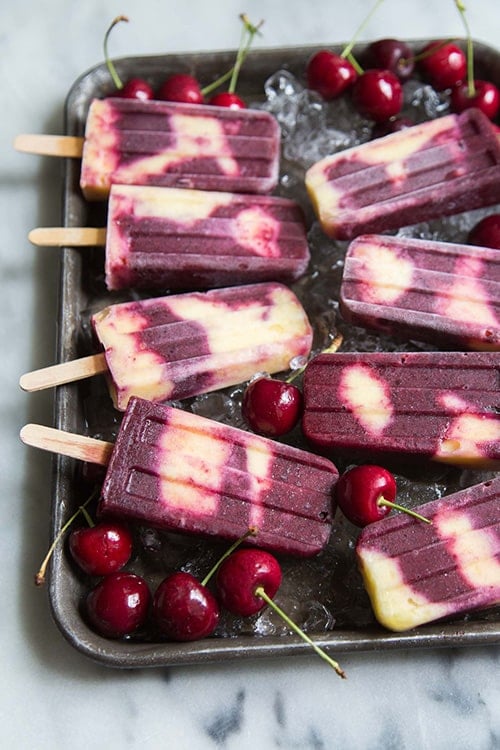

Swirled Cherry Pineapple Popsicles from The Little Epicurean

Raspberry Rose (Frose) Popsicles from Three Olives Branch
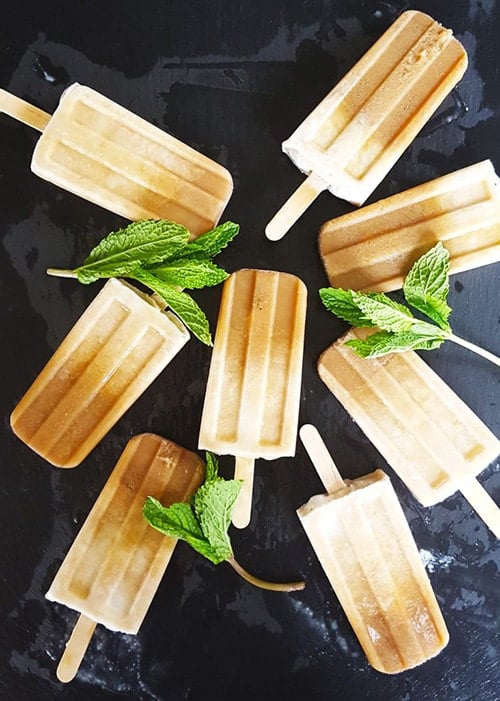

Boozy Mint Coffee Coconut Cream Popsicles from Feast in Thyme
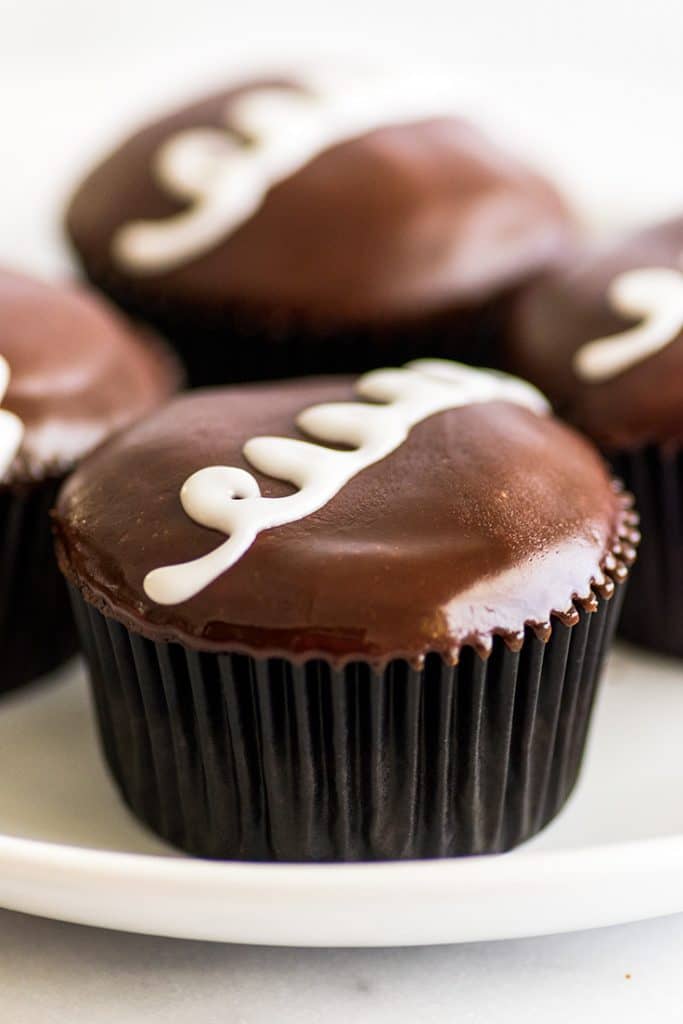
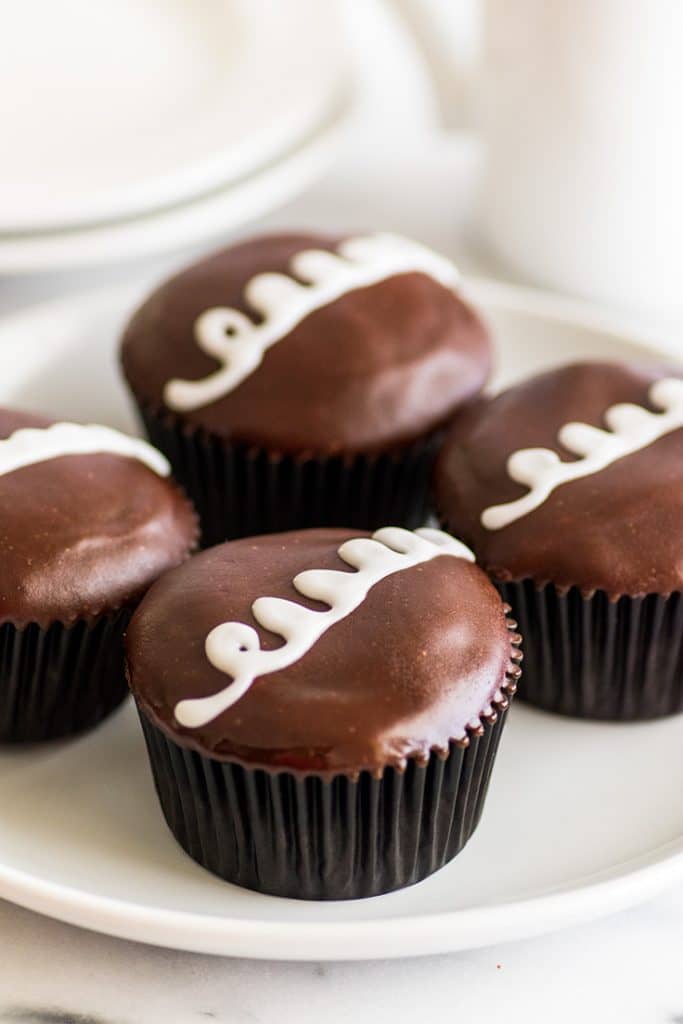
With this recipe for Small-batch Homemade Hostess Cupcakes, you can make a childhood favorite at home! Moist chocolate cake, creamy marshmallow filling, and luscious chocolate topping. What could be better?

Looking for more small-batch cupcakes? Try my Small-batch Vanilla Cupcakes.
I originally had these cupcakes scheduled for a couple of weeks down the road, BUT then I realized that with back-to-school season happening right now, this was the perfect time to share them.
I mean, most of us are done with our own back-to-school grind, but that doesn’t mean we shouldn’t get to enjoy some childhood lunch bag favorites this time of year.
Did your parents pack Hostess Cupcakes in your lunches as a kid? My parents DID NOT. We weren’t allowed to have them in the house, so of course, they were one of my most coveted childhood treats. I traded snacks for them at lunch, sneaked them on to the counter during road trip snack runs, and went nuts over them at friend’s houses.


Now that I’m (ostensibly) a grown up, I try not to eat sweets that come in little plastic wrappers from the gas station, but that doesn’t stop me from getting the occasional nostalgic craving for them. So for just those times and cravings, I put together this small-batch recipe for Homemade Hostess Cupcakes.
And I love them sooooo much. This homemade version uses my favorite small-batch chocolate cupcake base, stuffed full of (sort-of) homemade marshmallow fluff, with a thick and luscious chocolate glaze on top.


They are definitely what I would call “project cupcakes” like my S’mores Cupcakes and Samoa Cupcakes , in that they have more steps than just bake and frost.
I usually don’t do small-batch project cupcakes, but the steps for these are all so simple and quick that I think it’s totally worth it even for the small yield, and if you want to double or triple the recipe to make more, you can just slide the yield slider in the recipe card and make as many Homemade Hostess Cupcakes as your heart desires.
I’ll be sticking to the original four for built-in portion control though because this is one of those recipes I had to force myself to share. They are just so damn good that you’ll probably just want to eat them all by yourself.
The cake is soft, the chocolate topping thick with just the right level give when you bite into it, and the homemade marshmallow fluff center is fluffy, creamy, and perfect.


They are everything good about the originals but even better because they are homemade and you can make them whenever you want, no parental permission required!


Ingredients
Small-batch Chocolate Cupcakes
- ▢ 2 tablespoons ( 1oz ) unsalted butter
- ▢ 2 tablespoons ( 21g ) chopped semi-sweet chocolate high-quality chips are fine
- ▢ 1 1/2 teaspoons vegetable oil
- ▢ 1/4 cup ( 30g ) all-purpose flour
- ▢ 2 tablespoons ( 11g ) cocoa powder sifted if lumpy
- ▢ 1/2 teaspoon baking powder
- ▢ 1/8 teaspoon salt
- ▢ 1/4 cup ( 50g ) granulated sugar
- ▢ 1 large egg yolk room temperature
- ▢ 1/4 teaspoon vanilla extract
- ▢ 2 tablespoons milk any percentage
- ▢ 2 tablespoons hot coffee or water
Marshmallow Filling
- ▢ 8 large marshmallows
- ▢ 1 teaspoon corn syrup
Chocolate Glaze
- ▢ 1 tablespoon milk
- ▢ 1 tablespoon ( 1/2oz ) butter
- ▢ 1 teaspoon corn syrup
- ▢ 1/4 cup ( 1.5oz ) chopped semi-sweet chocolate (high-quality chips are fine)
- ▢ 1/2 cup ( 60g ) powdered sugar sifted
Icing
- ▢ 1/4 cup ( 30g ) powdered sugar
- ▢ 1/2 teaspoon to 1/2 tablespoon milk
Instructions
Small-batch Chocolate Cupcakes
- Preheat your oven to 350°F. Line a cupcake pan with 4 cupcake liners.
- In a small, microwave-safe bowl, combine butter, chopped chocolate, and vegetable oil. Microwave for 30 seconds, and stir until smooth, microwaving for an additional 15 seconds if necessary. Set aside to cool slightly.
- In a small bowl, whisk together flour, cocoa powder, baking powder, and salt. Set aside.
- In a medium bowl, whisk together sugar, egg yolk, and vanilla. Whisk in slightly cooled chocolate mixture until smooth.
- Whisk in flour mixture until just combined. Add the milk and coffee and whisk until smooth. The batter will look thin.
- Spoon or pour batter into prepared cupcake cups, filling 2/3 of the way full. Bake for 16 to 19 minutes, until a toothpick inserted in the center comes out clean or with only a few dry crumbs.
- Cool cupcakes in pan for 5 minutes before transferring to a cooling rack to cool completely, 15 to 20 minutes.
Marshmallow Filling
- Use a serrated knife to cut a cone-shaped piece out of the center of each cupcake. Cut the base of the cone/center of the cupcake off and discard (or eat!) and save the cupcake top.
- Spray two spoons with cooking spray and set next to your hollowed out cupcakes. In a medium, microwave-safe bowl, combine marshmallows and corn syrup. Microwave for 20 to 30 seconds until marshmallows are bloated and melty. Stir until smooth. Mixture will be sticky! Use greased spoons to fill hollows of cupcakes and place the cupcake tops back on.
Chocolate Glaze
- Once your cupcakes are filled, in a small saucepan, combine milk, butter, corn syrup, and chocolate. Heat over medium, stirring occasionally, until melted and combined. Turn heat off, but leave the pot on the burner and whisk in sifted powdered sugar until glaze is smooth.
- Transfer glaze into a small bowl wide enough for dipping and dip each cupcake down to the paper wrapper. Allow glaze to set for 5 minutes.
Icing
- In a small bowl, whisk together powdered sugar and 1/2 teaspoon of milk. Add milk by the 1/4 teaspoon until icing is smooth and when you run a knife down the center of the bowl it takes 20 seconds for the icing to completely fill back in. (You can add more powdered sugar if necessary to reach the right consistency.)
- Transfer icing to a small plastic bag and snip off a very small piece of the tip. Practice writing a line or two on a plate before adding swirls to the top of the cupcakes. Let sit for 5 minutes and enjoy!
Notes

These Small-batch Chocolate Chip Muffins are incredibly soft and moist and packed full of chocolate chips.

I went a little muffin crazy this summer and have posted a bunch of small-batch muffin recipes over the last couple of months. There were Small-batch Chocolate Chocolate Chip Muffins , Small-batch Orange Muffins , and Small-batch Blueberry Muffins . And today, I have some Small-batch Chocolate Chip Muffins for you.
This is the last muffin recipe I have on the calendar for now, but if there’s something you’d like to see, shoot me an email . I always love hearing from you!
I’m pretty pleased to be ending my current muffin run with these little beauties because there is absolutely nothing better than the excuse to eat chocolate for breakfast.


These small-batch chocolate chip muffins are positively packed full of chocolate chips, and I added espresso powder to the batter, so they have just a hint of coffee flavor to them, which gives the chocolate a nice little boost. (If you don’t like coffee, don’t worry, you can omit the espresso).


This base is the same as my Blueberry Muffins, so like those muffins, these are incredibly soft and moist. Eating one for breakfast with a cup of coffee makes even the busiest morning feel just a little bit indulgent and special.
This small-batch muffin recipe will make four muffins, and while muffins are usually best on the first day, these are so moist that if you make them in the afternoon, they’re still going to taste amazing the next morning, and if you pop it in the microwave for about 15 seconds before eating, so the chocolate is all gooey and melty, even better.


More Small-batch Muffins
- Small-batch Banana Muffins
- Small-batch Chocolate Banana Muffins
- Pumpkin Streusel Muffins
- Small-batch Apple Crumb Muffins
Have you made any muffins this summer? What’d you make?

Ingredients
- ▢ 1/2 cup ( 60g ) all-purpose flour
- ▢ 3/4 teaspoon baking powder
- ▢ 1/8 teaspoon espresso powder optional but extra delicious
- ▢ 1/8 teaspoon salt
- ▢ 1/4 cup ( 50g ) granulated sugar
- ▢ 3 tablespoons vegetable oil
- ▢ 1 large egg white
- ▢ 3 tablespoons sour cream
- ▢ 1/2 teaspoon vanilla extract
- ▢ 1/3 cup chocolate chips
Instructions
- Preheat your oven to 375°F and line your muffin tin with 4 cupcake liners.
- In a small bowl, whisk together flour, baking powder, espresso powder, and salt. Set aside.
- In a medium bowl, combine sugar and oil, and whisk until well-combined. Add egg white, sour cream, and vanilla. Whisk until smooth. Stir in flour mixture until just combined and then fold in chocolate chips.
- Divide mixture between your prepared muffin tins. Bake for 17 to 21 minutes, until a toothpick inserted into the center of the muffins comes out with only a few dry crumbs and when gently pressed, the muffin top springs back.
- Cool for 5 minutes before transferring to a cooling rack to finish cooling.
