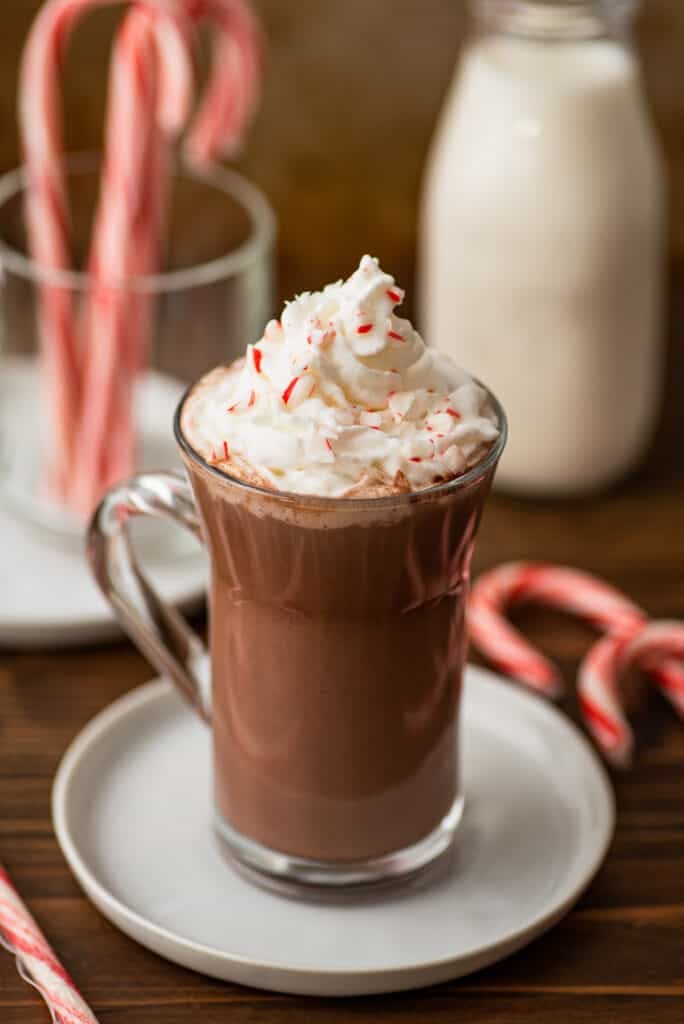
You can make a warming cup of peppermint hot chocolate at home with just a few pantry staples and a candy cane. No special extracts or syrups needed.
Is it really the holiday season if you don’t have at least one cup of peppermint hot chocolate? I think not.
This is one of my favorite drinks as soon as the weather begins to turn cold, and while it’s perfectly lovely to order one while I’m out and about, I love that it’s almost as easy and just as delicious to throw one together for myself at home.

I have a couple other peppermint drinks on the site (my peppermint mocha and white chocolate peppermint mocha ), and as with those recipes, this recipe doesn’t use peppermint extract, just a single candy cane instead.
Using a candy cane gives you the that spicy-sweet peppermint flavor you’re looking for without you having to stock another extract that you probably won’t use 10 months out of the year.
Ingredient Notes
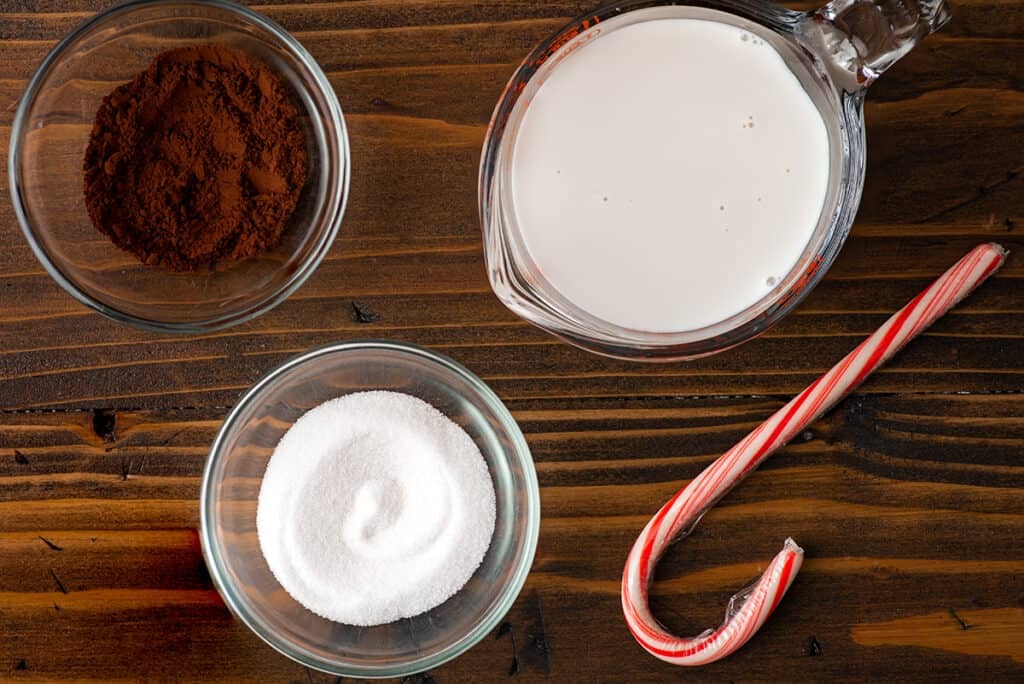

- Milk: Use any milk you’d like, but I typically like to use whole milk for hot chocolate since the higher fat the milk, the richer your hot chocolate will be. For an extra rich and creamy drink, try substituting half and half or heavy cream for some of the milk.
- Cocoa powder: This recipe calls for unsweetened cocoa powder, but both natural and Dutch-process cocoa powder will work just fine here.
- Candy cane: This recipe calls for one large candy cane, but if you only have small ones, one large candy cane is equal to about 3 or 4 minis. For a less intense peppermint flavor, you can use just half of one.
How to Make Peppermint Hot Chocolate
- Place candy cane in a zip-top bag and use a rolling pin or meat mallet to crush the candy into small crumbs. The crumbs don’t need to be ground into a fine dust, just small pieces so they dissolve more quickly in the hot chocolate.


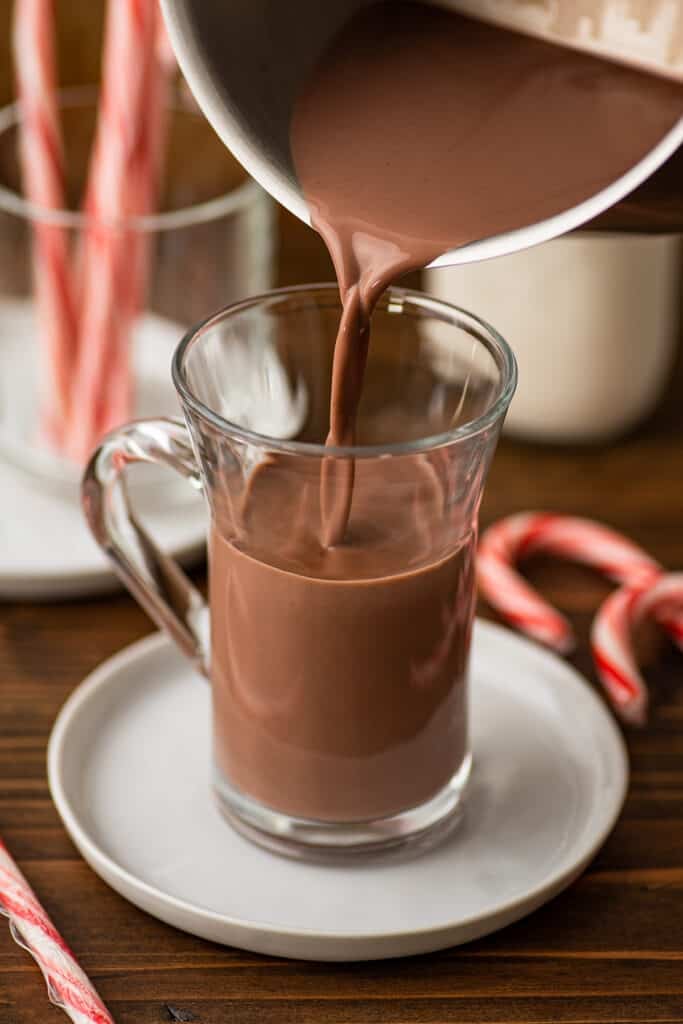
In a small saucepan, over medium heat, combine candy cane pieces, sugar, cocoa powder, and water. Stir until sugar and cocoa powder are smooth and candy cane has mostly dissolved.
Add milk and salt and stir. Heat, stirring occasionally, until the mixture reaches your desired temperature and any remaining candy cane pieces have completely dissolved.
Pour into a mug and top with whipped cream or marshmallows!

Variations
- Richer hot chocolate: Replace ⅓ cup of the milk with heavy cream or half and half.
- Extra chocolatey hot chocolate: Add 1 ounce (2 slightly heaping tablespoons) of chopped chocolate or good quality chips along with the cocoa powder and sugar at the beginning of the recipe.
- Hot chocolate float: Add a scoop of vanilla ice cream to the hot chocolate just before serving. (It’s so good!!)
Can I make this with peppermint extract instead?
Yes. If you’d like to use extract, skip the candy cane, and make the rest of the hot chocolate recipe as written. Pour the hot chocolate into a mug and then add extract to taste. Peppermint extract is extremely concentrated, so you’ll need only a drop or two!
Can I add coffee?
Absolutely. If you want to turn your peppermint hot chocolate into a peppermint mocha , simply replace ½ cup of the milk with ½ cup of strongly brewed coffee.
Can this be made in the microwave?
Sure can. Make sure to crush your candy cane extra finely if you’re going to make this in the microwave. Combine cocoa powder, sugar, crushed candy cane and water in a mug. Stir until well-mixed and microwave for 15 seconds.
Stir until candy cane pieces are mostly dissolved before adding the milk. Microwave 1 minute to 1 ½ minutes, until steaming, and enjoy!


MoreHot Chocolate Recipes
- Classic Hot Chocolate
- Crockpot Hot Chocolate
- Rich and Thick Hot Chocolate
- White Hot Chocolate
- Peanut Butter Hot Chocolate
Recipe Notes
- This recipe makes 1 cup of hot chocolate, enough to fill an 8-ounce mug. To fill an oversized mug, 1 ½ or double the recipe.

Equipment
- Zip top bag
- Rolling pin or meat mallet
Ingredients
- ▢ 1 full-size candy cane *
- ▢ 2 tablespoons ( 25g ) granulated sugar
- ▢ 1 tablespoon ( 5g ) unsweetened cocoa powder
- ▢ 1 tablespoon water
- ▢ 1 cup milk any percentage
- ▢ Pinch of salt
- ▢ Whipped cream optional for topping
- ▢ Mini marshmallows optional for topping
Instructions
- Place candy cane in a zip top bag and use a rolling pin or meat mallet to crush the candy into small crumbs.
- In a small saucepan, over medium heat, combine candy cane pieces, sugar, cocoa powder, and water. Stir until sugar and cocoa powder are smooth and candy cane has mostly dissolved.
- Add milk and salt and stir. Heat, stirring occasionally, until the mixture reaches your desired temperature and candy cane has completely dissolved.
- Pour into an 8-ounce mug and top with optional whipped cream or marshmallows if desired.
- Enjoy!
Notes
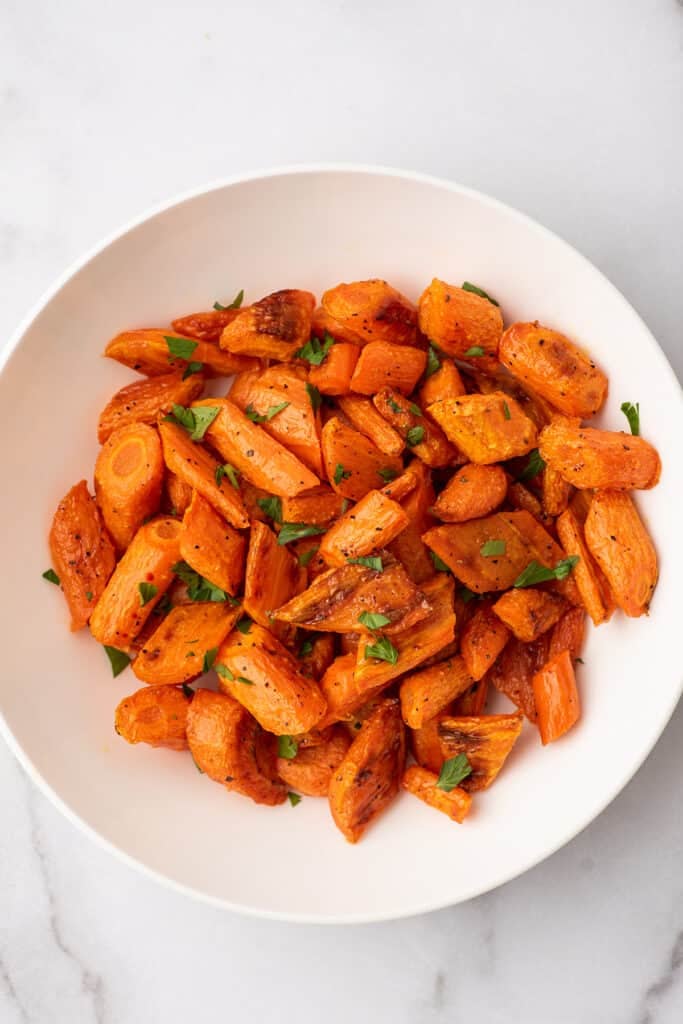
Roasted carrots are a super easy and simple crowd-pleasing side dish that you can prep in just a few minutes.
We all know that roasting improves almost any vegetable, and that absolutely holds true for carrots.
Give your carrots 30 to 40 minutes in the oven, tossed with a little butter, salt, and pepper, and they will come out tender, buttery, and perfect every time.

Ingredient Notes
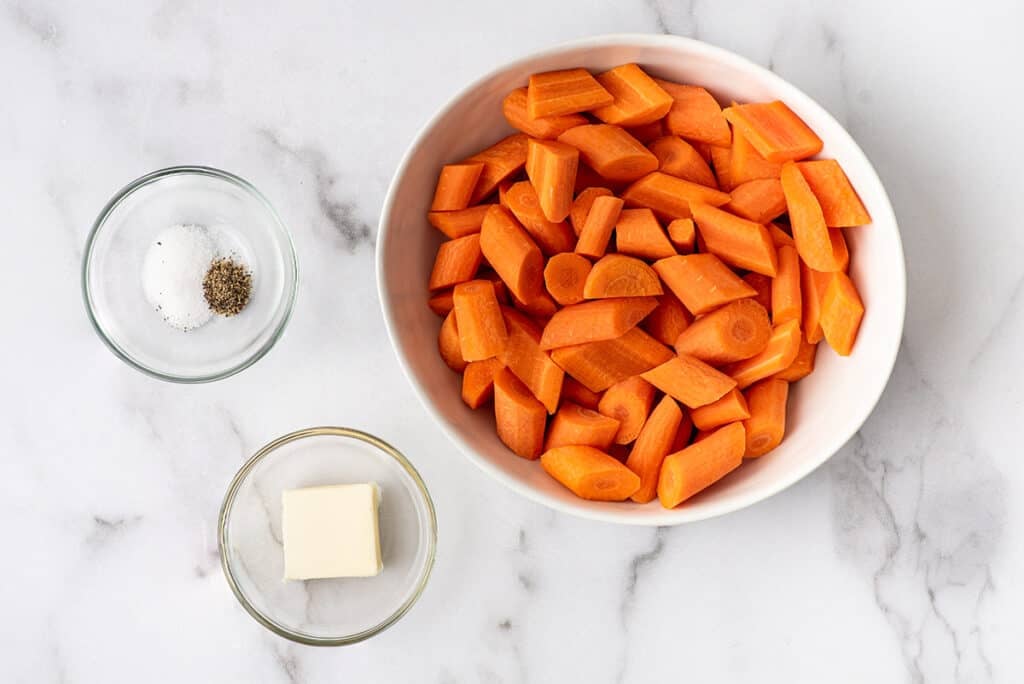

- Carrots: Try to chop your carrots into pieces roughly the same size so they cook evenly. For very large carrots, slice the thick upper part in half lengthwise before cutting into chunks.
- Salted butter: I love the buttery flavor of carrots roasted in melted butter, but you can use the same amount of olive oil if you’d prefer.
How to Make Roasted Carrots
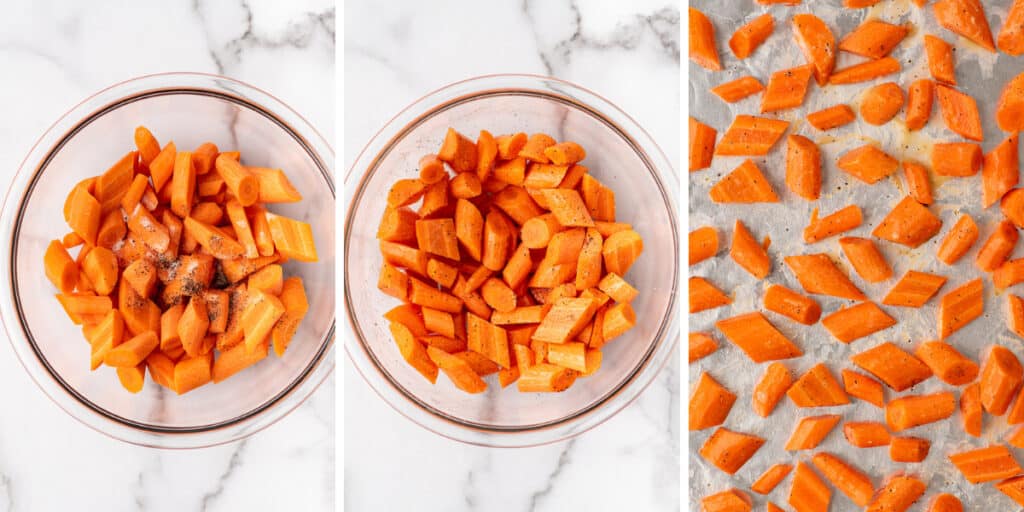

Prep carrots: Toss peeled and sliced carrots with melted butter, salt, and pepper. I like to do this in a bowl for more even coverage, but you can mix everything directly on your baking sheet if you don’t want another dish to wash.
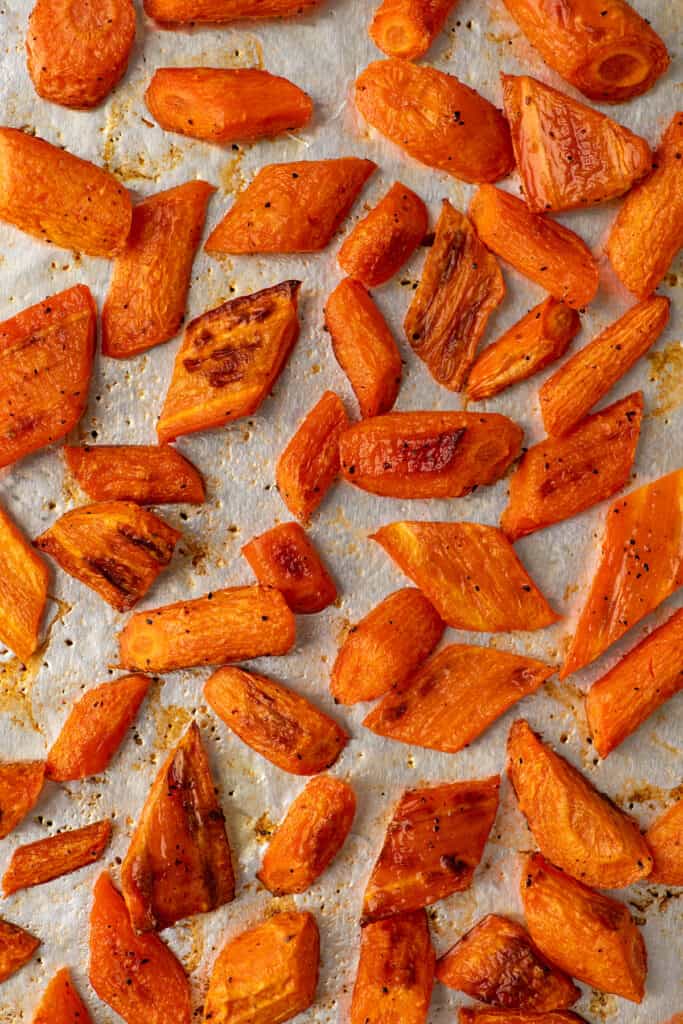
Spread carrots out: Arrange carrots on a rimmed baking sheet in a single layer. Too close and they’ll steam rather than brown, so make sure the slices are space out and have some room.
Roast: Bake for 30 to 35 minutes, tossing the carrots once halfway through, until carrots are caramelized around the edges and fork tender.
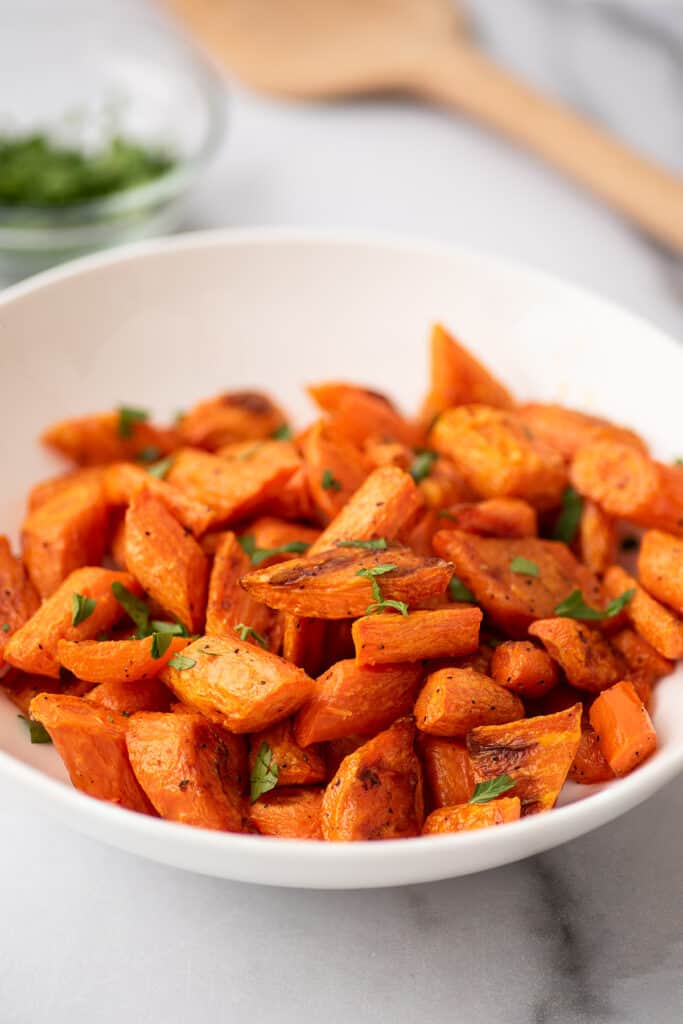
Adjust seasoning: Add additional salt and pepper if needed, serve and enjoy!

Should roasted carrots be peeled?
Probably. You don’t have to peel carrots–the skins are totally edible, you just have to scrub your carrots well before cooking.
But for best results, I always recommend peeling your carrots. Carrot peels will shrivel as they cook, giving the carrots a somewhat unappealing wrinkly look. They can also become tough, and some people find them bitter once cooked.
Peeling carrots means you don’t have to spend as long scrubbing the skins clean, and you don’t have to worry about any texture or flavor issues from the skin.
What to serve with roasted carrots?
Roasted carrots go extremely well with cozy comfort foods. Some of my favorite recipes to pair with them are:
- Shepherd’s Pie
- Roasted Tri-tip
- Chili
- Lemon chicken thighs
Can I roast carrots ahead of time?
Roasted carrots are best hot out of the oven, but if you’re meal prepping for the week and want to include roasted carrots on the menu, you can. They’ll just be slightly softer after refrigerating and reheating.

Can I roast carrots at the same time as my main dish?
Yes, if you’re cooking something like roasted chicken , you can cook your main and side at the same time. However, you will probably need to extend the baking time if you are cooking them at a lower temperature than this recipe calls for, and the carrots may not brown as much.
Roast the carrots on a rack below the main dish and extend the baking time as needed for the carrots to become tender.
More Easy Vegetable Sides
- Carrots in the Microwave
- Roasted Broccoli
- Oven-roasted Zucchini
- Corn on the Cob in the Microwave
- Roasted Green Beans
Recipe Notes
- Store leftover carrots in an airtight container in the refrigerator for up to 3 days.

Equipment
- Rimmed baking sheet
Ingredients
- ▢ 2 pounds carrots
- ▢ 2 tablespoons (28g) salted butter melted
- ▢ ¼ teaspoon salt
- ▢ ¼ teaspoon black pepper
Instructions
- Preheat your oven to 425°F. Peel and trim the tops from your carrots and slice them into 2-inch chunks. For larger carrots, slice the thick upper part in half lengthwise before cutting into pieces.
- Toss carrots with melted butter, salt, and pepper. Arrange on a baking sheet in a single layer.
- Bake for 30 to 35 minutes, tossing the carrots once halfway through, until carrots are caramelized around the edges and fork tender.
- Add additional salt and pepper if needed, serve and enjoy!
Notes
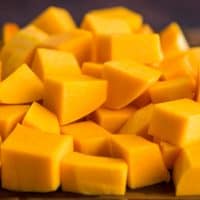
How to Cut Butternut Squash, a quick and simple tutorial.
Now that it’s fall, I can’t wait to bust out all my fall favorites, Ham and Potato Soup , Beef Stew , Baked Potatoes with Cheese Sauce –okay, admittedly I eat these all year long, but they all feel extra special this time of year.
But, one of my favorite comfort foods that I only get to enjoy this time of year is butternut squash. I love cooking with it because it’s fabulous on its own, tossed with a little oil and salt, but it also adds such a nice, slightly sweet richness to everything you put it in (like, for example, Butternut Squash Bacon Mac and Cheese ).
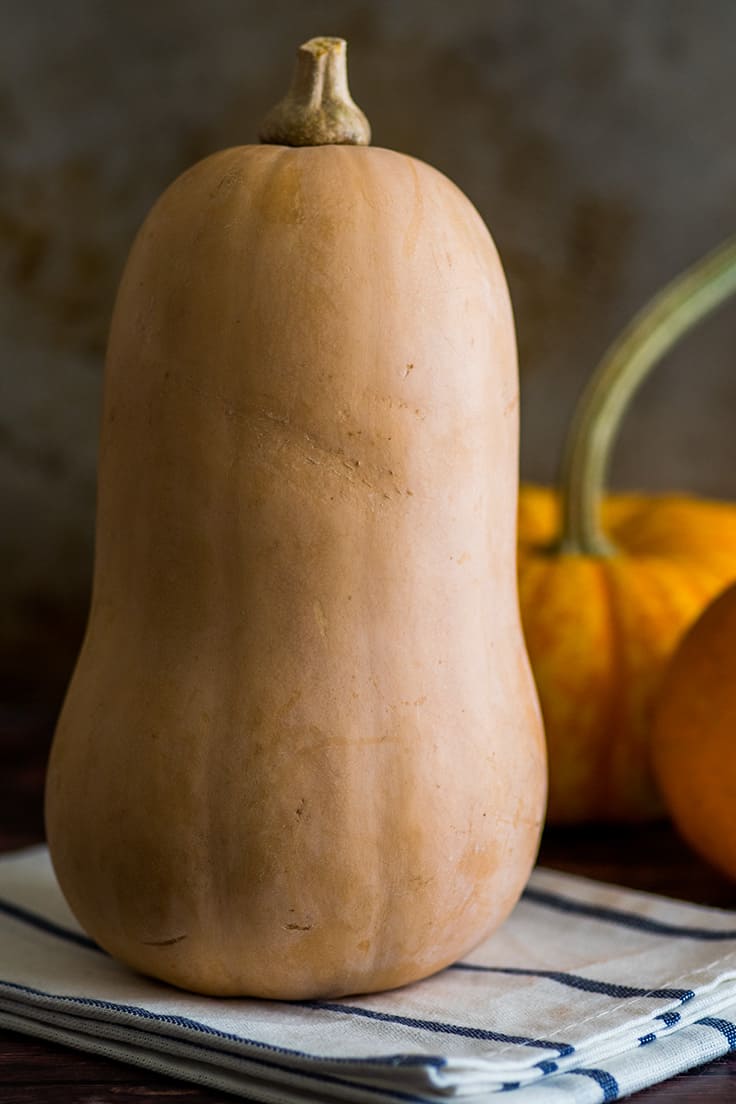

Before you can enjoy butternut squash though, you have to chop them up, and if you’ve never done that before, it can be a little intimidating. So today, I’m posting a quick little tutorial on how to cut butternut squash.
It’s super easy and fast, and once you learn, you can enjoy butternut squash all season long.


How to Cut Butternut Squash
- Use a sharp knife to cut ½-inch off both ends of the squash.
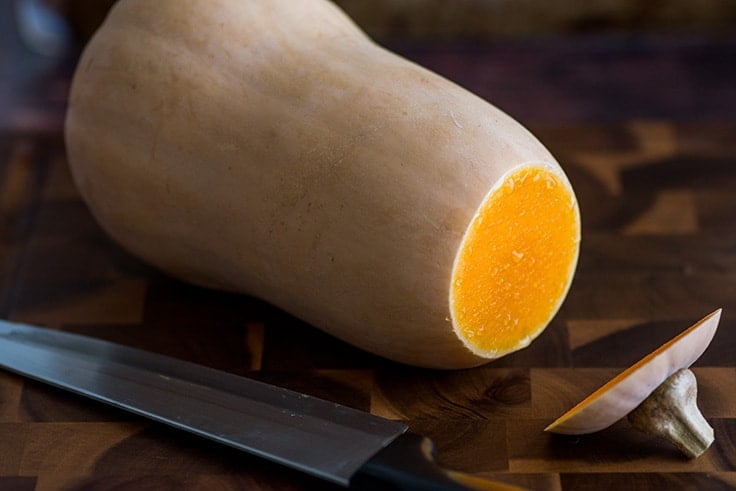

- Use a vegetable peeler to remove all of the skin.


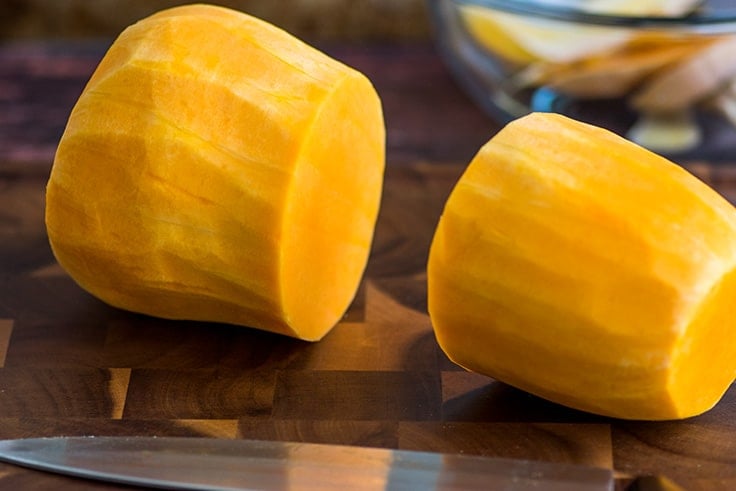
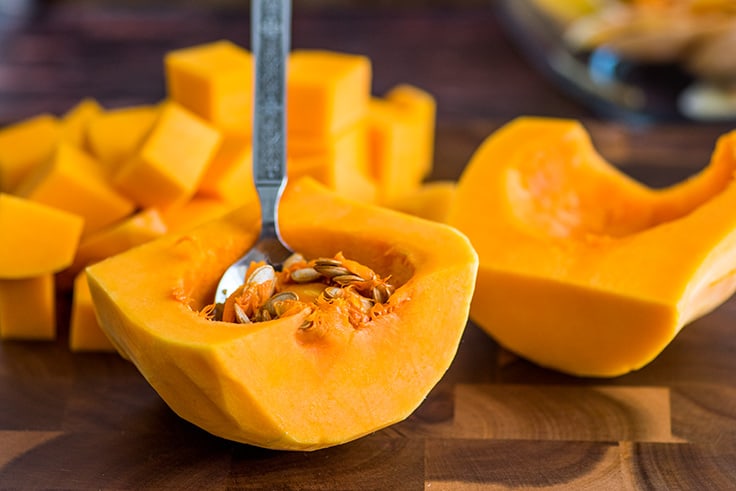
- Cut the squash in two at the neck where the squash begins to flair out. Set the body (the thicker part) aside.

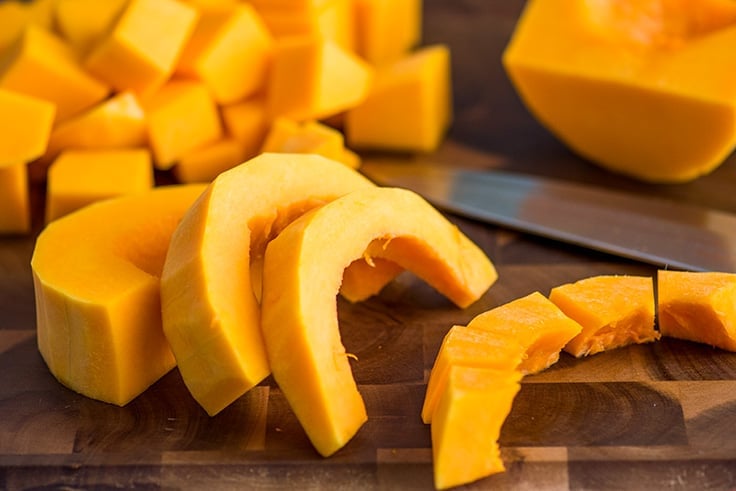
- Slice the neck into rounds.
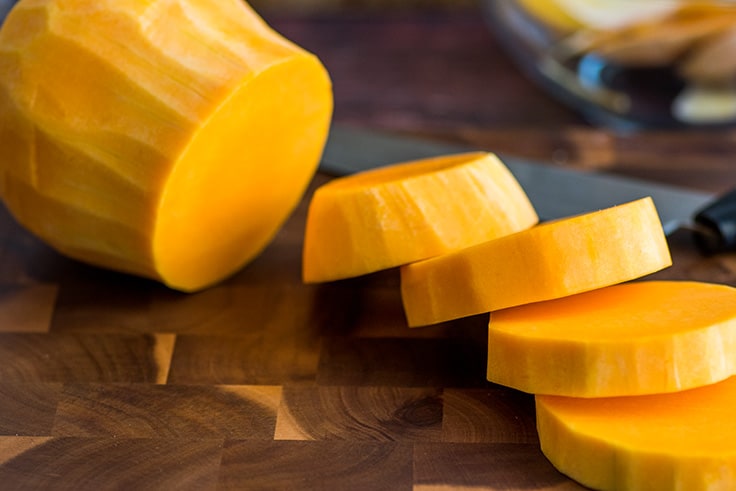

- Cube each of the rounds.
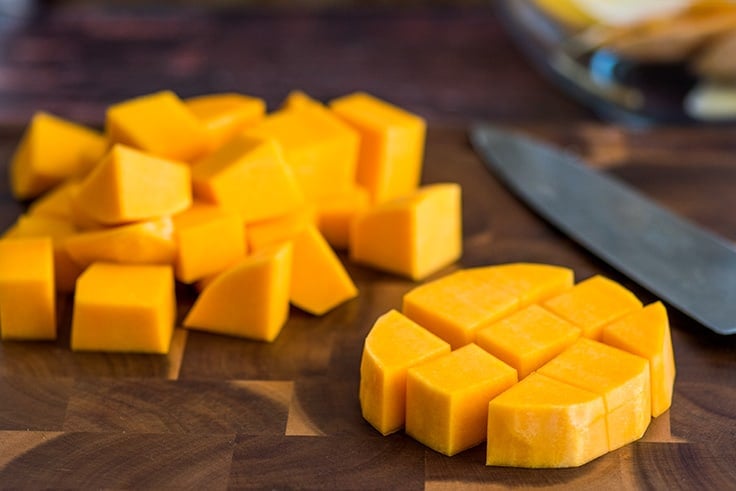

- Turn the body on its end and slice it in half vertically. Scoop out the seeds and innards with a spoon.

- Lay one-half of the squash on its flat cut side and cut into slices so you have half-moons.


- Cut those slices into cubes and repeat with the other half of your squash.

And done!


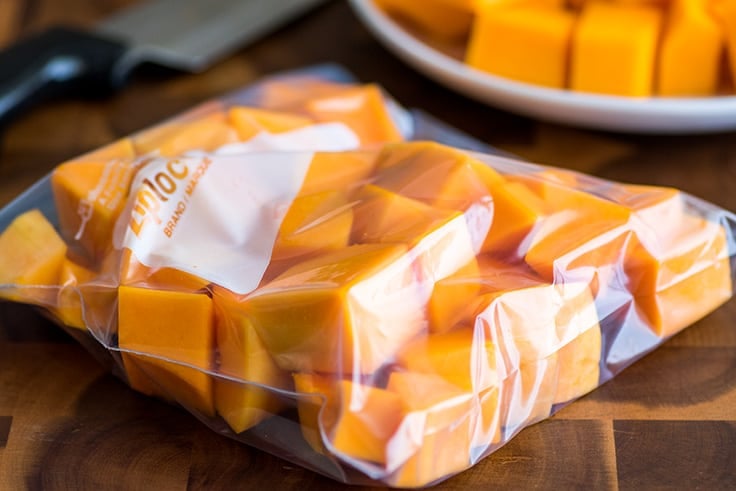
Cook as desired and store any leftovers in an airtight bag in the refrigerator for up to 4 days.

More Vegetable Tutorials
- How to Steam Broccoli in the Microwave
- How to Cook Broccoli in the Oven
- How to Cook Corn on the Cob in the Microwave
- How to Steam Green Beans in the Microwave
Ingredients
Special Equipment
- ▢ Vegetable peeler
Squash
- ▢ 1 butternut squash
Instructions
- Use a sharp knife to cut 1/2 inch off both ends of the squash and use a vegetable peeler to remove the skin.
- Cut the squash in two at the neck where the squash begins to flair out. Set the body aside.
- Slice the neck into rounds and then cube them.
- Turn the body on its end and slice in half vertically. Use a spoon to scrape out the seeds from both sides.
- Lay one-half of the squash on its flat cut side and cut into slices so you have half-moons. Cut those slices into cubes and repeat with the other half of your squash.
- Cook as desired and store any leftovers in an airtight bag in the refrigerator for up to 5 days.

Peppermint Hot Chocolate
Equipment
- Zip top bag
- Rolling pin or meat mallet
Ingredients
- 1 full-size candy cane *
- 2 tablespoons ( 25g ) granulated sugar
- 1 tablespoon ( 5g ) unsweetened cocoa powder
- 1 tablespoon water
- 1 cup milk any percentage
- Pinch of salt
- Whipped cream optional for topping
- Mini marshmallows optional for topping
Instructions
- Place candy cane in a zip top bag and use a rolling pin or meat mallet to crush the candy into small crumbs.
- In a small saucepan, over medium heat, combine candy cane pieces, sugar, cocoa powder, and water. Stir until sugar and cocoa powder are smooth and candy cane has mostly dissolved.
- Add milk and salt and stir. Heat, stirring occasionally, until the mixture reaches your desired temperature and candy cane has completely dissolved.
- Pour into an 8-ounce mug and top with optional whipped cream or marshmallows if desired.
- Enjoy!
