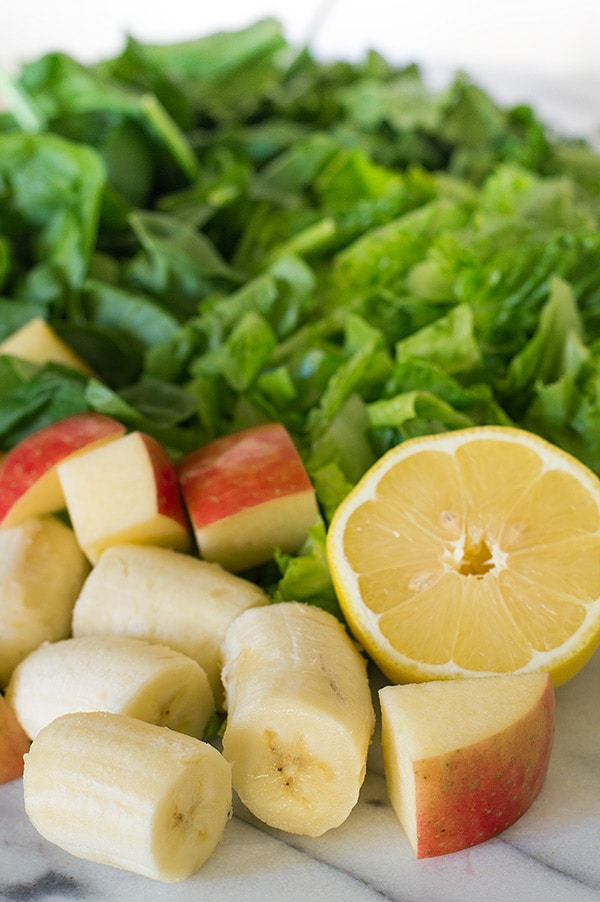
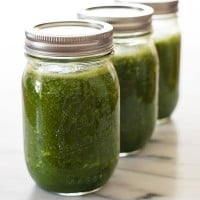
A simple naturally sweet green smoothie made with banana and apple slices and packed full of healthy greens. A perfect freezer-friendly grab-and-go breakfast for busy mornings.


So this month’s blog theme is “My Favorite Recipes,” and I bet you thought it was going to be all carbs, sweets, and cream-laden sweet carbs. Okay, it almost was (because carbs, cream, and sweets are the best things in the world), but unfortunately, I don’t actually eat like that every day in real life. So today I’m posting one of my everyday favorites.
This naturally sweet green smoothie is my favorite go-to breakfast because it’s good for you and makes you feel good about yourself. There’s nothing like starting your day knowing that if you are already one green smoothie (and two servings of veggies) up on the rest of the world.

I will never lie to you and tell you that a green smoothie tastes like anything other than a green smoothie, but as far as breakfasts made mostly out of leafy green things, this one’s really good.
It’s made with spinach and romaine, which are milder tasting greens than things like kale and dandelion greens, and the generous squeeze of lemon in the mix really helps those flavors blend with the fruity taste of the apple and banana in there.
The high ratio of greens to fruit means that you get the best of both worlds, a light sweetness without too much sugar and a massive boost of healthy leafy green veggies.
These smoothies freeze really well and are a great breakfast for busy mornings. I usually make a big batch and keep most of them in the freezer. Throughout the week, when I drink my morning smoothie, I pull the next one out of the freezer and put it in the refrigerator. 24 hours later, I have a perfect healthy breakfast defrosted and waiting for me.


More Favorite Recipes
- BLT Salad
- Asian Chicken Salad
- Easy Beef Teriyaki
- Crispy Lemon Chicken Thighs
Ingredients
- ▢ 1 large sweet apple cored and chopped
- ▢ 1 head romaine lettuce roughly chopped
- ▢ 2 cups (packed) spinach
- ▢ 2 cups cold water
- ▢ 1 large ripe banana frozen
- ▢ Juice of 1/2 lemon
Instructions
- Combine apple, romaine, and water in your blender and blend on high until smooth. Add spinach and repeat.
- Add banana and lemon juice and continue to blend until mixture is very smooth.
- Divide smoothie between 3 16-ounce mason jars and enjoy!
Notes
Nutritional Information
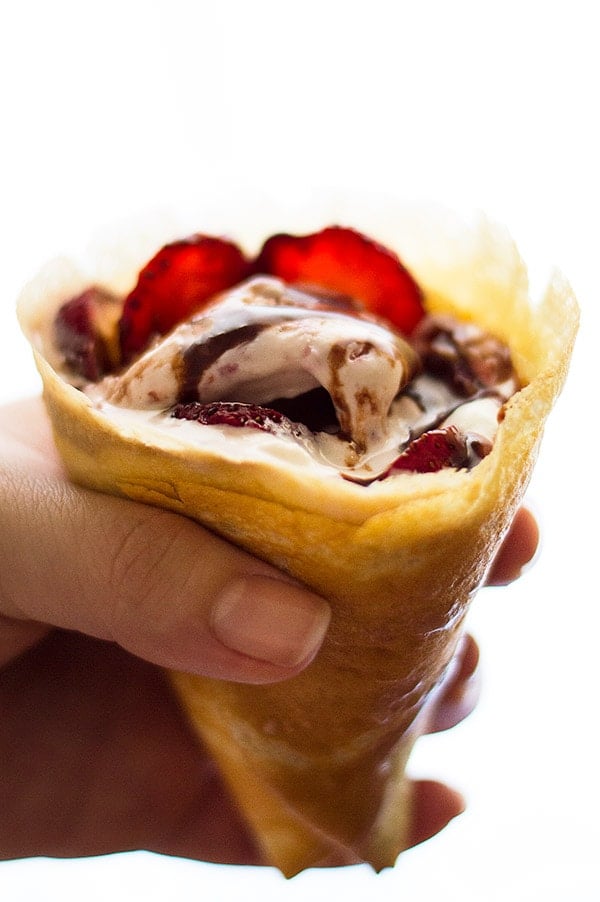
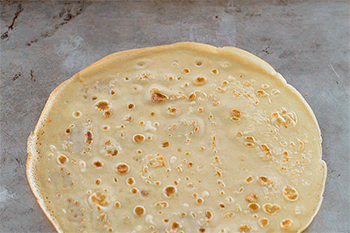
Put leftover crepes to good use and turn them into crepe cones! Perfect for a sunny summer day, these cones are stuffed with strawberry ice cream, fresh strawberries, and whipped cream, and drizzled with a quick and easy Nutella sauce.

On Tuesday, I teased that something fun was coming up today and here we are: It’s #ToonFood day! A few of my fellow nerdy bloggers and I teamed up, and we are posting cartoon-themed posts today across all of our sites. You should click over and check out their recipes right now… I’ll wait.


Rick and Morty Cinnamon Toast Squanch


Futurama Slurm


South Park Chocolate Salty Balls

Adventure Time Bacon Pancakes
Since I just did a Bob’s Burger’s recipe ( Bacon Dutch Apple Baby for Two , you can’t even taste the baby ), I thought I’d pick something from non-western animation for today’s post, so I made Fruits Basket Crepe Cones!
I was a little too old for the Saturday morning anime boom of the 2000’s, so I never got into Pokemon or Sailor Moon , but when I was in Jr. High, my dad, out of the blue, brought home the complete series of Fruits Basket .
I’m not sure if he was trying to get me and my sisters in touch with our Japanese roots or if one of his comic dealer buddies just gave him a really good deal on the set, but the why doesn’t matter. I was hooked. I watched the show a million and one times that summer, and it still holds a special place in my heart.
If you’ve never seen it, Fruits Basket* is a very charming anime about a high school girl who comes to live with a wealthy family under a mysterious curse that makes them turn into animals of the Chinese zodiac when they are hugged by a member of the opposite sex.
And yes, it’s just as delightfully silly as it sounds.


During one episode late in the series, some of the characters buy crepe cones from a food truck. I was so intrigued by the idea of them when I first watched the show and have been wanting to the dessert a try for ages. And since I just recently did a Crepes for Two post , this challenge seemed like kismet.
How are they? They are everything I hoped they would be! The lightly sweet crepes pair perfectly with the sweet summer strawberries and ice cream. And they hold up surprisingly well to being stuffed.
I was worried regular breakfast crepes would tear under the weight of all the fillings, but they’re well up to the task of containing all the drips and dribbles (somehow without becoming soggy!) that come with ice cream in summer. They even kept my hands clean as my ice cream slowly turned into soup over the course of the photo shoot.

I foresee many a flavor crepe cone in my future, but I made this first batch with what I happened to have around, strawberries, whipped cream, Nutella, and strawberry ice cream. It’s a real winner of a combo, if I do say so myself.
If you happen to have a crepe or two left over from breakfast, I highly recommend turning them into your dessert!


More Nerdy Recipes
- Hannibal’s Lomo Saltado
- Game of Thrones Frey Pie
- The Good Place Maple Butter Scones
- Happy Endings Beef Ribs

Ingredients
- ▢ 1 tablespoon milk or cream
- ▢ 2 tablespoons Nutella
Crepes and Fillings
- ▢ 2 8-inch crepes
- ▢ 2 small scoops strawberry ice cream
- ▢ 1/4 cup thinly sliced strawberries
- ▢ 1/2 cup whipped cream
Instructions
Make the Nutella Sauce
- In a small microwave-safe bowl, microwave milk for 20 to 30 seconds until steaming hot. Stir in Nutella and continue stirring until Nutella is thin enough to drizzle.
Assemble
- Spread whipped cream over 1/4 of your crepe. Add strawberry slices over the whipped cream, stopping at least an inch from the center of the crepe.
- Drizzle 1/4 of the Nutella mixture over them.
- Add one scoop of ice cream over your strawberries, near the edge of your crepe.
- Fold crepe in half, covering your ice cream and strawberries. Starting from the ice cream side, roll your crepe into a cone.
- Drizzle another quarter of the Nutella mixture over the top.
- Repeat with the second crepe and eat!
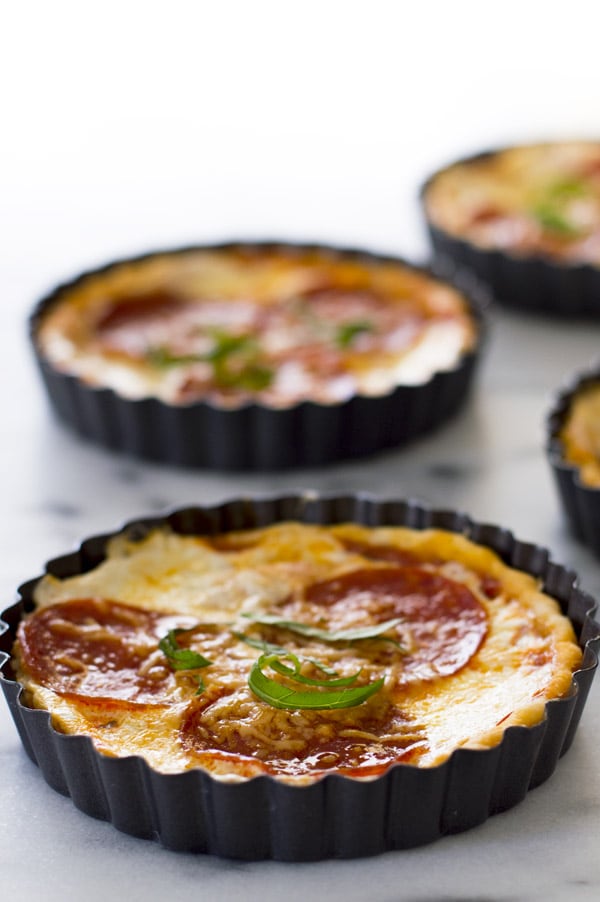
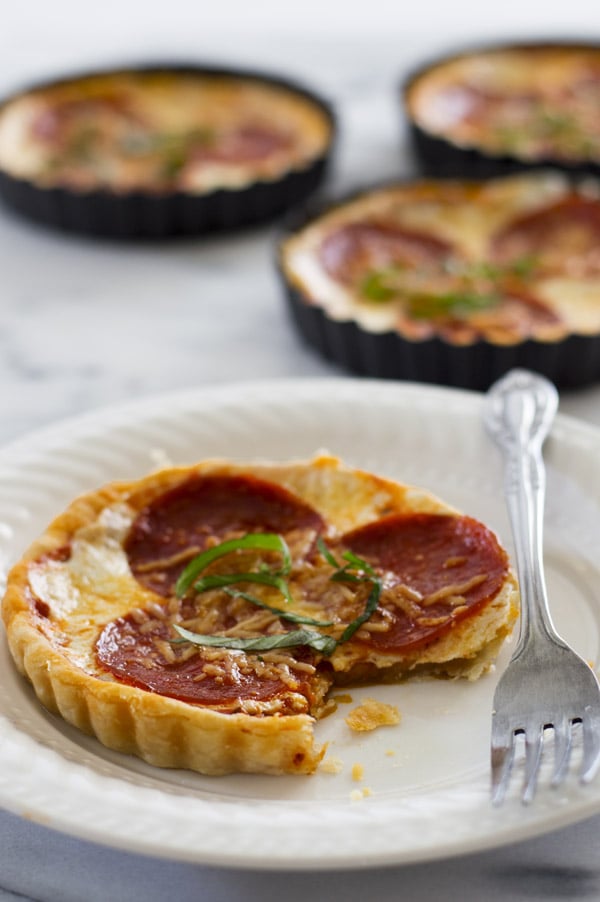
The cutest mini pizza tarts baked in a delicious buttermilk pie crust tart shell.

Last weekend my parents were in LA for a concert, so I asked them to drop by Crate and Barrel to pick me up a pastry slab while they were there. I may have underestimated the terribleness of LA parking, because my poor wonderful, lovely parents, and my sister, with whom they were staying, ended up having to carry the solid marble board through the streets of LA back to where they’d left their car.
So I just want to say publicly to them, thank you for that. Um, my bad.

Totally worth it though (she says, not having carted the piece of rock through a busy city), because this slab is great and is the entire reason today’s recipe exists. Obviously, with the new pastry slab, I had to break it in and make a pastry, but it’s a little (A LOT) hot for pie here in SoCal, so I made Pizza Tarts!!
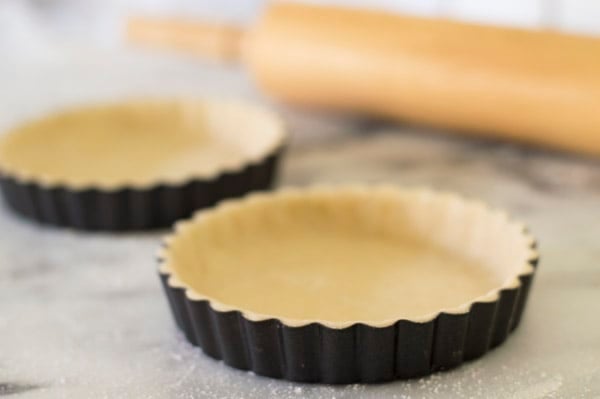
These are my new favorite things. For the tart shell, I went back to my old friend, My Favorite Buttermilk Pie Crust . Turns out that not only is it an amazing (and amazingly easy to make) pie dough, it also makes for a killer tart base.

Then I filled that tart base with all the makings for pizza, homemade pizza sauce (it doesn’t have to be homemade, but that sauce is amazing), mozzarella, pepperoni, and a bit of Parmesan. You’re never really going to go wrong with those ingredients, but put them in a flaky buttermilk shell and it’s basically magic.
When they came out of the oven with the cheese all gooey and bubbling, it was all I could do not to take a bite before taking pictures!
As for how to serve them, they would make a fun and unique dinner for two (serve with a side salad), or they would be the cutest appetizers. Quartered, they are two-to-three-bite treats and would look like perfect mini slices of pizza!

If you don’t already own a set, these are the mini tart pans * I own. I’ve been making a lot of tarts lately and the pans are fantastic. But you could also make these pizza tarts in a cupcake pan, with a slightly shorter cooking time.
And one more note, you don’t have to blind bake the shells–I didn’t for the ones I photographed, but I’ve included instructions in the recipe for it, and think I will in the future for extra crispy bottoms and sides. It’s up to you!
More Pizza Recipes
- Naan Pizzas
- BBQ Chicken Pizza
- Hawaiian Naan Pizzas
- Homemade Margherita Pizza

Ingredients
Special Equipment
- ▢ 4 mini tart pans
- ▢ 1/2 batch My Favorite Buttermilk Pie Crust
- ▢ 4 tablespoons pizza sauce homemade or store-bought
- ▢ 1/2 cup ( 2 oz) shredded mozzarella
- ▢ 12 slices good-quality pepperoni
- ▢ 2 tablespoons Shredded Parmesan cheese
- ▢ 4 small basil leaves thinly sliced
Instructions
Prepare Tart Crust
- Preheat oven to 400°F.
- Divide dough into 4 even pieces. If it’s warm in your kitchen, place all but one of the pieces in the refrigerator while you make your first tart. On a well-floured surface, roll dough out thinly enough that your tart pan can sit on top of it and have at least 1-inch of space all the way around the sides.
- If your tart pan has a removable bottom, place dough over the bottom disk and fold dough up so that none of it hangs over the sides. Drop tart bottom and dough back into the rest of the pan and unfold the dough. (If your tart bottom is not removable, just drape the dough over the entire pan.
- Press the dough gently into the sides of the pan and then run your rolling pin lightly over the rim to pinch off the excess dough.
- Repeat with the rest of the dough.
Blind Bake (optional for a crispier bottom and sides)
- Place tart pans on a baking sheet and cut four pieces of parchment paper so they cover the tops of the tarts. Fill tarts with pie weights, dry beans, or uncooked rice and bake for 10 minutes. Remove weights and paper and place back in the oven for 2 to 3 minutes, just until the bottom of the tart looks dry and the edges are very slightly golden. Remove from the oven and if the bottom has puffed up at all, gently pat it down.
Assemble
- Spread each tart with 1 tablespoon pizza sauce, 2 tablespoons mozzarella, 3 slices pepperoni, and sprinkle with Parmesan cheese.
- Place tart pans on a cookie sheet and bake for 15 to 20 minutes, until cheese is bubbly and crust is golden.
- Cool for at least 5 minutes before serving or cutting. Sprinkle with fresh basil if desired.

Naturally Sweet Green Smoothies
Ingredients
- 1 large sweet apple cored and chopped
- 1 head romaine lettuce roughly chopped
- 2 cups (packed) spinach
- 2 cups cold water
- 1 large ripe banana frozen
- Juice of 1/2 lemon
Instructions
- Combine apple, romaine, and water in your blender and blend on high until smooth. Add spinach and repeat.
- Add banana and lemon juice and continue to blend until mixture is very smooth.
- Divide smoothie between 3 16-ounce mason jars and enjoy!
