
A few simple gingerbread house tips and tricks.
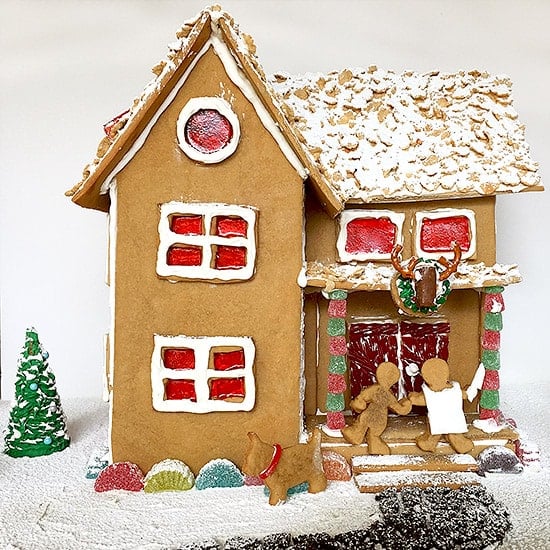
In college, my sister and I started a gingerbread house tradition. While home for Christmas breaks, when the novelty of no homework began to wear off, just before the boredom of being home really started to drive everyone crazy, we’d put on a day-long marathon of movies, tear our parents’ kitchen and dining room apart, and make a gingerbread house.
We made our first house in 2009 out of graham crackers and have made one every year since, finally graduating to actual homemade gingerbread last year. This past weekend, we made our seventh house and while we’re not exactly expert gingerbread-house craftsmen, we have learned a few things through trial and error. These are my favorite recipes, tools, and tricks we’ve discovered over the years:
Recipes
Structural Gingerbread – I love this dough. It’s easy to make, easy to work with, and dries hard and strong. In the two years we’ve used it, I’ve never had so much as a crack. Bonus: If you measure wrong (not that I would ever do this), it’s very forgiving of some last-minute trimming (I DID NOT HAVE TO DO THIS ON SATURDAY IAMNOTLYING).
Frosting Cement – The canned stuff works fine when you are just gluing four graham cracker walls together, but if you are putting together anything more complex, this is the frosting you want. They aren’t kidding when they say cement. This stuff is so strong once it dries that you could probably build a real house with it.
Marshmallow Modeling Clay – Just in case you too feel the need to sculpt a dragon/detective for your house, this edible clay is great. It contains ingredients you probably keep in your pantry and is about as easy to work with as regular clay. The most difficult part is working in the coloring, which will take you a few minutes.
*All of these things are technically edible, but we don’t eat our houses, so I can’t comment on the taste.
House Templates
Victorian Gingerbread House – There is a surprising dearth of free gingerbread templates on the web for anything more complicated than your basic four walls and a chimney, so I was absolutely DELIGHTED to find this Victorian template from Kitchen Trials last year. It’s what we used for our 2014 house and it was perfect.
Tools
Other Tips and Tricks (AKA, lessons we learned the hard way)
- If you cut your dough and then bake, check and trim it after it comes out of the oven! A good gingerbread dough shouldn’t spread too much when it cooks, but it probably will a little bit, and a little bit is all it takes to throw your angles off. Check your pieces against their stencils and re-cut while the gingerbread is still warm and pliable.
- If you get any air bubbles in your dough, very, very gently smooth them out with a light rolling pin as soon as you take it out of the oven.
- Make your gingerbread house a two or three day project. Copying and cutting and rolling and tracing and baking and cooling takes a while. For these bigger houses, I like to cut the stencils day one, cook the gingerbread on day two and assemble day three. It will make the whole project feel so much less overwhelming.
- Use cans and mugs to prop up your walls while they are drying.
- Finally, buy more ingredients than you think you need! If something goes wrong, or you need more dough, there is nothing worse than having to go back out and buy ingredients in the middle of your baking. Believe me. It’s. The. Worst.
A History of Our Houses
If you’d like, take a walk down memory lane with me…
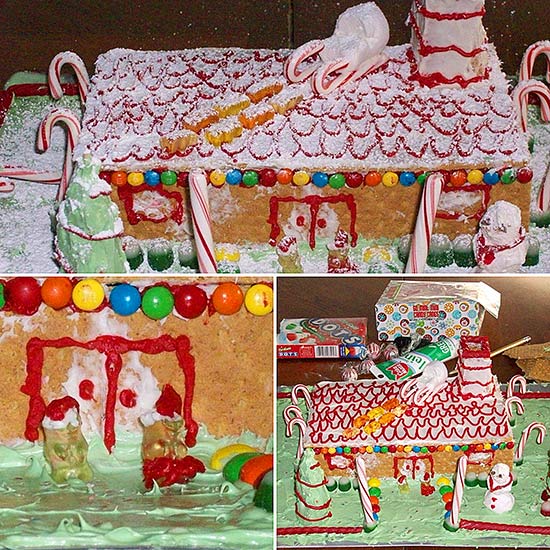

2009 – A House for Mr. & Mrs. Claus
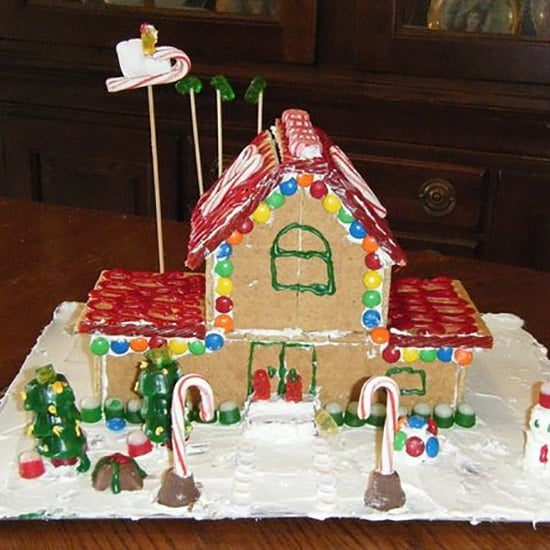

2010 – A Home for the “Supernatural” Boys + Santa Cas
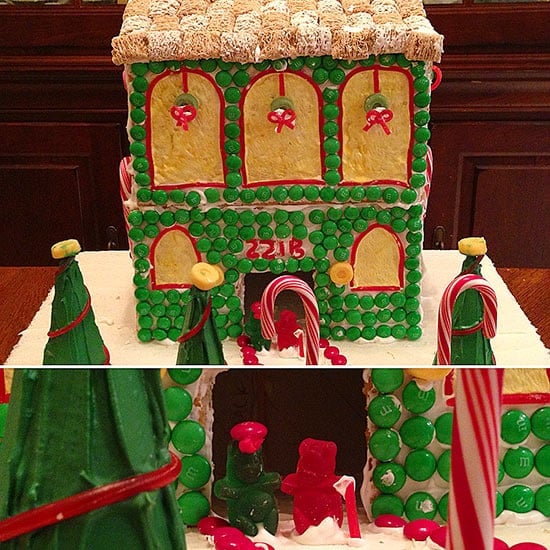

2012 – 221 B Baker Street Got a Gingerbread Upgrade
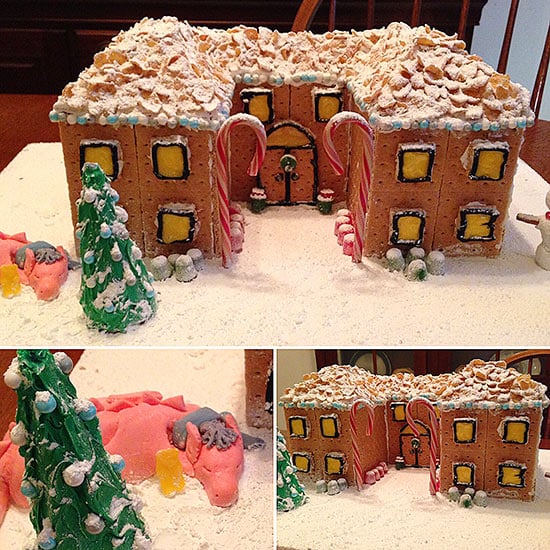

2013 – A “Sherlock”/”Desolation of Smaug” Gingerbread Crossover


2014 – “Hannibal” House

2015 – “Hannibal” House, Year 2

These Miniature Hot Chocolate cookies are rich, chocolatey, and adorable!
(November 2016 Update) This post has been updated with new, non-iPhone photos and edited to update some of the text and recipe notes.
If you miss the old photography, I saved one of the old photos beneath the recipe to remember the good times. 😉

How is your Christmas prep going? Mine’s going great, if by great, you mean I have bought a grand total of one present and don’t yet have a tree.
Fortunately, my family is small and mostly local so the biggest part of holiday planning is coordinating Christmas dinner and deciding what holiday-themed movies to watch this year. I can’t imagine how all of you with huge extended families who travel for the holidays handle it.
While I’ve been shirking my holiday prep duties, I have been busy in the kitchen. This week alone, I’ve made a batch of my Chai Sugar Cookies with Eggnog Glaze , Snickerdoodle Sandwich Cookies , and now these adorable little Hot Chocolate Cookies.
I’d been meaning to make these cookies since I first saw them last year, long before Baking Mischief was even a dream of an idea, but Christmas came and went and they got stashed away in my next-year file.
So as soon as it got chilly enough for a sweater, I pulled these babies out and gave them a spin. The (gorgeous) originals are huge and use jumbo marshmallows, something I just don’t keep on hand. So I miniaturized them to make them the right size to use the mini marshmallows I had in the pantry, and they turned out so cute!

These things are perfect three-bite cookies, and man, are they RICH. I would never say stop at just one baby cookie, but you totally could.
Eaten warm, they are more like the most decadent, chocolatiest brownies you have ever tasted. Cooled, the deep chocolate flavor really pops and the little bite of hard chocolate in the center is perfection. I say eat warm with milk, cool with coffee, because they are definitely best paired with something to offset that sweetness!

More Cozy Recipes
- Perfect Snickerdoodles
- Easy Hot Chocolate
- White Hot Chocolate
- Dutch Apple Pie
- Snickerdoodle Hot Chocolate
Miniature Hot Chocolate Cookies Recipe Notes
- This recipe makes 24 small cookies. If serving to people, I would recommend 3 per person.
- I generally prefer to make my cookies in a stand mixer, but this is technically a small-batch cookie recipe with about 1/3 the amount of dough you would normally produce and requires no creaming of any ingredients. I’ve made it both ways and it’s simpler just to make in a bowl with a whisk.

Ingredients
- ▢ 3 tablespoons ( 1.5 oz) unsalted butter
- ▢ 1 cup ( 6 oz) semi-sweet chocolate chips divided
- ▢ 1/3 cup + 1 heaping tablespoon ( 85 g) brown sugar
- ▢ 1 large egg
- ▢ 3/4 teaspoon vanilla extract
- ▢ 1/2 cup ( 70 g) all-purpose flour
- ▢ 1 tablespoon + 1 teaspoon ( 10 g) cocoa powder
- ▢ 1/2 teaspoon baking powder
- ▢ 1/8 teaspoon salt
- ▢ 24 mini marshmallows
- ▢ Finely chopped chocolate for topping optional
Instructions
- In a small bowl, melt butter and 2/3 cup of the chocolate chips together in the microwave. Heat for 30 seconds and stir. Then continue in 15-second bursts, stirring in between until smooth. Set aside to cool slightly for about five minutes.
- Mix brown sugar, egg, and vanilla in a large bowl until just combined. Beat in the cooled chocolate mixture.
- Mix in flour, cocoa powder, baking powder, and salt, until just combined.
- Cover and chill for 45 minutes until the dough is firm enough to handle.
- Preheat oven to 325 degrees Grease or cover two cookie sheets with parchment paper.
- Scoop dough and roll into 1-inch balls. Place them on the baking trays 2-inches apart.
- Bake for 7 minutes before removing the cookies from the oven. Place 2-3 chocolate chips in the center of each cookie and top with a mini marshmallow. Press the marshmallow firmly into the chocolate and place the tray back into the oven.
- Bake cookies for an additional 4 minutes and remove pan from the oven. While the cookies are still hot, sprinkle with chopped chocolate, if so desired.
Nutritional Information Adapted from Stepable
Original Post Photography, circa 2015 (iPhone 5)

Rich and delicious eggnog buttercream frosting snuggled inside of Snickerdoodle Sandwich Cookies makes for a perfect holiday treat!
( November 2016 Update : I updated the old iPhone photos in this post, but if you scroll all the way to the bottom, there’s still one old photo to remember Baking Mischief’s pre-DSLR days by. 😉

We’re so close to Christmas that I can practically taste it! There are two big things I love about this time of year. One we’re going to talk about in a minute, but the other is Christmas movies!
I have a very strict Christmas-movies-between-Thanksgiving-and-Christmas-day-only policy, so by the time Thanksgiving rolls around, I’m chomping at the bit to watch all of my favorites.
A few on the list this year are A Muppet Christmas Carol , While You Were Sleeping, Iron Man III , and Polar Express . The family traditionally gets together and watches Love Actually , but I swear that film gets sadder every year, so we decided to give it a pass this Christmas. Do you have any favorite holiday films?
And now back to my first love of Christmas time, Christmas baking! December is probably my favorite baking month, because I have an excuse to make ALL THE COOKIES, like my Miniature Hot Chocolate Cookies , my Butterscotch Shortbread Thumbprint Cookies , my Chai Sugar Cookies with Eggnog Glaze , and basically every cookie I’ve pinned on Pinterest for the last month (guys, I make so many cookies in December).
But there’s one cookie that holds a special Christmas place in me heart: Snickerdoodles.

They are the cookies I make on Christmas eve every year to eat while we sip hot chocolate and wait for Santa. But everyone has a snickerdoodle recipe , and mine is very much more of the same. So I thought I’d put a little twist on it. Enter Snickerdoodle Sandwich Cookies with Eggnog Buttercream Filling.
I’m going to be honest. These are the sort of ridiculous, ridiculously good, desserts you can only really justify around the holidays. They’re rich and buttery and AMAZING. The decadent eggnog buttercream takes the humble cinnamon snickerdoodle and elevates it to the stuff of dreams.
I tried a couple different fillings with these cookies and the minute this one crossed my lips, I knew I’d found a winner. I’ve been throwing test batches at everyone I know for the last couple of weeks (so I don’t eat them all myself!) to rave reviews and now I cant wait to share them with you!


Ingredients
Snickerdoodles
- ▢ 4 tablespoons ( 2oz ) unsalted butter room temperature
- ▢ 1/4 cup ( 48 g) shortening
- ▢ 3/4 cup ( 150 g) granulated sugar
- ▢ 1 large egg
- ▢ 1 teaspoon vanilla extract
- ▢ 1 1/3 cups ( 187 g) all-purpose flour
- ▢ 1 teaspoon cream of tartar
- ▢ 1/2 teaspoon baking soda
- ▢ 1/8 teaspoon salt
- ▢ 2 tablespoons ( 25g ) granulated sugar
- ▢ 2 teaspoons ground cinnamon
Eggnog Buttercream
- ▢ 1 1/2 cup ( 180 g) powdered sugar sifted
- ▢ 1/4 teaspoon nutmeg
- ▢ Pinch of salt
- ▢ 1/2 cup ( 4oz ) unsalted butter softened
- ▢ 1-2 tablespoons eggnog or heavy cream
Instructions
Snickerdoodles
- Preheat your oven to 400°F. Cover two cookie sheets with parchment paper or a silicone baking mat.
- In a stand mixer, using the paddle attachment, cream butter, shortening, and sugar. Beat in egg and vanilla.
- Scrape down the sides and bottom of the bowl. On low, mix in flour, cream of tartar, baking soda, and salt until just combined.
- In a small bowl, mix 2 tablespoons of sugar with the cinnamon. Scoop 36 1/2-ounce mounds of dough into balls (just over 1-inch wide) and roll in sugar mixture. Place on a baking sheet 1 1/2-inches apart. These are small cookies, so you should be able to fit 18-20 on a standard-size cookie tray.
- Bake for 6 to 8 minutes. They are done when they are just golden and look set. You don’t want them to crisp up too much since we are turning them into sandwiches.
- Allow cookies to cool completely.
Eggnog Buttercream
- In a small bowl, whisk together powdered sugar, nutmeg, and salt. Set aside. Cream butter and add the powdered sugar mixture and 1 tablespoon of the eggnog, beating until combined. If your frosting is too dry, mix in a little more eggnog, 1 teaspoon at a time, until you reach the desired consistency.
Assemble
- Pair cookies by size so that you have 18 sandwiches with matching halves.
- The best way to fill these cookies is to “pipe” the buttercream. Spoon the buttercream into a disposable plastic bag and cut off a corner. Pipe frosting in the center your first cookie, about two-thirds of the way to the edge and then top with a second cookie and squeeze gently until the frosting comes to the edges. I recommend experimenting with a couple cookies to see how much frosting you need before finishing the entire batch.
Nutritional Information Snickerdoodle Cookies Adapted from AllRecipes
Original Snickerdoodle Cookie Sandwiches Photography, circa 2015 (iPhone 5)

