Welcome to part two of Baking Mischief’s meal planning guide, How to Meal Plan Using Google Calendar. This section takes you through why Google Calendar works great as a meal planner, how to set up your meal plan, and includes some extra tips and tricks to get the most out of your meal planning calendar.
<img loading=“lazy” src=“https://i2.wp.com/bakingmischief.com/wp-content/uploads/2018/10/meal-plan-using-google-calendar-image-683x1024.jpg" onerror=“this.onerror=null;this.src=‘https://blogger.googleusercontent.com/img/a/AVvXsEhe7F7TRXHtjiKvHb5vS7DmnxvpHiDyoYyYvm1nHB3Qp2_w3BnM6A2eq4v7FYxCC9bfZt3a9vIMtAYEKUiaDQbHMg-ViyGmRIj39MLp0bGFfgfYw1Dc9q_H-T0wiTm3l0Uq42dETrN9eC8aGJ9_IORZsxST1AcLR7np1koOfcc7tnHa4S8Mwz_xD9d0=s16000';" alt=“Text, “How to Meal Plan Using Google Calendar” over photo of a computer. - 1”>
A couple weeks ago, I shared a pretty massive in-depth guide on how to start meal planning . (If you haven’t read that post and you’re interested in creating a meal planning system, go read it! It takes you step-by-step through setting up a system that will work for you.) In that post, I talked about one of the essential components of meal planning, where to keep your meal plan.
A lot of people have success going low-tech, with bullet journals , keeping it in their planner, or just putting a dry erase board on the fridge. For people who prefer digital, something like Trello is an excellent option, but as I said in that first post, my tool of choice is Google Calendar .
I LOVE using Google Calendar for my meal planning, and there wasn’t space in my original post to go into it too much, so today I’m going to take you through using Google Calendar to meal plan, why I use it, how to set up your calendar, and some tips and tricks for getting the most out of your meal planning calendar.
Most of these techniques could probably be applied to any digital calendar you use, so even if you’re not a Google Calendar user and not interested in becoming one, there’s still plenty of useful stuff here. 🙂
A sample month of recipes, click the image for full-size view.
Why I Use Google Calendar for Meal Planning
- It’s free. Yay!
- It’s available on all of your devices, so wherever you are, whatever device you have with you, you have access to your meal plan.
- You can drag and drop meals around your calendar, which makes planning extra easy.
- You can share your Meal Plan Calendar with family, roommates, etc., so everyone always knows what’s for dinner.
- You have a record of your meals, which you can use to create future meal plans and track eating habits and trends. Plus, it’s just fun to be able to look back and see what you were eating three years ago. (For the record, according to my calendar, I was eating Salsa Chicken and Peasant Soup three years ago.) 😉
Setting up Your Meal Plan Calendar
We live in a Google world, so I’m going to assume you have a Google account and know how to access your Google Calendar (if you don’t, here’s how to do both ). Once you’re in your Google Calendar, you’re going to want to set up a separate calendar just for meal planning.
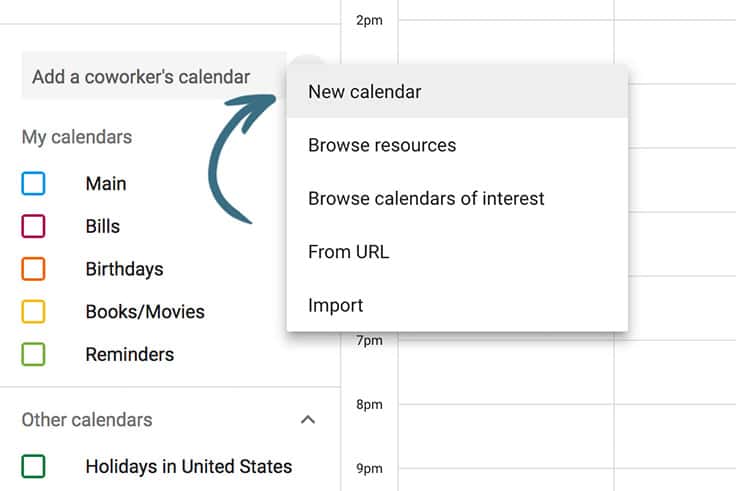

Creating a meal-planning-specific calendar allows you to toggle your meals on and off so they don’t clutter your daily calendar and so that if you share that calendar with others, your housemates aren’t getting your doctors appointments too.
Extra Tip: Google Calendars are arranged alphabetically so using a special character in front of the title or calling your calendar something like “A Menu” will keep that calendar at the top of your list, which is convenient since you will be adding to it so often.
Sharing Your Meal Plan Calendar
Once your calendar is set up, if you regularly share meals with other people, you can share your calendar with them via the sharing settings. For each person, you can allow them read-only access or allow them to make changes to the calendar. When you invite them to see your calendar, they’ll receive an email notifying them that they’ve been given access to the calendar and it should immediately show up in their “Other calendars” list.
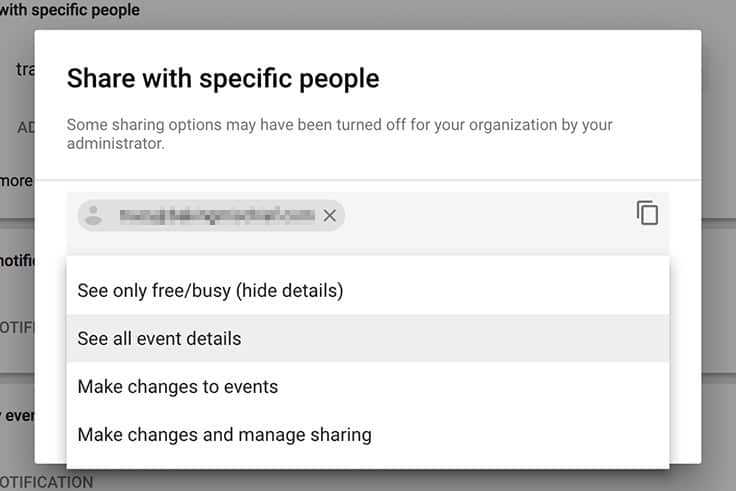
To access these sharing settings in Google Calendar, go Settings » Settings for my calendars » select your meal plan calendar » Share with specific people .
If at any point you are no longer living together or don’t want them to have the same level of access, you can revoke access or change your sharing settings in that same menu.
Filling Out Your Calendar
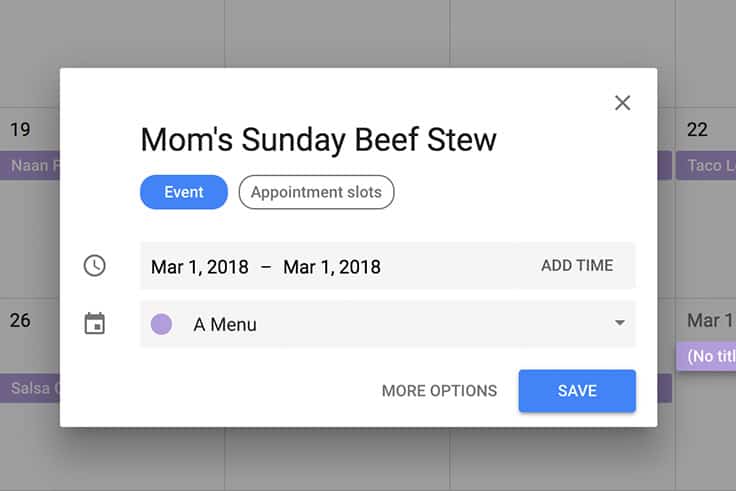
And now, all that’s left is the fun part, filling out your meals for the week! I like to do this from the month view. You just click on the day you’re planning for, make sure you have the correct calendar selected, and type in the meal you’ll be having that day.
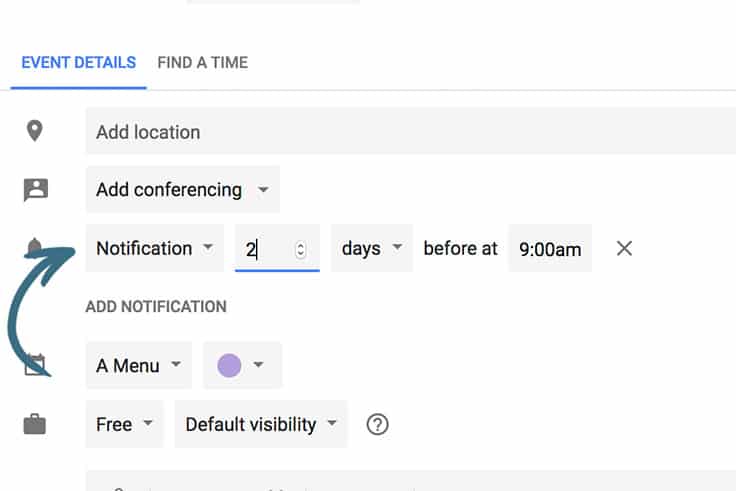
That’s usually all I do for each entry, but, occasionally, I will click the “More Options” button and add a little more information.

If you’re trying a new recipe and it hasn’t made its way into your recipe book yet, in the description box, you can add the link to the recipe so you don’t have to hunt it down later.
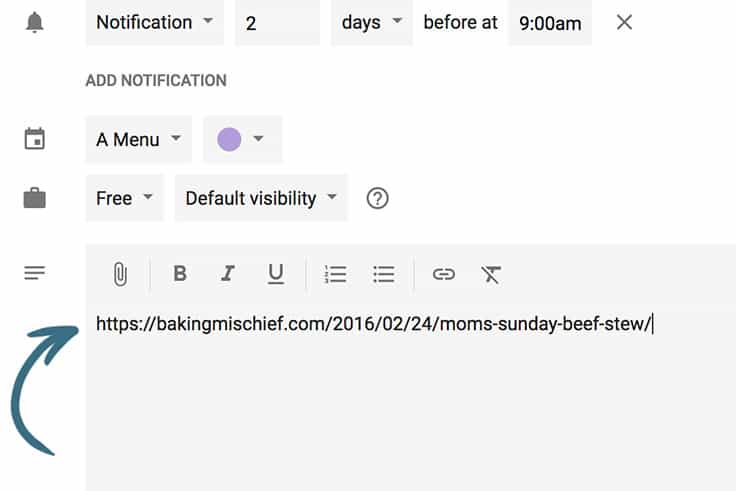

And for recipes later in the week that are going to use meat or other ingredients you’ve frozen, use the notification function to have Google remind you to take those ingredients out the freezer.

Once you’ve filled those out, your entry will look like this when you click on it.
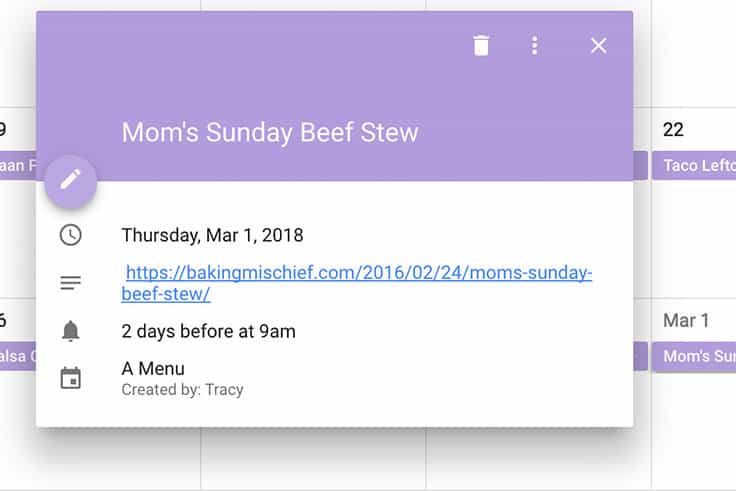

And that’s it, you now have a week of meals planned out and recorded somewhere you and everyone in your household can always access.
Bonus Meal Planning Calendar Tips
- If you share cooking duties, you can color code your entries so you know at a glance who is cooking. (Change entry colors in the “More Options” view next to the calendar selection.)
- If you’re the sort of person who uses your calendar as a journal of sorts, you can also add recipe reviews to the description field, so when you look back, you’ll know how you felt about a certain recipe and any changes you might have wanted to try.
- Aside from the aforementioned Salsa Chicken and Peasant Soup, some of the recipes that show up most often on my own meal plan include Tri-tip in the Oven , Butter and Garlic Green Beans , Ham and Potato Soup , Chicken Cacciatore , and chicken salads made with this Chicken Breast Recipe .
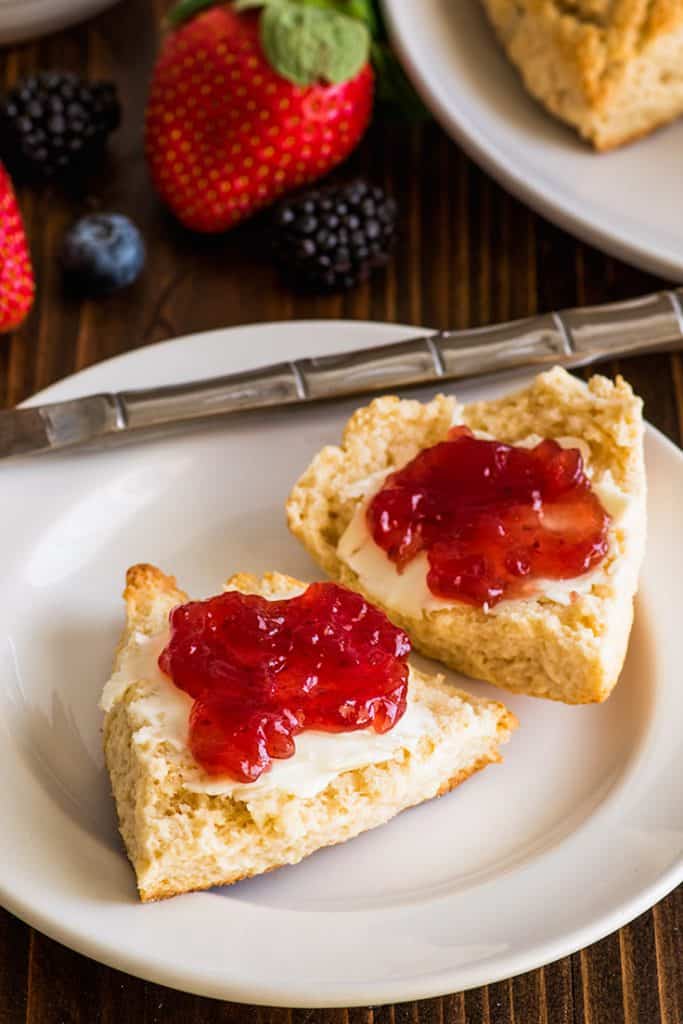
These melt-in-your-mouth cream scones are incredible and incredibly easy to make. They’re made with just six ingredients and can be on your breakfast table in under twenty minutes.

Let’s set the scene here: you, a lazy weekend morning, there’s coffee brewing on the counter and half a carton of heavy cream in the refrigerator from last night’s dinner that you need to use up. What are your going to do?
You’re going to make cream scones.
You’re going to take five minutes to throw together 5 ingredients and that leftover cream to make some dough, 14 minutes to have a kitchen dance party while it bakes, and then you’re going to spend the most charming morning sitting at the counter in your sun-drenched kitchen spreading butter and jam over freshly baked, warm-out-of-the-oven scones while you sip coffee and finish organizing your Pinterest boards .
At some point, you’ll smile to yourself and whisper yeah, we can have it all.


Okay, maybe not really. Maybe that scenario ends with you in yoga pants and a t-shirt from high school with a hole in the armpit, crying over a scone as you scroll through Twitter (even though you know nothing good ever comes starting your day with Twitter).
But you know what, a morning crying over Twitter with a freshly baked scone is still going to be better than a morning crying over Twitter without a scone.
Scones aren’t going to cure the world’s ills, but they’ll brighten your morning just a bit.
And fortunately, whenever your morning needs a bit of brightening, this small batch of cream scones is one of the easiest and quickest things to bake. It’ll go from bowl to 6 cute little scones in less than 20 minutes, and you can start eating them as soon as they’ve cooled enough that you’re not scalding off taste buds.
Pull one open, enjoy that little curl of steam that puffs out, and spread butter and jam over the inside or give it a drizzle of honey. The outside will be a little crunchy, the inside soft, and the whole thing kind of just melts in your mouth when you bite into it.
The entire process, from making to shaping to eating is utterly satisfying and really does make you feel like you accomplished something with your morning, even if that thing was just making some excellent baked goods.


Small-batch Cream Scones Recipe Tips
- Proper flour measurement is very important in this recipe. Too much flour and you might have trouble getting your dough to come together. Make sure to follow the measuring instructions in the recipe.
- If it feels like a maple morning, I made a version of these scones ( The Good Place themed!) with maple glaze, Small-batch Maple Scones .
- Have leftover heavy cream? Here are some ideas to use up the leftover cream .
Looking for more small-batch breakfasts? Try these Cinnamon Rolls for Two , Small-batch Chocolate Cinnamon Rolls , and Fluffy Buttermilk Pancakes for Two .

Ingredients
Cream Scones
- ▢ 1 1/2 cup ( 180g ) all-purpose flour measured by weight or using the spoon and sweep method*
- ▢ 3 tablespoons ( 37g ) granulated sugar
- ▢ 1 1/2 teaspoon baking powder
- ▢ 1/2 teaspoon salt
- ▢ 3/4 cup heavy cream plus more for brushing on scones*
- ▢ 1/2 teaspoon vanilla extract
Serve With
- ▢ Butter
- ▢ Jam
Instructions
- Preheat your oven to 425°F and line a baking sheet with parchment paper or a silicone baking mat.
- In a medium bowl, whisk together flour, sugar, baking powder, and salt.
- In a bowl or liquid measuring cup, combine heavy cream and vanilla. Drizzle cream over flour mixture and stir, using just enough cream so that a shaggy dough forms with no loose flour at the bottom of your bowl (you may not need all of the cream).*
- Use your hands to shape the dough into a ball and place on a lightly floured work surface. Press the dough into a disk about 5 1/2-inches across or 3/4-inch thick.
- Use a knife or your dough scraper to cut the circle into six wedges. Transfer scones to your prepared baking sheet, placing them in a circle, 1-inch apart.
- Brush scones with a little more cream to help with browning and bake for 14 to 16 minutes, until baked through and lightly golden.
- Allow to sit for 5 minutes and serve warm. Enjoy!
Notes
Recipe Adapted From King Arthur Flour
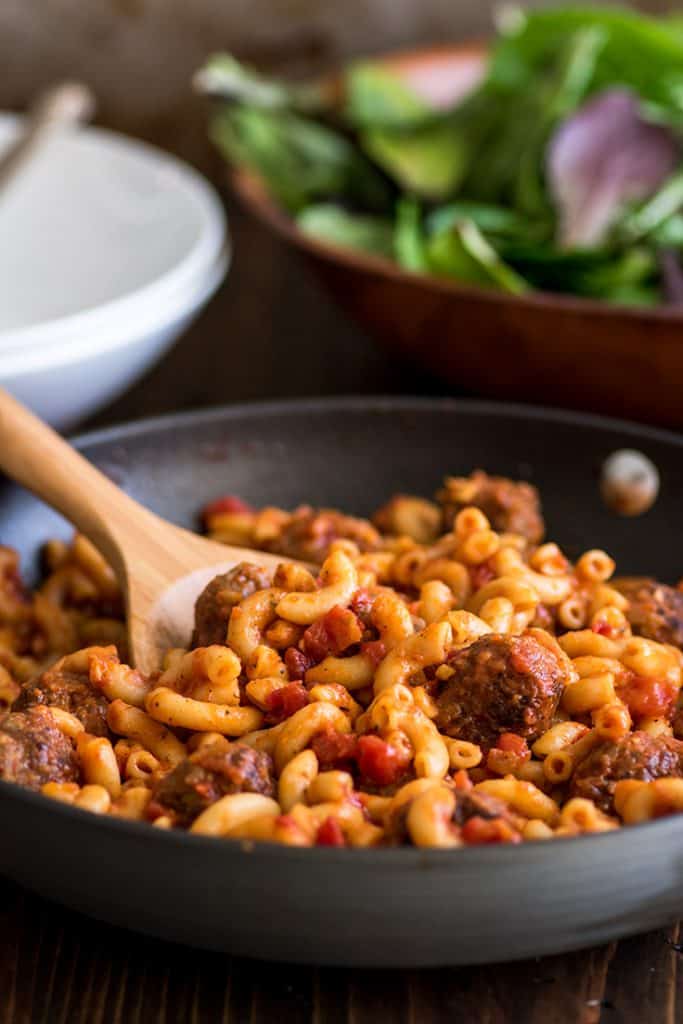
One-pot Homemade Spaghettios with Italian sausage and crushed San Marzano tomatoes: all the fun of the canned stuff and ten times more delicious.

Hey, I have something pretty fun for you today, One-Pot Homemade Spaghettios!
I know, I’m excited about it too.
This is the ideal dinner idea for those world-weary days when you’d like to feel like a kid again and eat something delicious out of a can with a cartoon character on the side of it, without actually, you know, eating something out of a can with a cartoon character on the side of it.
One-pot Homemade Spaghettios is all the saucy, pasta-y fun of the canned stuff, but classed up a little to better appeal to your grown up sensibilities.
Best of all, it’s cooked all in one pan, so sure, it’s a little more work than opening up a can and heating it in a pot, but it’s still the same number of dishes to wash.
And when I say work, I don’t mean much. This is actually an incredibly simple dinner to make, and most of the cooking time is hands-off simmering time.


Our Homemade Spaghettios start with a couple links of mild Italian sausage (if you don’t usually cook with sausage, see the recipe notes below for some extra tips).
You squeeze them out of their casings and shape into cute little meatballs that get browned in butter. After that, you cook some onions and garlic in the drippings, and once those have gotten a little stove time, you’ll add the pasta to the pan.
The type of pasta you use is up to you. If you want super traditional Spaghettios, you’ll want to use anelli or anelletti, but depending on where you live, you might have trouble finding them locally (I did!). Other good options are conchiglie, orecchiette, or macaroni (what I used in the photos).
Following the pasta are the rest of the ingredients, including a little dash of apple cider vinegar, which boosts the flavor and gives everything a fabulous tangy kick.
Simmer together for 25 to 30 minutes, just enough time to do dinner cleanup and chop veggies for a side, and then dig into your super saucy fabulous grown-up pasta with a childlike amount of glee and enthusiasm.


Homemade Spaghettios Recipe Tips
- If you don’t usually cook with/buy Italian sausage, you can generally find packages of it near the hamburger in the butcher department. To remove the casings, you can make a shallow slice down the sausage lengthwise and peel it off, or just squeeze the sausage until it bursts out the top or bottom and squeeze the meat into a bowl.
- Italian sausage is usually sold by the pound and this recipe calls for 1/2 pound of meat. You can freeze the extra sausages in their casings or form the extra meat into meatballs and freeze to make this dish again later. Just be sure to defrost the meatballs completely before cooking.
- Turkey sausage can be substituted, but if there’s not enough fat in the pan after browning your meatballs, you may need to add another tablespoon of butter to the pan before adding your onions.
- Perfect sides for this dish include: super simple Broccoli Steamed in the Microwave , crunchy Panko Parmesan Broccoli , and the ever-popular Butter and Garlic Green Beans .
- If you have extra tomato paste, see my post What to Do With Leftover Tomato Paste for storage ideas and recipes to use up the leftovers.
As written, this recipe makes two huge or three more modest servings. To change the recipe yield, hover over the number of servings (or click if you are on mobile), and slide the slider. No cooking changes are necessary.
Looking for more Dinner Ideas for Two? Try this Asparagus Chicken Pasta , Salsa Chicken , Baked Ziti , and Slow Cooker Beef Fajitas for Two .

Ingredients
- ▢ 1/2 pound mild Italian sausage casings removed
- ▢ 1 tablespoon butter
- ▢ 1/4 cup diced onion
- ▢ 1/4 teaspoon salt
- ▢ 1/4 teaspoon pepper
- ▢ 1 clove garlic minced
- ▢ 1 1/2 teaspoon tomato paste or ketchup
- ▢ 4 ounces ( 1 cup) anelli, macaroni, conchiglie, or orecchiette
- ▢ 1 (14-ounce can) crushed tomatoes San Marzano if you can get them
- ▢ 1 to 1 1/2 cups chicken broth
- ▢ 1 1/2 teaspoon apple cider vinegar
- ▢ 1 teaspoon granulated sugar
- ▢ 1/2 teaspoon dried oregano
- ▢ Shredded Parmesan cheese optional for topping
Instructions
- Scoop your sausage into approximately 16 half-ounce balls and roll into tablespoon-size meatballs. In a medium to large skillet, melt butter over medium-high heat.
- Add meatballs to the pan and cook a couple minutes per side until completely browned. Transfer meatballs to a plate.
- Turn heat down to medium. Add onions, salt, and pepper to the pan and cook until the edges of the onions turn translucent, 4 to 5 minutes.
- Add garlic and tomato paste/ketchup and cook for 30 seconds to 1 minute, until garlic is lightly golden.
- Pour in pasta, crushed tomatoes, 1 cup of chicken broth, apple cider vinegar, sugar, and oregano, and stir together. Return meatballs to the pan. Bring to a boil and turn stove down so your mixture is just at a simmer. Cook for 25 to 30 minutes, stirring occasionally, and adding a bit more of the chicken broth if too much of the liquid simmers away.
- Dinner is done when the meatballs are cooked through and pasta is al dente.
- Serve with Parmesan cheese if desired, and enjoy!
Notes

Recipe From The Kitchn
