Pink Cream Puffs filled with a rich vanilla pastry cream. So cute and delicious you’ll want to keep them all to yourself.

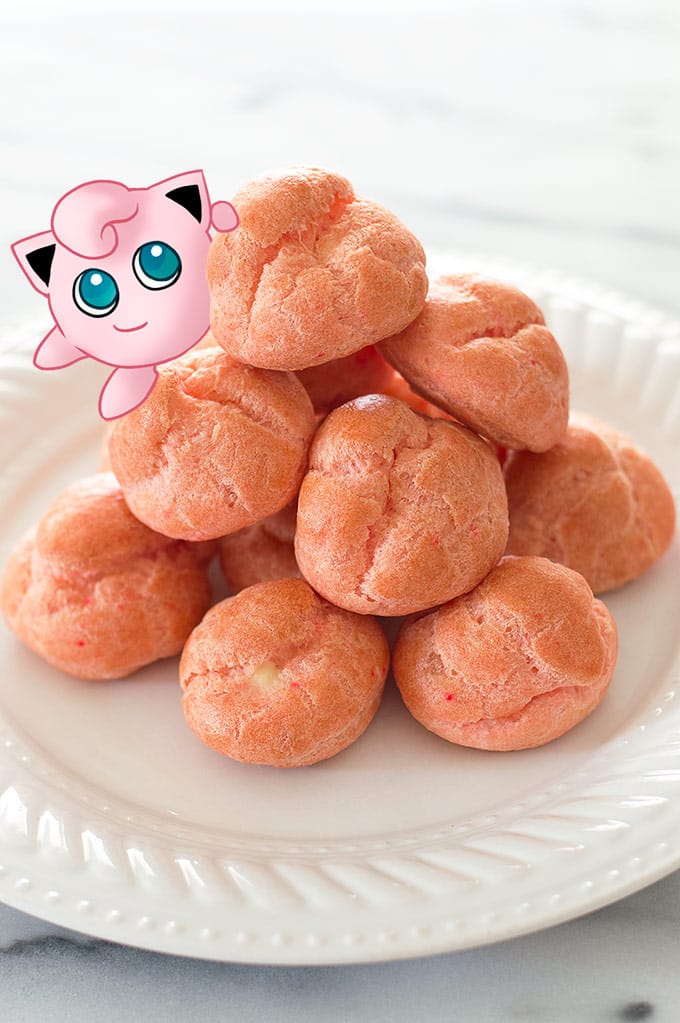
I have another fun and nerdy recipe for you today, Jigglypuff Pink Cream Puffs! A bunch of fellow bloggers are putting together a month of Pokemon-inspired recipes, and I definitely didn’t want to miss out on all the geeky fun.
The recipe linkup is being hosted by The Gluttonous Geek . There are some really great ones in there, and you should absolutely head on over to check them all out.
Have you been playing Pokemon Go? I have not let myself start because I was pretty obsessed with the Game Boy version as a kid, and it’s a slippery slope when it comes to me and Pokemon games, but it is sooooo tempting.
Anyways, given my childhood obsession, when #PokeNOM month was announced, I knew I wanted to participate and Jigglypuffs and pink cream puffs immediately popped into my head.
I mean Jigglypuff is basically a sentient pink cream puff right? Put them next to each other and there’s no telling which is which. 😉

Have you ever made cream puffs from scratch? It’s easier than you might think, and SO satisfying. Your eggy, wet pâte à choux dough goes into the oven and these perfect fluffy puff balls come out half an hour later. I think it might be magic.
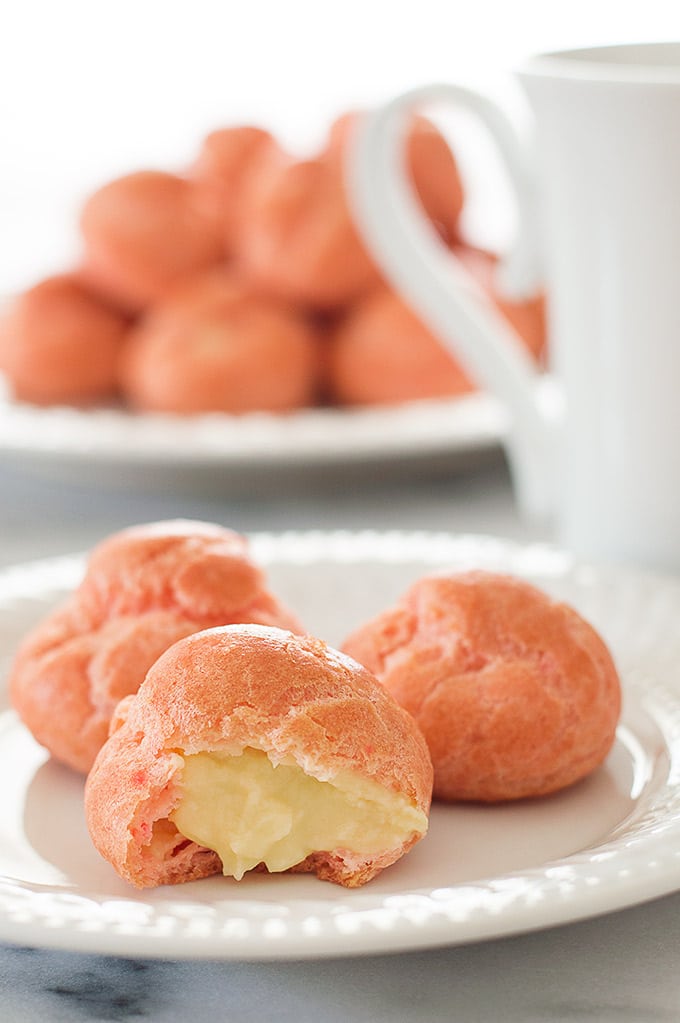
The pastries bake up hollow, leaving plenty of space for fillings. Some people like a simple whipped cream filling in their cream puffs, but not today. Not in these cream puffs. We are making a fantastically rich, gloriously creamy pastry cream for our pink cream puffs, so when you bite into them, you are met with a perfect, sinful center.

And guess what, if you keep cream in your fridge for coffee, you probably have all of the ingredients to make these. The great thing about these pink cream puffs is that they are made with simple kitchen staples. These fancy pastries do not require fancy ingredients!
They do however require a couple of notes:
- This pâte à choux recipe is simple and easy, but it’s not necessarily forgiving. Make sure to follow the instructions as written and measure your flour correctly, preferably with a scale. If you don’t have a scale, use the spoon and sweep method . (Use a scoop to drop flour into your measuring cup and then the flat side of a butter knife to sweep off the excess. This way your flour won’t become compressed and you won’t end up with too much.)
- You will also need a couple tools. Both the pâte à choux and pastry cream need to be piped. The former works best using a 5/8-inch plain tip *, but you get away with using a large plastic bag with the corner snipped off. For the pastry cream, you need a piping bag with about a 1/8-inch plain tip *. Filling the cream puffs requires you to make a small hole in the bottom and pipe cream in. Without a sturdy tip, filling them is going to be difficult.
- The final thing you need is a fine mesh strainer. While making the custard for the pastry cream, sometimes bits of egg get overcooked and running the cream through the strainer will make sure that you don’t get solid eggy bits in your pastry cream. They are super cheap on Amazon *, but you can also find them in the baking aisle in most grocery stores.

More Easy Desserts
- No-bake Cheesecake Bites
- Giant S’mores Cookie
- Small-batch Lemon Pound Cake
- Small-batch Lemon Cookies With Strawberry Frosting
You can find all of my nerdy recipes by clicking here .

Ingredients
Pastry Cream
- ▢ 1 cup milk any percentage
- ▢ 1/2 cup heavy cream
- ▢ 1/2 cup ( 100 g) granulated sugar
- ▢ 2 tablespoons cornstarch
- ▢ 1/4 teaspoon salt
- ▢ 4 large egg yolks
- ▢ 1 teaspoon vanilla extract
Pate A Choux
- ▢ 1/2 cup water
- ▢ 1/4 cup ( 2 oz) unsalted butter diced
- ▢ 1 teaspoon sugar
- ▢ 1/4 teaspoon salt
- ▢ 1/2 cup ( 60 g) all-purpose flour
- ▢ 2 to 3 drops red food coloring
- ▢ 2 large eggs
Egg Wash
- ▢ 1 large egg
- ▢ 1 tablespoon water
Instructions
Pastry Cream
- In a medium saucepan, heat milk and cream until just before simmering. Remove from heat and set aside.
- In a medium bowl, whisk together sugar, cornstarch, salt, and egg yolks. SLOWLY drizzle in hot cream mixture, whisking constantly so you don’t scramble your eggs.
- Continue whisking and pouring until all of the liquid is incorporated. You can speed up the pouring as you go and the temperature of your eggs is brought up.
- Transfer egg mixture back to your saucepan and cook over medium heat, whisking constantly. Continue to cook until mixture thickens and begins to bubble, about 3 to 6 minutes. It’s ready when it is the consistency of a thick pudding. Whisk vigorously until smooth, remove from heat, and stir in vanilla.
- Place your strainer over a medium bowl and strain pastry cream, using your whisk to push the mixture through.
- Place a piece of plastic wrap directly over the pastry cream to prevent a skin from forming and place in the refrigerator to chill completely, at least an hour.
Pate a Choux
- Preheat the oven to 375°F. Line your baking sheet with parchment paper or a silicone baking mat.
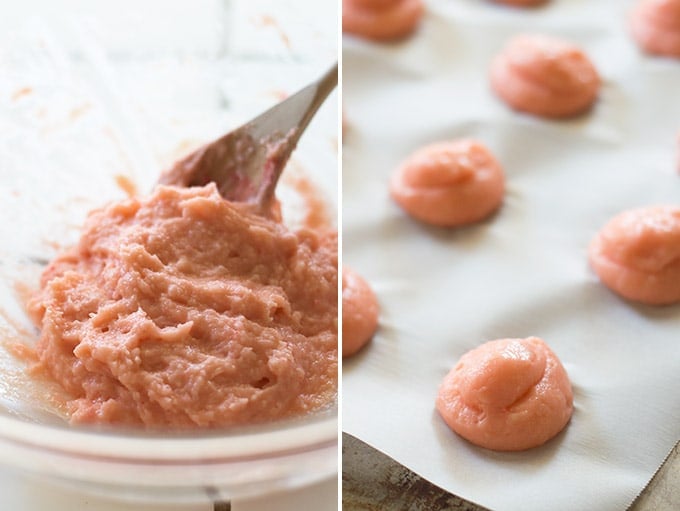
- Have your flour measured out and ready to go. In a medium saucepan, combine water, butter, sugar, and salt. Bring to a boil over medium high heat. As soon as the butter is melted and the mixture reaches a boil, stir in the flour with a wooden spoon. Stir until flour is incorporated and the mixture pulls away from the sides and forms a thin film over the bottom of the pan.
- Transfer dough to a large bowl and allow to cool for about 4 minutes, until no longer hot to the touch. Add 2 to 3 drops of red food coloring and your first egg. Use your wooden spoon to work the egg and coloring into the dough until completely mixed. It will seem slow going at first, but it will come together. Repeat with the second egg.
- Transfer mixture to a pastry bag fitted with a 5/8-inch tip. Pipe 14 1 1/2-inch mounds at least 1 inch apart. Once finished, use a little water on your fingertip to pat down any tips that are sticking up from piping so you have smooth rounds (otherwise the tips sticking up will burn).
- In a small bowl whisk together egg and water and brush gently over the pate a choux.
- Bake for 25 minutes. Do not open the oven. At 25 minutes, check the puffs. They should be lightly browned. If not, cook for an additional 2 to 5 minutes. Remove from the oven and cool completely before filling.
Filling the Puffs
- Use a chop stick or small, sharp knife to poke a small hole in the bottom of each cream puff. Transfer your cooled pastry cream to a piping bag fitted with a 1/8-inch round tip (if the cream has firmed up too much in the fridge, you can whisk it for about 30 seconds until it is smooth and the right consistency for piping.
- Fill each of the cream puffs with a generous amount of pastry cream. Serve and enjoy!
Notes
Pate a choux adapted from Martha Stewart Pastry Cream Adapted From TheKitchn
14 amazing slow cooker recipes for a delicious and easy dinner!

Hey, we are in the last days of August! Thursday brings September, and September means fall, right!? Cool crisp mornings and chilly evening strolls are just around the corner.
If I lie hard enough to myself, maybe it will become true…
Anyway, this long, hot August, the recipe theme on the blog was slow cooker recipes so that our ovens might stay off and our kitchens might stay slightly cooler. The recipes I posted were:

Slow Cooker BBQ Chicken Sandwiches for Two
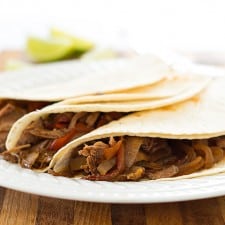

Easy Slow Cooker Beef Fajitas for Two
A Few More Baking Mischief Slow Cooker Recipes
- Slow Cooker Beef Ribs
- Crispy Slow Cooker Carnitas
- Slow Cooker Tri-Tip Sandwiches
- Slow Cooker Baked Potatoes With Broccoli and Cheese Sauce
Some Recipes From Friends
And since the heat’s probably going to be sticking with us a while longer, and you know I like to end my monthly recipe series with a round up, I asked some blogger friends for slow cooker recommendations of their own.
They all look amazing, and I know I will be putting them to good use over the coming weeks…
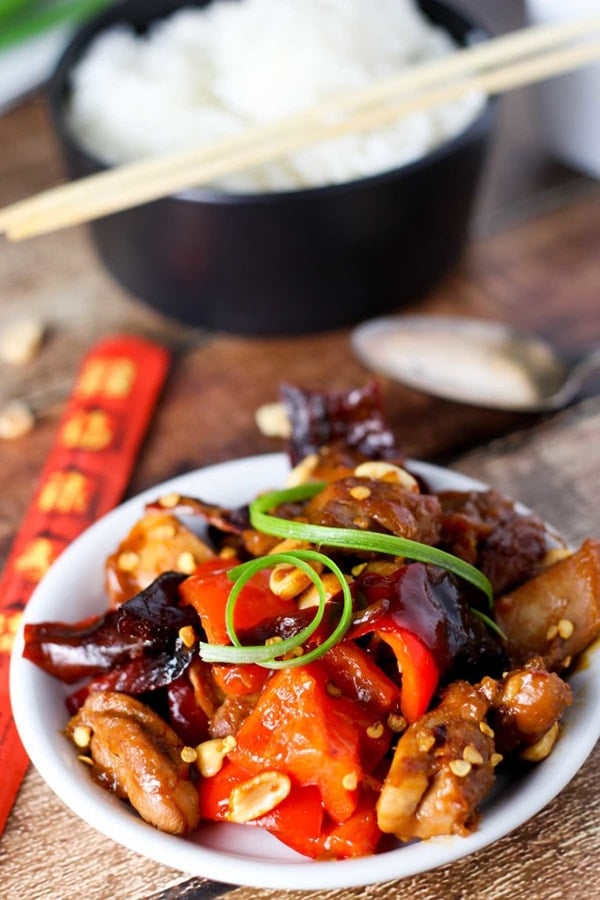

Slow Cooker Kung Pao Chicken from Platings and Pairings
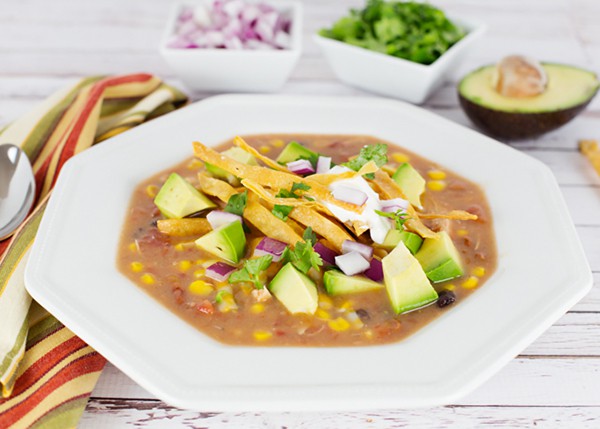

Chicken Tortilla Soup from Joy In Every Season


5 Ingredient Slow Cooker Sriracha Chicken from Leelalicious


Slow Cooker Chili Lime Beef Tacos With Mango Salsa from TheFitBlog
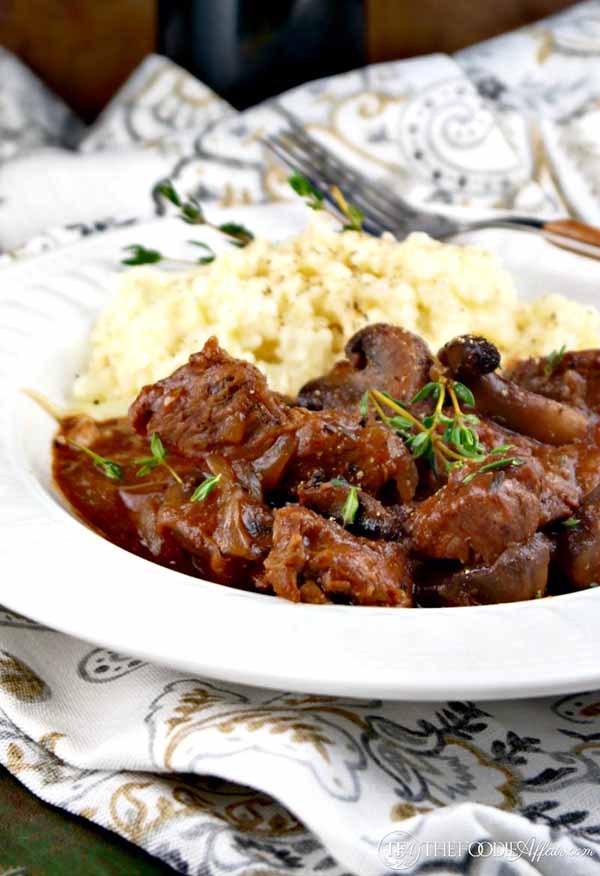

Slow Cooked Sirloin Tips with Mushrooms from The Foodie Affair
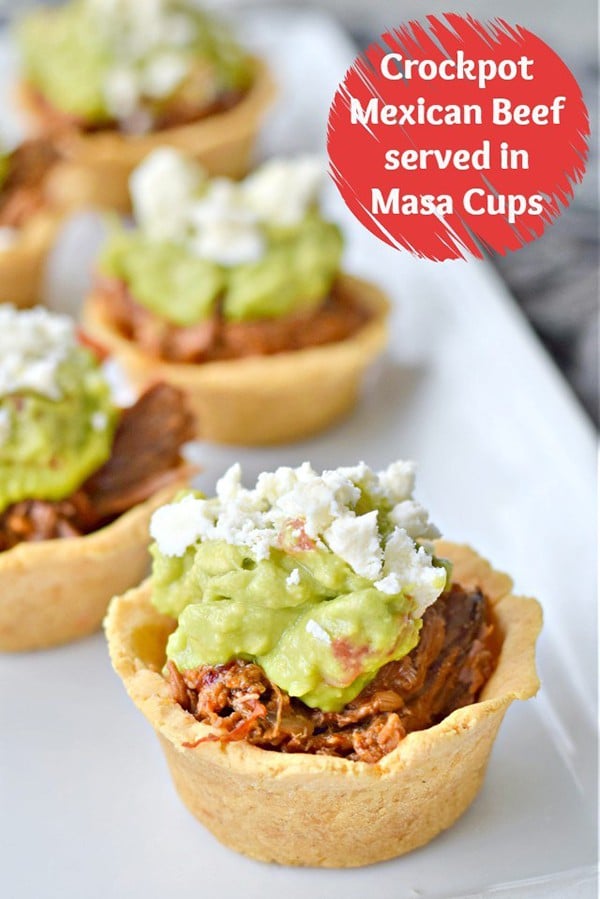

Crockpot Mexican Beef In Masa Cups from Honest and Truly
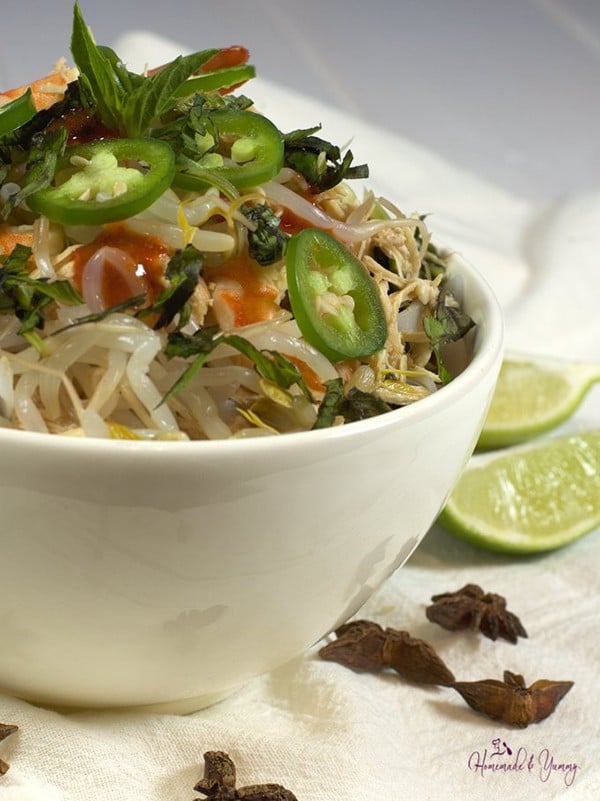

Simple Slow Cooker Pho from Homemade and Yummy
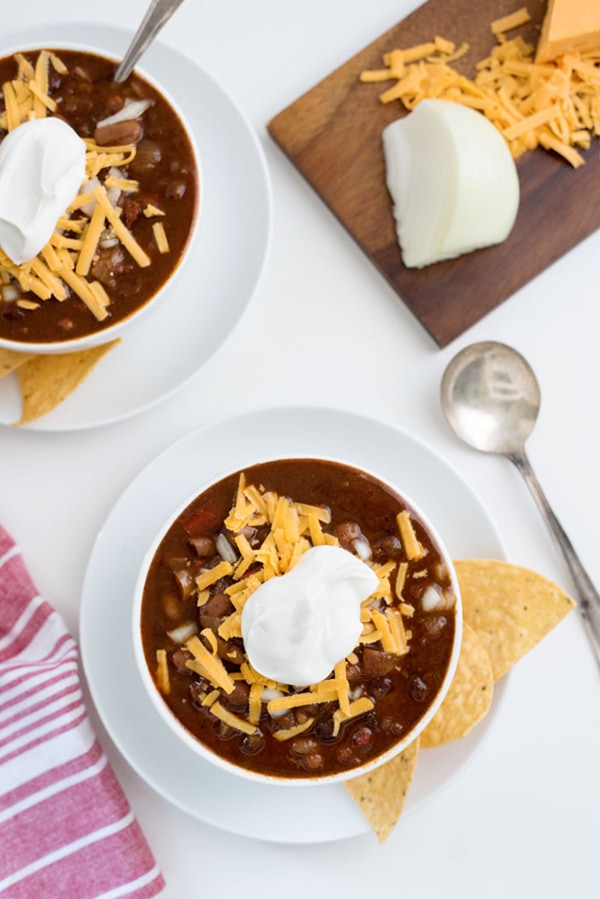

The Best Slow Cooker Vegetarian Chili from A Side of Sweet
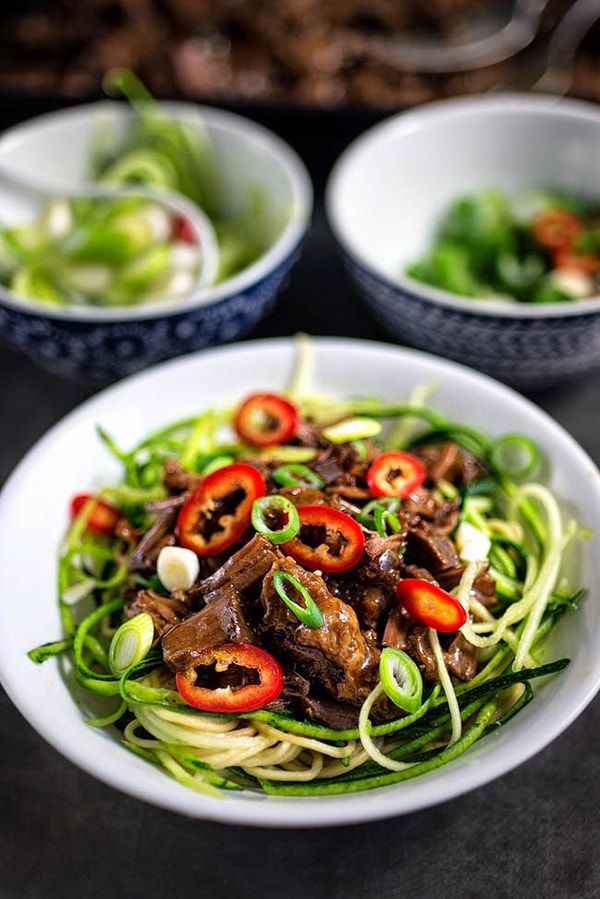

Slow Cooker Chinese Pulled Beef from Supergolden Bakes
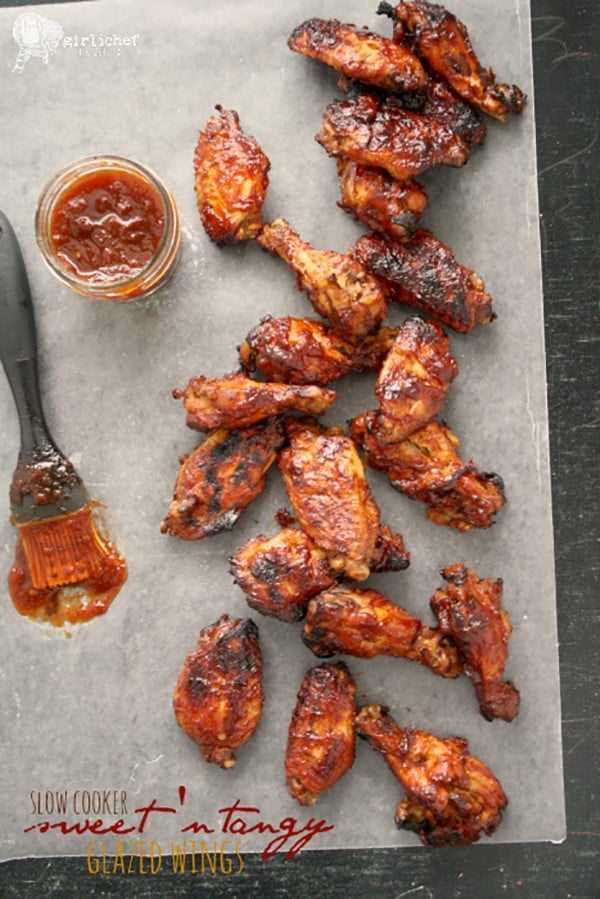

Slow Cooker Sweet ‘n Tangy Glazed Chicken Wings from All Roads Lead to the Kitchen
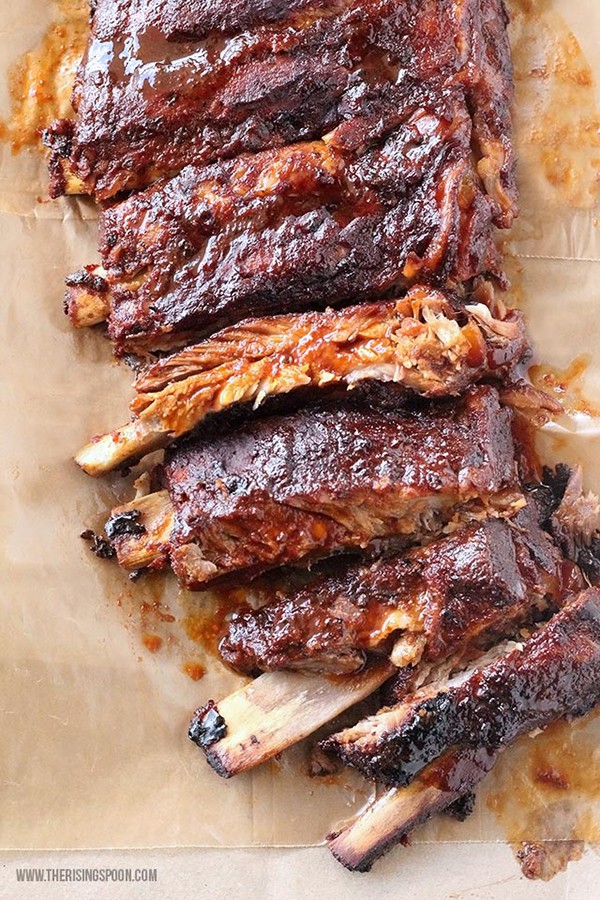

Crock-Pot BBQ Pork Ribs from The Rising Spoon
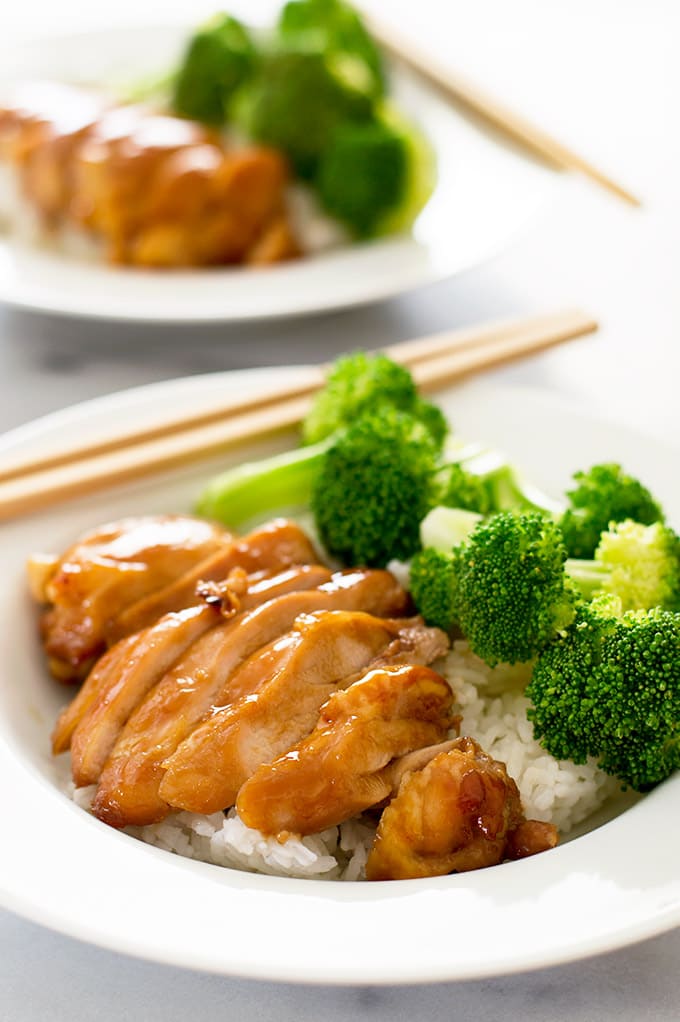
This easy teriyaki chicken with homemade teriyaki sauce has to be one of the simplest, most delicious dinners ever.

We’re well into September, which means it’s time for a new recipe theme for the month! Last month’s theme was Slow Cooker recipes since it was way too hot in August to be running an oven. This month since it’s (nearly) fall, school has started, and the days are getting shorter, I thought I’d go with a theme we could all use right about now, dead simple recipes.
I have a few of those on the site already, like my Quick Rosemary Pork Chops or the World’s Easiest Chicken Taco Soup , but we can always use a few more.
These are the recipes I make when there is no bone left in my body that can even fathom picking up a knife when dinnertime comes around.
They are all easy, quick, and healthy. These are some of my most-made recipes, and I think you are going to love them. We’ll start out with Easy Teriyaki Chicken because it’s about as simple of a recipe as you can get.
Before we get to the good stuff, I want to say: I’m including a homemade teriyaki sauce recipe here. It’s thick, quite sweet, and AMAZING. It makes enough for 2 to 3 meals and will keep for a few weeks in the fridge. The recipe calls for a couple of ingredients that you might not keep on hand if you don’t cook Japanese food often, but I’ve included substitutions in the recipe notes.
This homemade teriyaki doesn’t require any cutting or grating, just a little measuring, mixing, and simmering, but if that sounds like too much for you tonight, this cooking method works just as well with a store-bought sauce. (I’m kind of partial to the Panda Express Mandarin Sauce * myself.)
It’s great when it is, but sauce doesn’t always need to come from scratch. 😉
Moving on.
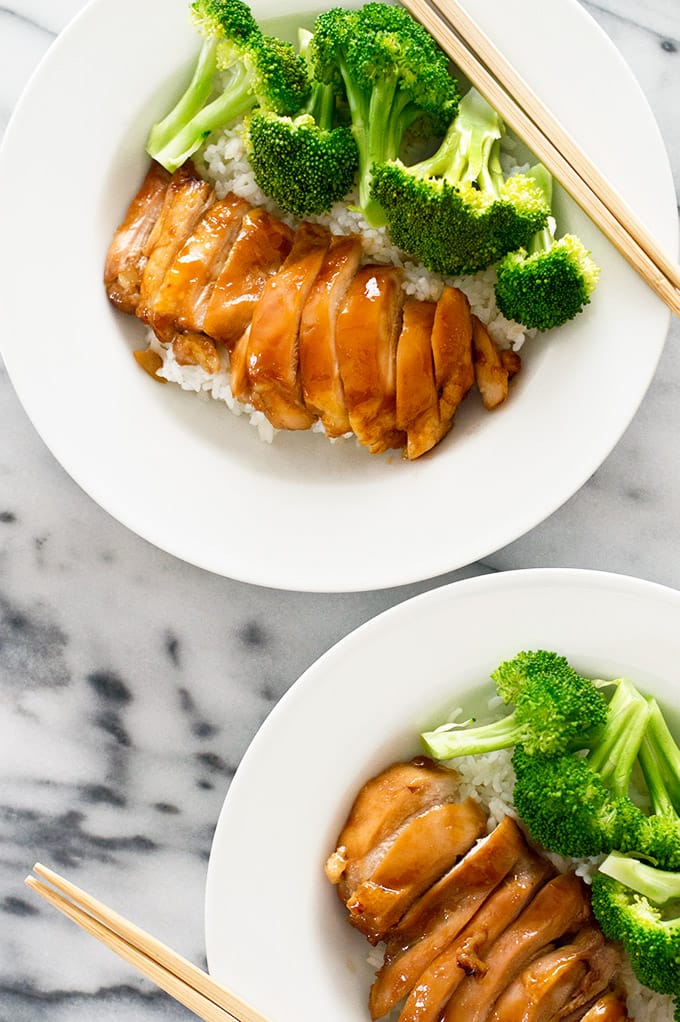

This is just about the best, easiest chicken recipe out there. Just pour a bit of teriyaki sauce over some boneless skinless chicken thighs in the morning or at least 30 minutes before cooking. Then plop those babies on a greased baking sheet and bake in a nice hot oven so they cook quick without drying out.
We’ll baste them once about halfway through so you get a lovely baked-on glaze, and then, boom. You have teriyaki chicken that is honestly better than takeout, and you didn’t have to lift a knife to get it. (Okay, you will have to pick up a knife to eat it.) The whole thing takes about 15 minutes from start to finish.
Serve this Easy Teriyaki Chicken with a side of steamed broccoli and some rice ( Calrose is my favorite * for serving with Asian dishes), and enjoy the rest of your evening with a glass of wine and some Netflix.

As written, this Easy Teriyaki Chicken recipe serves 2. See recipe notes for doubling instructions.

Ingredients
Homemade Teriyaki Sauce
- ▢ 1/3 cup soy sauce
- ▢ 1/4 cup water
- ▢ 2 tablespoons mirin*
- ▢ 1 tablespoon rice wine vinegar*
- ▢ 1/4 cup ( 50 g) granulated sugar
- ▢ 3 tablespoons ( 37 g) brown sugar
- ▢ 1/2 teaspoon garlic powder
- ▢ 1/2 teaspoon ground ginger
- ▢ 1/2 tablespoon cornstarch whisked with 1 tablespoon water
Teriyaki Chicken
- ▢ 2 large or 4 small boneless skinless chicken thighs
Serve With
- ▢ Rice
- ▢ Steamed Broccoli
Instructions
Homemade Teriyaki Sauce
- Combine soy sauce, water, mirin, rice wine vinegar, granulated sugar, brown sugar, garlic powder, ground ginger, and cornstarch and water mixture in a small sauce pan. Bring to a simmer over medium-high heat, stirring occasionally. Turn heat down to medium and simmer for 4 to 6 minutes, until sauce is thickened. (It will thicken further as it cools.)
Teriyaki Chicken
- In a small bowl or plastic bag, combine chicken thighs and about 3 tablespoons of teriyaki sauce. Toss to coat. Marinate for at least 30 minutes, up to 12 hours.
- Preheat your oven to 400°Line your baking sheet with foil for easy clean up and lightly grease. Remove thighs from the marinade and transfer to baking sheet. Bake for 8 minutes. Pour about 3 tablespoons of sauce into a small bowl and use to baste the chicken thighs. Discard remaining basting sauce.
- Bake for an additional 3 to 5 minutes before using an instant-read thermometer in the thickest part of the meat. Once the meat reads 165°, pull it from the oven and allow it to rest for at least 5 minutes before slicing. Thigh size varies wildly, so baking time will too. Don’t be alarmed if your thighs take longer to cook.
- Brush with additional teriyaki sauce if desired. Serve over white rice with steamed broccoli and enjoy!
Notes
Teriyaki Sauce Adapted From Food Network

Jigglypuff Pink Cream Puffs
Ingredients
Pastry Cream
- 1 cup milk any percentage
- 1/2 cup heavy cream
- 1/2 cup ( 100 g) granulated sugar
- 2 tablespoons cornstarch
- 1/4 teaspoon salt
- 4 large egg yolks
- 1 teaspoon vanilla extract
Pate A Choux
- 1/2 cup water
- 1/4 cup ( 2 oz) unsalted butter diced
- 1 teaspoon sugar
- 1/4 teaspoon salt
- 1/2 cup ( 60 g) all-purpose flour
- 2 to 3 drops red food coloring
- 2 large eggs
Egg Wash
- 1 large egg
- 1 tablespoon water
Instructions
Pastry Cream
- In a medium saucepan, heat milk and cream until just before simmering. Remove from heat and set aside.
- In a medium bowl, whisk together sugar, cornstarch, salt, and egg yolks. SLOWLY drizzle in hot cream mixture, whisking constantly so you don’t scramble your eggs.
- Continue whisking and pouring until all of the liquid is incorporated. You can speed up the pouring as you go and the temperature of your eggs is brought up.
- Transfer egg mixture back to your saucepan and cook over medium heat, whisking constantly. Continue to cook until mixture thickens and begins to bubble, about 3 to 6 minutes. It’s ready when it is the consistency of a thick pudding. Whisk vigorously until smooth, remove from heat, and stir in vanilla.
- Place your strainer over a medium bowl and strain pastry cream, using your whisk to push the mixture through.
- Place a piece of plastic wrap directly over the pastry cream to prevent a skin from forming and place in the refrigerator to chill completely, at least an hour.
Pate a Choux
- Preheat the oven to 375°F. Line your baking sheet with parchment paper or a silicone baking mat.
- Have your flour measured out and ready to go. In a medium saucepan, combine water, butter, sugar, and salt. Bring to a boil over medium high heat. As soon as the butter is melted and the mixture reaches a boil, stir in the flour with a wooden spoon. Stir until flour is incorporated and the mixture pulls away from the sides and forms a thin film over the bottom of the pan.
- Transfer dough to a large bowl and allow to cool for about 4 minutes, until no longer hot to the touch. Add 2 to 3 drops of red food coloring and your first egg. Use your wooden spoon to work the egg and coloring into the dough until completely mixed. It will seem slow going at first, but it will come together. Repeat with the second egg.
- Transfer mixture to a pastry bag fitted with a 5/8-inch tip. Pipe 14 1 1/2-inch mounds at least 1 inch apart. Once finished, use a little water on your fingertip to pat down any tips that are sticking up from piping so you have smooth rounds (otherwise the tips sticking up will burn).
- In a small bowl whisk together egg and water and brush gently over the pate a choux.
- Bake for 25 minutes. Do not open the oven. At 25 minutes, check the puffs. They should be lightly browned. If not, cook for an additional 2 to 5 minutes. Remove from the oven and cool completely before filling.
Filling the Puffs
- Use a chop stick or small, sharp knife to poke a small hole in the bottom of each cream puff. Transfer your cooled pastry cream to a piping bag fitted with a 1/8-inch round tip (if the cream has firmed up too much in the fridge, you can whisk it for about 30 seconds until it is smooth and the right consistency for piping.
- Fill each of the cream puffs with a generous amount of pastry cream. Serve and enjoy!
