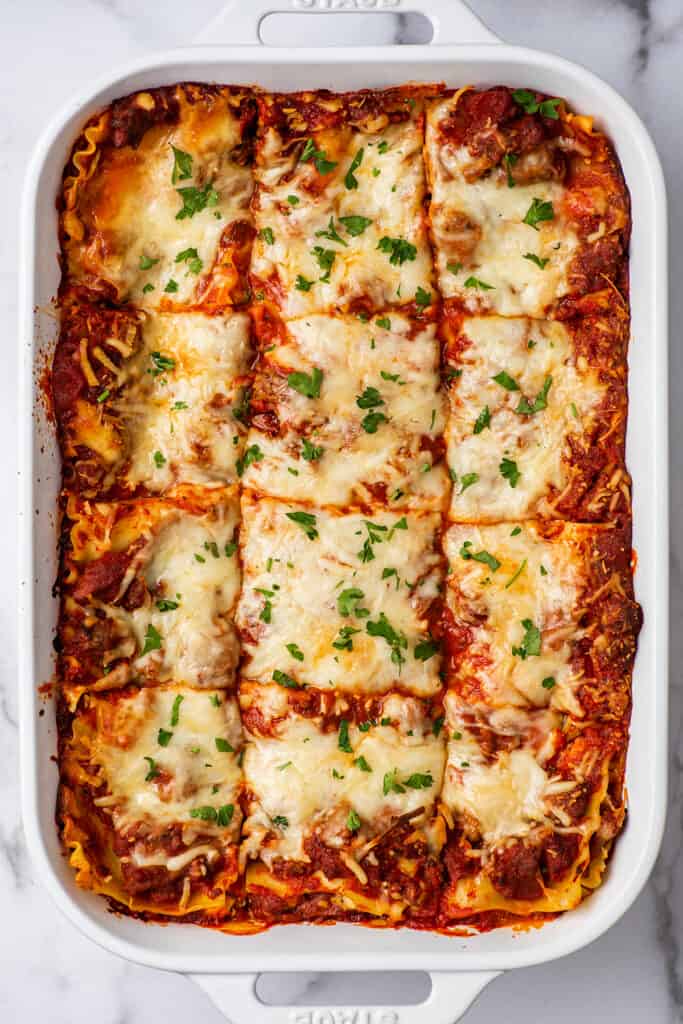
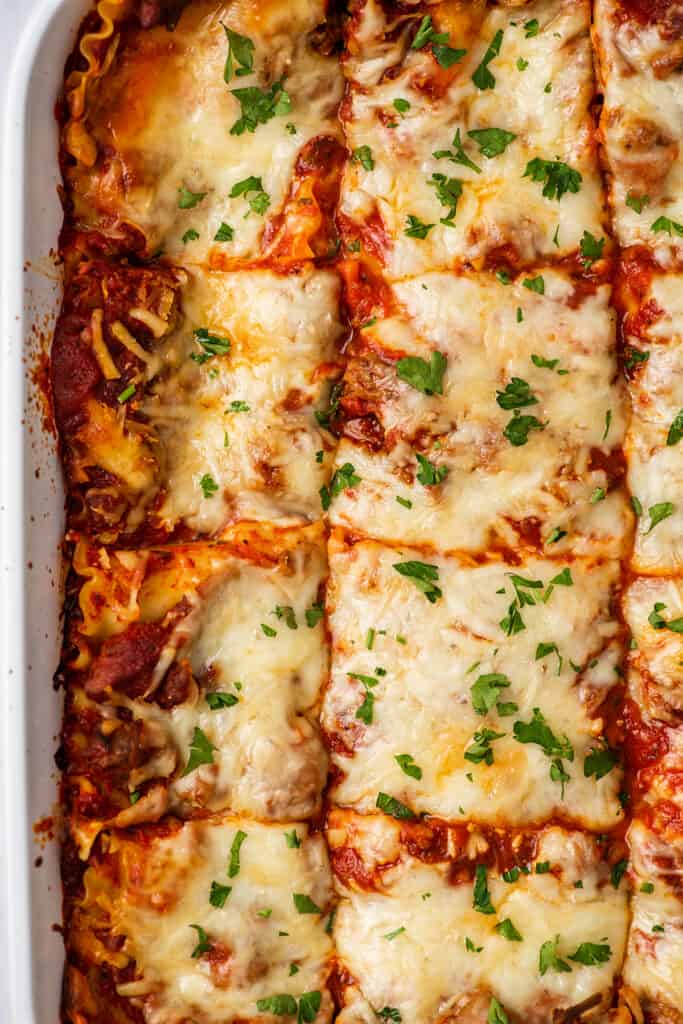
This easy lasagna recipe bakes up cheesy and beautiful. It’s quick and simple to throw together and is a total crowd-pleaser.
This recipe was my family’s go-to lasagna recipe growing up, and it’s just about the easiest lasagna you’ll ever make.
If you’re craving a plate of meaty, cheesy pasta comfort food, this lasagna absolutely delivers.

Why You Should Make This Lasagna
- It’s totally foolproof and easy. There’s no cutting needed, and you can get almost all the ingredients pre-made, pre-shredded, and ready to go.
- It’s a crowd-pleaser. Everyone loves a perfect cheesy slice of lasagna.
- It makes a ton. This dish is perfect for potlucks and parties (when those are safe to have again) and fantastic for freezing. Lasagna is one of the few pasta dishes that freeze really well, so if you’re a small household, you can stock your freezer with a ton of food fast.
Ingredient Notes
- Store-bought red pasta sauce: Using a store-bought sauce cuts a ton of prep work and time out of this recipe. I typically use Prego, but use whatever brand you prefer/is on sale.
- Lasagna noodles: This recipe is designed to be made with regular lasagna noodles, not oven-ready noodles.
- Ground beef: I typically use 85% lean hamburger here, but any hamburger will work. If you like sausage in your lasagna, you can also swap in ground sausage (sweet, hot, or mild) instead. For a meatier lasagna, you can also double the beef.
- An egg: Stirring an egg into the ricotta cheese makes it extra creamy and easier to spread when assembling your lasagna. But if you’re out of eggs or don’t like the idea, you can skip it. Mozzarella and Parmesan cheese: Feel free to use bagged, pre-shredded cheese here.
How to Make Lasagna (Easy)
- Cook the lasagna noodles until just al dente. Don’t overcook or they’ll become mushy in the oven.
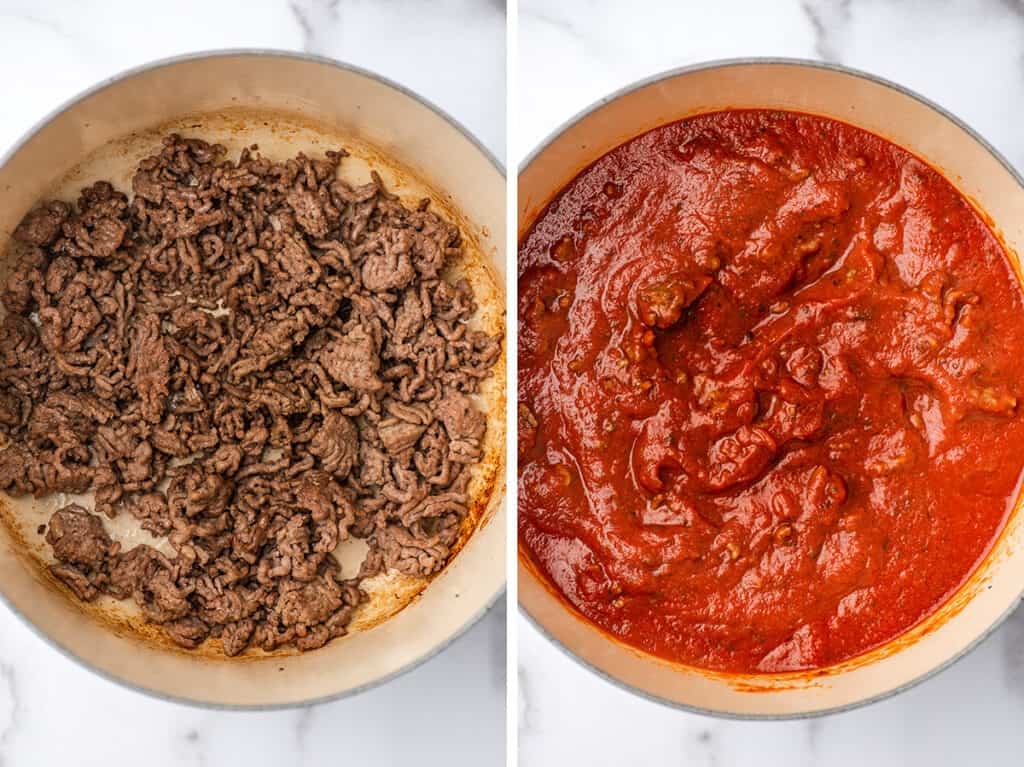

Brown the ground beef, add the pasta sauce and cook until sauce is hot and beef is cooked through.
Mix ricotta with egg, salt, and pepper and set aside.


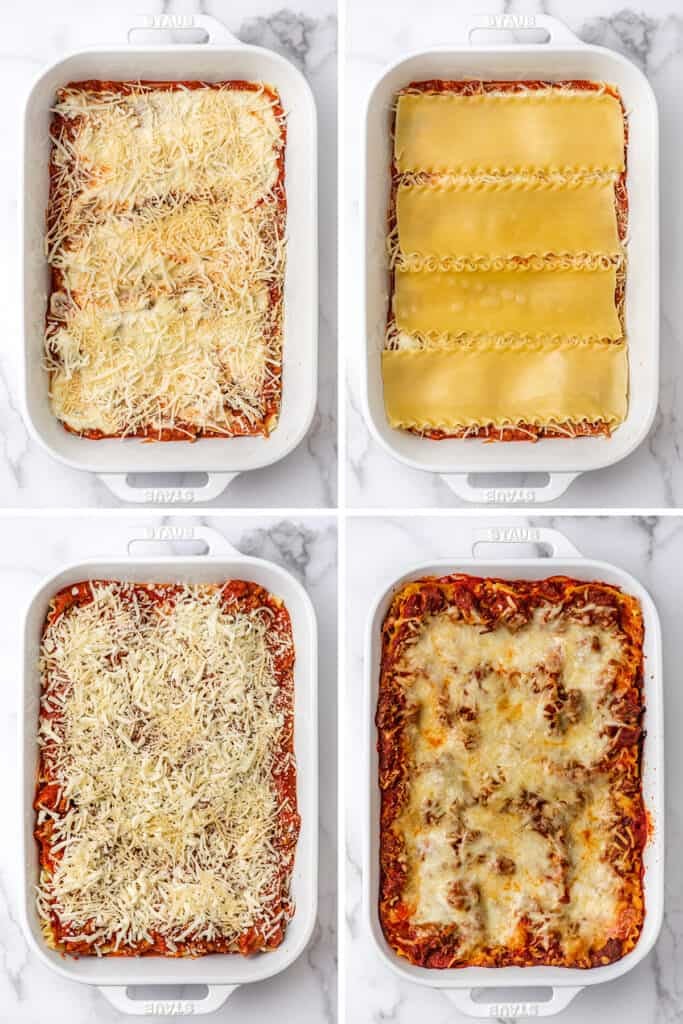
- Assemble the lasagna. You’ll be doing three layers of noodles with sauce and cheese in between, alternating between laying the noodles horizontally and vertically. (This helps hold the layers together after baking.)

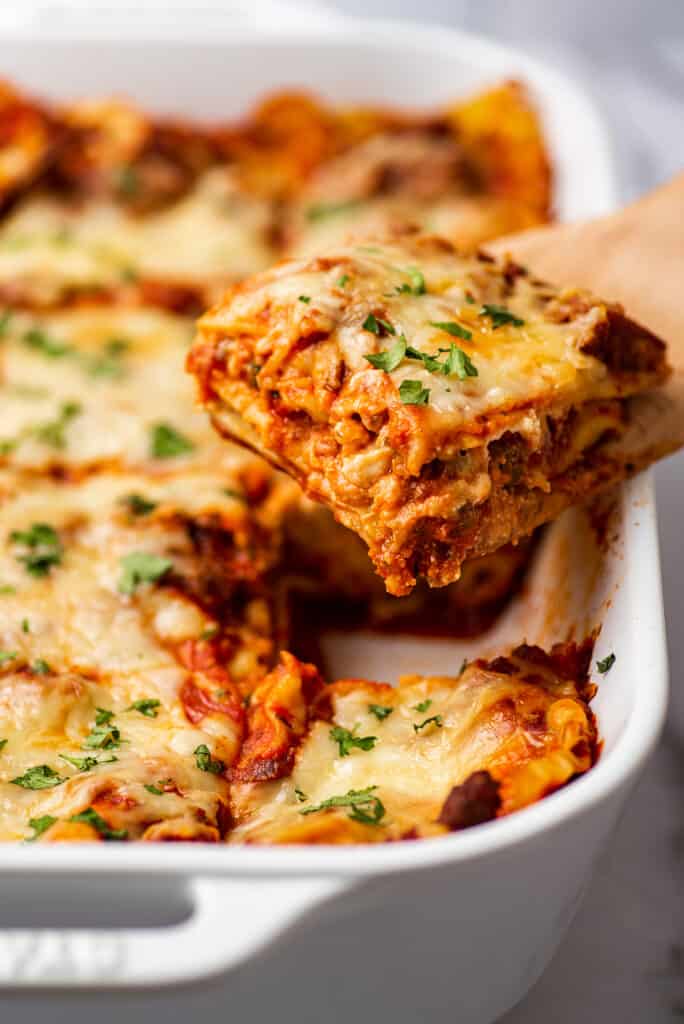
- Bake and allow the lasagna to rest for 10 minutes before serving otherwise it will be so gooey the slices won’t hold together. Serve and enjoy!
What to serve with lasagna?
A loaf of crusty bread with butter and classic green salad are perfect to serve alongside a plate of lasagna. You might also enjoy:
- Steamed green beans
- Roasted zucchini
- Steamed broccoli

How to Freeze Lasagna
To freeze individual slices: Cut and wrap the slices individually in cling wrap and store in an airtight container or freezer bag for up to 3 months. Defrost the slice in the refrigerator and then reheat in the microwave for 2-3 minutes.
You can reheat frozen slices in the microwave as well (extend the microwave time 1-2 minutes) but I find it makes the noodles a little soggy.
To freeze an entire lasagna: Freeze unbaked lasagna, tightly wrapped for up to 3 months. Defrost in the refrigerator overnight. To bake, unwrap, cover with foil and bake at 375°F for 45 minutes. Remove foil and continue to bake until cheese is melted and the lasagna is hot all the way through (the temperature at the center of the lasagna should read 165°F), usually about 15 minutes.
If baking a frozen lasagna, extend the initial covered baking time by 15-20 minutes.
Can I make a half batch of lasagna?
Yes! If you’d like to halve this recipe, it’s easy to do so. Just cut the ingredients in half (hover over the serving size in the recipe card below or click if you’re on mobile, and slide the slider) and bake in an 8×8-inch baking dish.
Baking time will be just slightly shorter. Pull the lasagna when the top is golden and the sauce is beginning to bubble around the edges.

Can I make lasagna ahead of time?
Absolutely! Lasagna is one of the best make-ahead dishes.
To make lasagna ahead of time: Just fully assemble the lasagna and store covered in the refrigerator for up to 2 days.
When you’re ready to bake it, cover the top tightly with foil, stick it in a 375°F oven and bake for 35 minutes. Remove foil and continue to bake for about 15 minutes more, until cheese is melted and the lasagna is hot all the way through.
More Easy Recipes
- American Goulash
- BBQ Chicken Thighs
- Teriyaki Beef
- Baked Ziti
- Creamy Chicken Noodle Soup

Equipment
- 9x13-inch baking dish
- Foil
Ingredients
- ▢ 10 lasagna noodles
- ▢ 1 tablespoon olive oil
- ▢ 1 pound ground beef or Italian sausage *
- ▢ 2 24-ounce jars tomato pasta sauce
- ▢ Salt and pepper
- ▢ 1 15-ounce container ricotta cheese skim or whole milk is fine
- ▢ 1 large egg optional*
- ▢ 2 cups ( 8oz ) shredded mozzarella cheese
- ▢ 1 cup ( 4oz ) shredded Parmesan cheese
Instructions
- Preheat your oven to 375°F. Lightly grease a 9x13-inch baking dish.
- In a large pot of generously salted water, cook lasagna noodles according to package instructions until just al dente. Drain and set aside.
- While your noodles cook, heat oil over medium-high heat. Add ground beef and cook until browned. If your meat released a lot of fat while it cooked, drain or spoon off the fat.
- Add pasta sauce and simmer until beef is cooked through. Taste and add salt and pepper as needed.
- In a medium bowl, whisk together ricotta cheese, egg, 1/2 teaspoon of salt, and 1/4 teaspoon of pepper. Set aside.
- Use a ladle to spoon 1/4 of the sauce into your baking dish. Lay 3 noodles lengthwise and top with 1/4 of the sauce. Drop 1/2 of the ricotta mixture over the top in dollops and then gently spread it out into a smooth layer. Sprinkle with 1/3 of the mozzarella and parmesan.
- Lay another layer of noodles, this time using 4 and placing across the dish instead of lengthwise, trimming the edges as needed. Add the sauce, remaining ricotta, and cheese just as you did with the last layer.
- Add final layer of noodles, going horizontally this time and top with remaining sauce and cheese.
- Cover tightly with foil and bake for 35 minutes. Remove foil and continue to bake until cheese is melted and the lasagna is hot all the way through, about 15 minutes.
- Let the lasagna sit for at least 10 to 15 minutes before cutting and serving. Serve and enjoy!
Notes
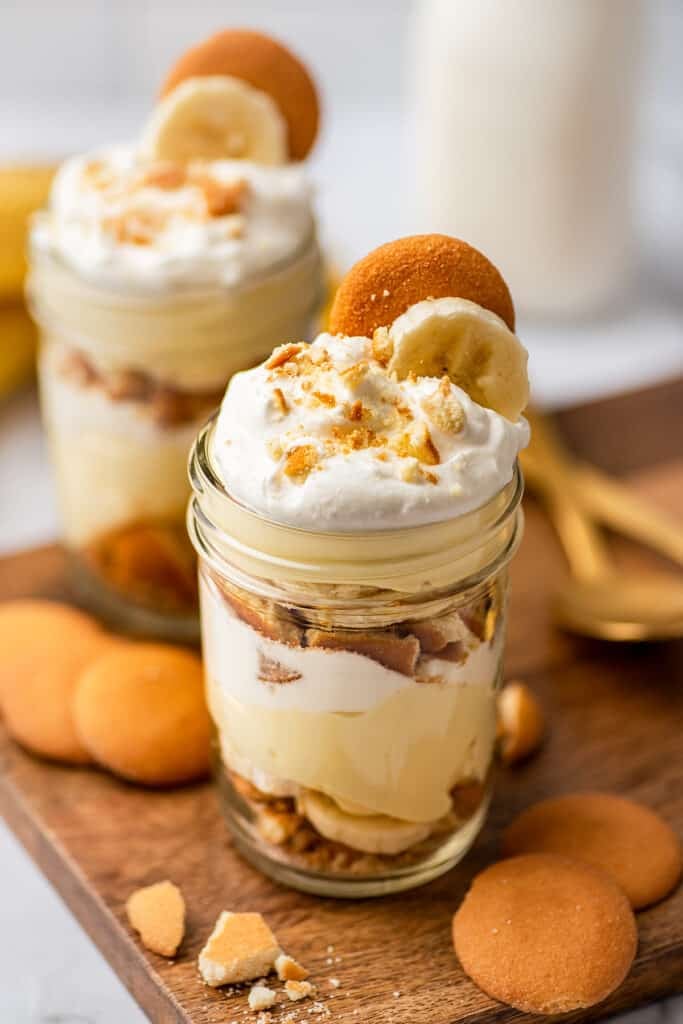
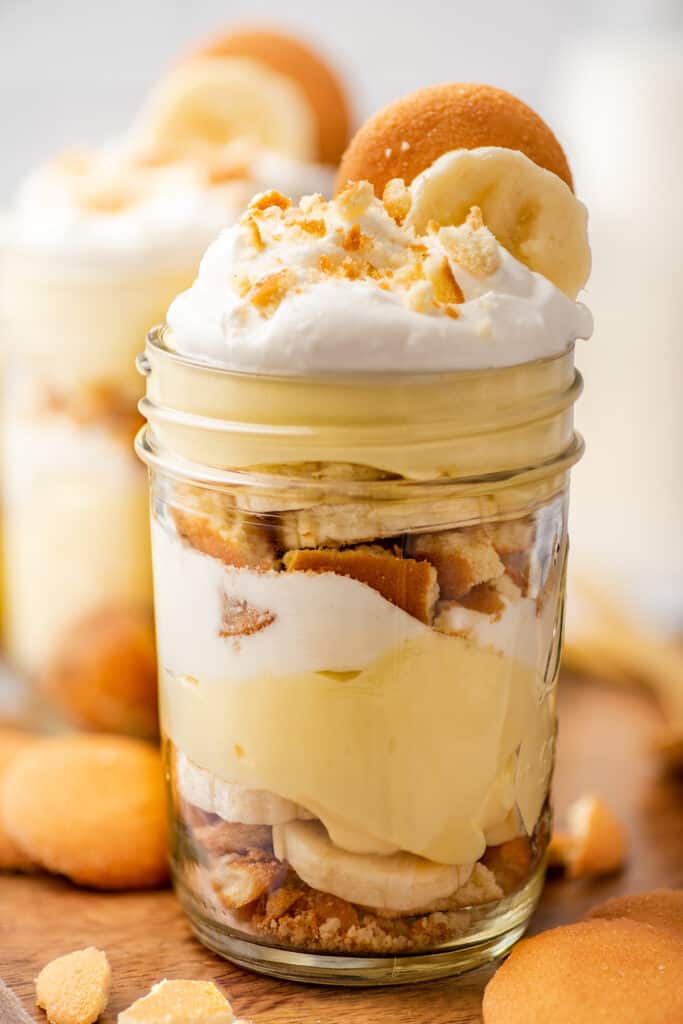
This is the best banana pudding you’ll ever eat. Rich and creamy pudding made with cream cheese, whipped cream, and sweetened condensed milk, layered with crumbled vanilla wafers, even more whipped cream, and sliced bananas.
I have something a little different for you today, a good old-fashioned Southern dessert, banana pudding! This is the absolute best banana pudding I’ve ever eaten, and I think you’re going to LOVE it.

Incredibly Good Banana Pudding
This method of making banana pudding is a Southern classic, but I first stumbled upon it Joanna Gaines’ Magnolia Table cookbook .
When I saw that this was a pudding that involved both cream cheese and sweetened condensed milk, I HAD to try it, and after one bite, I knew I had to share it with you.
This pudding is decadently rich and creamy. Smooth, unapologetically sweet, and SO indulgently good. If ever there were a desert for a treat yourself day, this is it.
Is this the pudding from Magnolia Bakery?
Magnolia Bakery banana pudding (according to the recipe they’ve shared online) is made with whipped cream, instant pudding mix, and sweetened condensed milk. This recipe is extremely similar, but it has one notable difference.
This recipe includes a block of cream cheese. (I know, I’m excited about it too.)
So I’d argue this banana pudding is even better than the Magnolia Bakery version. The cream cheese doesn’t make the pudding taste “cream cheesy;” it just adds an extra smooth texture to the pudding and a tiny bit of tang that is SO GOOD. Make it, and you’ll see what I mean.
Ingredient Notes
Softened cream cheese: It is ESSENTIAL that you start with softened cream cheese. Cream cheese that’s too cold will leave lumps in your pudding that you won’t be able to get rid of. My go-to cream cheese brand for desserts is Philadelphia cream cheese . Sweetened condensed milk: If you don’t regularly buy sweetened condensed milk, you can usually find it in the baking aisle or near the coffee and tea aisle. It’s sold in cans, and be sure to double check to make sure you’ve grabbed sweetened condensed milk and not evaporated milk since they’re typically sold side by side. Instant pudding mix: You’ll need a 3.4-ounce box of instant vanilla pudding mix for this recipe. You should be able to find pudding mix in the baking aisle of your grocery store. Heavy whipping cream: If you have leftover heavy cream, check out my post What to Do With Leftover Heavy Cream for ideas to use up the extras. Bananas: Go with ripe but firm bananas for your banana pudding. Bananas that are overripe will brown too quickly and don’t have the best texture for layering.

How to Make Banana Pudding
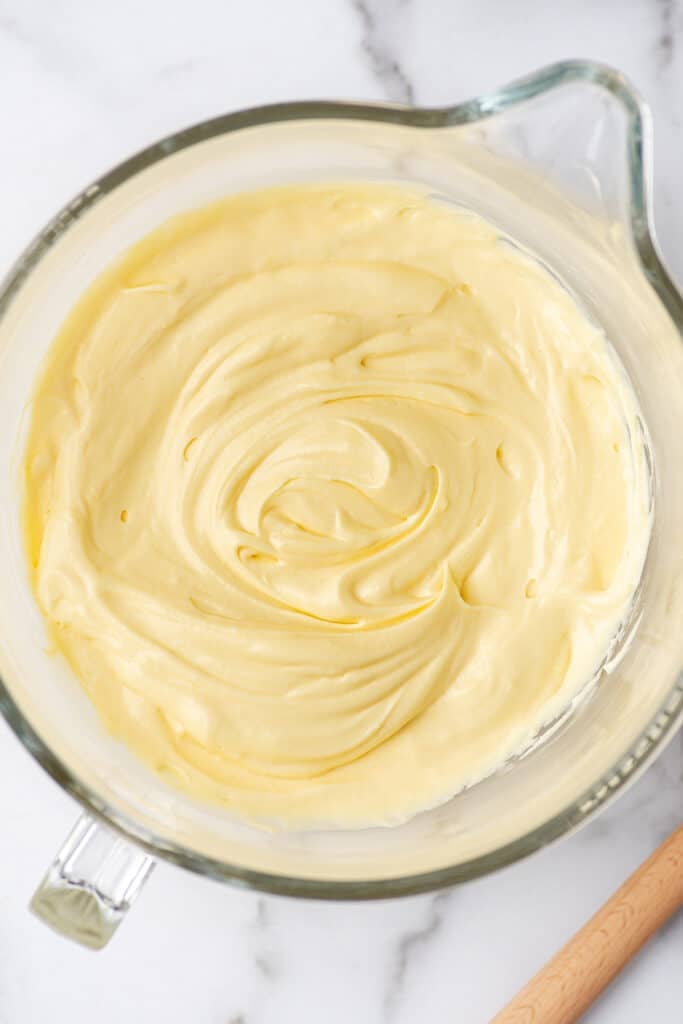
Make whipped cream: Whip heavy cream, sugar, and vanilla until it whips up into whipped cream. You’ll use half of this to fold into the pudding (it helps lighten things up) and half of it when assembling.
Make the pudding base: Beat softened cream cheese until completely smooth and then add half of the condensed milk. Beat these together until you are sure no cream cheese lumps remain, scraping the bottom and sides down a couple of times as you do so to make sure all of it is fully incorporated. And then add the rest of the condensed milk and beat in the vanilla pudding mix and milk.
Add whipped cream: Fold in half of the whipped cream until the pudding is uniform in color. The pudding will seem thin, but it will firm up the longer it sits and as it chills.

Assemble the pudding: Assemble the pudding either in 8-ounce glass jars or a 3-quart trifle dish. I used mason jars for the pudding in the photos.
Chill and enjoy: Refrigerate for 2 hours, up to 24, serve, and enjoy!
How ripe should bananas be for banana pudding?
Bananas for banana pudding should be ripe but firm. Think the type of bananas you’d like to eat for breakfast not the type you’d use in banana bread .
Of course you can use any banana you’d like, but under-ripe bananas won’t give you nearly as much flavor, and overripe bananas won’t look very pretty layered in your pudding and their texture will be too mushy to stand up to the other ingredients.
How long can banana pudding last?
You should make banana pudding no more than 24 hours before you plan on serving it. Leftovers will keep in the fridge for up to 3 days, but the bananas will begin to brown and the wafers will get very soft.
If making this for your family/yourself and you know there will be leftovers, store the pudding, whipped cream, and the rest of the ingredients separately and assemble as needed in batches. The whipped cream will probably deflate a bit as it sits, but not horribly so.
I also recommend assembling the pudding on-demand if you prefer crunchy cookies in your pudding and don’t want them softened from sitting layered with the moist ingredients.

Should you refrigerate banana pudding?
Yes. Banana pudding should be stored tightly covered in the refrigerator.
Can I make a smaller batch of banana pudding?
You know I love small-batch recipes , but for this particular recipe, I recommend against trying to make it small-batch. Both the pudding mix and condensed milk come in exactly the amounts you need and you’ll have to deal with dividing them if you want to make a smaller batch (though if you want to, by all means, go for it.)
Just make the full batch, and if you don’t want to eat it all, make banana pudding kits and drop them off with friends or neighbors (give them a container of pudding, a container of whipped cream, a banana, a plastic baggie of vanilla wafers, and assembly instructions). I did this with the shoot leftovers, and it was a hit.
Do I have to chill the pudding? Shouldn’t instant pudding be instant?
You don’t have to chill your pudding for 2 hours before eating it. It will be soft-set within about 5 minutes of being made, (kind of like the texture of really thick whipped cream).
You can layer it into bowls and eat it right away. But for thicker pudding or if you’re making it in a trifle dish and want it to hold its shape when being served, you’re going to want to let it chill in the fridge first.
More Decadent Desserts
- Easy Cheesecake
- Easy Carrot Cake
- The Best Crockpot Hot Chocolate
- S’mores Cupcakes
- Frosted Brownies

Ingredients
Whipped Cream
- ▢ 3 cups heavy whipping cream
- ▢ 1/4 cup ( 50g ) granulated sugar
- ▢ 1 1/2 teaspoons vanilla extract
Pudding
- ▢ 8 ounces cream cheese softened
- ▢ 1 14-ounce can sweetened condensed milk
- ▢ 1 cup milk preferably whole
- ▢ 1 3.4-ounce package instant vanilla pudding mix
For Assembly
- ▢ 1 11-ounce box vanilla wafers crumbled into pieces or whole
- ▢ 3 ripe but firm bananas sliced
Instructions
Whipped Cream
- In a large clean bowl or the bowl of your stand mixer, combine heavy cream, sugar, and vanilla extract, and beat until the cream is light, fluffy, and holds stiff peaks (when you lift the beater straight out, the cream should stand up and form peaks that hold their shape and don’t flop over at the tip). Set aside (if using your stand mixer, transfer whipped cream to a different container while you make the pudding).
Pudding
- In a separate large bowl or the bowl of your stand mixer, beat softened cream cheese until completely smooth.
- Add half of the sweetened condensed milk and beat until completely mixed and there are no lumps of cream cheese remaining, stopping once or twice to scrape the bottom and sides of the bowl. Beat in remaining sweetened condensed milk.
- Add milk and instant pudding mix and beat on high for 2 minutes, scraping the sides and bottom once halfway through, until well-mixed.
- Add half of the whipped cream (approximately, you don’t need to measure it) to your pudding mixture, and fold it in until the mixture is uniform in color and no streaks remain.
Assemble
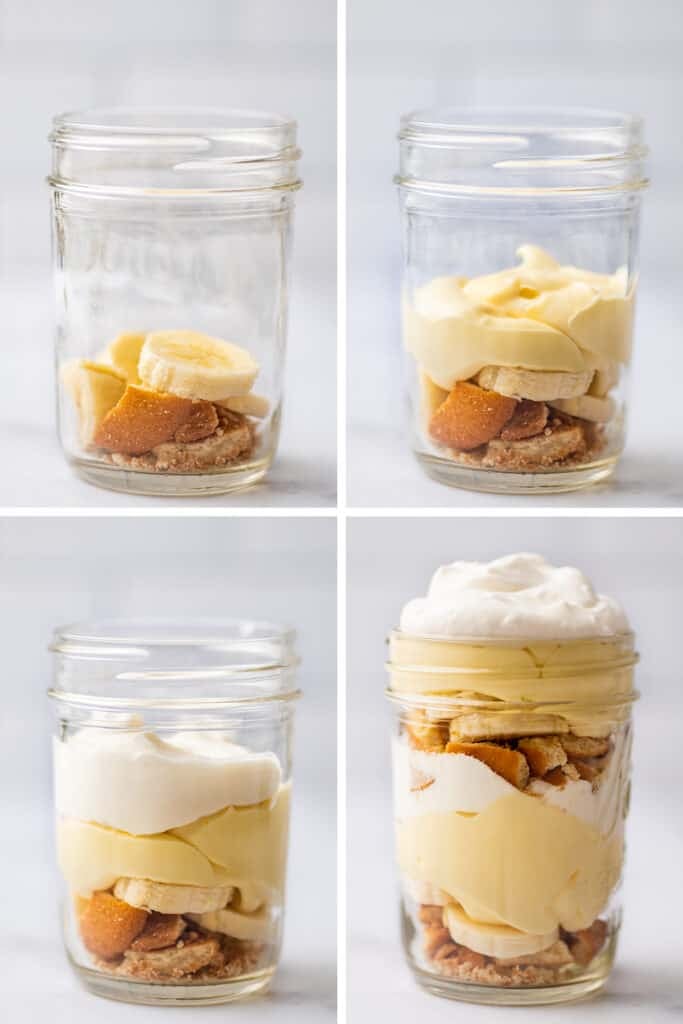
- To assemble, layer wafers, banana slices, pudding, and whipped cream into individual glasses, doing two layers of each.
- Chill for at least 2 hours*, up to 24, serve, and enjoy!
Notes
- 1/4 of the vanilla wafers in a single layer at the bottom of your bowl
- 1/3 of the pudding
- 1/4 of the vanilla wafers
- 1/2 of the banana slices
- 1/3 of the pudding
- 1/4 of the vanilla wafers
- 1/2 of the banana slices
- 1/3 of the pudding
- 1/4 of the vanilla wafers
- All of the whipped cream (that you didn’t mix into the pudding)
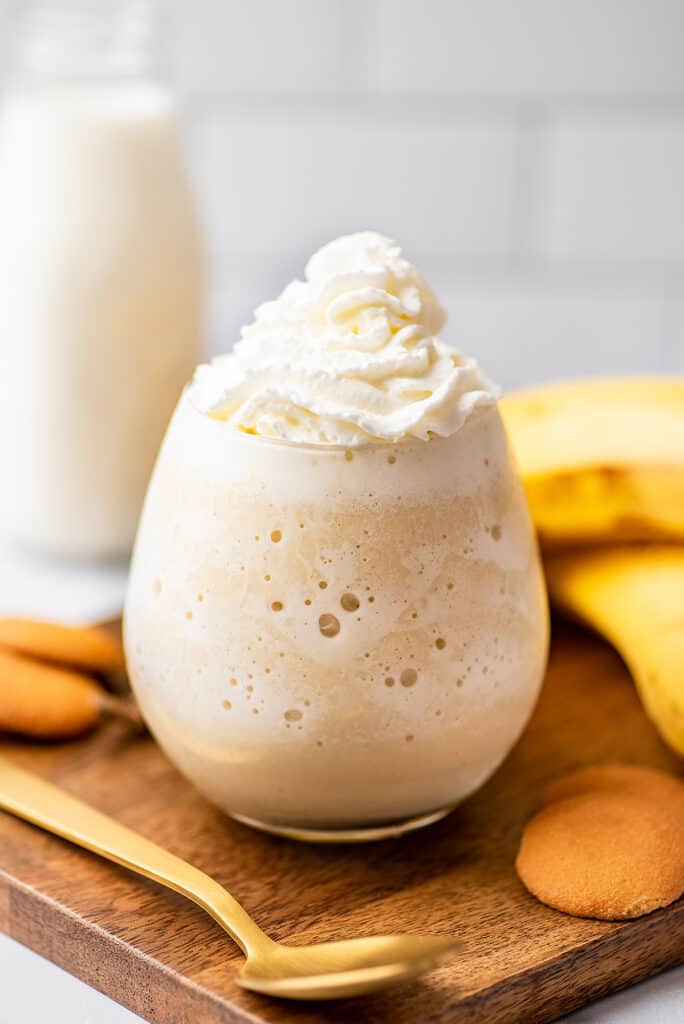
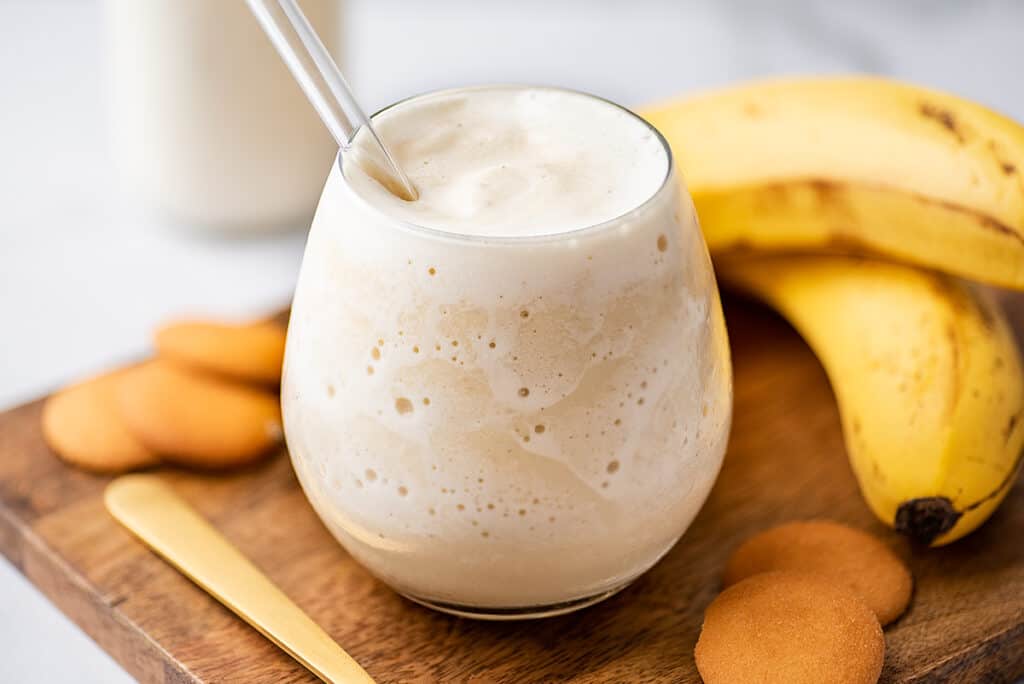
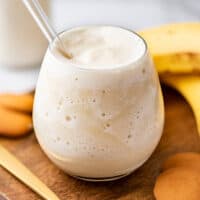
You can make a fantastic sweet and creamy banana milkshake without ice cream. All you need is a blender, a ripe banana, and a handful of pantry staples.
I love a good milkshake, and a couple years ago I started uploading a bunch of milkshake recipes to the site ( How to Make a Milkshake , The Best Vanilla Milkshake , Banana Milkshake , Oreo Milkshake , etc.).
Since then, I have gotten a TON of requests for a milkshake without ice cream, and today that day has finally come. Let’s make a banana milkshake without ice cream.

A No-Ice Cream Milkshake
I’ll be totally honest, I was a little iffy about doing a no-ice cream shake. I mean isn’t a milkshake without ice cream just a smoothie?
BUT, I got so many requests for one, and I remembered really enjoying the banana “milkshakes” my health-nut parents used to make for me and my sisters as kids, that I figured I’d give it a try.
I called my mom for the recipe, gave it a couple of tweaks, and you know what? This is a really good milkshake, no ice cream involved.
It’s thick and frosty, surprisingly creamy, and satisfyingly sweet. Best part about it? It feels totally indulgent without actually overindulging.
Ingredient Notes
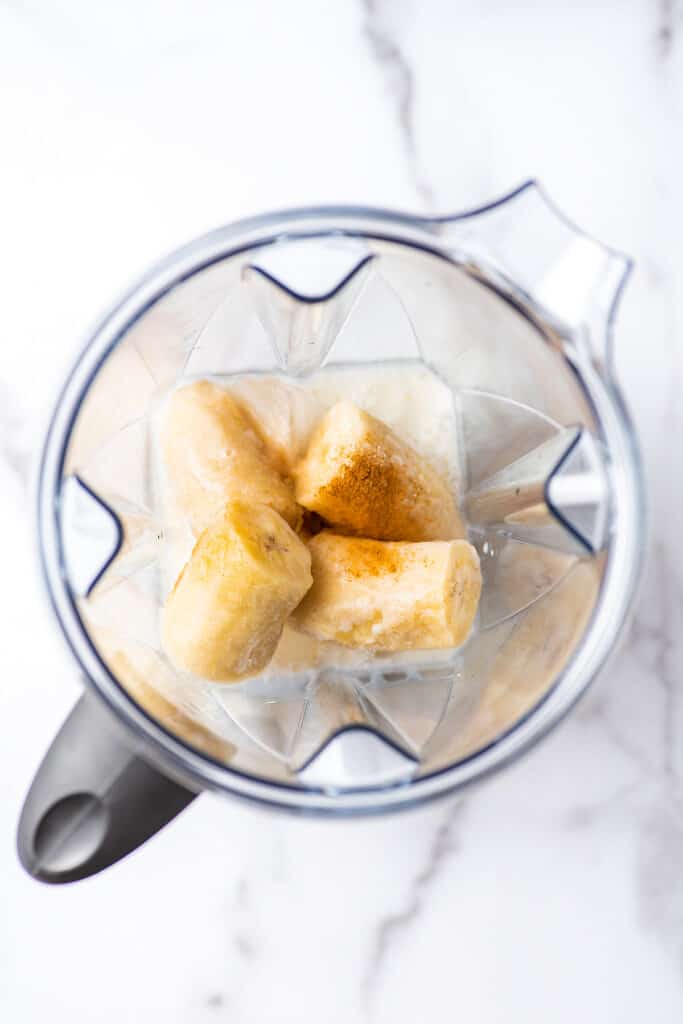
- An overripe banana, preferably frozen: You’ll get the best results with a very ripe, frozen banana. The riper the banana, the more flavor your shake will have. And frozen bananas help you get that true frosty milkshake texture. I found during testing that shakes made with fresh unfrozen bananas were good, but much thinner and less milkshake-like. For extra tips and tricks on freezing bananas, check out my post How to Freeze Bananas .
- Milk: Any milk will work here including non-dairy milks. For an extra rich shake, feel free to add a splash of heavy cream or half and half to your measuring cup before filling it the rest of the way with milk.
- Ice: A bit of ice along with the frozen banana adds to the frosty texture of the shake. If you don’t have ice or have a blender that can’t handle ice, you can skip it, but your shake won’t be as thick. Also cut the sweetener in the recipe by half if you omit the ice.
- Sugar or sweetener of choice: You can skip the sweetener if you want, but I feel like something called a milkshake should be sweet enough to feel like a milkshake. Start with a heaping tablespoon and add more to taste if needed. Honey, stevia, maple syrup or your preferred sweetener can all be used here.

How to Make a Banana Milkshake Without Ice Cream
- In your blender, combine all ingredients and blend until well-mixed and frosty. If the contents of your blender stop blending at any point, stop, give it a stir, and continue. Repeat as needed.
- Pour into a glass, top with optional whipped cream if desired, and enjoy.
Milkshake Variations
- Peanut butter: Add 1 heaping spoonful of peanut butter (or any nut butter) before blending. Nutella would also be amazing.
- Chocolate: Add 2 tablespoons of cocoa powder to the shake before blending. If you want to use fudge sauce , use 2 tablespoons, and omit the extra sugar in the shake.
- Other fruits: Replace 2/3 cup of the ice with 2/3 cup frozen fruit of your choice. Strawberries would be a great option.
Can I double this recipe?
If using a high-powered blender like a Vitamix or Blendtec , go for it. To change the recipe yield, hover over the serving size in the recipe card below or click if you’re on mobile, and slide the slider.
If your blender sometimes has trouble processing frozen fruit or ice, you might want to make your shakes in two batches.

Can I make a no-ice cream milkshake without a banana?
If you want to make a non-fruit milkshake without ice cream, go make my Frozen Hot Chocolate . Even though it’s called “frozen hot chocolate,” if I were going to make a non-ice-cream-based chocolate shake, this is exactly how I would do it, with sugar, cocoa powder, milk, and a lot of ice.
Or run to the store, get a pint of ice cream and make my Best Chocolate Milkshake (it’s worth it!).
More Milkshake Recipes
- Strawberry Milkshake
- Strawberry Banana Milkshake
- Caramel Milkshake
More Banana Recipes
- Small-batch Banana Muffins
- Small-batch CHOCOLATE Banana Muffins
- Banana Pancakes
- My Favorite Banana Bread Recipe
Ingredients
- ▢ 1 ripe banana frozen and broken into pieces*
- ▢ 1 cup ice cubes or ⅔ cup crushed ice
- ▢ 1 cup milk any percentage
- ▢ 1 heaping tablespoon ( 18g ) granulated sugar* or sweetener of choice
- ▢ 1 teaspoon vanilla extract
- ▢ Generous pinch ground cinnamon
- ▢ Whipped cream optional for serving
Peanut Butter Banana Milkshake
- ▢ 1 heaping spoonful of peanut butter
Chocolate Banana Milkshake
- ▢ 2 tablespoons ( 10g ) cocoa powder
Instructions
- In your blender, combine all ingredients and blend until well-mixed and frosty, stopping to stir to get things moving if needed.
- Pour into a glass, top with optional whipped cream if desired, and enjoy.
Notes

Easy Lasagna Recipe
Equipment
- 9x13-inch baking dish
- Foil
Ingredients
- 10 lasagna noodles
- 1 tablespoon olive oil
- 1 pound ground beef or Italian sausage *
- 2 24-ounce jars tomato pasta sauce
- Salt and pepper
- 1 15-ounce container ricotta cheese skim or whole milk is fine
- 1 large egg optional*
- 2 cups ( 8oz ) shredded mozzarella cheese
- 1 cup ( 4oz ) shredded Parmesan cheese
Instructions
- Preheat your oven to 375°F. Lightly grease a 9x13-inch baking dish.
- In a large pot of generously salted water, cook lasagna noodles according to package instructions until just al dente. Drain and set aside.
- While your noodles cook, heat oil over medium-high heat. Add ground beef and cook until browned. If your meat released a lot of fat while it cooked, drain or spoon off the fat.
- Add pasta sauce and simmer until beef is cooked through. Taste and add salt and pepper as needed.
- In a medium bowl, whisk together ricotta cheese, egg, 1/2 teaspoon of salt, and 1/4 teaspoon of pepper. Set aside.
- Use a ladle to spoon 1/4 of the sauce into your baking dish. Lay 3 noodles lengthwise and top with 1/4 of the sauce. Drop 1/2 of the ricotta mixture over the top in dollops and then gently spread it out into a smooth layer. Sprinkle with 1/3 of the mozzarella and parmesan.
- Lay another layer of noodles, this time using 4 and placing across the dish instead of lengthwise, trimming the edges as needed. Add the sauce, remaining ricotta, and cheese just as you did with the last layer.
- Add final layer of noodles, going horizontally this time and top with remaining sauce and cheese.
- Cover tightly with foil and bake for 35 minutes. Remove foil and continue to bake until cheese is melted and the lasagna is hot all the way through, about 15 minutes.
- Let the lasagna sit for at least 10 to 15 minutes before cutting and serving. Serve and enjoy!
