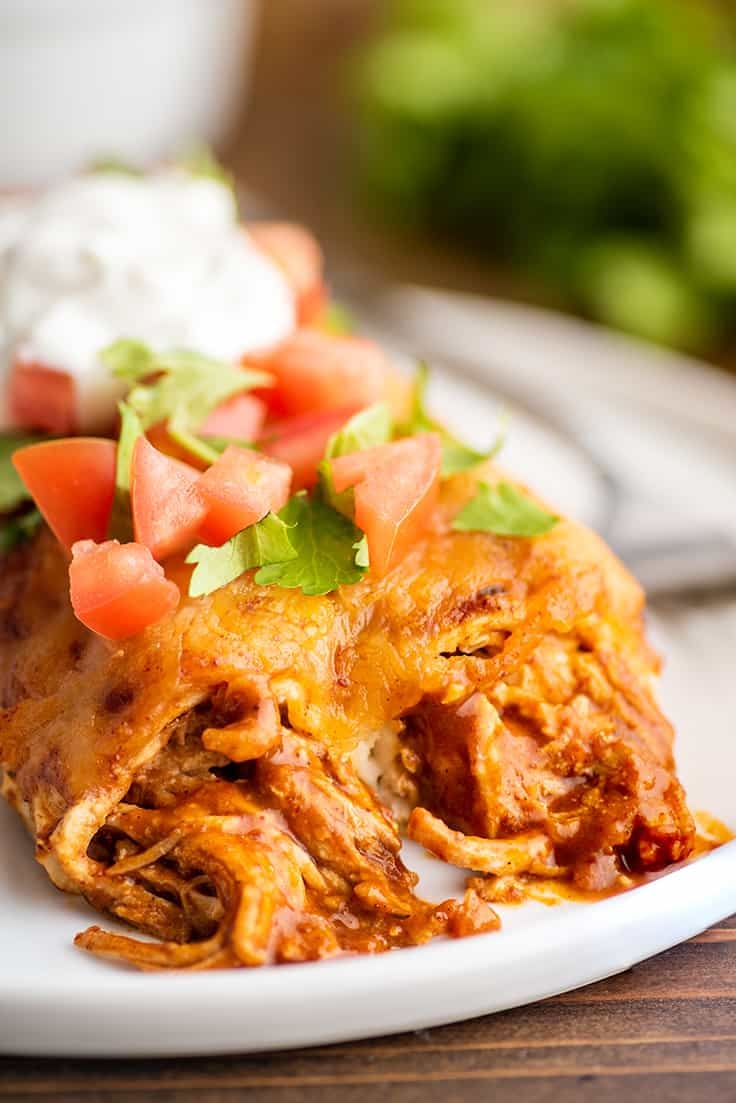
These easy chicken enchiladas are stuffed with creamy chicken filling and topped with melty cheese and a tangy homemade enchilada sauce that you’ll want to eat with a spoon.
I shared a carnitas version of these enchiladas a couple of years ago, and since then, I keep getting requests for a chicken version, so today let’s make chicken enchiladas.
These enchiladas are so easy to make and incredibly satisfying. The recipe makes a full dish of 10 enchiladas, so it will serve a 5 to 6 or freeze the enchiladas in batches and stock your freezer for later.

Ingredients
- Chicken filling: For the chicken filling, we’ll use boneless skinless chicken breasts seasoned with taco seasoning and mixed with cooked onions and sour cream. The sour cream helps add a bit of fat and richness to the meat, which I find you sometimes miss with chicken enchiladas compared to beef/pork enchiladas.
- Enchilada sauce: If you’re in a hurry and want to use store-bought sauce or have your own favorite sauce recipe, you’ll need 3 cups of sauce for these enchiladas. The homemade sauce recipe I’ve included is my very favorite enchilada sauce that comes out smooth and tangy with just a bit of heat and not too bitter.
- Tortillas: Traditional enchiladas are made with corn tortillas, but you can use corn or flour tortillas here depending on your preference.
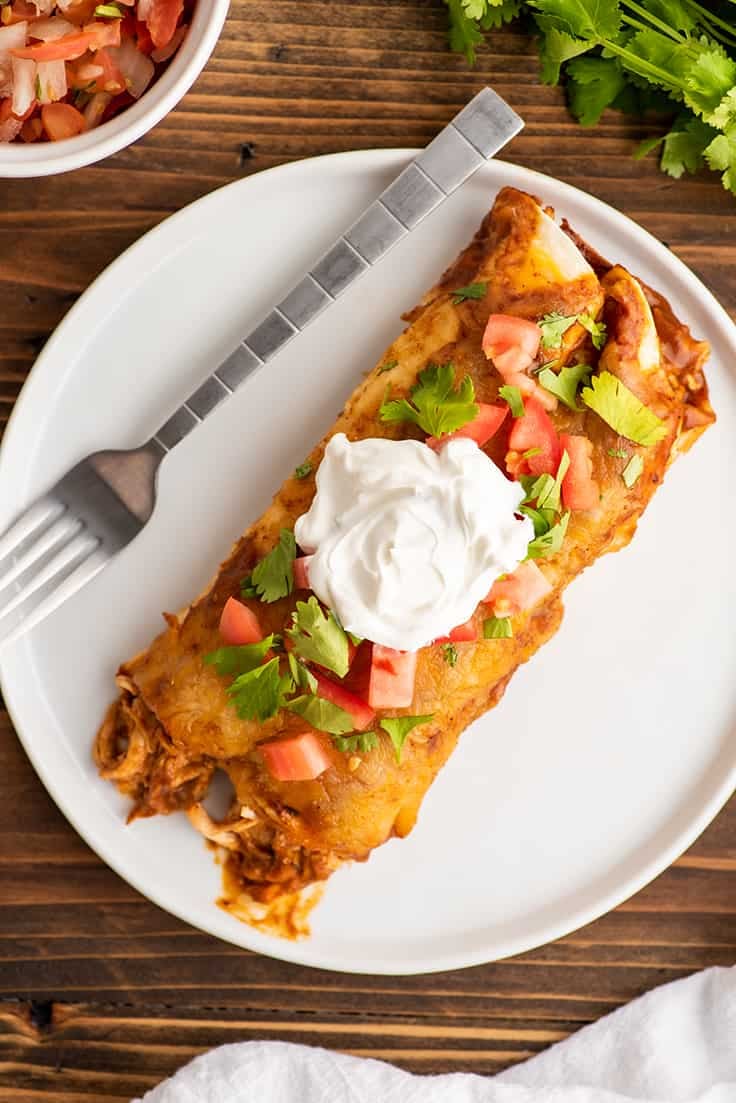
- Toppings: The enchiladas are finished with whatever melty cheese you prefer. I like a good Mexican cheese blend, but cheddar or Monterey Jack would be delicious too. After baking, you can load the enchiladas up with sour cream, cilantro, and pico de gallo or chopped tomatoes.

How to Make Chicken Enchiladas
- To make the filling, you’ll start by coating chicken breasts with taco seasoning and then cooking them on the stove using my favorite method for cooking shredded chicken , which is a mix of pan frying and poaching. Once the chicken is cooked, you’ll cook the onions for a couple minutes to take the bite out of them, and then shred the chicken and mix it with sour cream.
- After everything is mixed, taste and add salt as needed. Depending on the brand of taco seasoning you used, you may need quite a lot or just a bit.
- To make the sauce, you’ll want to make sure to measure out all your ingredients before you start. The sauce comes together quickly at the beginning, and you won’t have time to hunt down spices and measuring spoons while it’s cooking.
- Make a roux of olive oil, flour, and your spices and cook them for 30 seconds to a minute to help cook the raw taste out of the flour and bloom the spices. Then you’ll whisk in the tomato paste followed by chicken or vegetable broth and let that simmer until thickened. At the very end, you’ll stir in a little vinegar, which brightens up the sauce and makes it tangy and delicious. Finally, add salt and pepper to taste.
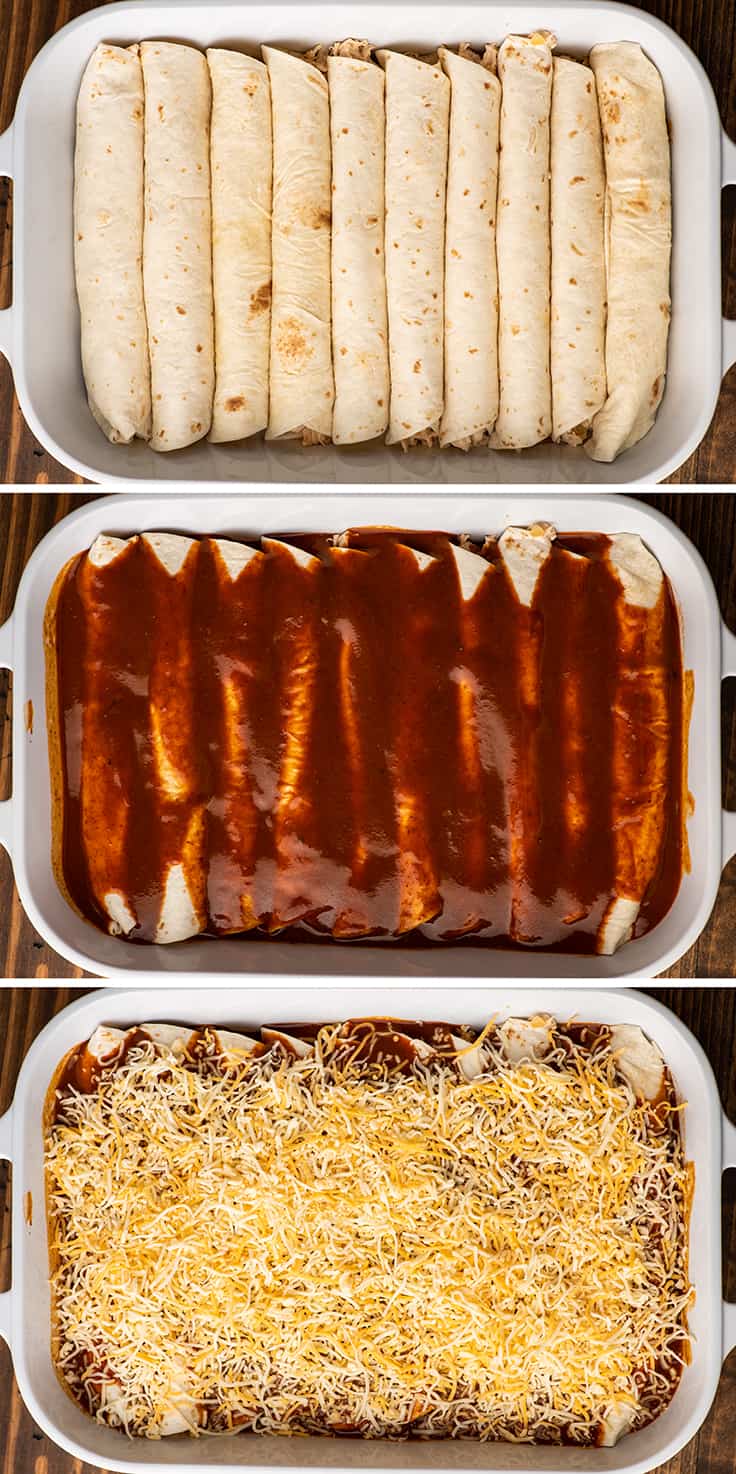
- To assemble the enchiladas, you’ll add just a little sauce to the bottom of your baking dish and then fill each tortilla with about 1/3 cup of chicken filling. Roll the tortillas tightly and fit them seam-side down into the baking dish. Pour the remaining enchilada sauce over the top and then sprinkle with cheese.
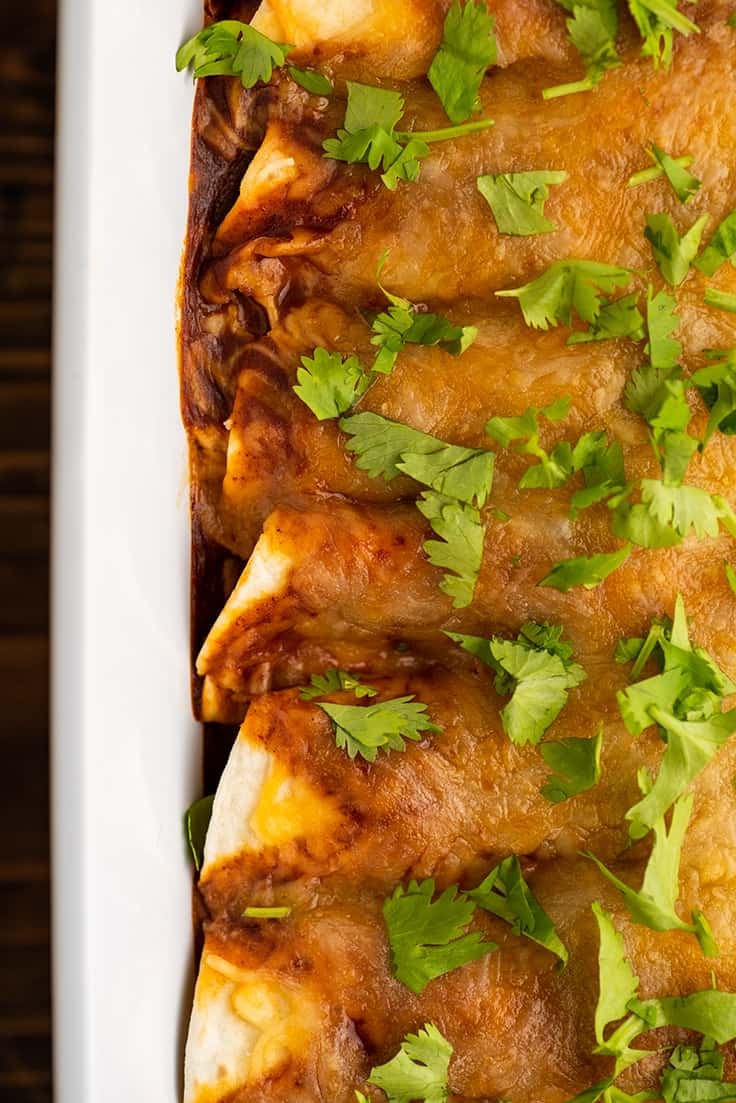
- Bake for 25 to 30 minutes, until cheese is bubbly, and then serve and enjoy!

How do you freeze chicken enchiladas?
Unbaked enchiladas freeze quite well. You can freeze them in two 8×8 pans of five enchiladas each or three 5×7 pans of three or four.
To freeze, line baking dish (disposable or reusable) with parchment paper. Assemble enchiladas completely. If using a disposable baking dish, wrap tightly with foil and store in a freezer bag.
If using a regular baking dish, place in the freezer and freeze until solid, about 4 hours. Use the parchment paper to lift enchiladas out of the pan and wrap tightly in foil (leave the parchment paper on the enchiladas). Store in a plastic freezer bag.
To reheat, preheat oven to 400°F. Remove foil. (If not using a disposable container, place frozen enchiladas, parchment paper included, into a baking dish.)
Grease a piece of foil and loosely cover the top of your enchiladas, greased side down. This will keep your cheese and tortillas from burning and won’t stick as the cheese melts.
Bake until heated through or an instant-read thermometer reads 160°F, this will take at least 30 minutes, up to over an hour for a full pan of enchiladas. When the enchiladas seem very nearly heated through, remove foil so the top of the enchiladas can brown.
What to Serve with Chicken Enchiladas
Serve your enchiladas with cilantro lime rice and a simple veggie side like butter and garlic green beans or roasted broccoli .
A Note on Serving Size
If feeding to guests or large eaters, plan on 2 enchiladas per person. Personally I find that the perfect serving size is 1 1/2 enchiladas, though kids and smaller eaters might only eat 1.

You Might Also Enjoy
- Easy Carnitas
- Barbacoa Beef
- Quick Chicken Fajitas
- Carne Asada
- Shredded Beef Burritos

Equipment
- 9x13-inch baking dish
Ingredients
Chicken Filling
- ▢ 2 pounds boneless skinless chicken breasts about 3 to 4 medium breasts
- ▢ 1 tablespoon taco seasoning *
- ▢ Cooking spray or olive oil
- ▢ 1/2 small onion diced
- ▢ 1/4 teaspoon salt
- ▢ 1 cup ( 240g ) sour cream
Enchilada Sauce
- ▢ 3 tablespoons olive oil
- ▢ 3 tablespoons ( 23g ) all-purpose flour
- ▢ 2 tablespoons chili powder
- ▢ 1 1/2 teaspoons ground cumin
- ▢ 3/4 teaspoon garlic powder
- ▢ 1/4 heaping teaspoon dried oregano
- ▢ 1/4 heaping teaspoon salt
- ▢ 3 tablespoons ( 50g ) tomato paste
- ▢ 3 cups chicken or vegetable broth
- ▢ 1 1/2 teaspoons apple cider vinegar or distilled white vinegar
- ▢ Pepper
Enchiladas
- ▢ 10 8-inch tortillas corn or flour are fine
- ▢ 1 1/2 cup ( 6oz ) shredded Mexican cheese blend or your favorite melting cheese
Optional Toppings
- ▢ Cilantro
- ▢ Pico de gallo
- ▢ Sour cream
Instructions
Shredded Chicken
- Preheat oven to 350°F and lightly grease a 9x13-inch baking dish. Set aside.
- Coat both sides of the chicken breasts in taco seasoning. If using taco seasoning that does not include salt, generously sprinkle both sides with salt as well.
- Heat a large skillet with a lid over medium-high heat. Grease with cooking spray or a drizzle of olive oil. Add chicken breasts to the pan and cook until browned, 2 to 3 minutes. Flip and repeat with the second side. Add enough water to the pan to come up about 1/2-inch.
- Bring to a simmer, cover the pan and cook for 6 to 10 minutes (longer with very large chicken breasts), until an instant-read thermometer inserted into the thickest part of the meat reads 165°F. If at any time the water level gets low, add a bit more water to the pan.
- Transfer chicken to a cutting board to rest and discard any juices from the pan. Return the pan to the stove and grease with cooking spray or a little olive oil and heat over medium heat. Add onions and 1/4 teaspoon salt and cook 5 to 7 minutes, until onions begin to turn translucent around the edges. If at any time they begin to brown, turn down the heat.
- Use two forks to shred the chicken breasts, and combine shredded chicken, onions, and sour cream in a large bowl. Mix well and add salt and pepper to taste. Set aside.
Enchilada Sauce
- Pre-measure all of your sauce ingredients (flour, spices, and salt will be added together so they can all go in the same small bowl) and place them next to the stove.
- In a medium pot, heat oil over medium heat. Add flour, spices, and salt and whisk until a thick paste forms and begins to bubble, 30 seconds to 1 minute.
- Whisk in tomato paste and stir until mostly combined. Slowly pour in broth, whisking out any lumps as they form and whisk until completely smooth. Bring to a simmer and cook, whisking often, until sauce has thickened, 6 to 12 minutes.
- Remove from heat, stir in vinegar, and add salt and pepper to taste. Set aside to cool slightly.
Assemble Enchiladas
- To your prepared baking dish, add 1/4 cup of the enchilada sauce, spreading it so that it mostly coats the bottom in a thin layer.
- Fill each tortilla with about 1/3 cup of meat and sour cream mixture and roll tightly. Place in the baking dish, seam-side down.
- Pour remaining sauce over the enchiladas and sprinkle the cheese over the top.
Bake
- Bake for 25 to 30 minutes, until cheese is melted and the edges of the tortillas are just slightly golden.
- Cool for 10 minutes before serving. Top with sour cream, cilantro, and pico de gallo if desired. Enjoy!
Notes
Storage tips and recipe ideas for leftover pie dough scraps.
I’d been meaning to write this post since I posted my Favorite Buttermilk Pie Crust recipe, because pie crust is one of those things you always have leftovers for, and you can make so many easy and delicious things with the scraps.

What to do With Leftover Pie Dough
First things first: You don’t have to do anything with the pie dough scraps right away! You just made an entire pie (like a Dutch Apple Pie or something probably equally impressive).
If you don’t feel like playing in the kitchen anymore, those scraps will keep until tomorrow or next month depending on how you store them.
Storing Pie Dough Scraps
- In the Refrigerator: Squish all your scraps together and place them in a zip-top bag and store in the refrigerator for up to 48 hours.
- In the Freezer: Squish scraps together, transfer to a freezer bag, and store in the freezer for up to 2 months. Defrost in the refrigerator for 12 hours before using.
Things to Make With Leftover Pie Dough
When you are ready to do something with the scraps, here are a few things you can make with them.

- Cinnamon Sugar Pie Dough Cookies: Crispy, buttery pie crust cookies sprinkled with sweet and spicy cinnamon sugar .
- Jam Pop-tarts: Mini versions of the store-bought fav made with your favorite jam and a quick and simple powdered sugar glaze.
- Chocolate-stuffed Cookies: Pie dough cookies with melty chocolate chips inside that are rolled in powdered sugar.
- Pizza Roll-ups: A fun savory snack stuffed with pizza sauce , cheese, and pepperoni.
MoreWaste NotPosts
- What to Do With Leftover Whipping Cream
- What to Do With Leftover Pesto
- What to Do With Leftover Pumpkin Puree
- What to Do With Leftover Egg Whites
- What to Do With Leftover Egg Yolks
- What to Do With Leftover Half and Half
Scroll past the recipe card for even more pie dough recipe ideas.

Ingredients
Cinnamon Sugar Leftover Pie Dough Cookies
- ▢ Melted butter
- ▢ Cinnamon sugar
Jam Pop-tarts
- ▢ Jam
- ▢ Powdered sugar
- ▢ Milk
- ▢ Sprinkles
Chocolate-stuffed Cookies
- ▢ Chocolate chips
- ▢ Powdered sugar
Pizza Roll-ups
- ▢ Pizza or spaghetti sauce
- ▢ Shredded mozzarella cheese
- ▢ Shredded Parmesan cheese
- ▢ Pepperoni
- ▢ Wooden toothpicks
Instructions
Cinnamon Sugar Pie Dough Cookies
- Roll dough scraps out to 1/4-inch thick and cut into strips or use a cookie cutter to cut out shapes. Brush with melted butter and sprinkle with cinnamon sugar.
- Bake at 400°F on a parchment paper-lined baking sheet for 8 to 12 minutes, until bottom edges are golden brown.
Jam Pop Tarts
- Roll out scraps to 1/8-inch thick and cut into squares or rectangles. Add a dollop of jam to the center of half of the pieces. Place tops over the jam and crimp with a fork to seal. Poke with a fork a few times to allow steam to escape.
- Bake at 400°F on a parchment paper-lined baking sheet for 10 to 15 minutes until golden. Cool for at least 5 minutes and mix powdered sugar and milk together (about 1 teaspoon milk per 1/4 cup powdered sugar) until a thick glaze forms.
- Spread over the tops of the pop tarts and add sprinkles.
Chocolate-stuffed Cookies
- Roll dough out to 1/8-inch thick and cut about 3-inch rounds. Put a few chocolate chips in the center, fold edges up, and pinch to seal.
- Bake at 400°F on a parchment paper-lined baking sheet until golden brown, 10 to 12 minutes. As soon as they are cool enough to handle, drop into powdered sugar and toss to coat.
Pizza Roll Ups
- Roll leftover pie dough into a rectangular(ish) shape 1/8-inch thick. Spoon on a thin layer of red sauce, top with mozzarella, Parmesan, and pepperoni.
- Roll tightly and secure by poking wooden toothpicks through the center every 1 1/2 inch. Cut between toothpicks and bake at 400°F (leaving the toothpicks in the rolls) on a parchment paper-lined baking sheet for 10 to 15 minutes until golden. Remove toothpicks and enjoy!
More things to make with leftover pie dough!
And, I asked some food blogger friends for some more ideas. These recipes don’t specifically call for scraps, but they are easily scalable and all look fantastic!
- Wee Little Blueberry Maple Pies from Hungry Enough to Eat Six – I bet you have enough dough to make a couple cupcake-sized versions of these adorable wee pies!
- Mini Nutella Pies on a Stick from The Road to Honey – Pie on a stick? Love it. Add Nutella? Even better. It doesn’t get much easier than these!
- Apple Pie Stuffed Apples from Two Purple Figs – I’m definitely making one of these with my next batch of leftovers.
- Cinnamon Roll Dippers from 4 Sons R Us – Make up a mini batch of this glaze dip and use it on some Cinnamon Sugar Leftover Pie Dough Cookies!!
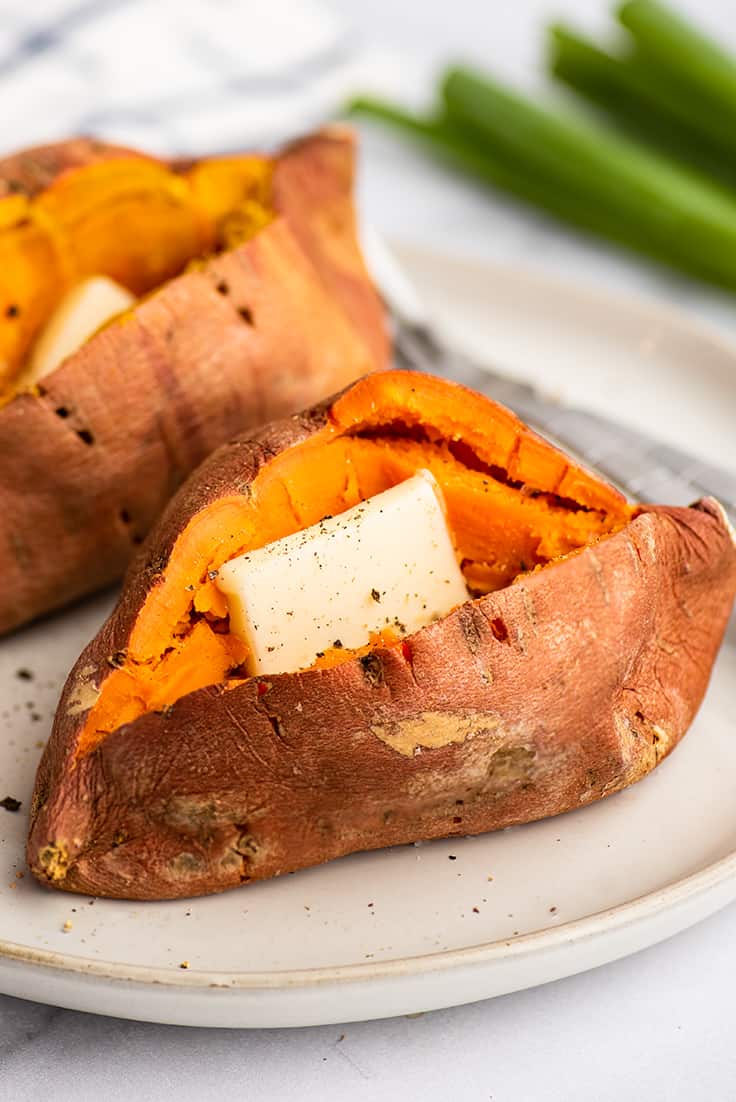
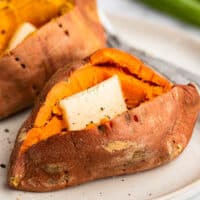
How to make a microwave sweet potato. This is the quickest, easiest way to cook sweet potatoes at home.
Microwaved sweet potatoes are incredibly versatile. Serve them as a quick and easy side dish, load them up with toppings for a filling dinner or add butter and cinnamon sugar and they make a sweet and cozy breakfast.

Since I know some of you popped in from search just looking for this information, here you go:
How long to microwave a sweet potato?
- After poking holes in a medium sweet potato, cook for 2 1/2 minutes per side.
- For each additional sweet potato being cooked at the same time, add 1 minute per side.
For everyone else, let’s chat a little more about sweet potatoes…
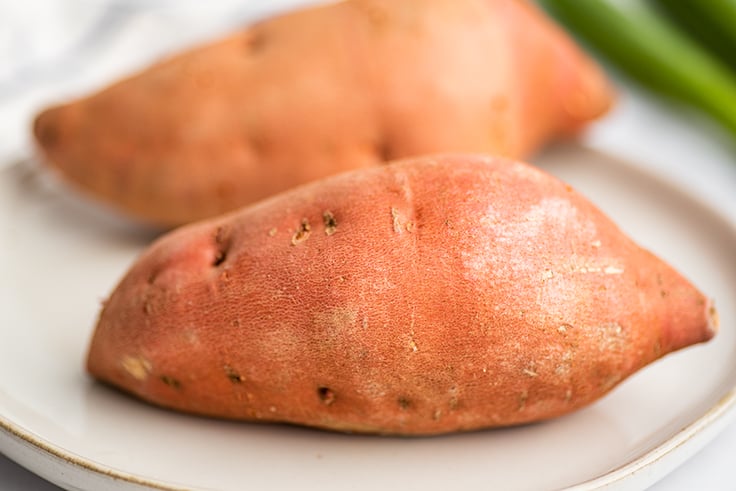
Choosing Sweet Potatoes
When choosing sweet potatoes at the store, select ones that are firm, without blemishes or soft or wrinkled spots. If you plan on cooking more than one sweet potato at a time, try to pick ones that are roughly the same size so they cook in the same amount of time.
Store sweet potatoes in a cool, dry place (not the refrigerator) away from apples and onions.

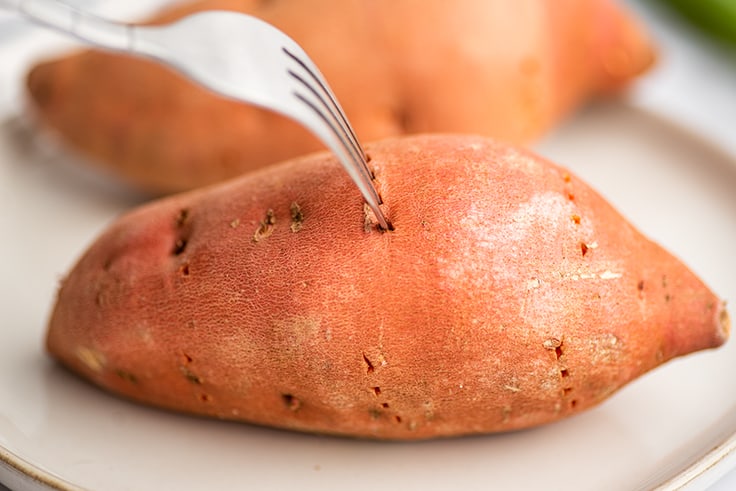
How to Prep Sweet Potatoes for Cooking
Scrub and dry your sweet potato. Then take a fork and pierce it on all sides, 5 or 6 times total. This will allow steam to escape while the potato cooks and prevent it from exploding in your microwave.

How to Cook a Sweet Potato in the Microwave
- Once sweet potato is prepped, place it in your microwave and cook for 2 1/2 minutes. Flip and cook for an additional 2 1/2 minutes.
- Use a knife or fork to poke into the sweet potato and test for doneness. If still under-done, continue to microwave the sweet potato in 30-second increments until tender.
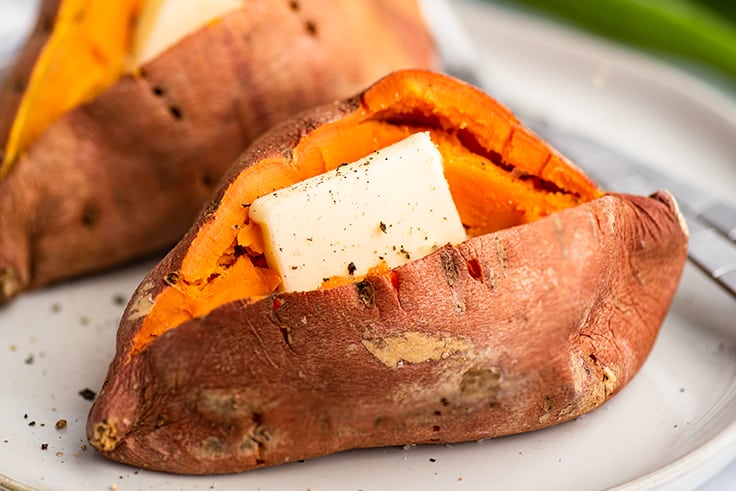
- Allow the sweet potato to sit for 2 minutes before cutting it open.
Can you microwave more than one sweet potato at a time?
Yes! To microwave more than one sweet potato at a time, arrange them in the microwave so they are not touching and add 1 minute per potato per side.
- For 2 sweet potatoes microwave: 3 1/2 minutes per side
- For 3 sweet potatoes microwave: 4 1/2 minutes per side
Can you eat the skin of a sweet potato?
Yes, you can eat the skin of a sweet potato! Just like regular potatoes, the skin of a sweet potato is edible and it is packed full of vitamins and antioxidants.
Is it bad to cook a sweet potato in the microwave?
No, it’s not bad to cook sweet potatoes in the microwave. Some people worry that cooking food in the microwave destroys all its nutrients, but this is simply not true.
According to the USDA, microwaves “generally do not destroy nutrients in food” and in fact microwaved foods retain more water-soluble vitamins than foods cooked using other cooking methods. So not only is cooking sweet potatoes in the microwave the fastest and easiest cooking method, but it’s one of the healthiest too.
What’s the difference between a sweet potato and a yam?
I went more in-depth on this topic in my roasted sweet potatoes post, but here’s a quick summary. True yams and sweet potatoes are completely unrelated plant species, but here in the US, we frequently label sweet potatoes as yams in the grocery store.
True yams are native to Africa, Asia, and parts of South America and the Caribbean, and have rough, bark-like skin. They are uncommon in large US grocery stores.
Sweet potatoes have smoother skin and sweeter flesh. If you’re buying it in a US chain grocery store, you’re almost certainly buying a sweet potato even if it’s labeled “yam.”

What to serve with microwave sweet potatoes?
Serve microwave sweet potatoes on their own with butter and salt and pepper as a side for things like:
- Roasted Tri-tip
- Marinated Steak
- Roasted Chicken
Or top them with toppings like you would a baked potato or with chili or chopped chicken and beans and they’ll make a filling main dish.
More Easy Microwave Recipes
- How to Steam Broccoli in the Microwave
- How to Cook Corn in the Microwave
- How to Steam Green Beans in the Microwave
- How to Steam Cauliflower in the Microwave
- How to Steam Carrots in the Microwave
- Microwave Mashed Potatoes
Ingredients
- ▢ 1 medium sweet potato
Optional toppings
- ▢ 1 tablespoon butter
- ▢ Salt and pepper
Instructions
- Scrub and dry your sweet potato and then pierce it on all sides with a fork, 5 or 6 times total.
- Place the potato in the microwave and cook for 2 minutes and 30 seconds. Carefully (the potato will be hot) flip the sweet potato over and microwave for an additional 2 minutes and 30 seconds.
- Use a knife to pierce the sweet potato to check for doneness. It should slide in smoothly without any resistance. If potato is still undercooked, continue to microwave in 30 second increments until softened.
- Allow the cooked potato to rest for 2 minutes before slicing open.
- Top with toppings of your choosing and enjoy!
Notes

Easy Chicken Enchiladas
Equipment
- 9x13-inch baking dish
Ingredients
Chicken Filling
- 2 pounds boneless skinless chicken breasts about 3 to 4 medium breasts
- 1 tablespoon taco seasoning *
- Cooking spray or olive oil
- 1/2 small onion diced
- 1/4 teaspoon salt
- 1 cup ( 240g ) sour cream
Enchilada Sauce
- 3 tablespoons olive oil
- 3 tablespoons ( 23g ) all-purpose flour
- 2 tablespoons chili powder
- 1 1/2 teaspoons ground cumin
- 3/4 teaspoon garlic powder
- 1/4 heaping teaspoon dried oregano
- 1/4 heaping teaspoon salt
- 3 tablespoons ( 50g ) tomato paste
- 3 cups chicken or vegetable broth
- 1 1/2 teaspoons apple cider vinegar or distilled white vinegar
- Pepper
Enchiladas
- 10 8-inch tortillas corn or flour are fine
- 1 1/2 cup ( 6oz ) shredded Mexican cheese blend or your favorite melting cheese
Optional Toppings
- Cilantro
- Pico de gallo
- Sour cream
Instructions
Shredded Chicken
- Preheat oven to 350°F and lightly grease a 9x13-inch baking dish. Set aside.
- Coat both sides of the chicken breasts in taco seasoning. If using taco seasoning that does not include salt, generously sprinkle both sides with salt as well.
- Heat a large skillet with a lid over medium-high heat. Grease with cooking spray or a drizzle of olive oil. Add chicken breasts to the pan and cook until browned, 2 to 3 minutes. Flip and repeat with the second side. Add enough water to the pan to come up about 1/2-inch.
- Bring to a simmer, cover the pan and cook for 6 to 10 minutes (longer with very large chicken breasts), until an instant-read thermometer inserted into the thickest part of the meat reads 165°F. If at any time the water level gets low, add a bit more water to the pan.
- Transfer chicken to a cutting board to rest and discard any juices from the pan. Return the pan to the stove and grease with cooking spray or a little olive oil and heat over medium heat. Add onions and 1/4 teaspoon salt and cook 5 to 7 minutes, until onions begin to turn translucent around the edges. If at any time they begin to brown, turn down the heat.
- Use two forks to shred the chicken breasts, and combine shredded chicken, onions, and sour cream in a large bowl. Mix well and add salt and pepper to taste. Set aside.
Enchilada Sauce
- Pre-measure all of your sauce ingredients (flour, spices, and salt will be added together so they can all go in the same small bowl) and place them next to the stove.
- In a medium pot, heat oil over medium heat. Add flour, spices, and salt and whisk until a thick paste forms and begins to bubble, 30 seconds to 1 minute.
- Whisk in tomato paste and stir until mostly combined. Slowly pour in broth, whisking out any lumps as they form and whisk until completely smooth. Bring to a simmer and cook, whisking often, until sauce has thickened, 6 to 12 minutes.
- Remove from heat, stir in vinegar, and add salt and pepper to taste. Set aside to cool slightly.
Assemble Enchiladas
- To your prepared baking dish, add 1/4 cup of the enchilada sauce, spreading it so that it mostly coats the bottom in a thin layer.
- Fill each tortilla with about 1/3 cup of meat and sour cream mixture and roll tightly. Place in the baking dish, seam-side down.
- Pour remaining sauce over the enchiladas and sprinkle the cheese over the top.
Bake
- Bake for 25 to 30 minutes, until cheese is melted and the edges of the tortillas are just slightly golden.
- Cool for 10 minutes before serving. Top with sour cream, cilantro, and pico de gallo if desired. Enjoy!
