This potato bacon soup is loaded with chopped bacon, cheese, and chunks of potato. It makes a quick and easy dinner that everyone will love.
We’re slowly approaching the end of soup season, but before we pack away our sweaters and say goodbye to the cozy winter evenings, there’s one more soup recipe I want you to try, potato bacon soup.
This soup is total comfort food. It’s rich and cheesy and SO easy to make. And it should be added to your soup rotation immediately.


Why This Soup Works
It’s double thickened: This soup is thickened twice, once with potatoes, by smashing and mixing some of them into the soup and then again by adding a thick and creamy cheese sauce. Cheese sauce: Speaking of that cheese sauce . This one is quick to make with butter, flour, milk and cheese. When stirred into the soup, it adds a cheesy, creamy richness that is completely irresistible. It’s loaded with bacon: We’ll use about 12 ounces of bacon in this recipe. That’s enough to ensure that there’s bacon in every single bite.
Ingredient Notes
- Your favorite bacon: Use whatever bacon you prefer here. Regular, thick-cut, and even bacon ends will all work just fine.
- Chicken broth: You can use homemade chicken stock if you have it, but this soup is just as fantastic when made with canned broth.
- Milk: Any percentage milk will work, but the higher fat the milk, the richer your soup will be. If you’d like to substitute a bit of half and half or heavy cream for the milk, you can do that as well.
- Cheddar cheese: If you have the option, grate your own cheese from a block rather than using pre-shredded bagged cheese because the anti-clumping additives added to bagged cheese can prevent it from melting completely smoothly.
How to Make Potato Bacon Soup
In a large pot, cook chopped bacon until barely crispy. While super crispy crunchy bacon is delicious, it isn’t great in soup. Cook the bacon until it’s just cooked through and a little crisp around the edges, but still pliable and then use a slotted spoon to transfer the bacon to a plate.
Spoon off and discard all but about a tablespoon of the bacon grease (it doesn’t need to be exact) and cook the onions and celery until the onions begin to turn translucent around the edges.
A Note on Bacon Grease: While it’s tempting to leave a ton of bacon grease behind when cooking the onions and celery, don’t leave too much. During testing, when I left a lot of grease in the pan, I found that it left an oily sheen on the top of the soup when it was finished cooking. About a tablespoon was the perfect amount to keep that bacon flavor without making the soup too oily.
- Add potatoes and chicken broth and simmer until the potatoes are fork-tender. Once potatoes are tender, use a potato masher or fork to roughly smash about half the potatoes.
Potato Mashing Tip: If your potato masher is metal and you’re cooking the soup in a pot that shouldn’t be used with metal cooking tools, simple ladle about half the potatoes into a heatproof bowl, smash them in the bowl, and then add them back to your soup.
Make the cheese sauce. While your soup simmers, make a roux of butter and flour and then slowly pour in the milk. Cook, stirring constantly until the sauce is thick and bubbly. Remove from heat and stir in the cheese until smooth.
Stir the cheese sauce into the soup and add salt and pepper to taste. Potato soups tend to really suck up the salt, so you may need to add more than you expect. Add about 3/4 of the bacon back to the pot, reserving the rest for topping.
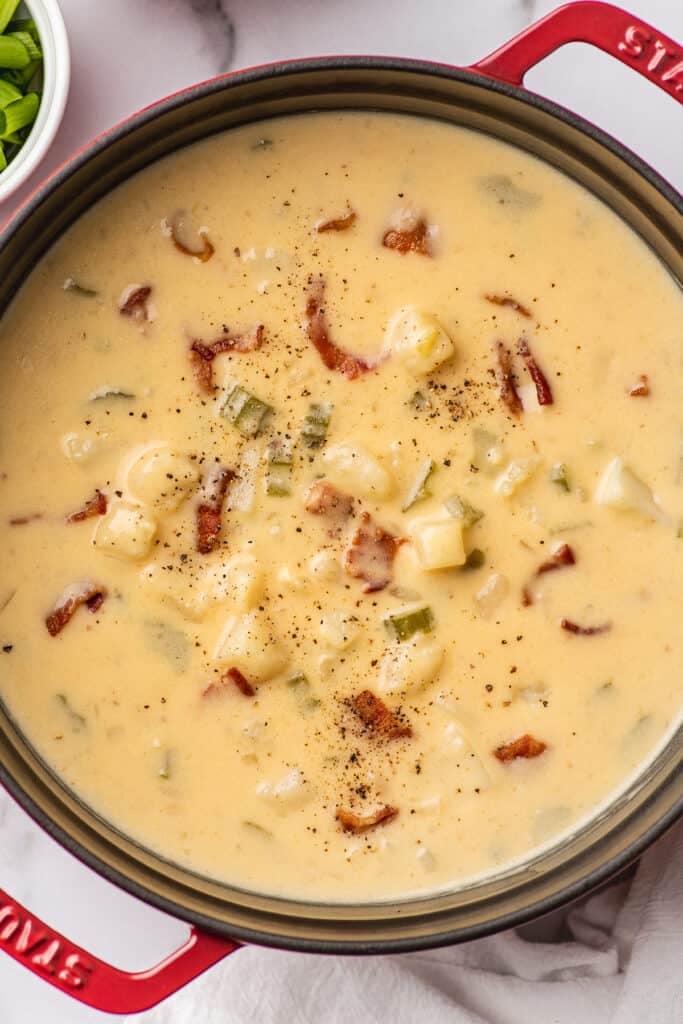

- Dish up the soup, top with sour cream, more cheese and green onions if desired, and chopped up bacon, and enjoy!!
Potato Soup Variations
- Ham and Potato Soup: Have leftover ham you’d like to use up? Swap the bacon for ham.
- Sausage Potato Soup: Replace the bacon with chopped smoked sausage.
- Potato Broccoli Soup: Add
- Lighter Potato Bacon Soup: If you’d like to lighten up this soup, reduce the bacon to 8 ounces, use skim milk, and omit the cheese from the sauce. Instead sprinkle just a little bit of cheese over the soup when serving.


Can I double/halve this recipe?
Absolutely. This recipe doubles/halves with no preparation changes except the thickening time for the cheese sauce might be a little longer/shorter. To change the recipe yield, hover over the serving size in the recipe card below or click if you’re on mobile, and slide the slider.
What to serve with bacon potato soup?
For a cheesy decadent soup like this, I recommend simple sides like a slice of French bread with butter and a roasted vegetable like:
- Roasted Broccoli
- Roasted Asparagus
- Roasted Green Beans


Can I freeze potato soup?
I prefer not to freeze potato-based soups because cooked potatoes can become a bit mushy after freezing, BUT if you want to freeze it, you can. Just know the texture won’t be as smooth when reheated. Freeze all together or in individual containers for up to 3 months. Defrost in the refrigerator overnight and reheat gently on the stove or in the microwave.
Check out my post How to Freeze Soup for more soup-freezing tips.
More Soup Recipes
- Creamy Chicken Noodle Soup
- Chicken Parm Soup
- Quick Chicken Tortellini Soup
- Tomato Soup for One or Two

Ingredients
- ▢ 12 ounces uncooked bacon sliced into 3/4-inch pieces
- ▢ ½ medium onion diced small
- ▢ 2 celery ribs diced small
- ▢ 2 large russet potatoes peeled and diced medium (about 4 cups)
- ▢ 4 cups ( 2 15oz cans) chicken broth
- ▢ 5 tablespoons ( 71g ) butter salted or unsalted is fine
- ▢ ¼ cup and 1 tablespoon ( 44g ) all-purpose flour
- ▢ 2 cups milk any percentage
- ▢ 6 ounces ( about 1 ½ cups ) shredded cheddar cheese plus more as desired for topping
- ▢ ¼ teaspoon black pepper
- ▢ Salt
- ▢ Sour cream optional for topping
- ▢ Sliced green onions optional for topping
Instructions
- Add bacon pieces to a large pot. Turn heat to medium and cook until bacon is cooked through but only slightly crispy. Use a slotted spoon to transfer the bacon to a paper-towel lined plate and set aside.
- Spoon off and discard all but about 1 tablespoon of the bacon fat. Add onions and celery to the pot and cook over medium heat, stirring often and scraping any browned cooked-on bits from the bottom of the pan, for about 5 minutes, until the onions have just begun to turn translucent around the edges.
- Add potatoes and chicken broth to the pot. Bring to a simmer and then cook for 10 to 15 minutes, until potatoes can be easily smashed against the side of the pot with a fork.
- Use a potato masher or spatula to roughly smash about half of the potatoes in the pot.
- In a medium pot, over medium heat, melt butter and then add flour. Cook, whisking continuously, until flour begins to turn lightly golden, about 1 minute.
- Slowly drizzle in milk, whisking constantly as you go to whisk out any lumps. Cook, whisking continuously, until mixture is thickened and bubbly around the edges, about 5 minutes.
- Remove pot from heat and slowly whisk in cheese, a handful at a time. Once all your cheese is melted, stir the cheese sauce into the soup. Add pepper. Taste the soup and add salt if needed.
- Add about ¾ of the bacon to the soup (reserve ¼ for topping) and stir everything together.
- Ladle into bowls, top with sour cream, reserved bacon, sliced green onions, and more cheese if desired. Enjoy!
Notes
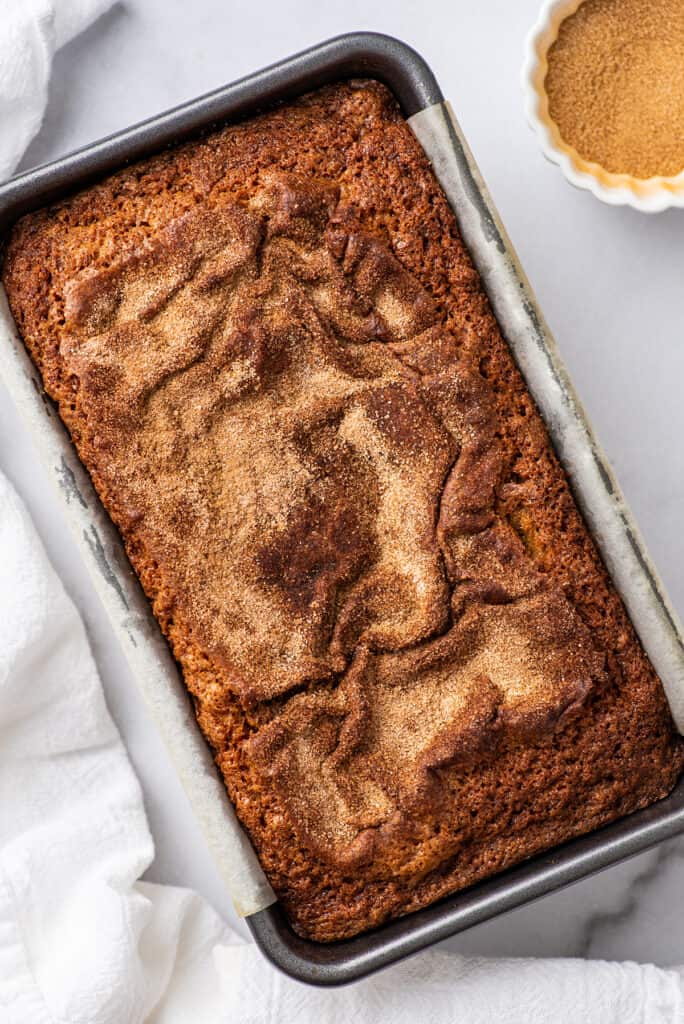
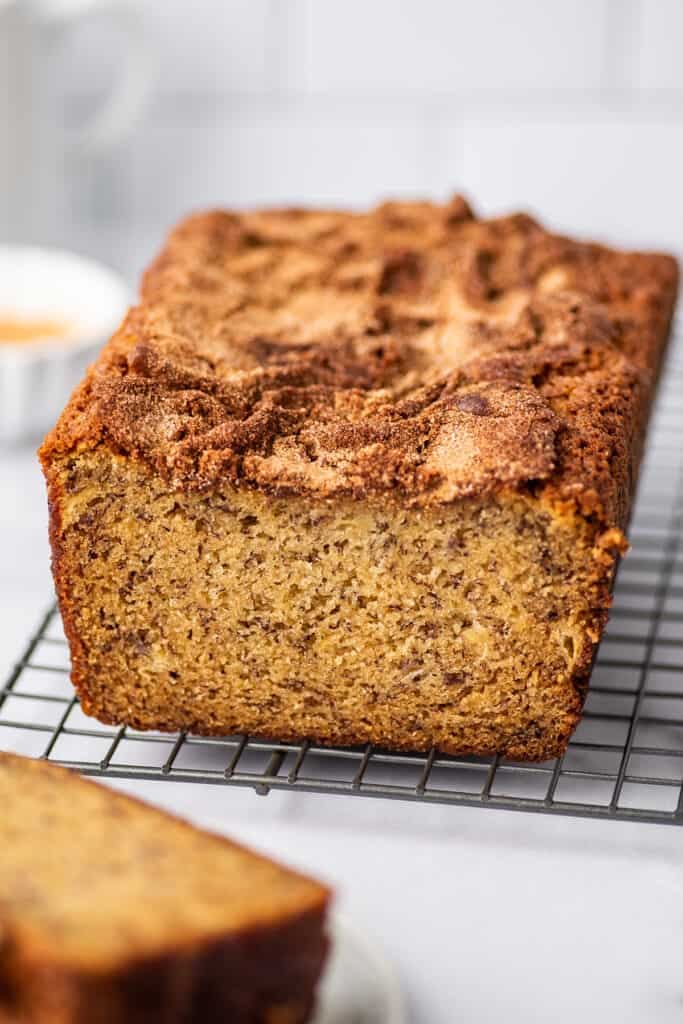
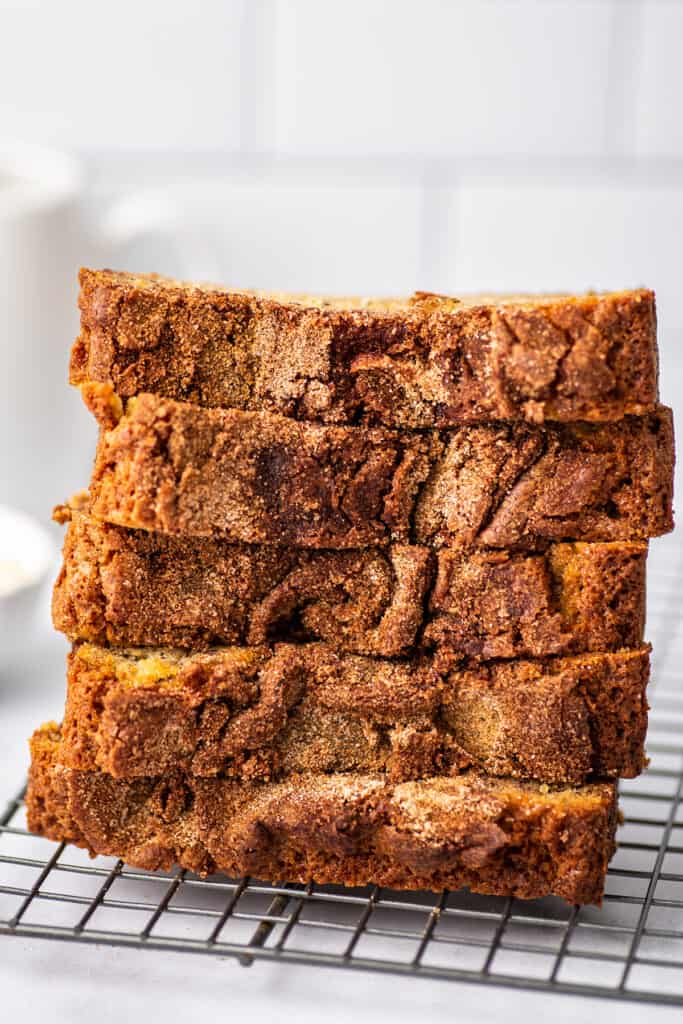
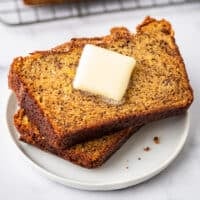
My favorite banana bread recipe makes some of the best banana bread you’ll ever eat. It’s incredibly easy to make and bakes up soft and moist with an irresistible cinnamon sugar crust.
As a food blogger, I get asked for recipe suggestions all the time, and I’m usually thrilled to oblige (it’d be silly to run a food blog if I weren’t). But there’s one recipe people ask me about the most that I just didn’t have a good answer for, banana bread.
Sure I have my ever-popular small-batch banana muffins and my absolute fav chocolate banana muffins , but I’m SUPER picky about my banana bread, and I just didn’t have a favorite full-size banana bread recipe I could unreservedly recommend.
So over the last year, I set out testing and experimenting with recipes, and I finally have it, my favorite banana bread recipe in the world. Friend, you should really make Dominique Ansel’s banana bread.

Dominique Ansel’s Banana Bread
If you’re not familiar with Dominique Ansel, he is a French pastry chef, owner of the Dominique Ansel Bakery, and the creator of the famous cronut. This recipe comes from his (excellent) book Everyone Can Bake , and makes an incredibly good, incredibly easy sweet and moist loaf of banana bread.
What Makes This Banana Bread So Good
- An extra banana: Most banana bread recipes with a similar ratio of ingredients call for 3 bananas. This recipe uses 4, which boosts the banana flavor and the moist texture of the bread.
- Butter, a lot of it: There is also a slightly obscene amount of butter in this recipe. It gives the bread a fantastic richness and hint of buttery flavor that is SO good.
- Heavy on the sugar: This recipe also uses quite a bit of sugar compared to some banana bread recipes, so the bread is tender, sweet, and absolutely feels like a dessert treat (that you can eat for breakfast!!!).
Ingredient and Tool Notes


- 10 x 5-inch loaf pan: The original recipe calls for a 10 x 5-inch loaf pan. If your loaf pan is slightly smaller, not a problem. You just won’t need to use quite all of the batter when it’s time to bake the bread.
- Bananas: This recipe uses 4 medium bananas. If you prefer doing all your baking by weight, that’s about 400 grams of bananas, but I have successfully made this with slightly larger bananas, up to about 500 grams.
- Butter: You can use salted or unsalted butter here, just make sure to read the recipe notes and add more or less salt depending on which you’re using.
- Cinnamon sugar: This is optional, but I like my banana bread with a cinnamon sugar crust, so I added one here. If you’re not a huge fan of cinnamon or don’t want the extra sweetness, you can skip it.
How to Make the Best Banana Bread
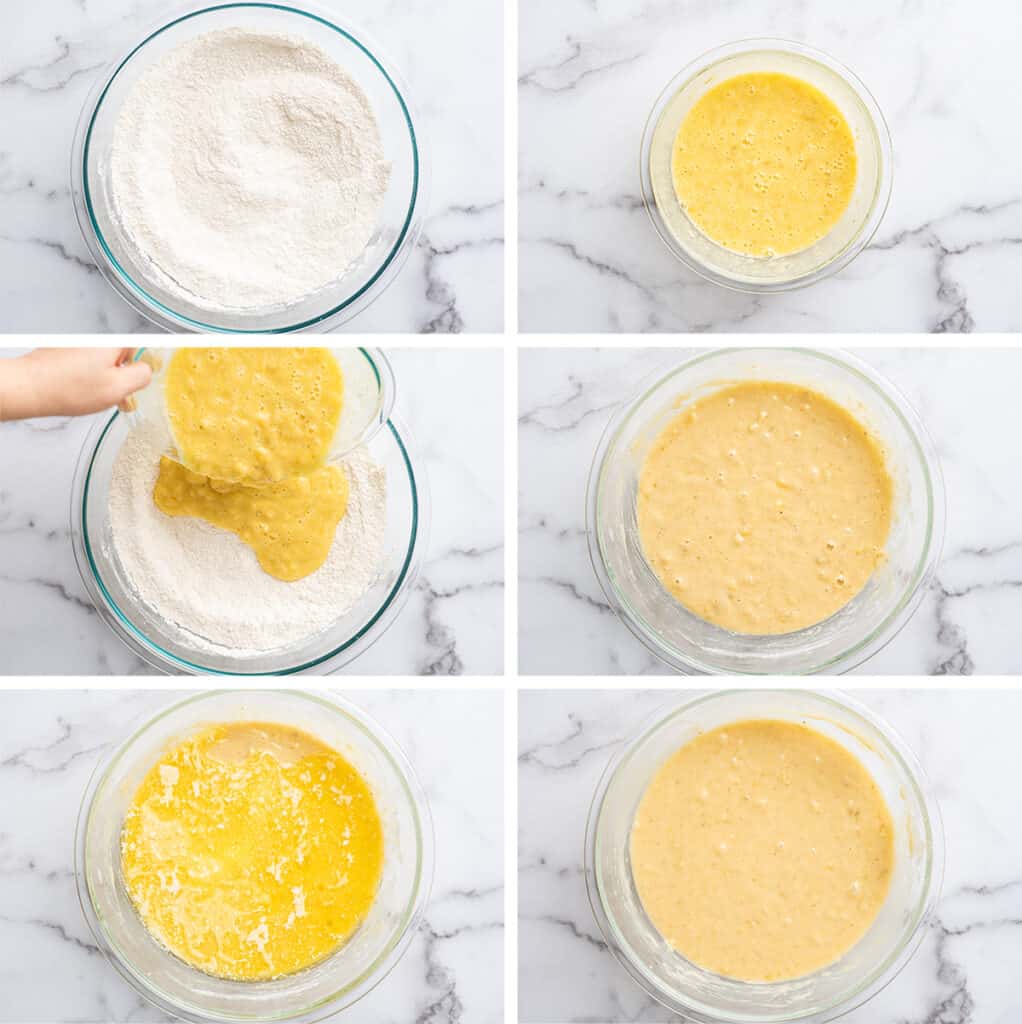

Mix dry ingredients: In a large bowl, whisk together sugar, flour, baking powder, baking soda, nutmeg, and salt.
Mix most of the wet ingredients: In a medium bowl, mash bananas and whisk in eggs. Pour banana mixture into the dry ingredients and mix until combined.
Add the butter: Add melted butter, and mix until butter is incorporated into the batter. Don’t over mix, but there should not be pools of butter remaining around the edges of the batter.


Bake: Transfer the batter to your prepared loaf pan, leaving ¾-inch of space from the top of the pan (discard extra batter if there is too much). Sprinkle cinnamon sugar over the top and bake the bread for about an hour, until a toothpick or knife inserted into the center of the loaf comes out clean.
Slice and enjoy: Allow bread to cool in the pan for 15 to 20 minutes before removing and slicing.

How can I quickly ripen bananas for banana bread?
If your bananas aren’t quite brown enough for baking, it’s really easy to help them along. Bake the bananas (with their peels ON) on a baking sheet in a 300°F oven for 30 to 40 minutes until the peels are blackened and soft to the touch.
Let them sit until cool enough to handle and then peel and transfer bananas to a bowl and mash so that they cool more quickly. Cool completely before using in the banana bread.
If you want to see photos of this process, go check out my post How to Quickly Ripen Bananas .

How to Store Banana Bread
Store the bread tightly wrapped at room temperature for up to 3 days. For longer storage, freeze the baked bread.
How to Freeze Banana Bread
Banana bread freezes quite nicely, either as a whole loaf or individual slices. To freeze, wrap loaf/pieces tightly in plastic wrap and then store in an airtight container or freezer bag.
When you’re ready to eat the bread, remove it from the freezer, defrost at room temperature, and enjoy.
You Might Also Enjoy: How to Freeze Bananas


Can I make a small-batch version of this banana bread?
Don’t worry, small-batch friends, I haven’t forgotten about you. If you’d like to make a mini version of this bread, I scaled the recipe down for you so you can make it with just one banana and a mini loaf pan. Go check out my One-banana Banana Bread post.
More Banana Recipes
- Banana Milkshake
- Banana Pancakes
- Small Banana Cake
- Strawberry Banana Milkshake
- Banana Milkshake Without Ice Cream
Or check out this post of Banana Recipes .
Equipment
- 10 x 5-inch loaf pan
- Parchment paper, optional
Ingredients
- ▢ 2 cups ( 400g ) granulated sugar
- ▢ 2 cups ( 250g ) all-purpose flour
- ▢ 1 teaspoon baking powder
- ▢ ¾ teaspoon baking soda
- ▢ ¾ teaspoon ground nutmeg
- ▢ ½ teaspoon salt*
- ▢ 4 ( about 400g ) medium overripe bananas
- ▢ 3 large eggs
- ▢ 14 tablespoons ( 196g ) salted butter* melted
Optional Cinnamon Sugar Crust
- ▢ 2 tablespoons granulated sugar
- ▢ 1 ½ teaspoons ground cinnamon
Instructions
Banana Bread
- Preheat your oven to 350°F, grease a 10 x 5-inch loaf pan, and line it with a parchment paper sling (optional).
- In a large bowl, whisk together sugar, flour, baking powder, baking soda, nutmeg, and salt.
- In a medium bowl, mash bananas and whisk in eggs until well-mixed. Pour banana mixture into the dry ingredients and mix until just combined.
- Add melted butter, and mix until butter is incorporated into the batter. Don’t over mix, but batter should be mostly uniform, and there should not be pools of butter remaining around the edges of the batter.
- Transfer the batter to your prepared loaf pan, leaving 3/4 inch of space from the top of the pan (discard extra batter if there is too much).
Optional Cinnamon Sugar Crust
- In a small bowl, stir together sugar and cinnamon and sprinkle evenly over the top of the batter.
Bake
- Bake bread in preheated oven for 1 hour to 1 hour 10 minutes, until a toothpick or knife inserted into the center of the loaf comes out clean.
- Allow the loaf to cool in the pan for 15 to 20 minutes before removing and slicing.
- Serve and enjoy!
Notes
Fudgy, chocolatey Homemade Pudding Pops are surprisingly easy to make and SO good. You just need a popsicle mold, some milk, sugar, a little cornstarch, and chocolate.
Hey, when was the last time you had a pudding pop?
Maybe it’s been years.
Maybe you’ve never tried one. Well, you should fix that today, because these homemade pudding pops are THE BEST THINGS.


Like, I don’t want to over-hype these popsicles, but they are legitimately one of my favorite recipes I’ve made for the blog.
I was so excited about how good they turned out that I made everyone within a 2-mile radius try one, and then I was so sad when I realized I had shared them all away and instantly regretted my generosity.
The next batch I make, I’m not telling anyone about and hoarding them away at the back of my freezer.


What’s Great About These Pudding Pops
- They’re surprisingly easy to make. Pudding pops are basically just frozen chocolate pudding , and all you need to make a killer pudding from scratch is a handful of pantry staples and about 15 minutes of cooking time.
- Tons of chocolate flavor. Since these popsicles are made with real chocolate in the pudding, they pack a huge chocolate punch that is incredibly rich and satisfying.
Tools and Ingredient Notes
- Popsicle mold: If you like making homemade popsicles, a good popsicle mold is a must. This is the one I have , and I’ve been really happy with it. It doesn’t pick up odors or colors and is easy to clean.
- Fine-mesh strainer: After making your pudding, you’ll want to strain it through a fine-mesh strainer to remove any lumps. If you don’t own one, you can find them anywhere kitchenware is sold, and they’re typically inexpensive and handy to have around ( this is the set I own).
- Cornstarch: Cornstarch is used to help thicken the pudding mixture. You cannot omit it from the recipe.
- Milk: Any percentage milk will work, but I prefer to use whole milk as it gives you a richer end result.
- Semi-sweet chocolate: Chopped chocolate or high-quality chips will work just fine here.
How to Make Pudding Pops
- Make your pudding base: In a medium saucepan, whisk together all ingredients except chocolate and vanilla until the mixture is thick enough to coat the back of your spoon.
- Stir in the chocolate: Add the chocolate and cook until the chocolate is completely incorporated before removing from heat and stirring in vanilla.
- Strain the pudding: Run the pudding through a fine-mesh strainer to remove any cornstarch lumps and allow the pudding to cool for 5 to 10 minutes.
- Transfer pudding to a popsicle mold: Transfer the pudding to your popsicle mold, add sticks, and freeze until solid.
- Serve and enjoy: Remove popsicles from the mold and enjoy!
Can I make these without a popsicle mold?
Sure. You don’t need a store-bought popsicle mold to make popsicles. Small paper cups, ice cube trays, and baking tins can all be used as makeshift molds. ( Check out this article for more ideas. )
BUT, if you like making popsicles at home, consider just investing in a popsicle mold. It’s worth it.
How to store pudding pops?
If you’re going to eat your pudding pops fairly quickly, you can just store them in the mold. But if it’s going to take you more than a couple days to eat your way through them, remove all the popsicles and wrap them individually in cling wrap or wax or parchment paper and store them in an airtight freezer bag or container to prevent freezer burn.


More Frozen Desserts
- Two-ingredient Cookies and Cream Popsicles
- Red Wine Popsicles
- No-churn Peanut Butter Oreo Ice Cream
- Frozen Hot Chocolate
- The Best Oreo Milkshake
- Strawberry Banana Milkshake

Equipment
- Fine mesh strainer
- Popsicle mold
- Popsicle sticks
Ingredients
- ▢ ½ cup ( 100g ) granulated sugar
- ▢ ¼ cup ( 30g ) cornstarch
- ▢ ¼ teaspoon salt
- ▢ 3 cups milk whole preferred, but any percentage will work
- ▢ 1 cup ( 6oz ) chopped semisweet chocolate good-quality chocolate chips are fine
- ▢ 1 teaspoon vanilla extract
Instructions
- In a medium saucepan, combine sugar, cornstarch, and salt. Slowly pour in milk, whisking continuously to keep lumps from forming.
- Heat over medium-low, whisking occasionally, until mixture is thick enough to coat the back of a spoon, about 10 to 15 minutes. Keep the heat low enough that the pudding thickens without coming to a simmer. If it begins to simmer, turn down the heat.
- Stir in chocolate and cook for 1 to 2 minutes more, until chocolate is completely incorporated. Stir in vanilla and remove from heat.
- Strain mixture through a fine-mesh strainer to remove any cornstarch lumps and allow to cool for 5 to 10 minutes. Pour mixture into your popsicle mold, leaving about 1/2-inch of space at the top. Cover, add sticks, and freeze for at least four hours until solid.
- Run mold under warm water to loosen popsicles and gently remove from mold. Enjoy!
Notes
Pudding Recipe Adapted From Smitten Kitchen

Easy Cheesy Potato Bacon Soup
Ingredients
- 12 ounces uncooked bacon sliced into 3/4-inch pieces
- ½ medium onion diced small
- 2 celery ribs diced small
- 2 large russet potatoes peeled and diced medium (about 4 cups)
- 4 cups ( 2 15oz cans) chicken broth
- 5 tablespoons ( 71g ) butter salted or unsalted is fine
- ¼ cup and 1 tablespoon ( 44g ) all-purpose flour
- 2 cups milk any percentage
- 6 ounces ( about 1 ½ cups ) shredded cheddar cheese plus more as desired for topping
- ¼ teaspoon black pepper
- Salt
- Sour cream optional for topping
- Sliced green onions optional for topping
Instructions
- Add bacon pieces to a large pot. Turn heat to medium and cook until bacon is cooked through but only slightly crispy. Use a slotted spoon to transfer the bacon to a paper-towel lined plate and set aside.
- Spoon off and discard all but about 1 tablespoon of the bacon fat. Add onions and celery to the pot and cook over medium heat, stirring often and scraping any browned cooked-on bits from the bottom of the pan, for about 5 minutes, until the onions have just begun to turn translucent around the edges.
- Add potatoes and chicken broth to the pot. Bring to a simmer and then cook for 10 to 15 minutes, until potatoes can be easily smashed against the side of the pot with a fork.
- Use a potato masher or spatula to roughly smash about half of the potatoes in the pot.
- In a medium pot, over medium heat, melt butter and then add flour. Cook, whisking continuously, until flour begins to turn lightly golden, about 1 minute.
- Slowly drizzle in milk, whisking constantly as you go to whisk out any lumps. Cook, whisking continuously, until mixture is thickened and bubbly around the edges, about 5 minutes.
- Remove pot from heat and slowly whisk in cheese, a handful at a time. Once all your cheese is melted, stir the cheese sauce into the soup. Add pepper. Taste the soup and add salt if needed.
- Add about ¾ of the bacon to the soup (reserve ¼ for topping) and stir everything together.
- Ladle into bowls, top with sour cream, reserved bacon, sliced green onions, and more cheese if desired. Enjoy!
