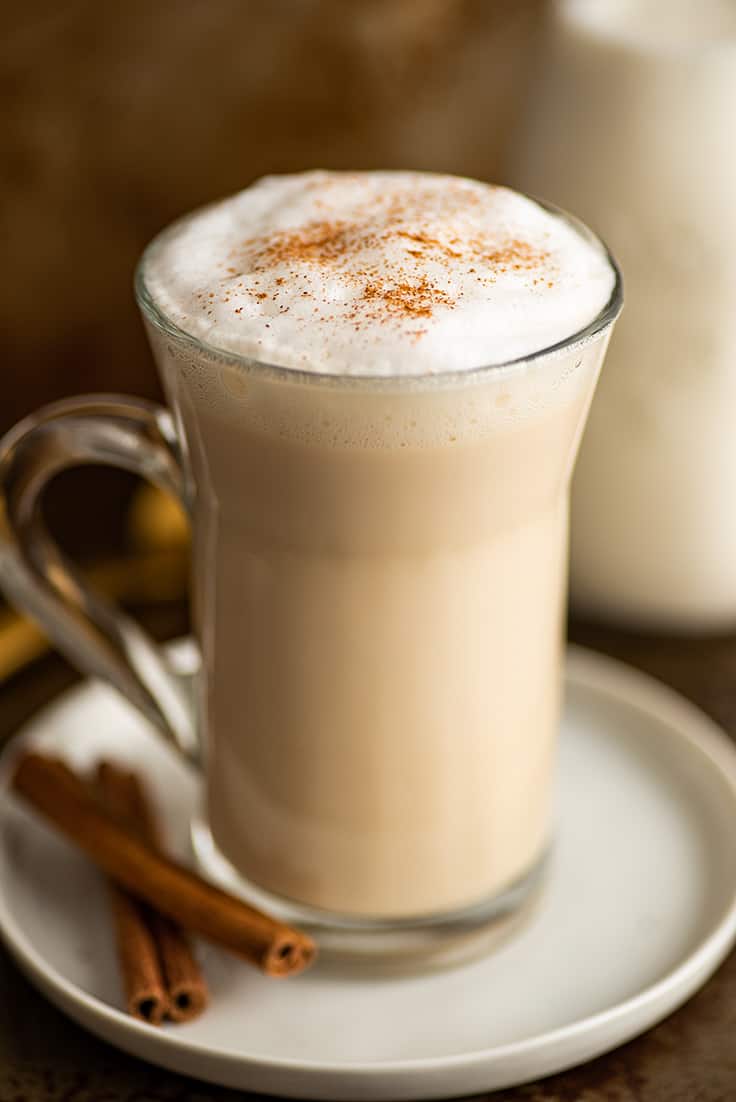
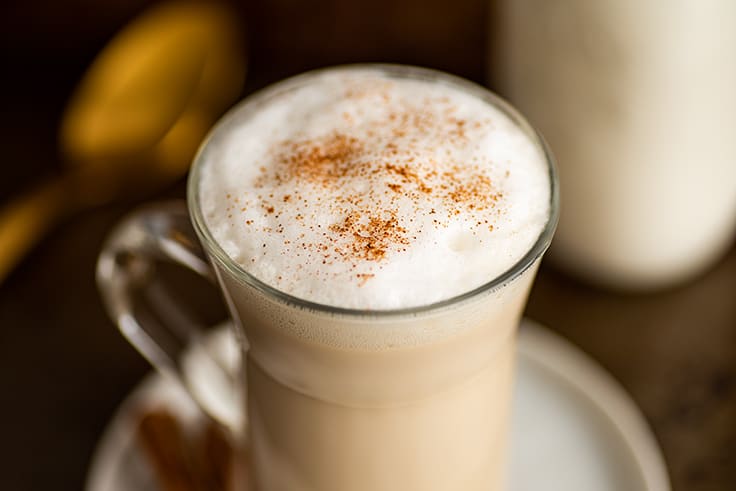
This homemade Chai Tea Latte is incredibly simple to make at home. It’s warming, the perfect level of sweet, and you probably have all the ingredients in your cupboard already.
Hey, friends. I’ve posted a lot of Starbucks-copycat/inspired recipes on Baking Mischief over the years, BUT until now they’ve mostly been coffee-based (like my Mocha , Caramel Macchiato , Caramel Latte , etc.). Well no more.
Tea lovers, get hyped, today’s recipe is for you: Chai Tea Latte.

Incredibly Easy Chai Tea Latte
This homemade chai latte is beyond simple to make at home. It’s warming, the perfect level of sweet, and if you’re a chai tea drinker, you probably have the ingredients in your cupboard already.
Ingredients
For your latte, all you will need are:
- Chai tea bag: Any brand will work, caffeinated or decaf.
- Sugar: I call for granulated sugar in the recipe, but you can also use brown sugar or your favorite artificial sweetener.
- Milk: By default, Starbucks uses 2% milk in their drinks, but you can use any milk you’d like including non-dairy milks. The higher fat your milk, the creamier your drink will be.

How to Make a Chai Tea Latte
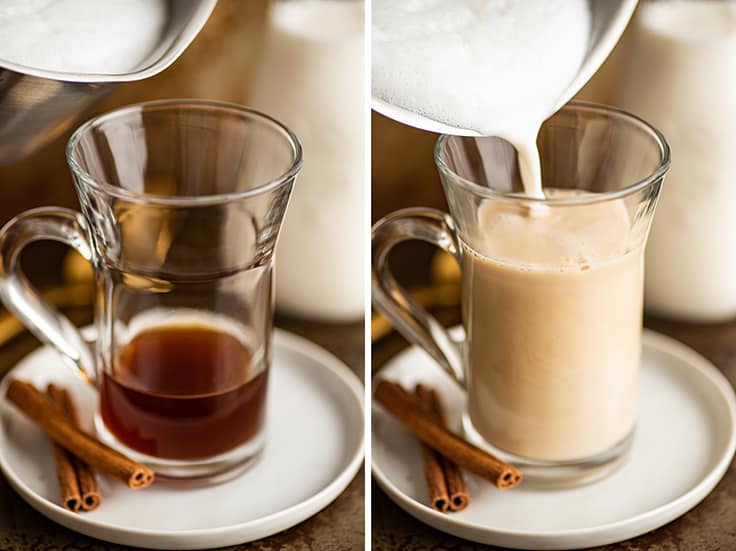
- To make a chai latte, you’ll make a quick chai concentrate, in this case, a very strongly brewed 1/4 cup of tea with sugar.
- Next, foam milk on the stove, either by whisking vigorously or using a milk frother, and then just pour the steamed milk over the chai concentrate. Serve and enjoy!
That’s it. Super easy, super quick, super good.
What does a chai tea latte taste like?
I think Starbucks’ chai latte actually tastes a lot like their pumpkin spice latte minus the slight bitterness the espresso gives it (there is no coffee in a chai latte).
This homemade version is very much the same. You have the spicy, warming chai flavor, lightly sweetened, and mellowed out by the steamed milk. Starbucks uses 2% milk by default, but if you like a richer drink, you can use whole milk or even add a splash of half and half or heavy cream .
Is there caffeine in a chai latte?
Yes. Chai tea is naturally caffeinated so if you use regular chai, your latte will have caffeine. If you want a decaf version, use decaf chai tea bags.
Can I make this an iced chai tea latte?
Yes! Go check out my iced chai latte post for instructions on how to make this recipe iced.
More Starbucks Coffee Drinks
- White Chocolate Mocha
- Iced Mocha Recipe
- Iced White Chocolate Mocha
- Dulce de Leche Latte
- Salted Caramel Mocha
- London Fog Latte

Recipe Notes
- If you make a lot of lattes at home and enjoy really foamy milk, I recommend purchasing a handheld milk foamer. They are pretty inexpensive (typically $10-$20), work well, and are just fun to use. 😉 I own the PowerLix MilkPro Frother , and I’ve been really happy with it.
- This recipe makes a 1-cup (8-ounce) latte. If you want to fill an oversized cup, 1½ or double the recipe.

Ingredients
- ▢ ¼ cup filtered water
- ▢ 1 chai tea bag
- ▢ 2 teaspoons ( 8g ) granulated sugar *
- ▢ ¾ cup milk any percentage
- ▢ Cinnamon optional for topping
Instructions
- In a small pot, bring water to a boil. Pour into an 8-ounce mug and steep tea bag for 5 minutes. Remove and discard tea bag. Stir in sugar.
- While your tea steeps, pour milk into the pot and heat over medium heat until milk begins to steam (do not bring to a boil) whisk vigorously until foamy or use a handheld milk frother to froth milk.
- Pour most of the milk into the tea concentrate, stirring to combine before adding in the last of the milk and foam, sprinkle with cinnamon if desired, and enjoy!
Notes
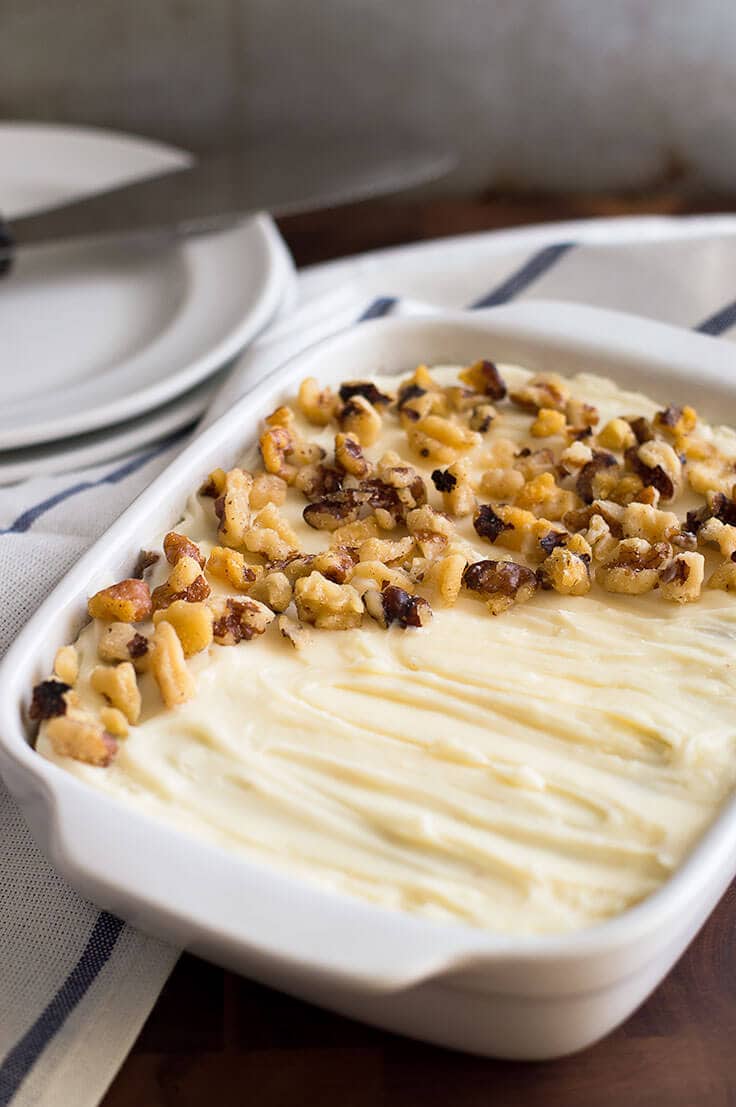
This incredibly easy Small Carrot Cake With Cream Cheese Frosting is a perfect replica of my mom’s potluck favorite.
I’ve mentioned on the blog before that we weren’t huge bakers in my house growing up, BUT, my mom did have a few really good go-to recipes in her arsenal that she brought out for special occasions.
One of those recipes was (and still is) her carrot cake. If she gets asked to bring a dessert to a potluck, I guarantee you, that’s what she’s going to bring. And when she does, at least five people will tell her it’s the best carrot cake they’ve ever eaten.

And they’re not wrong. Her carrot cake is a pretty magnificent thing. You bake it in a 9×13-inch pan, so it’s huge and basically perfect. It’s soft and fluffy, with just the right level of spice, and the entire thing is just smothered in a killer cream cheese frosting . (Update: so many people have emailed me asking for her recipe, I put it on the blog. You can find her easy carrot cake here. )
With spring nearly here and Easter just around the corner, I thought today would be a good day to share my mini version on the blog, so here we go.
This is a direct replica of my mom’s cake, so it’s everything described above, plus, it’s a small carrot cake, so you don’t need the excuse of a party to whip it up. And look how cute and tiny it is!!
This cake will serve four very generously or make six smaller servings. Make it over the weekend for you and someone special, or if you have a couple of good lunch buddies at work, I totally recommend baking it and surprising everyone at lunch. If you bake it in a pyrex dish , you can even just snap on a lid and go.
Ingredient Notes
- Loosely packed grated peeled carrots: To grate your carrots, use the large holes of a box grater and then loosely pile them into your measuring cup for measuring.
- Allspice: This recipe uses allspice, but not all carrot cake recipes do, and some people don’t enjoy the flavor. You can omit the allspice if you don’t have/like it or cut the amount in half.
- Softened cream cheese: My go-to cream cheese brand for baking and frosting is Philadelphia cream cheese . Make sure to allow enough time for your cream cheese to soften at room temperature. Cream cheese that’s too cold will leave cream cheese lumps in your frosting.
- Walnuts for topping: Nuts are optional. I’m not a fan of nuts anywhere near my carrot cake so these went straight into the garbage post photo shoot. If you like nuts, great, cover your cake in them and enjoy that crunch. If you don’t, skip them! 😉


How to Make a Small Carrot Cake
- Whisk together flour, baking powder, cinnamon, allspice, and salt in a small bowl.
- In a medium bowl, whisk together sugar, vegetable oil, and egg until well combined. Stir in flour mixture and use a rubber spatula to fold in grated carrots. Transfer batter to prepared baking dish.
- Bake for 25 to 30 minutes, until a toothpick inserted into the center of the cake comes out clean. Place cake (in pan) on a cooling rack, and cool completely before frosting, about 45 minutes.
I don’t have a 7×5-inch baking dish. What else can I use?
You can also bake this in a 6-inch round or square cake pan.
Can I double this recipe?
Yes. If you’d like to double the recipe, you can make a 2-layer 6-inch cake or bake it in an 8×8-inch pan, and extend the baking time as needed. To double the recipe ingredients, hover over the serving size in the recipe card below or click if you’re on mobile, and slide the slider.
If you’d like to make an extra-large version, go make my Mom’s Carrot Cake , which is this recipe but baked in a 9×13-inch pan.
Does carrot cake need to be stored in the refrigerator?
Yes. Because of the cream cheese frosting, this cake should be stored in the refrigerator. Unfrosted carrot cake, however, can be stored at room temperature.

More Small Cake Recipes
- Small Chocolate Cake
- Small Red Velvet Cake
- Small Banana Cake
- Small Lemon Pound Cake
- Small Pumpkin Cake
Recipe Notes
- This recipe has been updated to switch the baking soda out with baking powder, which creates a more stable cake and eliminates the slightly metallic flavor that some people sensitive to the taste of baking soda were experiencing. If you loved the old version, no problem! Simply continue to use the same amount of baking soda where the recipe now calls for baking powder.

Ingredients
Special Equipment
- ▢ 7x5-inch Baking Dish
Carrot Cake
- ▢ ½ cup ( 60g ) all-purpose flour
- ▢ ½ teaspoon baking powder
- ▢ ½ teaspoon cinnamon
- ▢ ½ teaspoon allspice
- ▢ ¼ teaspoon salt
- ▢ ½ cup ( 100g ) granulated sugar
- ▢ ¼ cup vegetable oil
- ▢ 1 large egg
- ▢ ⅔ cup loosely packed grated peeled carrots
Frosting
- ▢ 2 ounces cream cheese softened
- ▢ 4 tablespoons ( 2oz ) unsalted butter softened
- ▢ ¼ teaspoon vanilla extract
- ▢ ⅔ cup ( 80g ) powdered sugar sifted
- ▢ Pinch of salt
Instructions
- Preheat your oven to 350°F. Lightly grease your baking dish.
- In a small bowl, whisk together flour, baking powder, cinnamon, allspice, and salt.
- In a medium bowl, whisk together sugar, vegetable oil, and egg until well combined. Stir in flour mixture and use a rubber spatula to fold in grated carrots. Transfer batter to prepared baking dish.
- Bake for 25 to 30 minutes, until a toothpick inserted into the center of the cake comes out clean. Place cake (in pan) on a cooling rack, and cool completely before frosting, about 45 minutes.
Frosting
- Whisk together cream cheese, butter, and vanilla until smooth. Add sifted powdered sugar and salt and whisk until well-combined and fluffy. Spread frosting over the cake. Chilling before serving is optional but recommended.
- Serve cake in the baking dish and enjoy!
Notes
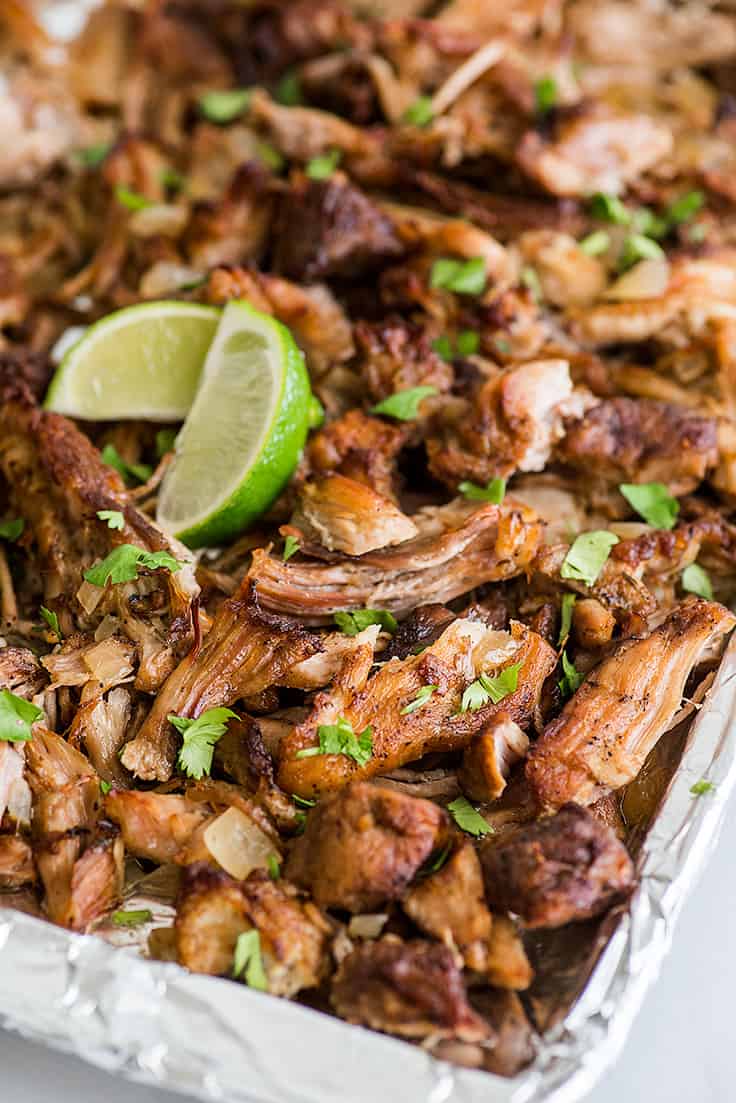
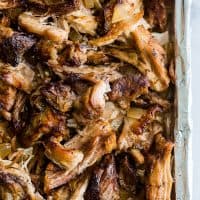
Crispy and tender, with tons of flavor, these easy Slow Cooker Carnitas will knock your socks off.
Hey you, yes you. Have you ever made carnitas at home?
If yes, good job. Gold star for you. Never stop.
If no, you should definitely start today. Right now. Drop everything.

Why should you be making carnitas this very second?
- Because they are SO GOOD, and you deserve good things.
- Crispy AND tender, with tons of flavor, they’ll knock your socks off.
- Because maybe you’re having some friends over, and they’re the ultimate party food since they look and taste like a million bucks but are impossible to screw up. Everyone will be SO impressed.
- Best of all, carnitas are made with pork shoulder roast which is super inexpensive, so you get a ton of really excellent food CHEAP.
If you’re not convinced by all that, there’s no hope left for you. Go eat some dry toast and be sad. ❤️
Slow Cooker Carnitas
I actually already have an excellent, easy recipe on the site for carnitas , but they’re cooked on the stove and require a bit of a time commitment that I know not everyone is willing or able to make.
So I took that recipe and modified it to work in a slow cooker so you don’t have to babysit them for three hours, turning carnitas from a weekend project to an everyday sort of meal.
And truly, once you try this recipe, you’ll be wanting to make it every day.
Ingredient Notes
- Pork shoulder roast: The best cut of meat for carnitas is pork shoulder AKA pork butt AKA Boston butt because it is well-marbled with fat and cooks up incredibly tender with a long braise.
- Large onion: A yellow, white, or red onion all work here.
- Lime juice: Fresh or bottled lime juice works just fine.
- Chicken broth: You can use homemade chicken broth if you have it, but this will be just as good with the canned stuff.
How to Make Carnitas in a Slow Cooker
- Prep the meat: Take a 4-to-6-pound pork shoulder roast, bone-in or boneless, debone if necessary, remove any huge chunks of fat and silver skin (the silvery blue membrane that sticks tightly to the meat) and cut it into large chunks, about the size of a fist.
- Sear: Then you sear the meat on the stove. If you are in a hurry, you can skip this step, but it adds a lot of flavor to the meat, so if you have the time, do it.
- Transfer to the Crockpot: Add browned pork and any juices from the pan to your slow cooker, and return the pan to the stove. Deglaze it with a bit of chicken broth, scraping the bottom of the pan clean, and pour that liquid into your slow cooker as well. (This makes sure you get all those super flavorful browned bits in with your meat AND makes your pan way easier to wash. Win win.)
- Assemble and cook: Then just add the rest of your ingredients, set your slow cooker to low, and forget about it for 7 to 8 hours. The meat’s done when you can easily shred it with a fork.
- Shred and crisp: Once the meat’s shredded, it’s time to make it crispy.
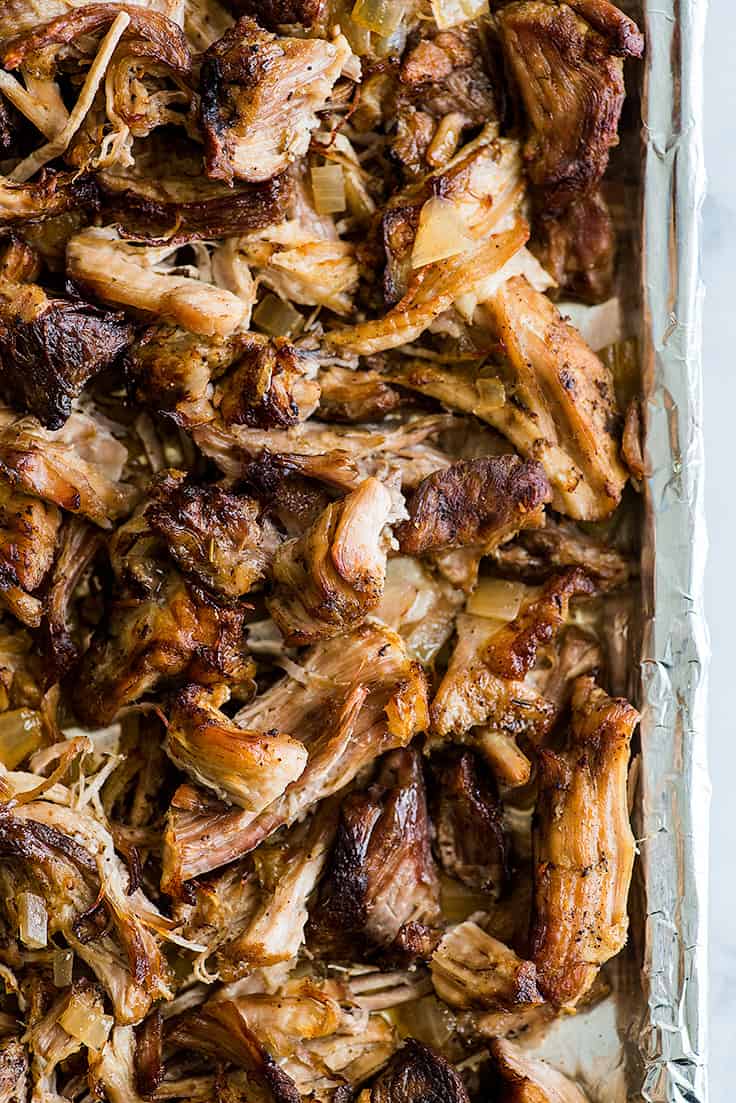

How to Make Crispy Pork
You have a couple of options for crisping up your pork. You can do it under the broiler or turn your oven temp way up and bake the shredded meat for about 30 minutes. Both ways have pros and cons, so the method you choose is really going to depend on how clean you want to keep your oven, how much of a hurry you’re in, and how crispy you want your meat.
Carnitas Broiler vs Oven
Broiler Pros: Broiling is way faster. Your carnitas will get crispy in less than 10 minutes, and it gets the edges and tops of the meat extra crispy with almost burnt bits that everyone will want to eat first. Cons: Broiling carnitas can be messy. Remaining fat in the meat pops quite a bit, and during one test batch, I opened the oven and had fat dripping from the oven ceiling. Also, under the broiler, only the tops and edges of the meat get crispy.
Oven Pros: Less messy (though I still don’t recommend cleaning your oven right before making these). Pork will get much crispier all over. Cons: Takes three times as long and you won’t get those really crispy burnt edges like you would from the broiler.
I use both methods depending what mood I’m in, sometimes I even combine them when I want extra crispy carnitas, so just experiment and see what works best for you.
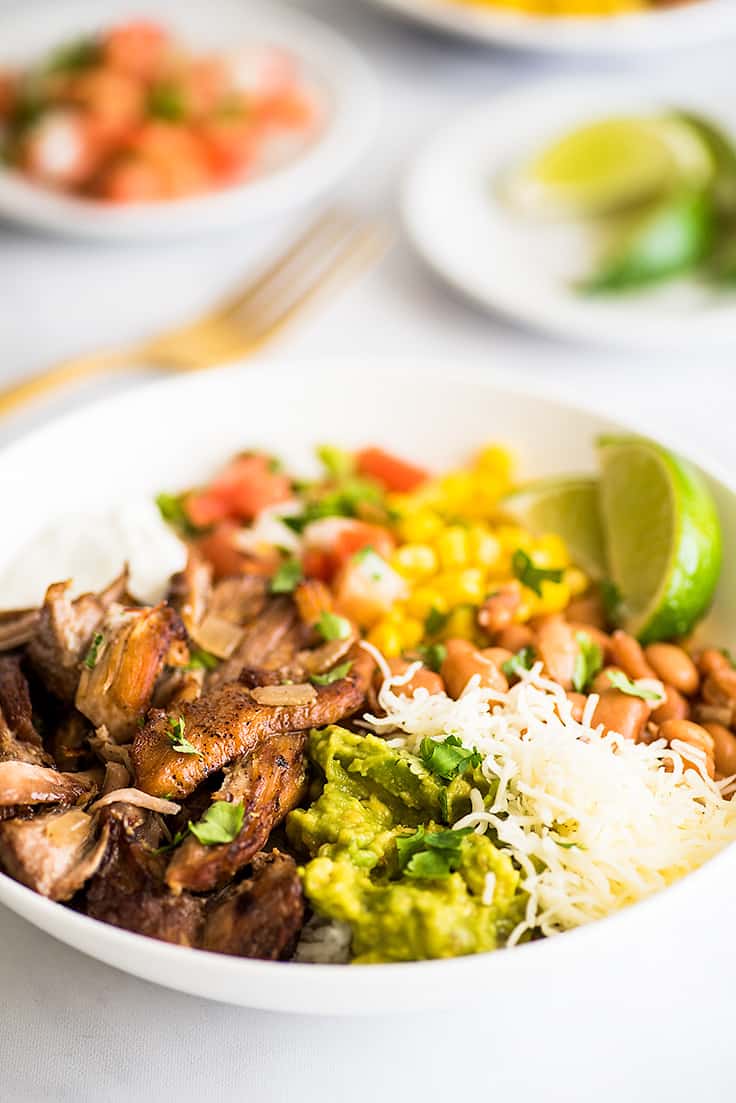
What to Make with Carnitas
4 pounds of (deboned and trimmed of fat) meat will make a little less than 10 cups of cooked carnitas. That’s a lot of meat to make into a lot of good things.
My favorite way to eat carnitas is picked hot off the tray, but they are absolutely stellar used in:
- Burrito Bowls with Cilantro Lime Rice
- Carnitas Enchiladas
- Carnitas Tacos
- Carnitas Nacho Fries
- Burritos
Also, if you’re low-carb or keto, a bowl of carnitas, some Pico de Gallo , cheese, sour cream, and a little hot sauce is a real good time. 😉
What cut of meat is best for carnitas?
The best cut of meat for carnitas is pork shoulder. It’s well-marbled with fat and cooks up rich and tender after a long, slow cooking time. You’ll find bone-in and boneless pork shoulder roasts at the grocery store, and both will work great for carnitas, but if you have the option, go with a boneless roast.
The bone in the bone-in shoulder roast is Y-shaped and a little irritating to cut around, so if you can avoid it, all the better.
How long should you cook pork in a slow cooker?
Cook the pork for 3 to 4 hours on high or 7 to 8 hours on low. You’ll know the carnitas are ready when you can easily pull the meat apart with a couple of forks.
Can you freeze slow cooker carnitas?
Absolutely. Because the cut of meat you need for carnitas comes as a pretty large roast, even if you’re part of a small household, I still recommend making the full-size carnitas recipe rather than trying to cut it down because carnitas freeze really well.
To Freeze: Freeze meal-sized batches with a few spoonfuls of the cooking liquid in freezer-safe storage bags for up to 3 months.
To Reheat: When you’re ready for more carnitas, defrost in the refrigerator. Microwave until warm or spread on a baking sheet and bake, loosely covered with foil at 350°F until heated through (usually 10-15 minutes). Remove the foil and broil on high for just a minute or two until the edges are crisp.
You Might Also Enjoy
- Country-style Pork Ribs
- Slow Cooker Tri-tip Sandwiches
- Slow Cooker Beef Ribs
- Chipotle Chicken Tacos

Recipe Tips
- If you know your morning is going to be rushed, measure your spices and cut your meat the night before (especially if you have a bone-in roast as cutting can take a little while), so everything is ready to go in the morning.
Ingredients
For Slow Cooker Carnitas
- ▢ 4-6 pound pork shoulder roast boneless or bone-in, trimmed of fat cap and cut into fist-sized chunks
- ▢ Salt and pepper
- ▢ ¼ cup vegetable oil
- ▢ 6-8 cups ( 3-4 ) 14.5 ounce cans chicken broth *
- ▢ 1 large onion diced
- ▢ 1 clove garlic crushed
- ▢ 3 tablespoons lime juice
- ▢ 1 tablespoon chili powder
- ▢ ½ teaspoon dried oregano
- ▢ ½ teaspoon ground cumin
For Carnitas Tacos
- ▢ Tortillas flour or corn
- ▢ Cilantro chopped
- ▢ White onion finely diced
- ▢ Limes quartered
Instructions
Slow Cooker Carnitas
- Generously salt and pepper chunks of meat on all sides.
- In a large dutch oven, heat oil over medium-high heat. Once hot, add meat to the pan and brown on all sides. You may need to do this in batches, and it will take 10 to 15 minutes.
- Transfer meat and any juices to your slow cooker and return pan to the stove. Add a splash of the chicken broth and deglaze the pan over medium-high heat, using a wooden spoon or spatula to scrape all the crispy browned bits off the bottom of the pan. Pour everything over the top of the meat in the slow cooker.
- To the slow cooker, add onions, garlic, lime juice, spices, and enough chicken broth to just cover the top of the meat. Cook on high for 3 to 4 hours or low for 7 to 8. The meat is ready when it can be easily shredded with a fork.
- Preheat the oven to 400°F. Transfer the meat, a few pieces at a time, to a plate and shred. Place shredded meat on a baking sheet and sprinkle with salt. If you had a large roast, you may need to split the meat between two baking sheets. Pour ¼ cup of the cooking liquid over the top of the meat. Bake until crispy, about 30 minutes, checking every 10 minutes and adding more cooking liquid if meat seems to be drying out.
- Or broil meat on high for 5 to 10 minutes until crispy, checking on frequently. DO NOT leave broiling meat unattended as it can burn very quickly.
Carnitas Tacos
- After carnitas are done, pop tortillas into the still-hot oven (or cover with a damp paper towel and microwave) until warmed.
- Top each tortilla with carnitas, chopped cilantro, onion, and a squeeze of lime juice. Serve and enjoy!
Notes
This homemade Chai Tea Latte is incredibly simple to make at home. It’s warming, the perfect level of sweet, and you probably have all the ingredients in your cupboard already.
Hey, friends. I’ve posted a lot of Starbucks-copycat/inspired recipes on Baking Mischief over the years, BUT until now they’ve mostly been coffee-based (like my Mocha , Caramel Macchiato , Caramel Latte , etc.). Well no more.
Tea lovers, get hyped, today’s recipe is for you: Chai Tea Latte.
Incredibly Easy Chai Tea Latte
This homemade chai latte is beyond simple to make at home. It’s warming, the perfect level of sweet, and if you’re a chai tea drinker, you probably have the ingredients in your cupboard already.
Ingredients
For your latte, all you will need are:
- Chai tea bag: Any brand will work, caffeinated or decaf.
- Sugar: I call for granulated sugar in the recipe, but you can also use brown sugar or your favorite artificial sweetener.
- Milk: By default, Starbucks uses 2% milk in their drinks, but you can use any milk you’d like including non-dairy milks. The higher fat your milk, the creamier your drink will be.
How to Make a Chai Tea Latte
- To make a chai latte, you’ll make a quick chai concentrate, in this case, a very strongly brewed 1/4 cup of tea with sugar.
- Next, foam milk on the stove, either by whisking vigorously or using a milk frother, and then just pour the steamed milk over the chai concentrate. Serve and enjoy!
That’s it. Super easy, super quick, super good.
What does a chai tea latte taste like?
I think Starbucks’ chai latte actually tastes a lot like their pumpkin spice latte minus the slight bitterness the espresso gives it (there is no coffee in a chai latte).
This homemade version is very much the same. You have the spicy, warming chai flavor, lightly sweetened, and mellowed out by the steamed milk. Starbucks uses 2% milk by default, but if you like a richer drink, you can use whole milk or even add a splash of half and half or heavy cream .
Is there caffeine in a chai latte?
Yes. Chai tea is naturally caffeinated so if you use regular chai, your latte will have caffeine. If you want a decaf version, use decaf chai tea bags.
Can I make this an iced chai tea latte?
Yes! Go check out my iced chai latte post for instructions on how to make this recipe iced.
More Starbucks Coffee Drinks
- White Chocolate Mocha
- Iced Mocha Recipe
- Iced White Chocolate Mocha
- Dulce de Leche Latte
- Salted Caramel Mocha
- London Fog Latte
Recipe Notes
- If you make a lot of lattes at home and enjoy really foamy milk, I recommend purchasing a handheld milk foamer. They are pretty inexpensive (typically $10-$20), work well, and are just fun to use. 😉 I own the PowerLix MilkPro Frother , and I’ve been really happy with it.
- This recipe makes a 1-cup (8-ounce) latte. If you want to fill an oversized cup, 1½ or double the recipe.

Ingredients
- ▢ ¼ cup filtered water
- ▢ 1 chai tea bag
- ▢ 2 teaspoons ( 8g ) granulated sugar *
- ▢ ¾ cup milk any percentage
- ▢ Cinnamon optional for topping
Instructions
- In a small pot, bring water to a boil. Pour into an 8-ounce mug and steep tea bag for 5 minutes. Remove and discard tea bag. Stir in sugar.
- While your tea steeps, pour milk into the pot and heat over medium heat until milk begins to steam (do not bring to a boil) whisk vigorously until foamy or use a handheld milk frother to froth milk.
- Pour most of the milk into the tea concentrate, stirring to combine before adding in the last of the milk and foam, sprinkle with cinnamon if desired, and enjoy!
Notes

Easy Chai Tea Latte
Ingredients
- ¼ cup filtered water
- 1 chai tea bag
- 2 teaspoons ( 8g ) granulated sugar *
- ¾ cup milk any percentage
- Cinnamon optional for topping
Instructions
- In a small pot, bring water to a boil. Pour into an 8-ounce mug and steep tea bag for 5 minutes. Remove and discard tea bag. Stir in sugar.
- While your tea steeps, pour milk into the pot and heat over medium heat until milk begins to steam (do not bring to a boil) whisk vigorously until foamy or use a handheld milk frother to froth milk.
- Pour most of the milk into the tea concentrate, stirring to combine before adding in the last of the milk and foam, sprinkle with cinnamon if desired, and enjoy!
