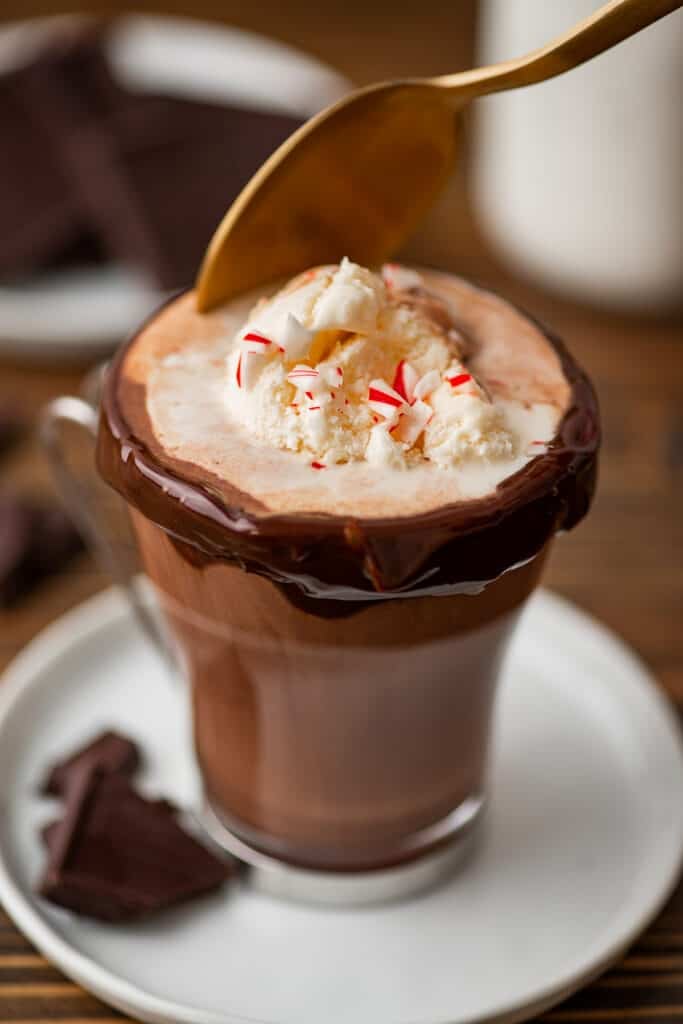
This homemade hot chocolate float is a dreamy and indulgent dessert perfect for chilly evenings.
I have a TON of hot chocolate recipes on this site because I fully believe that there’s a hot chocolate for every occasion.
Need an everyday walking around sort of hot chocolate? Go make my quick and easy classic hot chocolate .
Serving a crowd and need something hands-off? That’s a job for my favorite crockpot hot chocolate .
Need something totally indulgent and perfectly ridiculous? You should absolutely make a hot chocolate float.


Do you need to put a scoop of ice cream in your hot chocolate? Of course not. But wouldn’t your day be just a little better if you did?
I adapted this hot chocolate recipe from my rich and thick hot chocolate recipe so it’s intensely chocolatey, but not too sweet, and ideal for topping with a big scoop of vanilla ice cream.
As the ice cream melts into the hot chocolate, it makes the drink extra creamy, beyond delicious, and totally irresistible.
Ingredient Notes
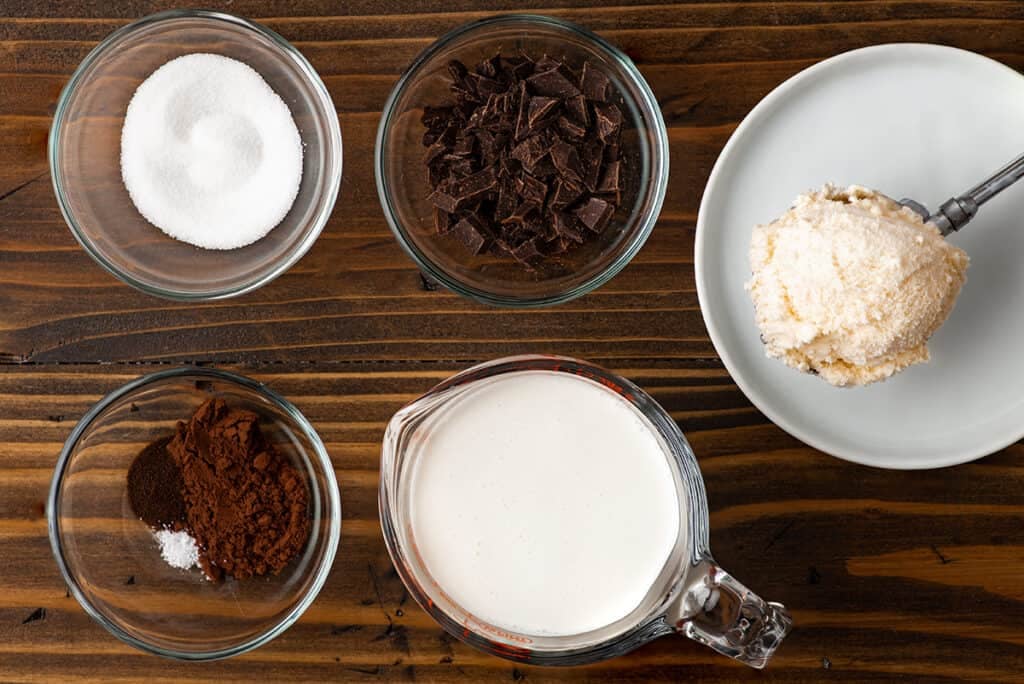

- Milk or milk and cream: I recommend using whole milk in this recipe because the higher fat the milk, the richer your hot chocolate will be, but any milk (including plant-based) will work just fine. For an extra rich and creamy drink, replace ⅓ cup of the milk with heavy cream or half and half.
- Cocoa powder: Stick with unsweetened cocoa powder for this recipe. You can use either natural or Dutch-process cocoa powder, but Dutch-process cocoa powder is considered the gold standard for hot chocolate.
- Chocolate: This recipe uses an ounce of real chocolate to really boost the chocolate flavor. Freshly chopped chocolate from a high-quality baking bar will melt the nicest, but good-quality chocolate chips work just fine.
- Espresso powder: Espresso powder is optional and will not make your float taste like coffee, just enhance the chocolate flavor. If you don’t have any, you can skip it. Or grab some from the coffee aisle the next time you’re at the store. It’s a good ingredient to keep on hand, especially if you make a lot of chocolate desserts.
How to Make a Hot Chocolate Float
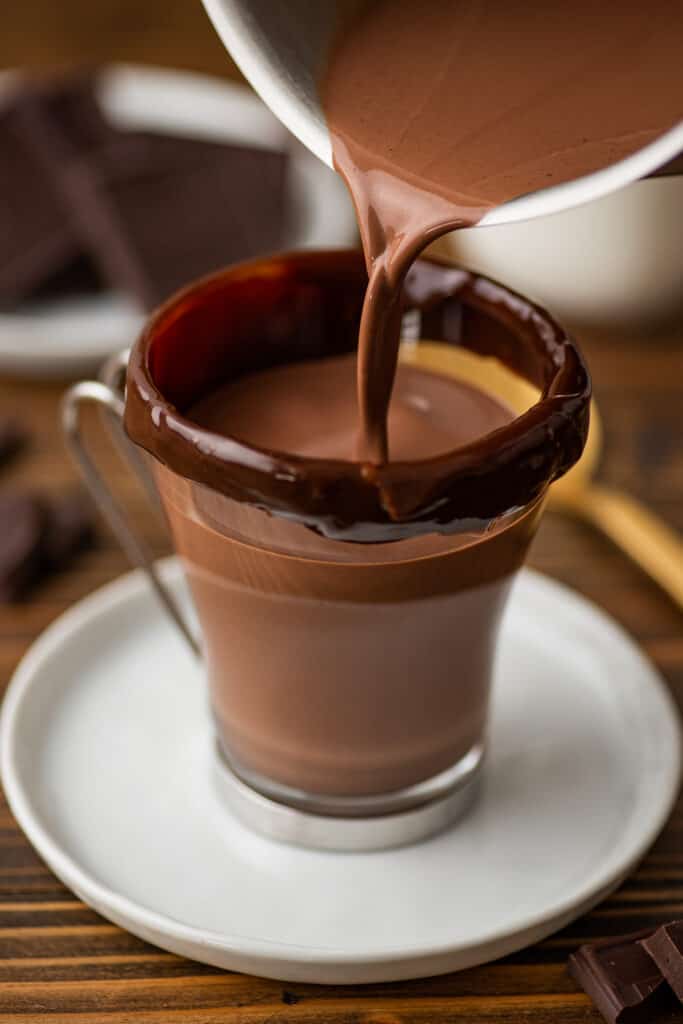

In a small pot, combine sugar, cocoa powder, espresso powder, salt, and water. Whisk over medium heat until smooth. Add chocolate and stir until melted and smooth.
Whisk in milk and heat until steaming. You want it quite hot but make sure not to let the milk come to a boil.
Transfer the hot chocolate to an 8-ounce mug, leaving about an inch of space at the top of the glass so your cup doesn’t overflow when you add the ice cream.
Add a generous scoop of ice cream. Serve with a spoon and enjoy!
Variations
- Boozy: To make a spiked chocolate float, once you remove your hot chocolate from the heat, before you pour it into a mug, add 2 tablespoons to ¼ cup of your choice of alcohol to the pot. Irish cream, Kahlua, and peppermint schnapps would all be good options.
- Ice cream flavor: Try switching up the ice cream flavor. Peppermint ice cream would be amazing as would caramel or dulce de leche ice cream …
- Big batch: This recipe scales up with no preparation changes, and would be ideal for a Christmas cookie decorating party or just a cozy night in. To change the recipe yield, hover over the serving size in the recipe card below or click if you’re on mobile, and slide the slider.
Isn’t putting ice cream in hot chocolate a little excessive?
You betcha. You should do it anyway. <3
Can I make this recipe in the microwave?
You sure can. To make this in the microwave, combine cocoa powder, sugar, espresso powder, and water in a mug. Stir until well-mixed and microwave for 15 seconds. Add the chopped chocolate and stir until it has mostly melted (microwave for another 10 to 20 seconds if necessary) before adding the milk. Microwave 1 to 1 ½ minutes, until milk is steaming. Stir, add ice cream, and enjoy!
Can I make this without the chocolate?
Yes. If you don’t have a chocolate bar or chocolate chips handy, you can omit the chocolate and instead use a slightly rounded tablespoon of cocoa powder (instead of a level one) and either 1½ or double the sugar.

More Hot Chocolate Recipes
- Classic Hot Chocolate
- White Hot Chocolate
- Baileys Hot Chocolate
- Snickerdoodle Hot Chocolate
- Peppermint Hot Chocolate
Recipe Notes
- This recipe makes 1 cup of hot chocolate, enough to fill an 8-ounce mug. To fill an oversized mug, 1½ or double the recipe.
- To line your glass like I did, make a batch of fudge sauce and allow it to cool slightly until it thickens (or use store-bought), pour it into a bowl with a bottom slightly larger than the rim of your mug. Dip the mug in the sauce and swirl it around to pick up as much sauce as possible.

Ingredients
- ▢ 1 tablespoon ( 12g ) granulated sugar
- ▢ 1 tablespoon ( 5g ) unsweetened cocoa powder
- ▢ ¼ teaspoon espresso powder optional
- ▢ Pinch of salt
- ▢ 1 tablespoon water
- ▢ 1 ounce semisweet or bittersweet chocolate chopped (high-quality chips are fine)*
- ▢ 1 cup milk any percentage*
- ▢ 1 scoop good-quality vanilla ice cream
Instructions
- In a small pot, combine sugar, cocoa powder, espresso powder, salt, and water. Whisk over medium heat until smooth. Add chocolate and stir until melted and smooth.
- Whisk in milk and heat until steaming.
- Transfer to an 8-ounce mug, leaving about an inch of space at the top of the glass.
- Add a generous scoop of ice cream. Serve with a spoon and enjoy!
Notes
How to make chicken stock: your complete guide to making an easy, rich, and delicious chicken stock at home.
A while back I posted an epic guide to making Roasted Chicken (which you should definitely go read if you haven’t already!). And as a follow-up, I have another guide for you: How to make chicken stock (from the leftover chicken carcass).
If you’ve never made homemade chicken stock before, friend, you are in for such a treat.

Why You Should Make Chicken Stock at Home
There’s a richness and depth of flavor to homemade chicken stock that you just can’t get from stock that comes from a box. The store-bought stuff is perfectly fine and serviceable; I use it all the time. But when you taste something made with homemade stock, oh man, can you taste the difference.
The good news is that while making homemade chicken stock is definitely a time commitment–it needs about 4 hours of simmering time–it’s not tough to make or labor-intensive.
You can let it simmer on a lazy Sunday so your house smells like a holiday while you watch Netflix, or throw it on the stove in the morning while you’re deep cleaning the house and feel doubly productive when you’re loading freshly made stock into your fridge around mid-afternoon.


What You Need to Make Chicken Stock
- Roasted chicken carcass: (Turkey will also do.) If using the carcass of a smaller (less than 3 pounds) chicken, like a small store-bought rotisserie chicken, you might want to use two to make sure your stock has enough flavor.
- Vegetables: You want flavorful but neutral veggies that are going to complement the chicken flavor and not clash with anything you might use the stock in later. Carrots, celery, and onion are the most common stock veggies, but some people also use things like leeks, garlic, and parsnips.
Veggie Notes: I threw some green onions in this batch of stock because they were about to go bad in my crisper and I only had half a yellow onion.
You don’t need to be too precise with your measurements. But, if you’re not sure where to start, three large carrots, three celery ribs, and one whole onion can do no wrong.
- Filtered water : You don’t have to use filtered water, but if you don’t drink tap water because you don’t like the taste, don’t use it in your stock.
- Vinegar: Vinegar, white or apple cider, is optional, but it helps break down the bones for a richer and luxurious stock. You might smell the vinegar for the first hour or two of cooking (if you really try), but don’t worry, it will not make your stock taste vinegary.
- Fine-mesh strainer : A fine-mesh strainer will strain out all the little vegetable and bone bits. You can use the strainer alone, or for perfectly strained stock, use it with cheesecloth.
- Cheesecloth : Cheesecloth will make sure all solid bits are filtered out of your stock. You can find cheesecloth at most grocery stores, usually in the baking aisle or order it cheap online .
Making Chicken Stock With Frozen Vegetables and Chicken Carcass
I almost always make my chicken stock with frozen ingredients. It’s a great way to reduce kitchen waste and means you can make the stock when you feel like it, not just when you have a chicken freshly roasted.
I freeze chicken carcasses immediately after they’ve been picked clean and keep a separate zip top bag in the freezer for spare vegetable ends and pieces. Any time I cut the top off an onion or stalk of celery, cut too many carrots, or have some veggies that look like they’re on their last leg, I scrub them, chop them, and toss them in the bag.
I know it’s time to make stock when a gallon bag’s about half full and has about equal amounts of celery and carrots with some onion in there.
You’ll use the frozen ingredients exactly the same way as fresh, they’ll just take longer to bring up to a simmer.
How to Make Chicken Stock
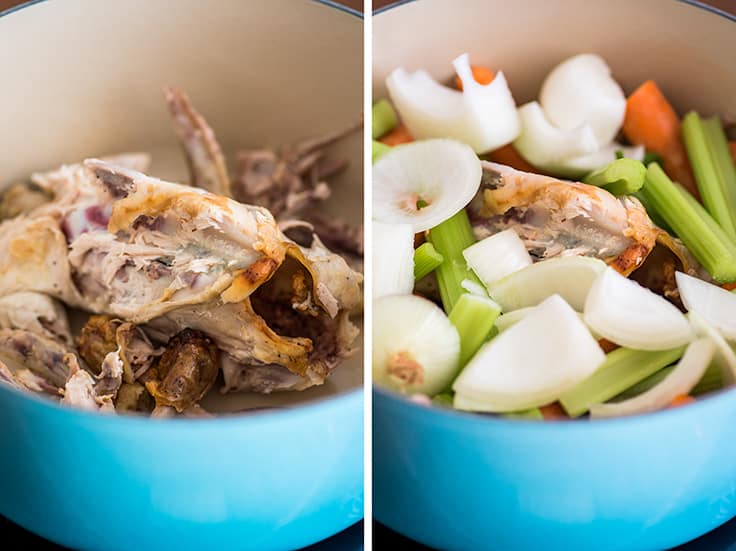

- In a large Dutch oven, combine chicken carcass and vegetables.
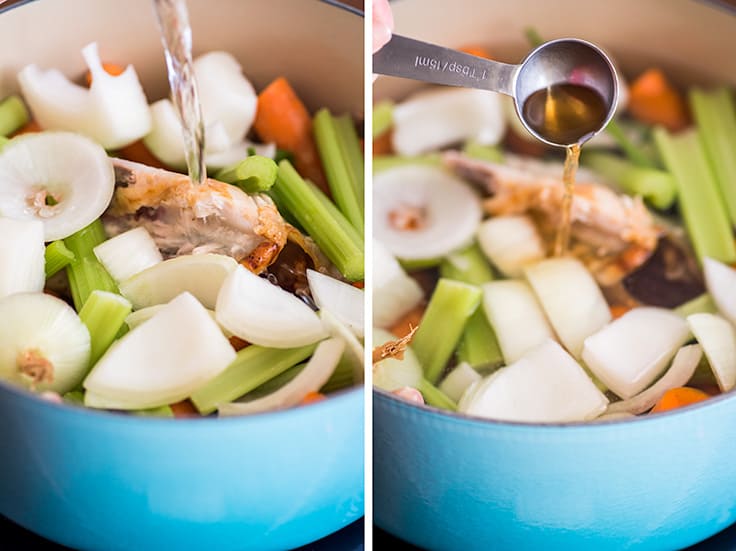

- Add 8 to 12 cups of water, enough to mostly cover the carcass and vegetables. Then pour in a tablespoon of apple cider or white vinegar to help break down the bones.
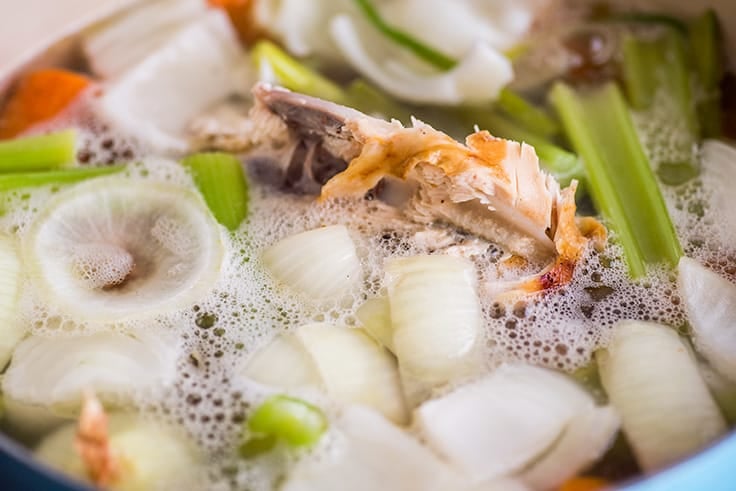

- Bring the stock to just barely a simmer. It’s hard to show in photos, but you don’t want a rolling boil, just small bubbles rising to the surface. A continuous boil can make your stock cloudy, which doesn’t hurt anything, but doesn’t look quite as pretty.
Cook for 3 to 4 hours, skimming fat off the surface occasionally, and checking to make sure the stock has not come to a boil.
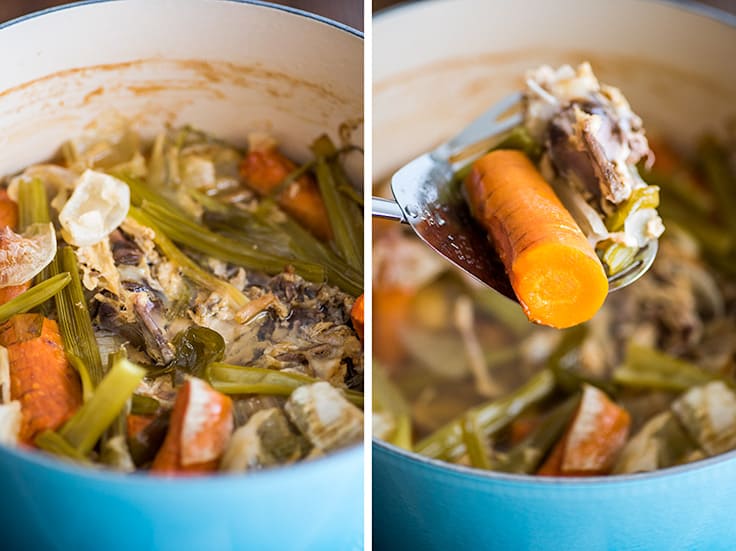

- Once the stock has simmered, and reduced by one-half to two-thirds, use a slotted spoon to remove and discard the vegetables and bones.


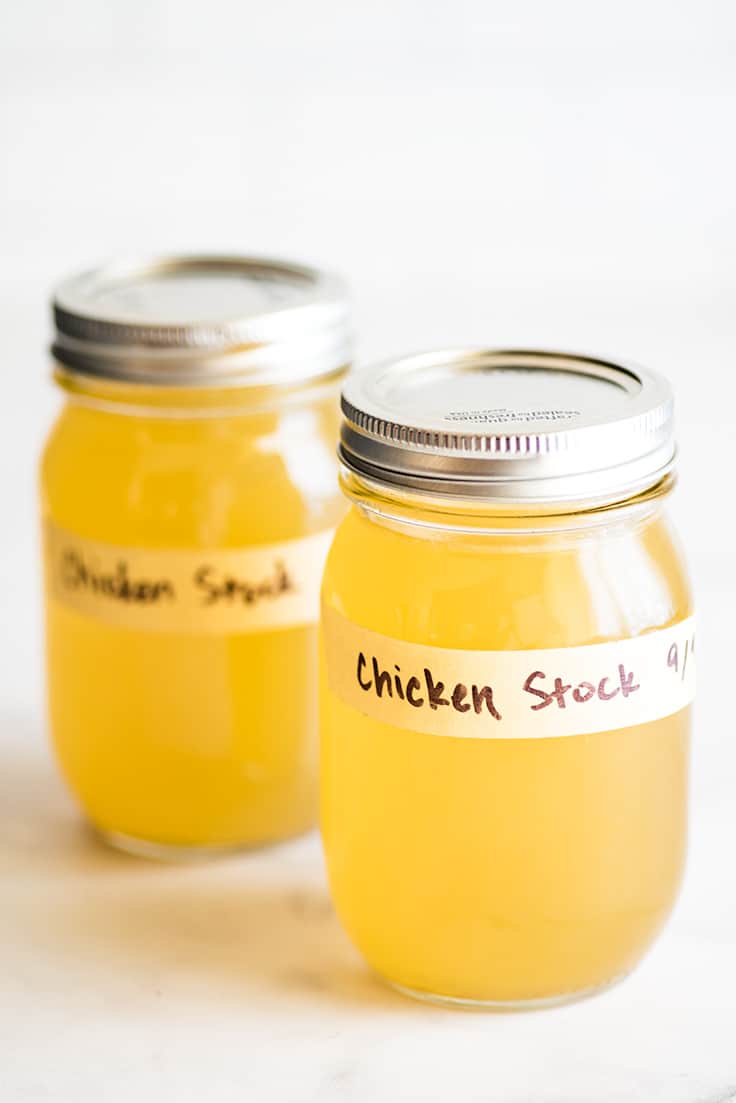
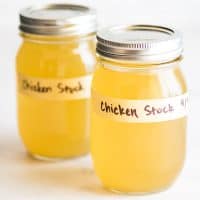
- Strain the chicken stock through a fine-mesh strainer and (optionally) a couple layers of cheesecloth folded together. Transfer it to mason jars and store in the refrigerator for up to 4 days.
The stock will become gelatinous when chilled (it will set and jiggle), and any fat will rise to the top. Scrape the fat layer off before using, and 30 seconds to a minute in the microwave will return the stock to its liquid state.
Using Homemade Chicken Stock
Chicken Stock can be used in any recipe that calls for chicken broth or stock. When using homemade chicken stock in recipes that call for broth, use half chicken stock and half water (if a recipe calls for 8 cups of chicken broth, use 4 cups stock and 4 cups water). You want to dilute the stock because it’s very rich and adds a ton of flavor, which can sometimes overpower clear soups.
The one thing to remember when making things with homemade stock is ALWAYS ADD SALT. Store-bought stocks and broths are usually quite salty, so don’t be alarmed if you find yourself adding a lot of salt to compensate.
My favorite recipes to use with homemade stock are:
- Ham and Potato Soup
- Creamy Chicken Noodle Soup
- Quick Chicken Tortellini Soup
- Creamed Turkey
- Peasant Soup
- Ground Turkey Vegetable Soup
How much stock will this make?
This should make about 4 cups/1 quart of very rich and flavorful chicken stock. If a ton of the liquid has evaporated and you are left with a more concentrated stock that is less than 4 cups, simply add water back until you reach 4 cups.
If you plan on using the chicken stock in recipes calling for chicken broth, dilute the stock using 1 cup of water to 1 cup of stock so you will get 8 cups/2 quarts of less concentrated stock that is so good in soups.
Can I freeze chicken stock?
Absolutely. You can freeze chicken stock for up to 3 months. If freezing in glass jars, be sure to leave plenty of headspace at the top so when the stock expands as it freezes it doesn’t crack the jar.
For more on my favorite freezing tips and tricks, go check out my post, How to Freeze Soup .
What’s the difference between chicken stock and broth?
This is really simple. Stock is water simmered with bones. Good stock will jiggle when chilled due to the collagen released from the bones and have a rich flavor and mouthfeel.
Broth is water simmered with meat (and sometimes bones) for a shorter period of time. It’s faster to make, less rich, and is usually seasoned while cooking.
They can be used mostly interchangeably, but you might miss some flavor and richness when using broth for a recipe calling for stock, and homemade stock should usually be thinned with water when using in recipes calling for broth.


For more How To Tutorials, you might also enjoy:
- How to Cook Chicken Breast for Salads and Sandwiches
- How to Cook Shredded Chicken
- How to Cook Chicken for Recipes
Ingredients
Special Equipment
- ▢ Fine-mesh strainer
- ▢ Cheesecloth optional
Homemade Chicken Stock
- ▢ 1 chicken carcass picked mostly clean of meat
- ▢ 3 large carrots peeled and cut into large chunks
- ▢ 3 large celery ribs cut into large chunks
- ▢ 1 large onion cut into large chunks
- ▢ 8 to 12 cups filtered water
- ▢ 1 tablespoon white or apple cider vinegar optional
Instructions
- In a large Dutch oven, combine chicken carcass and vegetables.
- Add 8 to 12 cups of water, enough to mostly cover the bones and vegetables. Add vinegar.
- Over medium-high heat, bring the stock to a simmer. Once the stock begins to simmer, turn heat down to keep it just barely simmering.
- Cook for 3 to 4 hours, skimming fat off the surface occasionally, and checking to make sure the stock has not come to a boil.
- Once the stock has simmered, and reduced by one-half to two-thirds, use a slotted spoon to remove and discard the vegetables and bones.
- Strain the stock through a fine-mesh strainer and a couple layers of cheesecloth folded together.
- Transfer the stock to mason jars, leaving plenty of headspace for expansion if freezing, and store in the refrigerator for up to 4 days or the freezer for 2 to 3 months.
Notes
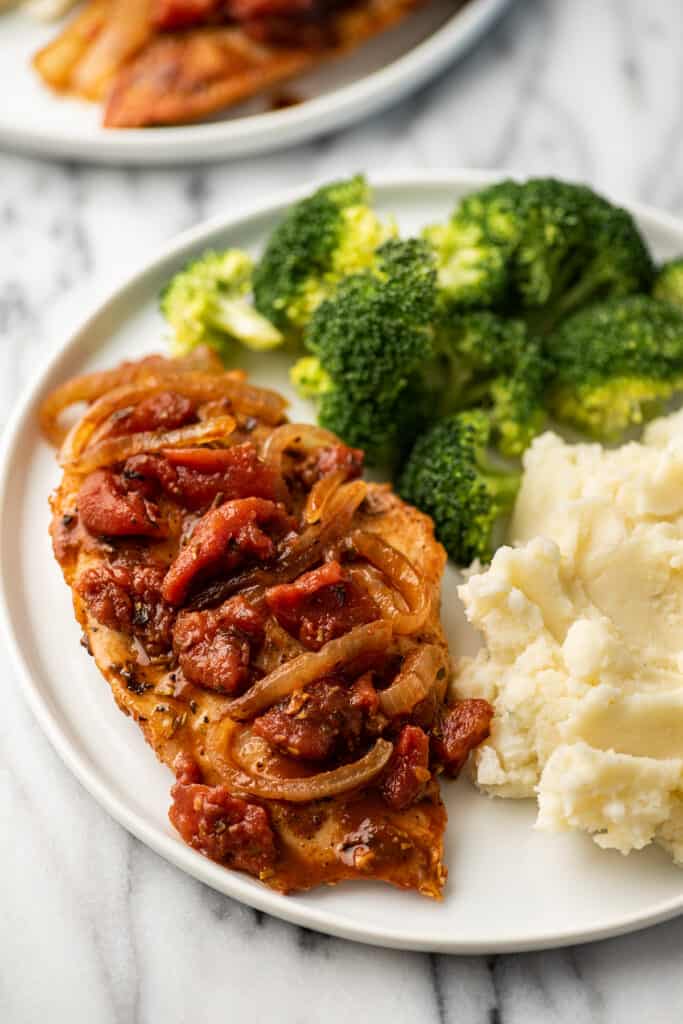
This balsamic chicken recipe requires almost no cutting and only about 5 minutes of prep time. The boneless skinless chicken breasts cook in a sauce of tomatoes, balsamic vinegar, and onions, so they come out deliciously moist and packed with flavor.
Friends, I’m really excited about sharing this one with you today.
You all are always asking me for easy chicken recipes, and balsamic chicken might just be my new ideal easy chicken dinner.

What’s Great About This Recipe
- Almost no cutting required. You’ll need to slice an onion and maybe a couple of chicken breasts. That’s it.
- You can prep the ingredients in about 5 to 10 minutes. Even though this dish is big on flavor, there aren’t a ton of ingredients, so the recipe comes together FAST.
- After searing, the chicken cooks in the sauce so you can walk away and don’t have to babysit it.
- The chicken comes out PACKED with flavor. Super tangy, and a little sweet, this definitely isn’t your usual old boring weeknight chicken recipe.
I hope you immediately add this to your weeknight dinner rotation and then come back here and tell me how much everyone loved it!
Ingredient and Equipment Notes
- Chicken breasts: Chicken breast size varies wildly these days, so you can use either 4 small chicken breasts (8 ounces or less) or 2 large (12+ ounces). If using large chicken breasts, in the recipe, I simply have you slice them into cutlets before cooking.
- Sweet onion: I love using a sweet onion here, but you can substitute a red or yellow onion if that’s what you have on hand.
- Canned diced tomatoes: You can substitute crushed or whole canned tomatoes if you’re out of diced. Crushed tomatoes will change the texture of the sauce but will still be delicious. To use whole canned tomatoes, pulse them a couple times in the can with an immersion blender or in your food processor or blender before adding them to the pan.
- A deep 12-inch skillet with a lid: A standard 12-inch skillet works okay for this recipe, but it gets a little full so you’ll want to watch it closely once you put the lid on to make sure everything stays at just a simmer and does not boil over. A deeper skillet gives you a little more breathing room. If you don’t own a skillet with a lid, you can also make this in a large dutch oven.
How to Make Balsamic Chicken
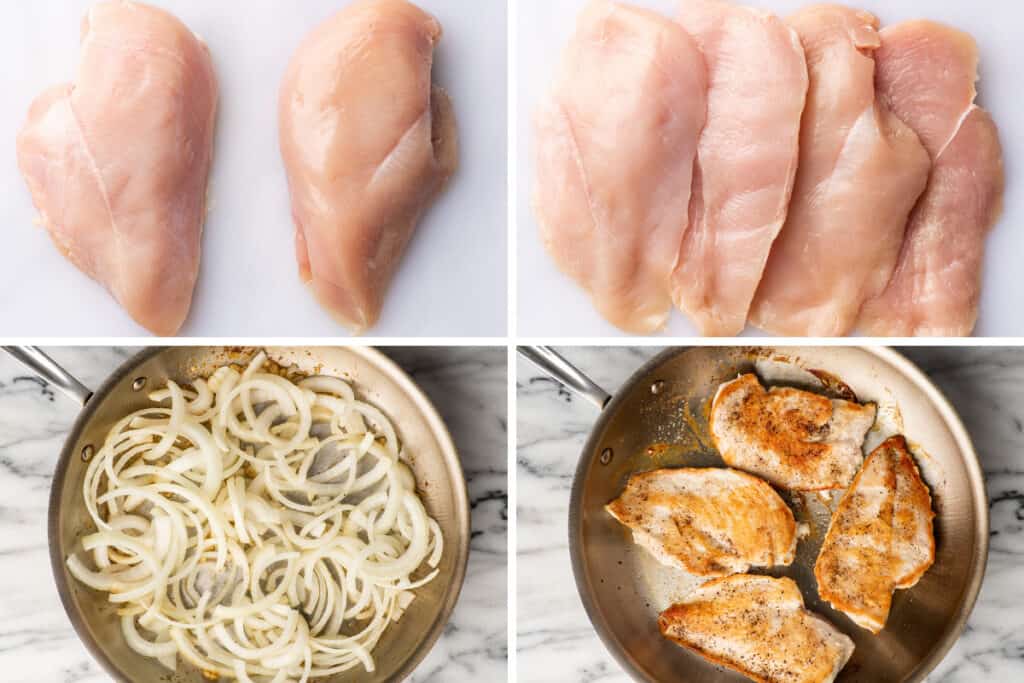

Slice the chicken if needed: If using 2 large chicken breasts, slice each piece of chicken into 2 cutlets by placing your hand on top of the chicken breast and running a sharp knife horizontally through the breast, slicing the top and bottom into two even pieces.
Brown the chicken: Salt and pepper the chicken breasts and brown both sides of the meat. Transfer the chicken to a plate and set aside.
Cook the onions and garlic: Add butter, garlic, and onions to the pan and cook until the onions are wilted and beginning to soften, about 5 minutes. While the onions cook, be sure to use a wooden spoon to scrape the bottom of the skillet and dislodge any cooked-on bits of fond. The fond adds flavor to the sauce, but it can burn if left sitting at the bottom of the pan.
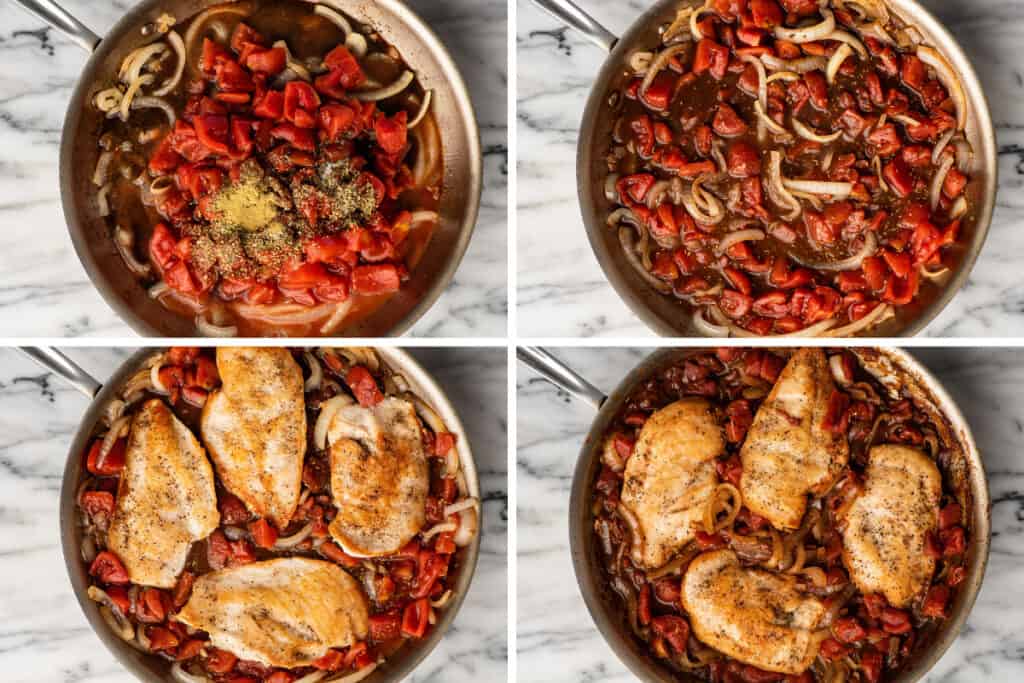

Add the remaining ingredients: Stir everything together and bring to a simmer.
Return the chicken to the pan: Nestle the chicken breasts in the simmering liquid and cover skillet. Cook for 6 to 10 minutes, until an instant-read thermometer inserted into the thickest part of the chicken breast reads 165°F.
Cooking time is going to vary depending on how thick your chicken breasts are, so if you’re working with thicker pieces of meat, don’t worry if they’re taking a little longer to cook.
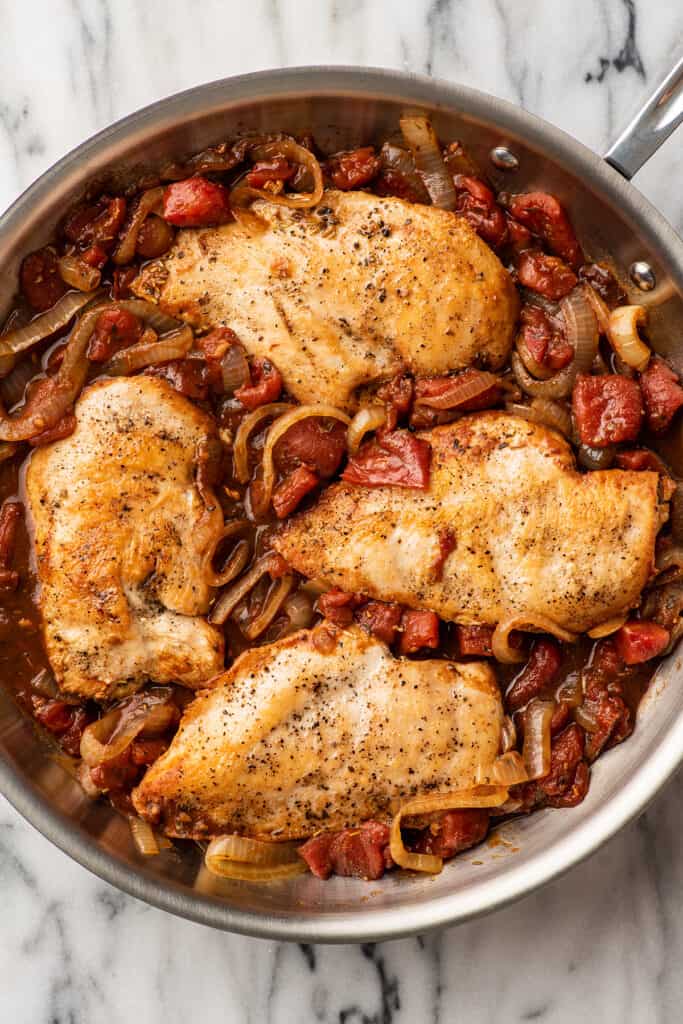
Reduce the sauce. Once the chicken is cooked through, transfer it to a clean plate or cutting board to rest and tent with foil to keep warm. Simmer the sauce uncovered until the onions are softened to your desired level of doneness and the sauce reduces to a thicker consistency, about 3 to 5 minutes. You’ll know the sauce is good to go when you run your spoon down the pan and you can briefly see the bottom without the liquid immediately covering it up.
Time to eat: Serve chicken with sauce spooned over the top alongside egg noodles or mashed potatoes. Enjoy!!
Can I use bone-in chicken breasts/thighs or boneless skinless chicken thighs?
You can, but bone-in meat will require longer cooking times, especially for chicken breasts. If the sauce becomes too thick before the meat has finished cooking, add a couple tablespoons of water back to the pan to keep the sauce from burning.

What to serve with balsamic chicken?
You can serve balsamic chicken breasts over egg noodles or with rice, but my favorite is mashed potatoes . Pair the chicken with a simple vegetable like:
- Roasted Green Beans
- Roasted Broccoli
- Roasted Zucchini
- Steamed Broccoli
- Roasted Carrots
Can I make this dish ahead of time?
You can. Make this dish up to 48 hours in advance and store it in an airtight container in the refrigerator.

More Easy Chicken Dinners
- Shredded BBQ Chicken
- Chicken Shawarma
- Creamy Chicken Tortellini Soup
- Chicken Francaise

Equipment
- 12-inch deep skillet with a lid
Ingredients
- ▢ 4 small or 2 large boneless skinless chicken breasts
- ▢ Salt and pepper
- ▢ 1 tablespoon olive oil
- ▢ 1 tablespoon butter salted or unsalted is fine
- ▢ 4 garlic cloves pressed or minced
- ▢ 1 sweet onion halved from root to tip and sliced into ¼-inch slices
- ▢ 2 14.5-ounce cans diced tomatoes*
- ▢ ¼ cup balsamic vinegar
- ▢ 1 teaspoon granulated sugar optional
- ▢ 1 teaspoon dried oregano
- ▢ 1 teaspoon dried basil
- ▢ 1 teaspoon dried, crushed rosemary
- ▢ ½ teaspoon ground thyme
Instructions
- If using 2 large chicken breasts, slice each piece of chicken into 2 cutlets by placing your hand on top of the chicken breast and running a sharp knife horizontally through the breast, slicing the top and bottom into two thin, even pieces.
- Generously salt and pepper both sides of your chicken breasts.
- In a deep 12-inch skillet with a lid heat oil over medium-high heat. Once hot, add chicken breasts to the pan and cook until browned, 3 to 4 minutes. Flip the chicken and repeat with the second side.
- Remove skillet from heat, transfer chicken to a plate and set it aside.
- To the same skillet, add butter. Melt butter over medium heat and then add the garlic and onions. Use a wooden spoon to stir, scraping the bottom of the pan to dislodge any cooked-on bits. Cook for 5 to 8 minutes, stirring occasionally, until the onions are wilted and beginning to soften.
- Add the remaining ingredients, stir to combine, and bring to a simmer. Return the chicken to the pan and nestle it in the simmering liquid. Cover skillet, and cook for 5 to 10 minutes, until an instant-read thermometer inserted into the thickest part of the chicken breast reads 165°F.
- Transfer chicken breasts to a clean plate or cutting board to rest and tent with foil to keep warm. Continue to simmer the sauce uncovered until the onions are softened to your desired level of doneness and the sauce reduces to a thicker consistency, about 3 to 5 minutes. Taste and add salt and pepper if needed.
- Spoon sauce over chicken breasts and serve alongside rice, over egg noodles, or with mashed potatoes. Enjoy!!
Recipe Adapted From Dishing With Leslie (no longer available online)

Dreamy Hot Chocolate Float
Ingredients
- 1 tablespoon ( 12g ) granulated sugar
- 1 tablespoon ( 5g ) unsweetened cocoa powder
- ¼ teaspoon espresso powder optional
- Pinch of salt
- 1 tablespoon water
- 1 ounce semisweet or bittersweet chocolate chopped (high-quality chips are fine)*
- 1 cup milk any percentage*
- 1 scoop good-quality vanilla ice cream
Instructions
- In a small pot, combine sugar, cocoa powder, espresso powder, salt, and water. Whisk over medium heat until smooth. Add chocolate and stir until melted and smooth.
- Whisk in milk and heat until steaming.
- Transfer to an 8-ounce mug, leaving about an inch of space at the top of the glass.
- Add a generous scoop of ice cream. Serve with a spoon and enjoy!
