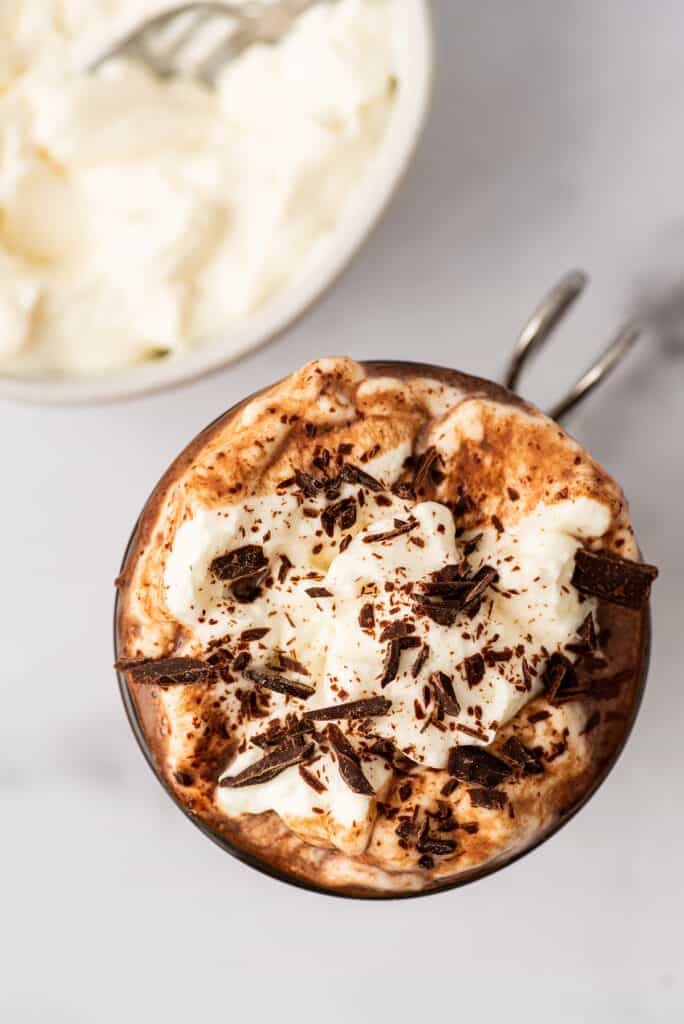
Cream cheese whipped cream is tangy, lusciously smooth, and creamy. It’s completely irresistible served over fruit, hot chocolate, or dessert.
If you’re looking to make some whipped cream and you’re feeling a little adventurous today, might I recommend adding some cream cheese to the mix?
This is one of my favorite tweaks to take sweet and simple whipped cream and make it feel twice as decadent. With a bit of cream cheese, whipped cream becomes extra smooth, a little tangy, and perfect for serving with fruit or spooned over your favorite dessert.


It takes a little longer to make than regular old whipped cream since you have to give the cream cheese time to soften, but it’s not much more effort, and I think the results are well worth the time.
Ingredient Notes
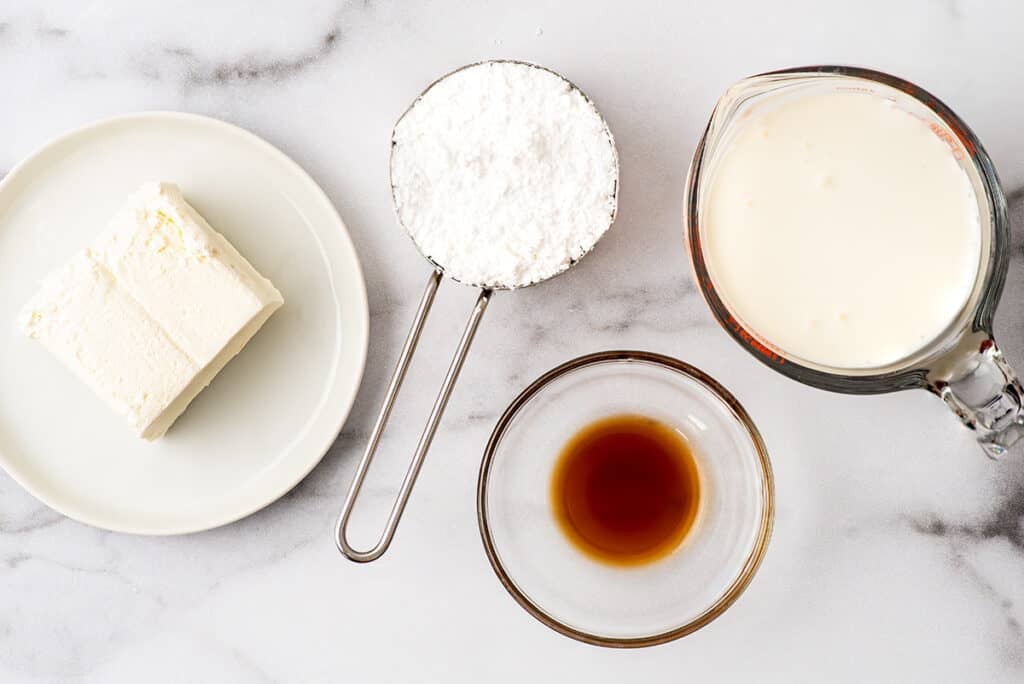

- Heavy cream: Heavy cream (30–36% milk fat) and heavy (whipping) cream (36%+ milk fat) both work just fine for whipped cream. Use whichever one you have on hand. Have some leftover cream? Check out my post What to Do With Leftover Whipping Cream for some recipe ideas to use up the leftovers.
- Powdered sugar: To offset the tanginess of the cream cheese, this recipe is quite a bit sweeter than the other whipped cream recipes on the site. If you prefer a less-sweet whipped cream, cut the sugar in the recipe by about ⅓. You can substitute granulated sugar here, but you’ll need less granulated sugar than powdered sugar, so be sure to read the substitution notes in the recipe card.
How to Make Cream Cheese Whipped Cream


Whip the heavy cream until stiff peaks form (when you lift the beaters/whisk straight up, the cream should stand up without flopping over at the tip). If you’re using your stand mixer, transfer the whipped cream to another bowl so you can use it again for the next step, no need to wash it out.
In a second large bowl or the bowl of your stand mixer, combine the remaining ingredients. I recommend sifting the powdered sugar so you don’t get any sugar lumps in your cream cheese, but that step’s technically optional. Beat until well-mixed and smooth, scraping the sides of the bowl with a silicone spatula as needed.
Use a spatula to fold whipped cream into the cream cheese mixture, doing your best not to deflate the whipped cream. Once the mixture is uniform in color, you’re good to go. Serve and enjoy!
Variations
- Chocolate cream cheese whipped cream: Sift in 3 tablespoons of unsweetened cocoa powder (1 teaspoon for a single serving) when you add the powdered sugar.
Where to Use Cream Cheese Whipped Cream
- Waffles (with strawberry sauce is my favorite!!)
- Over fruit
- In hot chocolate if you’re feeling really decadent
Can you pipe cream cheese whipped cream?
Not really. Cream cheese whipped cream is much softer than regular whipped cream. It’s perfect for scooping up with fruit or spooning over desserts, but it isn’t stiff enough to pipe or use to frost the sides of a cake.
Can you freeze cream cheese whipped cream?
Yes, with some caveats. If you would like to freeze leftover cream cheese whipped cream, spoon scoops of it onto a parchment paper-lined plate or baking sheet and freeze until solid. Then cut the parchment paper into squares and transfer the frozen scoops (still on the paper) to a freezer bag.
Like all frozen whipped cream , cream cheese whipped cream should be used within just a couple of weeks of freezing because its quality starts to deteriorate fairly quickly. It also won’t have quite the same texture as the cream can separate a bit and make defrosted whipped cream a little watery.
I wouldn’t make whipped cream specifically to freeze, but if I have leftovers, I think it freezes well enough to be worth the small effort of freezing to use in hot chocolate or over some fruit later.
You Might Also Enjoy
- Whipped Cream (Three Ways)
- Chocolate Whipped Cream
- Coffee Whipped Cream
- Cinnamon Whipped Cream
- Peanut Butter Whipped Cream

Recipe Notes
- Storage: Store leftover whipped cream in an airtight container in the refrigerator. The whipped cream will firm up considerably once chilled because of the cream cheese.

Ingredients
Full Batch
- ▢ 1 cup heavy whipping cream
- ▢ 4 ounces cream cheese softened
- ▢ ½ cup ( 60g ) powdered sugar sifted*
- ▢ 1 teaspoon lemon juice or vanilla extract
Single Serving
- ▢ 2 tablespoons heavy whipping cream
- ▢ ½ ounce cream cheese softened
- ▢ 1 tablespoon ( 8g ) powdered sugar sifted
- ▢ ⅛ teaspoon lemon juice or vanilla extract
Instructions
- To a large bowl* or the bowl of your stand mixer, add heavy cream, and beat until stiff peaks form. If using a stand mixer, transfer the whipped cream to another bowl and set aside.
- In a second large bowl or the bowl of your stand mixer, combine softened cream cheese, sifted powdered sugar, and lemon juice or vanilla extract. Beat until well-mixed and smooth, scraping the sides of the bowl with a silicone spatula as needed.
- Use a spatula to fold whipped cream into the cream cheese mixture, being careful not to deflate the whipped cream.
- Serve and enjoy!
Notes
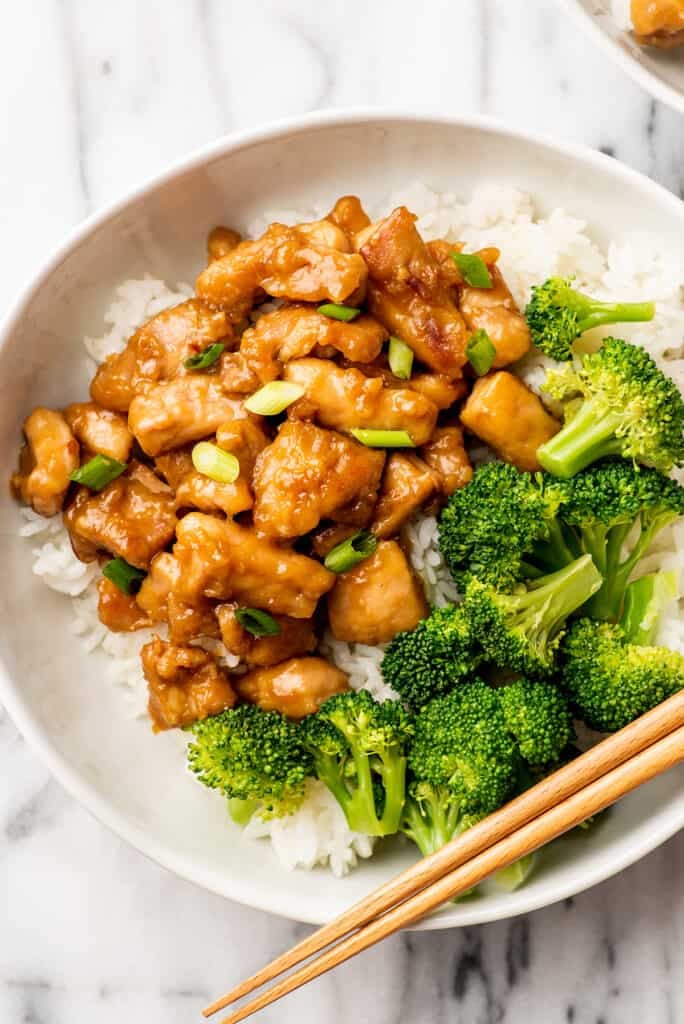
Honey ginger chicken: juicy chunks of chicken thighs cooked in a sticky-sweet honey, ginger, and garlic sauce. This is a super fast and easy dinner recipe that can be on your table in around 30 minutes.
On the hunt for a new quick and easy chicken recipe to add to your weekly dinner rotation? I’m so glad you dropped by, because this honey ginger chicken is exactly what you’re looking for.
It’s a total crowd-pleaser of a dish, with a sweet and tangy sauce and tender chunks of chicken thighs that are perfect for serving over a big bowl of rice.


Best of all, it’s super easy to make. This is my favorite sort of chicken recipe where the chicken is cooked in the sauce, so everything cooks in one pan and is super low-stress and practically fool-proof.
Once you have your ingredients prepped and measured out, which is honestly the most time-consuming part, the actual cooking time is less than 15 minutes.
So this is a dish that tastes great, is incredibly simple to make, and is going to have you in and out of the kitchen super quick. What’s not to love?
Ingredient Notes & Substitutions
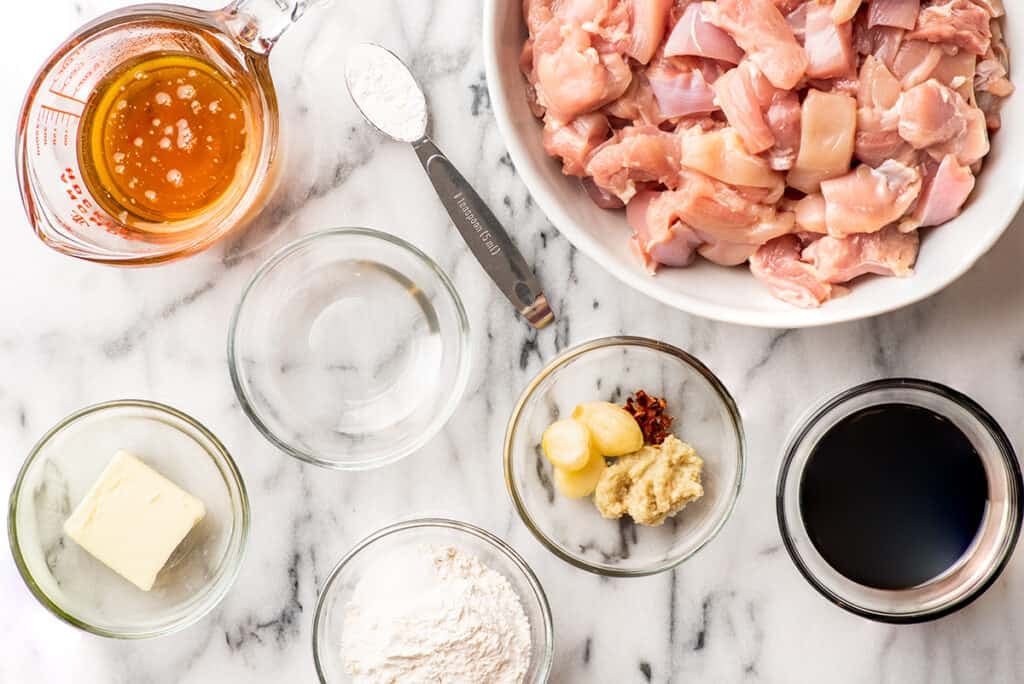

- Boneless skinless chicken thighs: Chicken thighs work great in this dish because you don’t have to worry about accidentally overcooking them in the sauce while you wait for it to thicken. You can substitute boneless skinless chicken breasts in this recipe, but when I tested it, I didn’t think they worked nearly as well.
- Ginger: Fresh ginger is so good in this dish, but if you don’t have any, you can substitute ¼ teaspoon of ground ginger. But the next time you’re at the store, buy some fresh ginger and pop it in your freezer so you have it on hand when you make this again!
- Flour: The flour in this recipe is optional. It helps the sauce cling to the chicken and assists with browning and thickening the sauce, but if you’re out of flour or don’t want the extra step, you can skip the dredging.
- White distilled vinegar: Vinegar gives the sauce a little kick that helps cut through the sweetness of the honey. I don’t recommend making this dish without some sort of vinegar, but if you’re out of white distilled, you can substitute apple cider or rice vinegar.
Measuring tip: Give your measuring cup a quick spritz with cooking spray before measuring out the honey. It will make the honey slide out of the cup faster and easier when you pour it into the sauce.
How to Make Honey Ginger Garlic Chicken

- Cook your rice and prep your ingredients: This is a quick dish, so make sure your rice is almost ready before you start the chicken.
While your rice cooks, assemble and prep your ingredients so they’re ready to go. Once the chicken hits the pan, this dish comes together FAST and you definitely won’t have time to grate ginger or find the vinegar at the back of your cupboard.
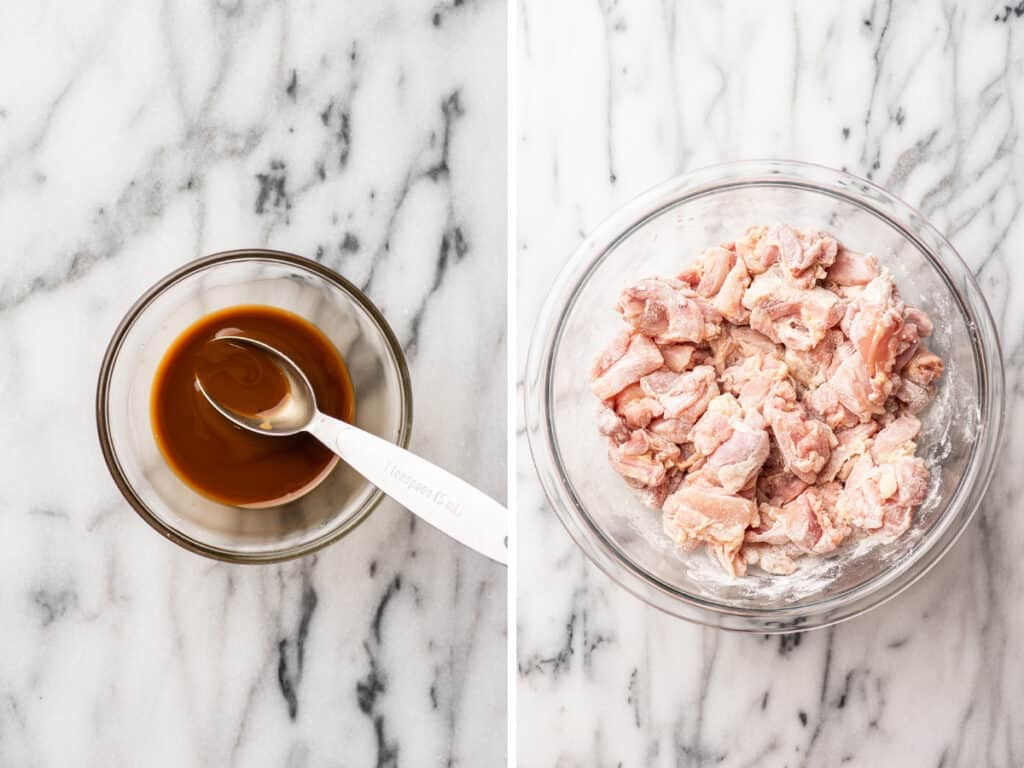
Make cornstarch slurry: In a small bowl, stir together the cornstarch with 1 tablespoon of the soy sauce. Stir until the cornstarch is completely dissolved (the cornstarch is easier to dissolve in a smaller amount of liquid at first) and then add the remaining 2 tablespoons of soy sauce. Set aside. This will be used to thicken the sauce later.
Prep chicken: Pat chicken thighs dry and trim any excessively large pieces of fat from the meat. Also feel along the underside of each thigh for any pieces of cartilage your butcher might have missed. Cut each thigh into 1½ to 2-inch chunks.
Add chicken to a medium-to-large bowl and sprinkle flour and salt over the top. Toss until the chicken is well-coated.
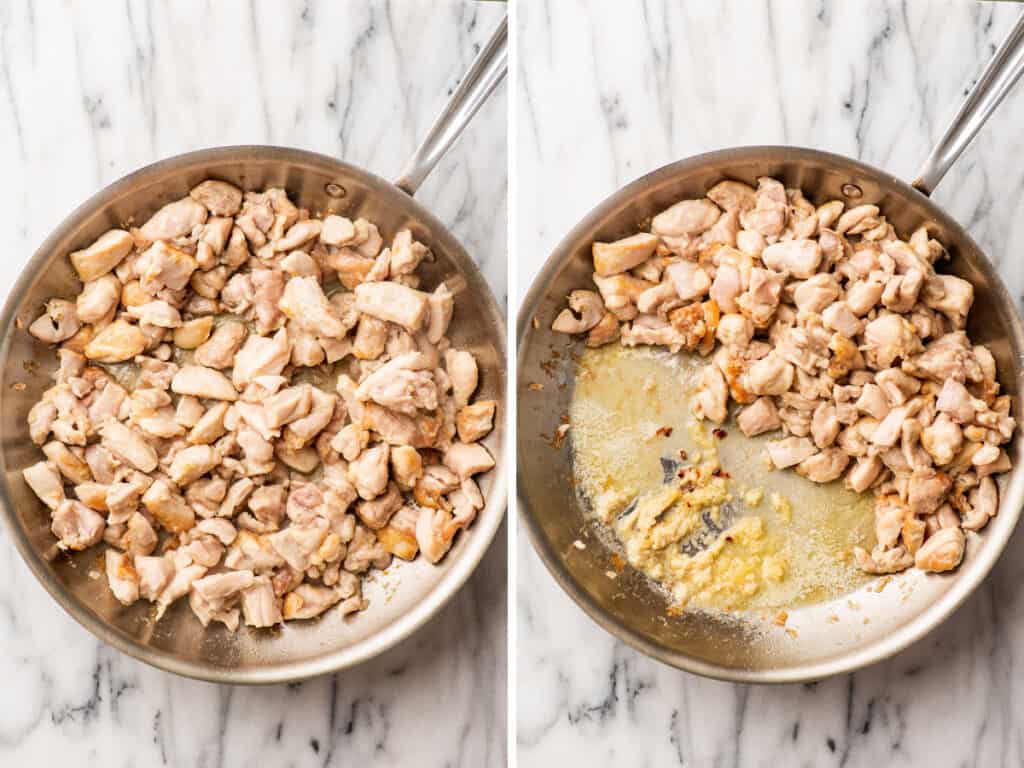

- Brown the chicken: In a large skillet, heat oil over medium-high heat until shimmering. Once hot, add the chicken. Cook the chicken undisturbed for 3 minutes. The pan is going to be too crowded to get a really good sear, but you should get a little extra browning, which is what we’re going for.
Stir the chicken and continue to cook just until the outside of the chicken is no longer pink.
- Add the garlic, ginger, and red pepper flakes: Turn heat down to medium and use a spatula to pull the chicken to one side of the pan. In the empty space, melt butter and add garlic, ginger, and red pepper flakes.
Cook until the garlic is lightly golden and aromatic, about 30 seconds to 1 minute.
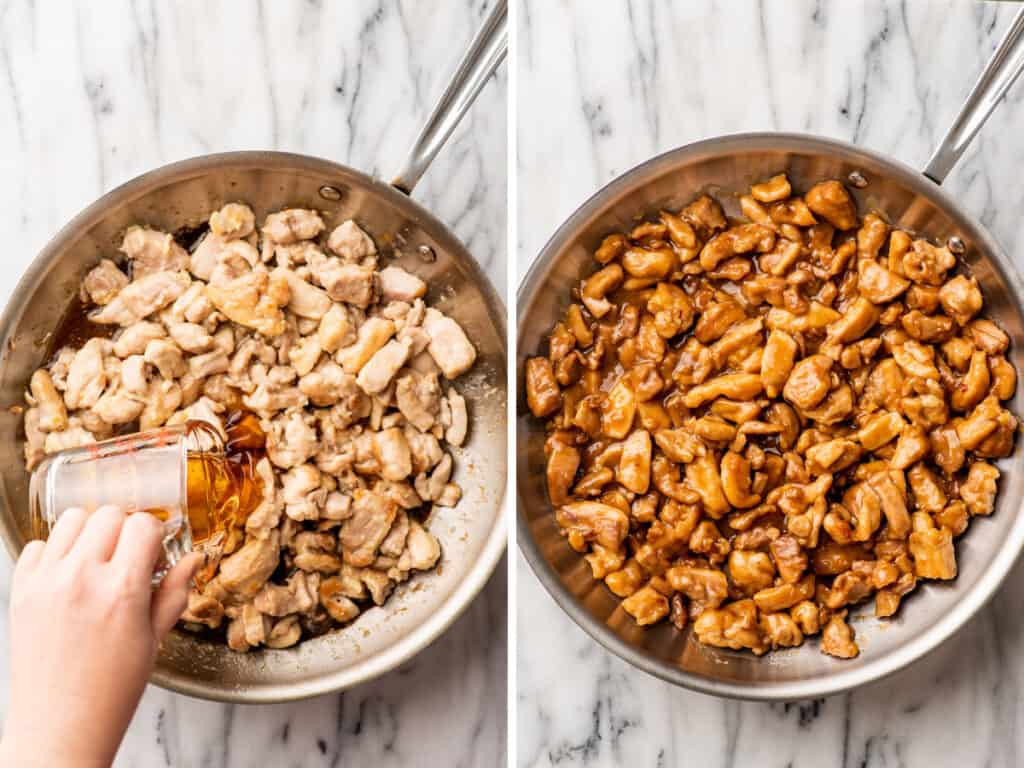

- Add remaining ingredients: Stir the soy sauce mixture in its bowl once or twice to re-mix any cornstarch that has settled at the bottom of the bowl. Add the mixture to the skillet along with the honey and vinegar.
Stir everything together and bring to a simmer. Simmer until the chicken is cooked through and the sauce thickened (when you run a spatula or wooden spoon down the center of the skillet, the sauce should take at least 5 seconds to fill back in), about 5 to 8 minutes.
- Serve: Serve over rice, garnish with scallions if desired, and enjoy!


Can I make this in advance?
Yes. You can make this dish up to 48 hours in advance. Store tightly covered in the refrigerator and reheat in the microwave.
What to serve with honey ginger chicken?
Serve your chicken over white rice (I like Calrose rice for this sort of dish) with a steamed vegetable like broccoli or green beans .

More Easy Dinners Recipes
- Honey Garlic Chicken
- Balsamic Chicken
- BBQ Shredded Chicken
- Teriyaki Beef
- Broccoli Potato Soup

Equipment
- 12-inch skillet
Ingredients
- ▢ 1 teaspoon cornstarch
- ▢ 3 tablespoons soy sauce divided
- ▢ 2 pounds boneless, skinless chicken thighs cut into 2-inch pieces
- ▢ ⅓ cup ( 43g ) all-purpose flour *
- ▢ ¼ teaspoon salt
- ▢ 1 tablespoon extra virgin olive oil
- ▢ 1 tablespoon ( 14g ) butter
- ▢ 3 cloves garlic crushed or minced
- ▢ 2 teaspoons grated fresh ginger
- ▢ Pinch of red pepper flakes optional
- ▢ ⅓ cup honey
- ▢ 2 tablespoons white vinegar
Instructions
- Prep and assemble your ingredients so they’re ready to go.
- In a small bowl, stir together the cornstarch with 1 tablespoon of the soy sauce. Stir until the cornstarch is completely dissolved and then add the remaining 2 tablespoons of soy sauce. Set aside.
- Add chicken to a medium-to-large bowl and sprinkle flour and salt over the top. Toss until the chicken is well-coated.
- In a large skillet, heat oil over medium high heat until shimmering. Once hot, add the chicken. Spread the chicken out in a single layer and cook undisturbed for 3 minutes.
- Stir the chicken and continue to cook just until the outside of the chicken is no longer pink.
- Turn heat down to medium and use a spatula to pull the chicken to one side of the pan. In the empty space, melt butter and add garlic, ginger, and red pepper flakes.
- Cook until the garlic is lightly golden and aromatic, about 30 seconds to 1 minute.
- Stir the soy sauce mixture in its bowl once or twice to re-mix any cornstarch that has settled at the bottom of the bowl. Add the mixture to the skillet along with the honey and vinegar.
- Stir everything together and bring to a simmer. Simmer until the chicken is cooked through and the sauce thickened (when you run a spatula or wooden spoon down the center of the skillet, the sauce should take at least 5 seconds to fill back in), about 6 to 8 minutes.
- Taste and add salt if needed. Serve over white rice and enjoy!
Notes
- *Flour: The flour in this recipe is optional. It helps the sauce cling to the chicken and assists with browning and thickening the sauce, but if you’re out of flour or don’t want the extra step, you can skip the dredging.
- Storage: You can make this dish up to 48 hours in advance. Store tightly covered in the refrigerator and reheat in the microwave.
- Freezing: This dish freezes well. Store in a freezer bag in your freezer for up to 2 months. Defrost overnight in the fridge before reheating.
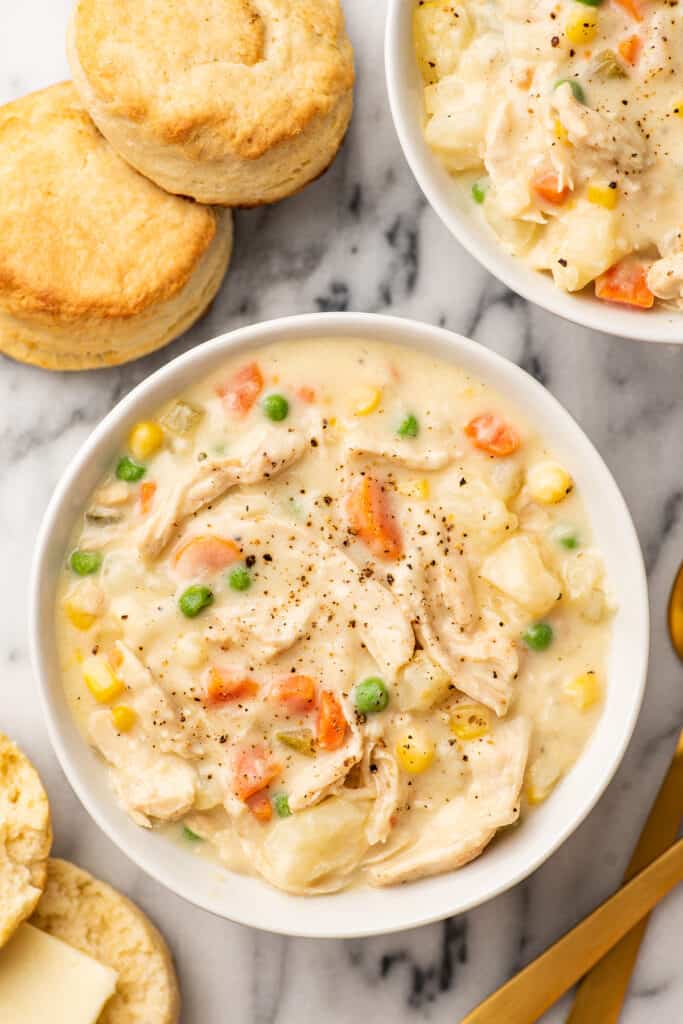
Super thick and creamy chicken pot pie soup has all the delicious flavor of chicken pot pie without the long cooking time.
Short on time tonight, but craving a warm and comforting slice of chicken pot pie? You should make pot pie soup instead!
What is Chicken Pot Pie Soup?
Pot pie soup is basically chicken pot pie filling with a little extra milk and broth that turns it into a super creamy and rich soup.
And where a whole pot pie is going to set you back a couple hours between making the dough, chilling it, and baking the pie, this soup can be on your table in less than half that time.

Things You Should Know About This Soup
- The chicken is seared in the hot pan and then cooked in the soup before being shredded or chopped, so no need to have pre-cooked chicken on hand.
- This is a real stick-to-your bones sort of soup packed with veggies, chicken, heavy cream and a splash of white wine, so it’s rich, creamy, and full of flavor.
- The vegetables are added in 3 stages so everything gets a chance to be cooked to the perfect level of doneness.
Ingredient Notes
- Boneless skinless chicken breasts: As mentioned above, the chicken in this recipe is cooked in the soup, but if you have a rotisserie chicken or cooked shredded chicken on hand, feel free to use 2 to 3 cups of cooked chicken instead. Simply stir it in at the end along with the corn and peas. You can also substitute cooked turkey for the chicken. This is a great soup to make with Thanksgiving leftovers!
- Dry white wine: Sauvignon Blanc and Pinot Grigio are both good options. I love the subtle boost in flavor the wine gives this dish, but you can omit it if needed. Simply use a splash of the chicken broth to deglaze the pot instead.
- Heavy cream: Heavy cream adds extra richness to the soup, but if you don’t have any, you can replace it with more milk. If you have leftover heavy cream, check out my post What to Do With Leftover Whipping Cream for storage tips and recipe ideas to use up the leftovers.
How to Make Chicken Pot Pie Soup
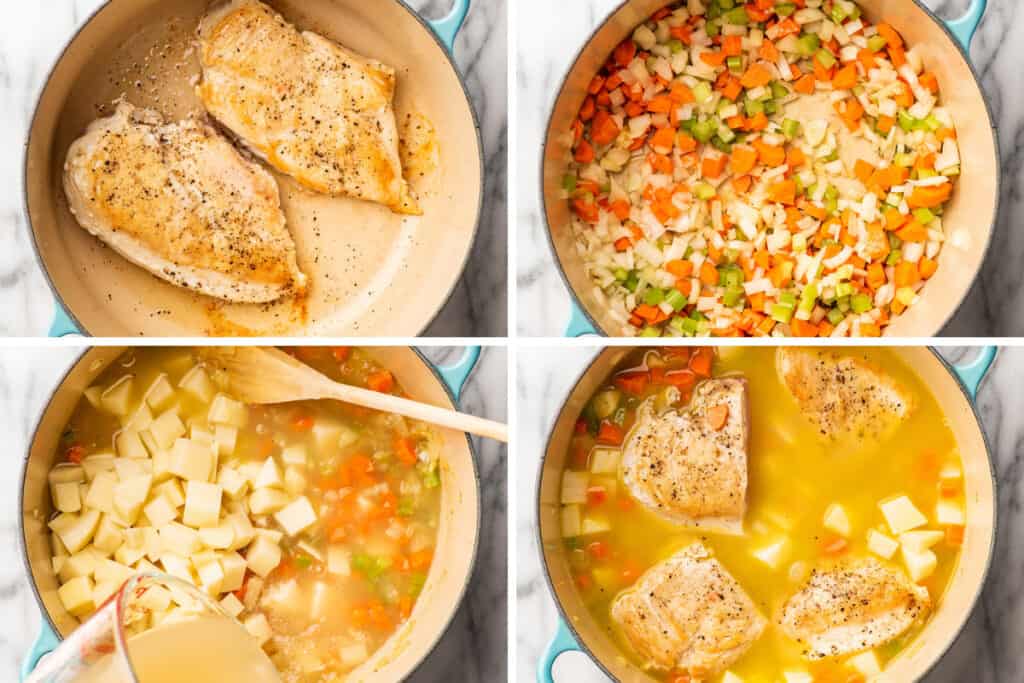

Sear chicken: Pat the chicken dry and generously salt and pepper both sides. Cook the chicken until well-browned, 3 to 4 minutes, flip and repeat. Transfer chicken to a plate and set aside.
Start your veggies: To the same pot, add garlic, onion, celery, and carrots, and cook, stirring occasionally, until the vegetables begin to soften. Stir in the white wine, using a wooden spoon to scrape any cooked-on bits from the bottom of the pot.
Simmer: Add potatoes and chicken broth and bring to a simmer. Cut chicken breasts in half (so they cook faster) and return the chicken pieces to the pot and simmer until the chicken is cooked through and potatoes are fork tender, 15 to 20 minutes. Remove the chicken from the pot and set on a clean plate or cutting board to cool slightly.


Make the roux: While your chicken cools, in a medium pot, melt butter over medium heat. Add flour and cook, whisking continuously, until the flour is lightly golden and forms a sticky paste with the butter.
Add milk: Slowly drizzle in the milk followed by the cream, whisking out any lumps as they form. Cook, whisking continuously, until mixture is thickened (it should be the consistency of thick gravy) and bubbly around the edges, about 5 minutes.
Add to soup: Stir the milk mixture into the soup. Shred or chop the cooked chicken and add it to the soup.
Add remaining ingredients: Stir in corn and peas and heat over medium heat until vegetables are heated through, 2 to 3 minutes. If soup is too thick, add up to 1 cup more broth until it reaches your desired consistency.
Serve: Adjust salt to taste. Serve, and enjoy!


Can I make this in advance?
Yes. You can make this soup up to 48 hours in advance. When you’re ready to eat it, reheat gently on the stove over medium heat, stirring occasionally, until heated through.
Can you make chicken pot pie soup in a crockpot?
Yes, but you’ll still have to make the roux on your stovetop. To your slow cooker, add all the ingredients except the butter, flour, milk, and cream. Cook on high for 3 to 4 hours, low for 6 to 7 hours, until chicken can be easily shredded and potatoes are tender.
Remove chicken, shred it, and return it to the pot. Follow the recipe instructions for making the roux and adding the milk and cream, and then stir the sauce into the soup. Add salt and pepper to taste.
What to serve with chicken pot pie soup?
I love to serve chicken pot pie with a side of cream biscuits or cheese scones and a simple veggie side like roasted broccoli or green beans .

More Easy Soup Recipes
- Ham and Potato Soup
- Creamy Tortellini Soup
- Tomato Soup
- Broccoli and Potato Soup

Ingredients
- ▢ 1½ pounds (about 2 medium) boneless skinless chicken breasts *
- ▢ 2 tablespoons olive oil divided
- ▢ 3 garlic cloves minced or pressed
- ▢ ½ medium onion diced
- ▢ 2 celery ribs diced ¼-inch
- ▢ 2 medium carrots peeled and diced ¼-inch
- ▢ ¼ cup dry white wine
- ▢ 1 large russet potato peeled and diced ½-inch
- ▢ 3 to 4 cups chicken broth divided
- ▢ 5 tablespoons ( 71g ) butter salted or unsalted is fine
- ▢ ¼ cup and 1 tablespoon (44g) all-purpose flour
- ▢ 1½ cups milk any percentage
- ▢ ½ cup heavy cream *
- ▢ ⅔ cup frozen or canned corn optional
- ▢ ⅔ cup frozen or canned peas optional
- ▢ ¼ teaspoon black pepper
- ▢ Salt
Instructions
- Pat chicken dry and generously salt and pepper both sides.
- In a large pot, heat 1 tablespoon of the oil over medium-high heat. Cook the chicken until well-browned, 3 to 4 minutes, flip and repeat. Transfer chicken to a plate and set aside.
- Turn heat down to medium and to the same pot, add remaining 1 tablespoon of the olive oil. Add garlic, onion, celery, and carrots, and cook, stirring occasionally, until the vegetables begin to soften, 5 to 8 minutes.
- Stir in the white wine, using a wooden spoon to scrape any cooked-on bits from the bottom of the pot.
- Add potatoes and 3 cups of the chicken broth and bring to a simmer. Cut the chicken breasts in half*, return them to the pot and simmer until the chicken is cooked through and potatoes are fork tender, 15 to 20 minutes. Remove pot from heat and use tongs to transfer the chicken pieces from the liquid to a clean plate or cutting board to cool slightly.
- While your chicken cools, in a medium pot, melt butter over medium heat. Add flour and cook, whisking continuously, until the flour is lightly golden and forms a sticky paste with the butter.
- Slowly drizzle in the milk followed by the cream, whisking out any lumps as they form. Cook, whisking continuously, until mixture is thickened (it should be the consistency of thick gravy) and bubbly around the edges, about 5 minutes.
- Stir the milk mixture into the soup. Shred or chop the cooked chicken and add it to the soup.
- Stir in corn and peas and heat over medium heat until vegetables are heated through, 2 to 3 minutes.
- If soup is too thick, add up to 1 cup more broth until it reaches your desired consistency.
- Add pepper and salt to taste. Serve, and enjoy!
Notes

Cream Cheese Whipped Cream
Ingredients
Full Batch
- 1 cup heavy whipping cream
- 4 ounces cream cheese softened
- ½ cup ( 60g ) powdered sugar sifted*
- 1 teaspoon lemon juice or vanilla extract
Single Serving
- 2 tablespoons heavy whipping cream
- ½ ounce cream cheese softened
- 1 tablespoon ( 8g ) powdered sugar sifted
- ⅛ teaspoon lemon juice or vanilla extract
Instructions
- To a large bowl* or the bowl of your stand mixer, add heavy cream, and beat until stiff peaks form. If using a stand mixer, transfer the whipped cream to another bowl and set aside.
- In a second large bowl or the bowl of your stand mixer, combine softened cream cheese, sifted powdered sugar, and lemon juice or vanilla extract. Beat until well-mixed and smooth, scraping the sides of the bowl with a silicone spatula as needed.
- Use a spatula to fold whipped cream into the cream cheese mixture, being careful not to deflate the whipped cream.
- Serve and enjoy!
