Coffee whipped cream is a sweet and sophisticated alternative to traditional whipped cream. It’s rich, full of coffee flavor, and irresistible spooned over chocolate desserts.
Alright, coffee lovers, I have a little treat for you today.
We all know regular whipped cream is great. A spoonful of chocolate whipped cream is positively sinful, and cream cheese whipped cream should be eaten by the spoonful. But you know what all those recipes are missing?
Caffeine. And that’s clearly a missed opportunity.
That’s right, friends, today let’s caffeinate our whipped topping and make some coffee whipped cream.

Admittedly, the amount of actual caffeine in a serving of coffee whipped cream is probably not going to have a huge effect on your day, but a spoonful of this over a cup of hot chocolate or a slice of chocolate cheesecake is so good, it might just perk you up anyway.
The deep, slightly bitter coffee flavor makes the rich and sweet whipped cream feel positively luxurious. As I was testing this recipe, I was dreaming of all the things that I could top with it.
And then instead, I just stood there at the counter eating it with a spoon, because that’s a real good time too.
Ingredient Notes


- Instant espresso powder: If you don’t keep espresso powder on hand, you can buy it online or find it in the coffee aisle at your grocery store. It’s a handy ingredient to keep around, especially if you bake a lot of chocolate desserts.
- Heavy cream: Have leftover heavy cream after making this recipe? See What to Do With Leftover Whipping Cream for storage tips and recipe ideas for using it up.
- Powdered sugar: You can substitute granulated sugar if you don’t have powdered sugar. Just be sure to read the substitution notes in the recipe card because you’ll need less of it to get the same level of sweetness.
How to Make Coffee Whipped Cream
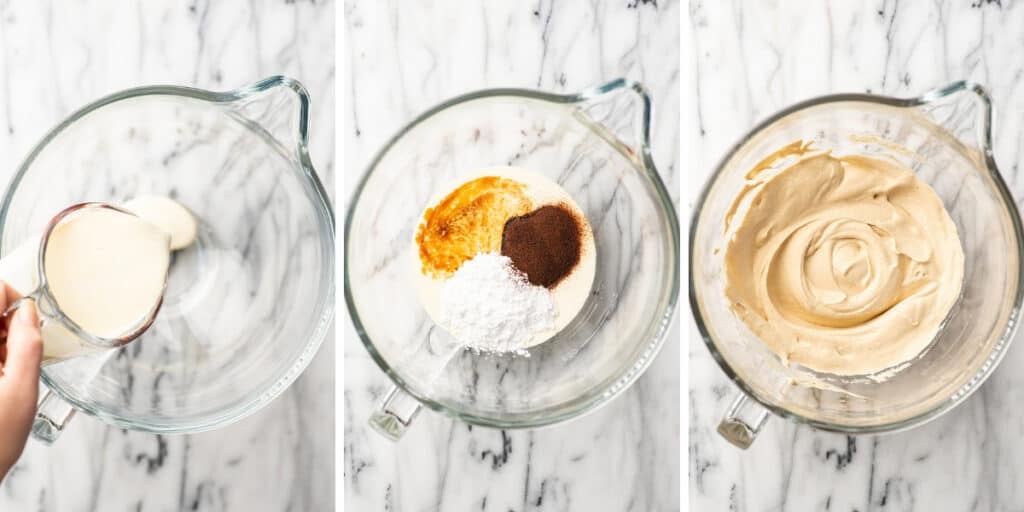

Combine all ingredients. In a bowl or the bowl of your stand mixer, add heavy cream, vanilla extract, sugar, and espresso powder.
Whisk, whisk, whisk. You can use a whisk, a handheld electric mixer, or the whisk attachment of your stand mixer to whip the cream into billowy peaks.
Stop every once in a while to scrape down the edges of the bowl with a rubber spatula to make sure no espresso powder or lumps of sugar are being left around the edges. Continue to beat the whipped cream until it reaches your desired consistency.
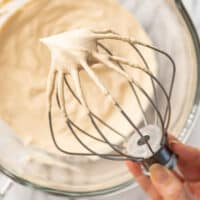
Soft peaks are perfect for spooning over hot chocolate. Stiff peaks are best for piping onto desserts.
- Serve and enjoy!
Variations
- Mocha whipped cream (chocolate coffee whipped cream): This is SO good. Add 3 tablespoons of cocoa powder along with the other ingredients.
Where to Use Coffee Whipped Cream
- On Hot Chocolate (it would be extra amazing on my Rich and Thick Hot Chocolate )
- Over a slice of banana bread
- On chocolate chip waffles
- Over chocolate pudding


Can I use coffee grounds / instant coffee / coffee to make whipped cream?
- Coffee grounds: No. Coffee grounds will not dissolve into the cream.
- Instant coffee: Yes this will work just fine.
- Coffee: Not really. While you can add a little (chilled) coffee to your whipped cream, it’s not going to do much. The amount needed to actually add a detectable coffee flavor would dilute the cream to the point that it would not whip up.
Can I pipe coffee whipped cream/frost a cake with it?
Yes. This whipped cream is stiff enough for piping.
You can frost a cake with with this whipped cream, but like all whipped creams, it’s not going to be nearly as stable or easy to work with as an American buttercream or most other frostings.
More Coffee Favorites
- Homemade Mocha
- Iced White Chocolate Mocha
- Caramel Latte
- Iced Mocha


Recipe Notes
- Storage: Store tightly covered in the refrigerator for up to 48 hours. The cream will begin to deflate and may weep the longer it sits.
- Freezing: To freeze whipped cream , freeze spoonfuls of whipped cream on a parchment-paper-lined baking sheet. Once frozen solid, cut the parchment paper into squares and transfer the whipped cream (still on the squares) to a freezer bag and store for up to 1 month. The cream may separate a bit after freezing and defrosting, but it still works great for drinks and over a quick dessert.
Ingredients
Full batch
- ▢ 1 cup heavy cream
- ▢ ½ teaspoon vanilla extract optional
- ▢ 2 tablespoons to ¼ cup (15-30g) powdered sugar*
- ▢ 2 teaspoons instant espresso powder*
Single serving
- ▢ 2 tablespoons heavy cream
- ▢ A couple drops vanilla extract optional
- ▢ 1 to 2 teaspoons ( 3-5g ) powdered sugar*
- ▢ ¼ teaspoon instant espresso powder
Instructions
- To a large bowl* or the bowl of your stand mixer, add heavy cream, vanilla extract, sugar, and espresso powder.
- Use a whisk, handheld electric mixer, or the whisk attachment of your stand mixer to whisk the cream, stopping to scrape down the sides of the bowl as needed. Whisk until the cream reaches your desired consistency (soft peaks for spooning over drinks and stiff peaks for piping).
- Serve and enjoy!
Notes
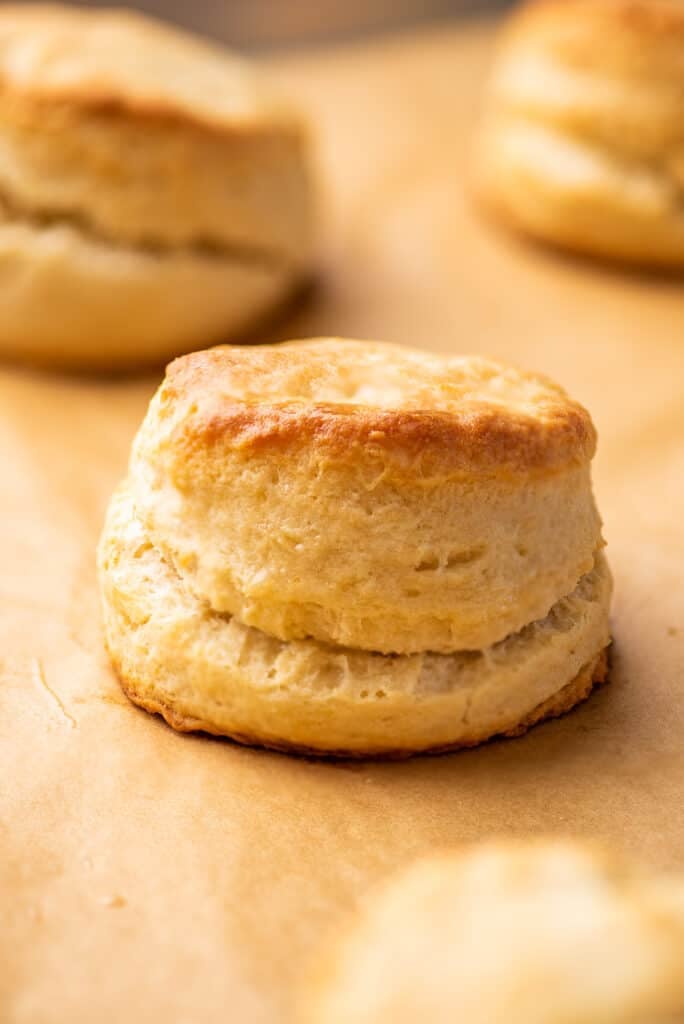
These cream biscuits can be on your table in about 20 minutes. With buttery, lightly crispy outsides and soft, fluffy interiors, they’re a quick and crowd-pleasing side dish.
Everyone should have a good biscuit recipe up their sleeve.
And for nights when you have a pot of soup simmering on the stove and need a quick and easy side dish to serve alongside, you couldn’t ask for a better biscuit recipe than this one.


Quick and Easy Biscuits
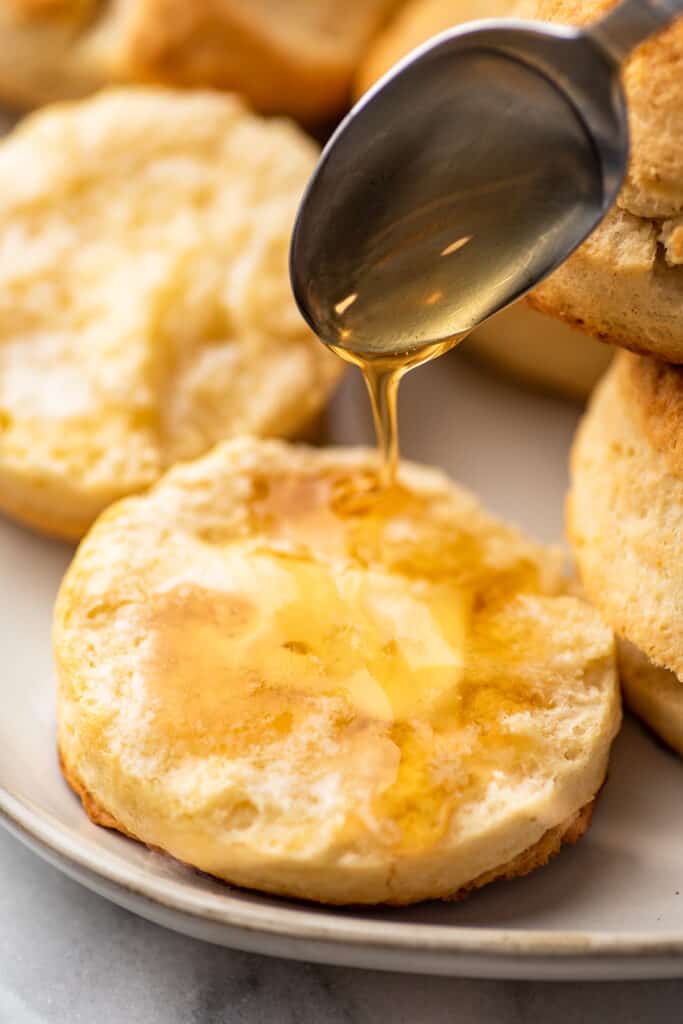
These biscuits can be mixed, baked, and on your table slathered in butter and honey in about 20 minutes.
Unlike traditional buttermilk biscuits which require you to rub chilled butter into flour, cream biscuits are made with heavy cream, so all you have to do is whisk together 4 ingredients and then stir in cream.
Once the dough is cut out, the biscuits are brushed with melted butter, so they bake up perfectly soft and fluffy with buttery, slightly crispy exteriors and are completely irresistible.
Ingredient Notes

- All-purpose flour: Proper flour measurement is fairly important in this recipe (too much flour and your dough isn’t going to come together), so be sure to follow the measuring instructions in the recipe.
- Heavy cream: This recipe won’t use up an entire carton of heavy cream. Check out my post What to Do With Leftover Heavy Cream for storage tips and recipe ideas for the leftovers.
- Melted butter: The biscuits are brushed lightly with melted butter before baking to help a bit with browning and then again after they come out of the oven so you get plenty of buttery flavor. Salted or unsalted butter will work fine here.
How to Make Cream Biscuits
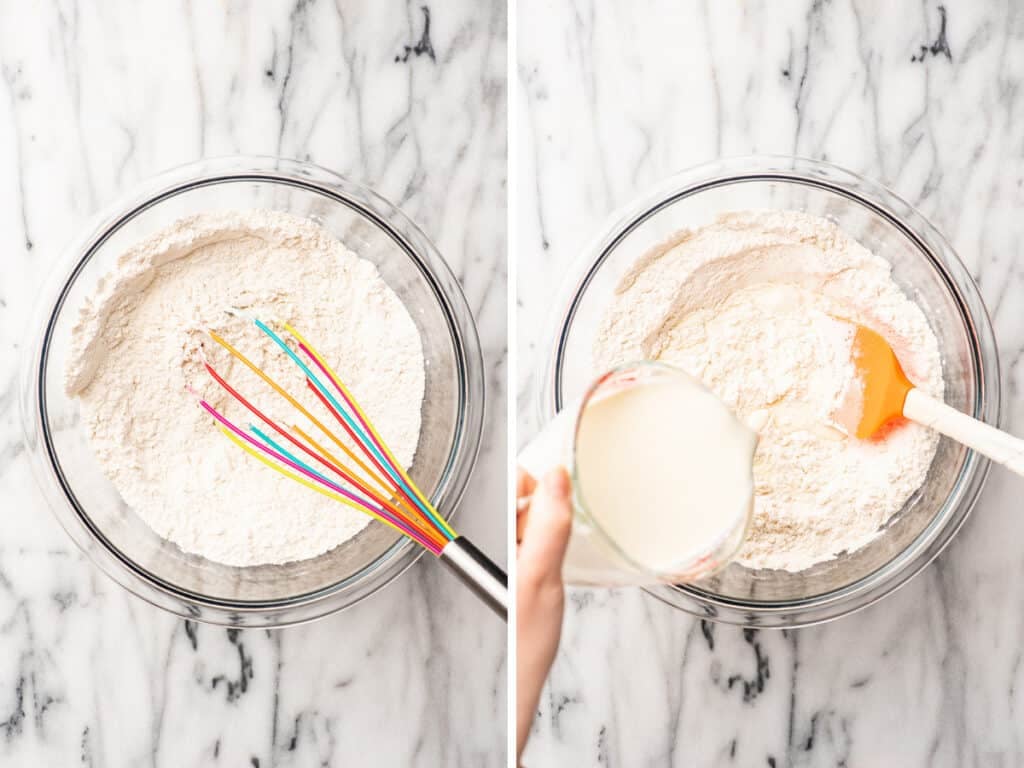

Mix the dry ingredients: In a large bowl, combine flour, baking powder, and salt. Whisk together until well combined.
Stir in the cream: Switch to a wooden spoon or silicone spatula and stir in the cream until a shaggy dough forms. Try not to over-mix, you just want to get to the point where no dry flour remains at the bottom of the bowl.
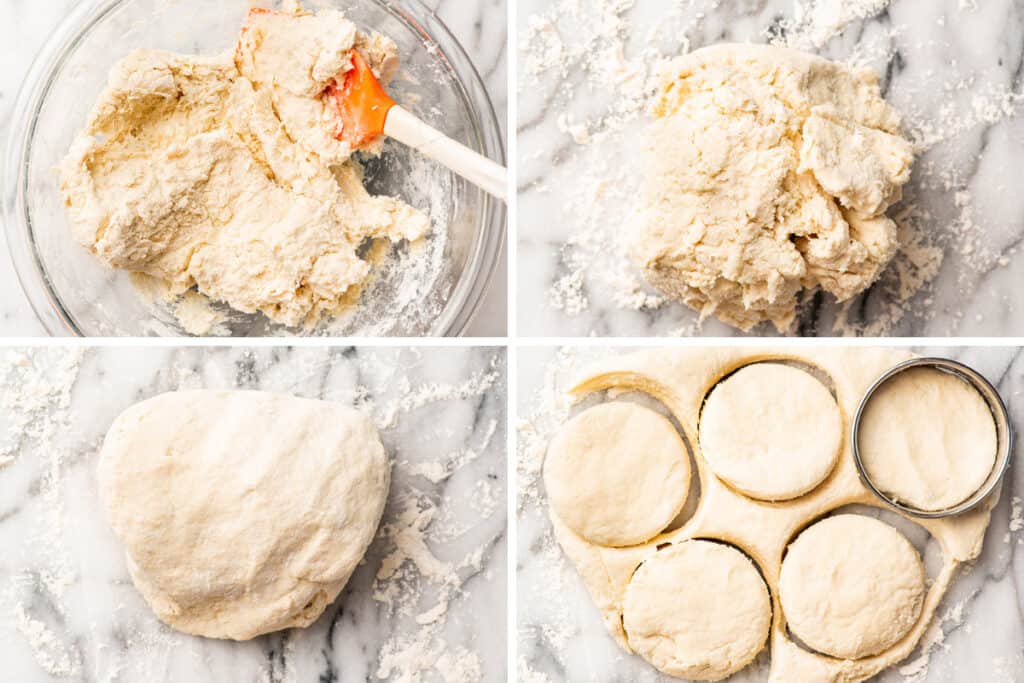

- Cut out the biscuits: Pat the dough out to about 3/4-inch thick. Use a 2-to-3-inch biscuit cutter to cut the dough into rounds. Do not twist the biscuit cutter as this can seal the edges of the biscuits causing them not to rise to their full height.
After the first cutting, gather the scraps repeat to get 1 or 2 more biscuits out of the dough.
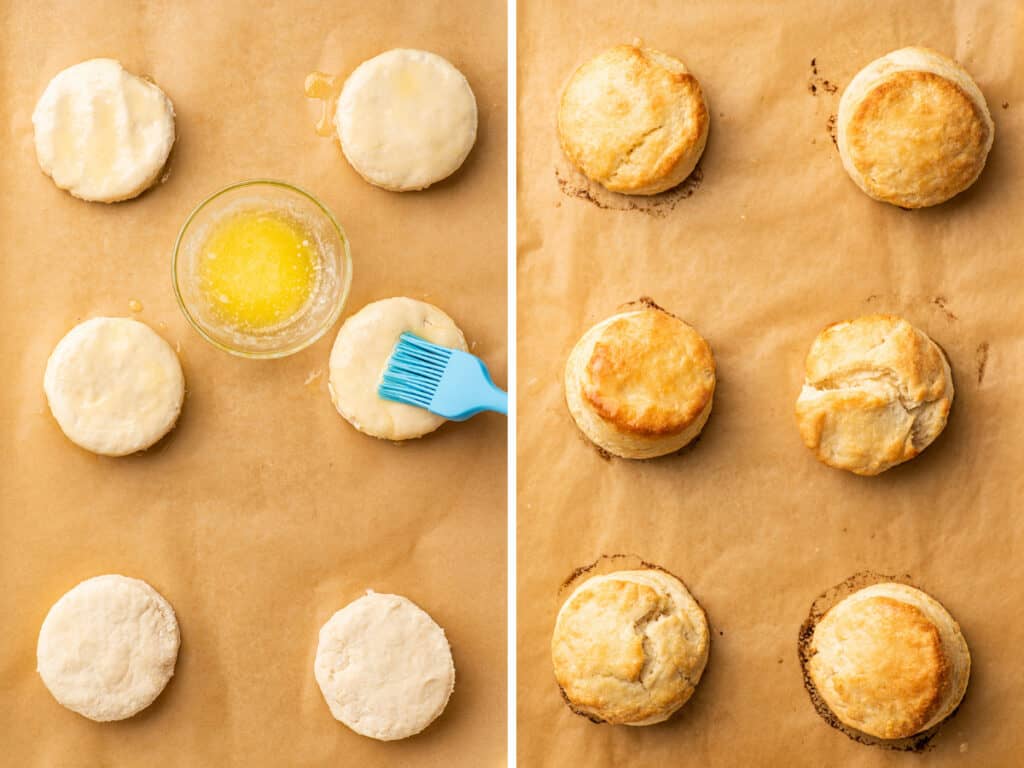

5: Brush with butter: Transfer the biscuits to your prepared baking sheet and brush the tops lightly with melted butter (reserve remaining melted butter).
Don’t go too heavy with the butter. You don’t want it to pool at the bottom edges of the biscuit because the milk solids in the butter can burn (you can actually see where I got a little too enthusiastic about the butter in the photo above). Stick to a thin layer on the top to help with browning.
- Bake: Bake on the center rack of your oven for 11 to 14 minutes, until the biscuits are golden brown.
Transfer the biscuits to a cooling rack and brush them with the remaining butter. Serve and enjoy!

Can I make a small batch of cream biscuits?
Yes! A half-batch of these biscuits is my very favorite way to make small-batch biscuits. Just cut the recipe in half (to change the recipe yield, hover over the serving size in the recipe card below or click if you’re on mobile, and slide the slider) and it will make 4 perfect biscuits.
To make things even quicker, instead of using a biscuit cutter, shape the dough into a square that is 3/4-inch thick, and then use a sharp knife to cut the dough into 4 even pieces. Transfer the biscuits to your baking sheet and they’re ready to go!
I don’t have a biscuit cutter. What can I use instead?
If you’re really attached to the idea of having round biscuits, you can use a 2 to 3-inch cup to punch out your rounds, but since cups don’t have a sharp edge, they can actually seal the edges of your biscuit so they don’t rise as high as they should.
What I recommend instead is using the method I described above for small batches, and just shaping your dough into a rectangle and using a sharp knife to cut your biscuits into squares. This way there’s no wasted dough and you get tall and fluffy biscuits.
What to serve with cream biscuits?
Cream biscuits pair perfectly with soup. Some of my favorites are:
- Chicken Pot Pie Soup
- Creamy Chicken Noodle Soup
- Sausage Potato Soup
- Broccoli Potato Soup

Can these be made ahead of time?
Cream biscuits are best hot out of the oven, but can be reheated gently in the microwave or oven.
You can also make the dough up to 24 hours in advance. Store the cut-out biscuits tightly wrapped in the refrigerator. When you’re ready to bake them, the biscuits can go straight from the fridge to the oven.
Recipe Notes
- Yield: This will make approximately 10 2-inch biscuits or 6 to 7 3-inch biscuits.
- Parchment paper: Most parchment paper is only recommended for use up to 425°F. This is because above that, parchment paper can become brittle. That’s not really an issue with this recipe since it’s not cooking long enough for that to happen, but if you don’t feel comfortable using parchment paper at this temperature, you can also lightly grease your baking sheet with cooking spray instead. Biscuit cutters: Use 2 to 3-inch biscuit cutters for this recipe. I used a 3-inch cutter for the biscuits in the photos.

Equipment
- 2-to-3-inch biscuit cutter
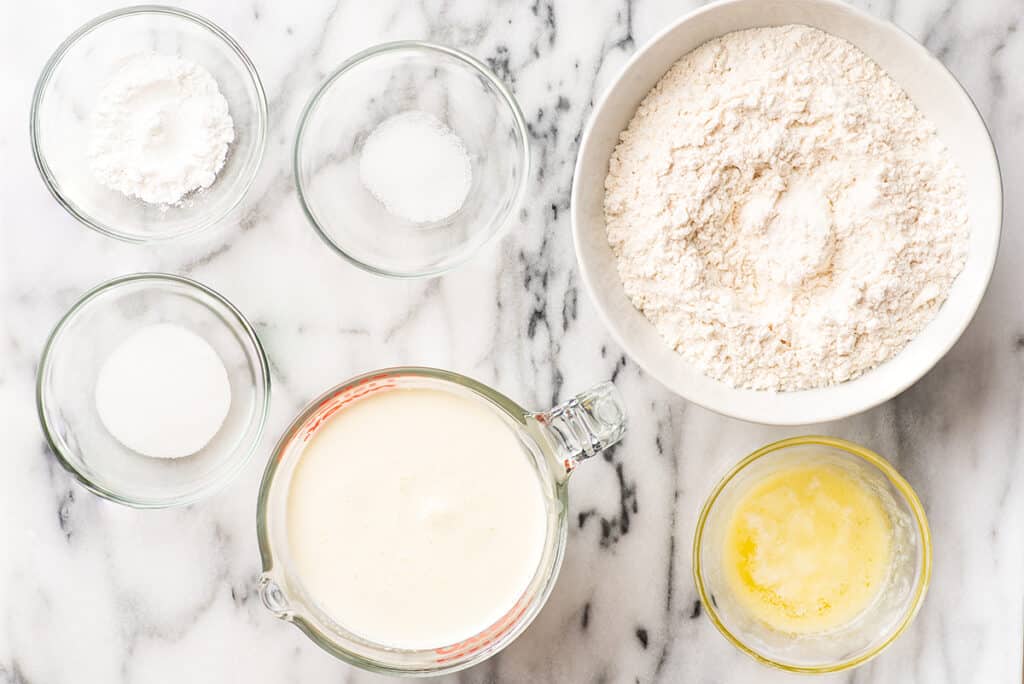
Ingredients
- ▢ 2 cups ( 260g ) all-purpose flour plus more for dusting, measured by weight or using the spoon and sweep method*
- ▢ 2½ teaspoons baking powder
- ▢ 1 tablespoon ( 12g ) granulated sugar
- ▢ ¾ teaspoon salt
- ▢ 1½ cups heavy cream
- ▢ 2 tablespoons melted butter optional
Instructions
- Preheat your oven to 475°F and line a baking sheet with parchment paper.
- In a large bowl, combine flour, baking powder, sugar, and salt. Whisk together until well combined.
- Switch to a wooden spoon or silicone spatula and stir in the cream until a shaggy dough forms and no dry flour remains at the bottom of the bowl.
- Turn the dough out on a lightly floured surface and knead the dough, folding it over on itself 5 or 6 times until the dough comes together, adding more flour if needed.
- Pat the dough out to about ¾-inch thick. Use a 2-to-3 inch biscuit cutter to cut the dough into rounds. After the first cutting, gather the scraps and repeat to get 1 or 2 more biscuits out of the dough.
- Transfer the biscuits to your prepared baking sheet and brush the tops lightly with melted butter (reserve remaining melted butter).
- Bake on the center rack of your oven for 11 to 14 minutes, until the tops of the biscuits are golden brown.
- Transfer the biscuits to a cooling rack and brush them with the remaining butter. Serve and enjoy!
Notes
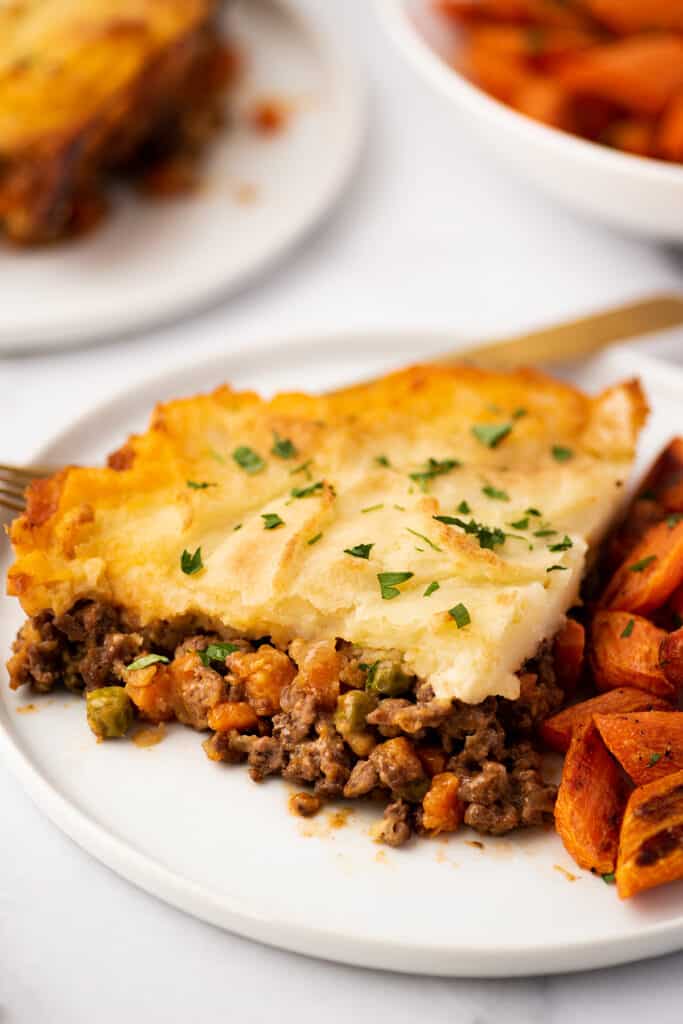
Cottage pie is the ultimate cozy comfort food. Ground beef, onions, carrots, and peas in a thick and luscious gravy with a golden brown mashed potato topping.
So today I present to you, a full-size COTTAGE pie, because I love you guys and I want you to be happy. <3

What is cottage pie?
Cottage pie is basically shepherd’s pie made with ground beef. The beef filling includes garlic, onions, carrots, and peas, which all cook in a thick and luscious gravy. And then the filling is covered with mashed potatoes, which turn golden brown and beautiful when baked.
It’s an extremely cozy dinner that is perfect on a chilly evening after a long day.
What’s the difference between shepherd’s pie and cottage pie?
The only difference between shepherd’s and cottage pie is the meat they use. Historically, cottage pie referred to all meat and potato pies, but these days, we typically call pies made with lamb “shepherd’s pie” and use “cottage pie” for beef pies.
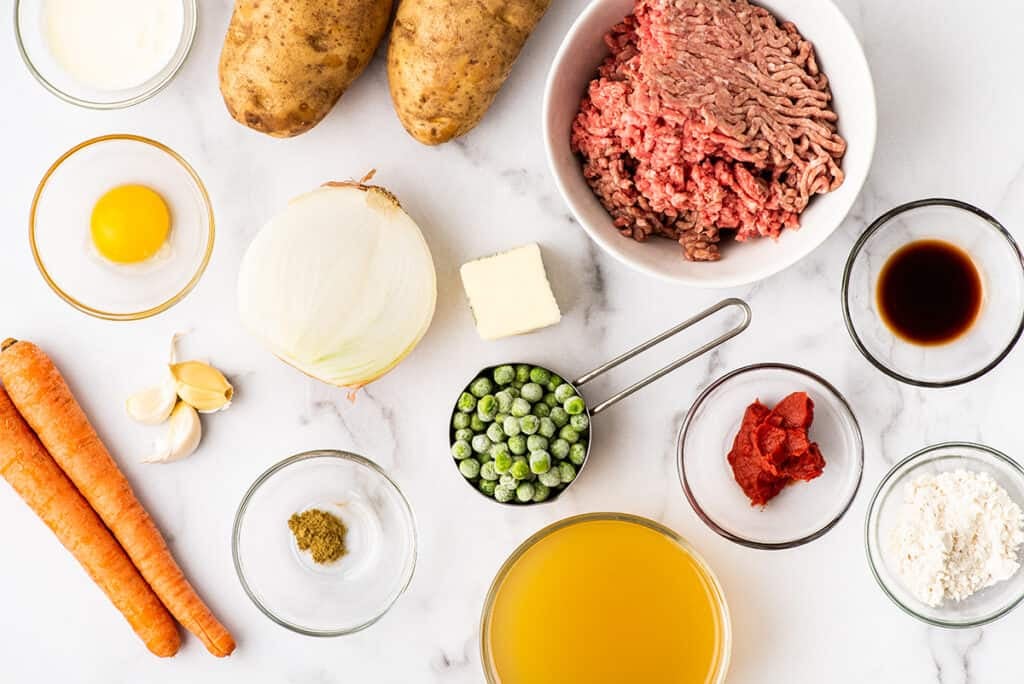

Ingredient and Equipment Notes
- 10-inch oven-safe skillet: This recipe is designed to go from stovetop straight to the oven, but if you don’t have an oven-safe skillet, you can do the stovetop portion in whatever large skillet you own and then transfer the filling to an 8×8 or 9×9-inch baking dish.
- Ground beef: You can use whatever ground beef you have on hand (I used 85% lean) since you’ll be draining off the fat. If you would like to make shepherd’s pie, you can substitute ground lamb here.
- Tomato paste: This recipe uses tomato paste or ketchup to add depth of flavor to the filling. If using tomato paste and you have most of a can leftover, check out my post What to Do With Leftover Tomato Paste for storage tips and recipes to use up the leftovers.
- Peas: Peas are optional and can be replaced with corn if you’re not a fan.
- An egg yolk: An egg yolk is added to the potato topping to help with browning. You can omit it, but you won’t get the same golden color from your potatoes after baking. For ideas on how to use the leftover egg white, check out my What to Do With Leftover Egg Whites post.
How to Make Shepherd’s Pie
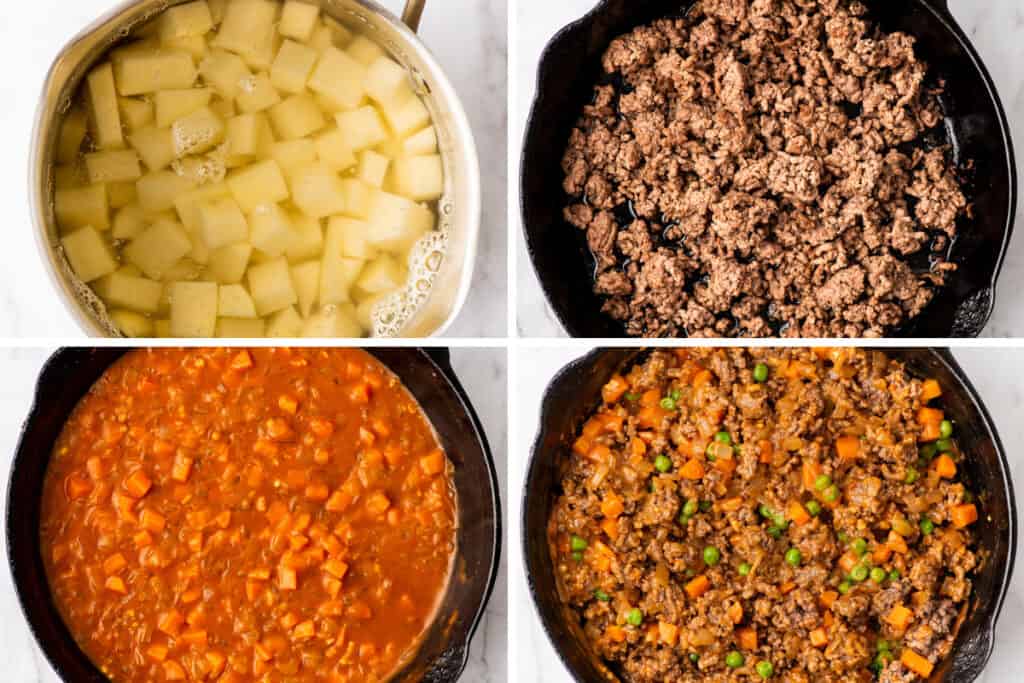

Cover your potatoes with cold water and let them simmer while you make the filling.
Brown the ground beef and use a slotted spoon to transfer it to a bowl. Pour off all but a couple teaspoons of fat left in the pan.
In the same pan, cook onions and carrots until they begin to soften and then add garlic and thyme and cook for 30 seconds. Add flour and tomato paste followed by chicken broth and Worcestershire sauce and simmer until thickened. Salt and pepper to taste.
Stir in ground beef and peas.
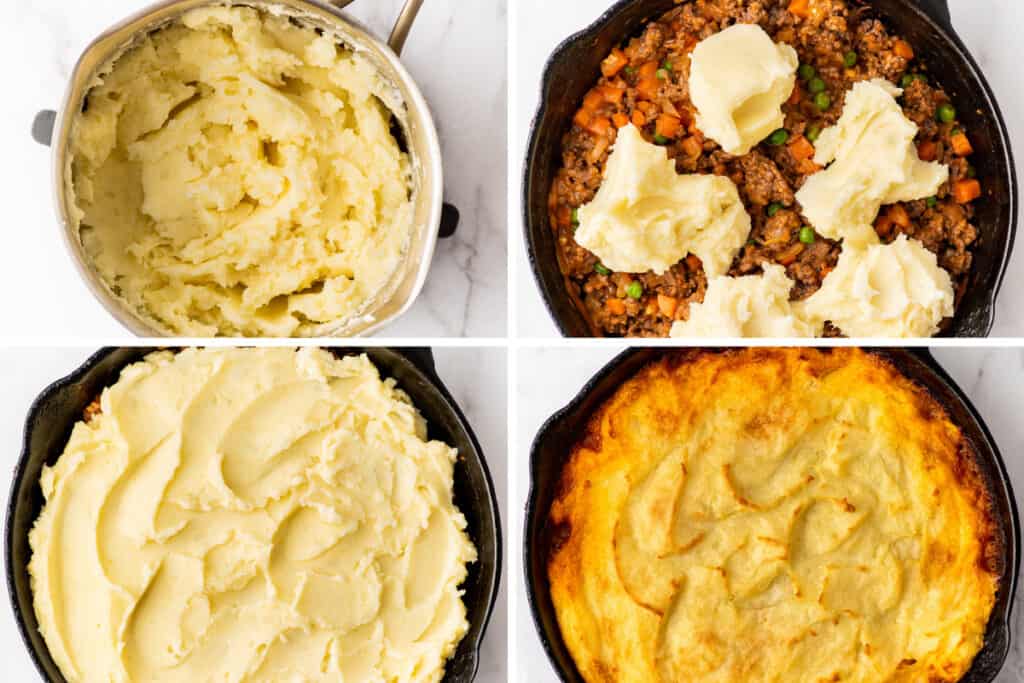

Mash the potatoes and add butter, milk/cream, and egg yolk.
Drop the mashed potatoes over the filling in dollops.
Spread potatoes out over the top, making sure the filling is completely covered.
Bake until the topping is golden brown and beautiful.
Can I use beef broth instead of chicken broth in this recipe?
Absolutely. I call for chicken broth because that’s what people tend to have on hand, but you can use beef broth, diluted chicken stock , or vegetable broth.

Can I make shepherd’s pie ahead of time?
I think the potato topping tastes best straight out of the oven, but if you want to make this in advance and reheat later, you definitely can. Bake the pie, cover tightly, and store it in the refrigerator for up to 48 hours before serving.
More Easy Comfort Food Recipes
- Country-style Pork Ribs
- Easy Carnitas
- Potato Bacon Soup
- American Goulash
Recipe Notes
- Yield: This recipe makes four large servings or five to six smaller ones.

Equipment
- 10-inch oven-safe skillet*
Ingredients
Potato Topping
- ▢ 2 large russet potatoes* peeled and chopped
- ▢ Salt and pepper
- ▢ ¼ cup ( 56g ) butter cut into chunks
- ▢ 2 tablespoons milk or cream
- ▢ 1 large egg yolk
Filling
- ▢ 1 tablespoon olive oil
- ▢ 1 pound ground beef
- ▢ 1 medium onion diced
- ▢ 2 medium carrot diced
- ▢ 2 garlic clove pressed or minced
- ▢ ⅛ teaspoon ground thyme
- ▢ 2 tablespoons ( 16g ) all-purpose flour
- ▢ 1 tablespoon ketchup or tomato paste
- ▢ 1½ cups chicken broth
- ▢ 1 teaspoon Worcestershire sauce
- ▢ ½ cup frozen peas
Instructions
Start the Potatoes
- Preheat your oven to 400°F.
- Add potatoes to a medium pot and cover with cold water. Add ½ teaspoon of salt, and bring to a simmer. Cook until potatoes are fork-tender, about 10 to 15 minutes. Drain and set aside.
Make the Filling
- While the potatoes cook, heat olive oil in a 10-inch oven-safe skillet over medium-high heat. Add beef and ¼ teaspoon of salt. Cook, breaking up the meat into crumbles as you go until it is well-browned. Use a slotted spoon to transfer the beef to a bowl and set aside.
- Spoon off and discard all but a couple teaspoons of fat from the pan. Heat the pan over medium heat and add the onions and carrots. Cook until the onions begin to soften, about 5 minutes.
- Add garlic and ground thyme, and cook for 30 seconds.
- Stir in the flour and ketchup/tomato paste and cook for 1 minute. Stir in the chicken broth and Worcestershire sauce. Bring everything to a simmer and cook, stirring occasionally, for 3 to 6 minutes, until the mixture has thickened.
- Remove from heat and add salt and pepper to taste. Stir in the hamburger and the frozen peas.
Finish the Potatoes and Assemble
- Add cubed butter to the potatoes and use a potato masher to mash them until smooth. Stir in the milk/cream. Add salt and pepper to taste before stirring in the egg yolk until well combined.
- Spoon the potatoes over your meat mixture in the skillet and spread them out evenly over the top.
- Bake for 35 to 45 minutes, until the potatoes are lightly golden. Cool for 10 to 15 minutes before serving, and enjoy!
Notes
Recipe Adapted From The Best One-Dish Suppers

Coffee Whipped Cream
Ingredients
Full batch
- 1 cup heavy cream
- ½ teaspoon vanilla extract optional
- 2 tablespoons to ¼ cup (15-30g) powdered sugar*
- 2 teaspoons instant espresso powder*
Single serving
- 2 tablespoons heavy cream
- A couple drops vanilla extract optional
- 1 to 2 teaspoons ( 3-5g ) powdered sugar*
- ¼ teaspoon instant espresso powder
Instructions
- To a large bowl* or the bowl of your stand mixer, add heavy cream, vanilla extract, sugar, and espresso powder.
- Use a whisk, handheld electric mixer, or the whisk attachment of your stand mixer to whisk the cream, stopping to scrape down the sides of the bowl as needed. Whisk until the cream reaches your desired consistency (soft peaks for spooning over drinks and stiff peaks for piping).
- Serve and enjoy!
