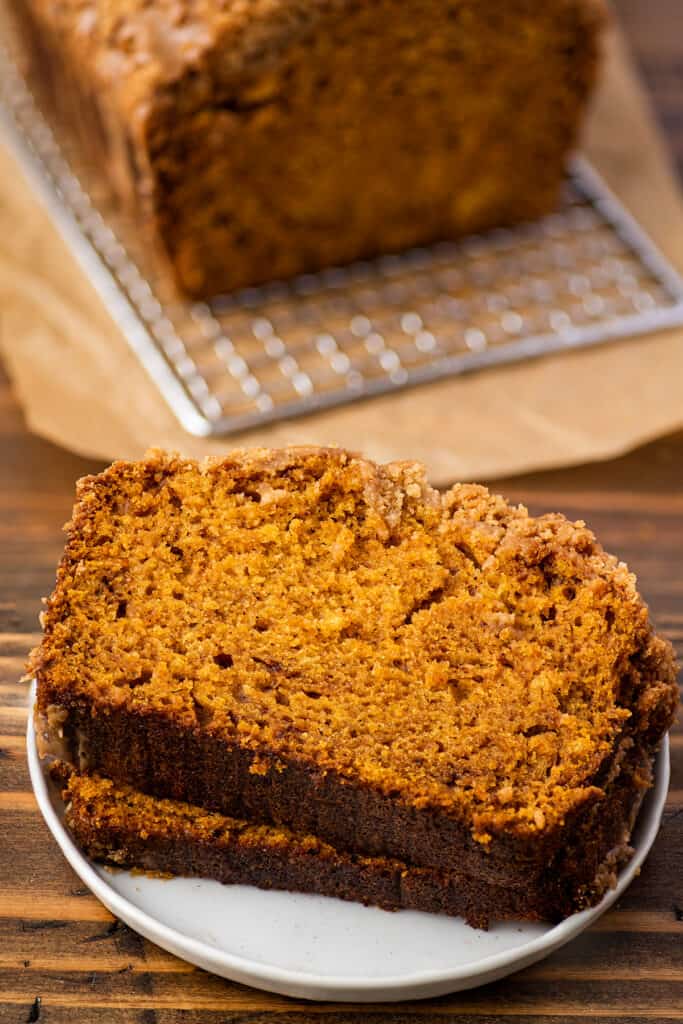
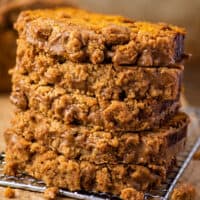
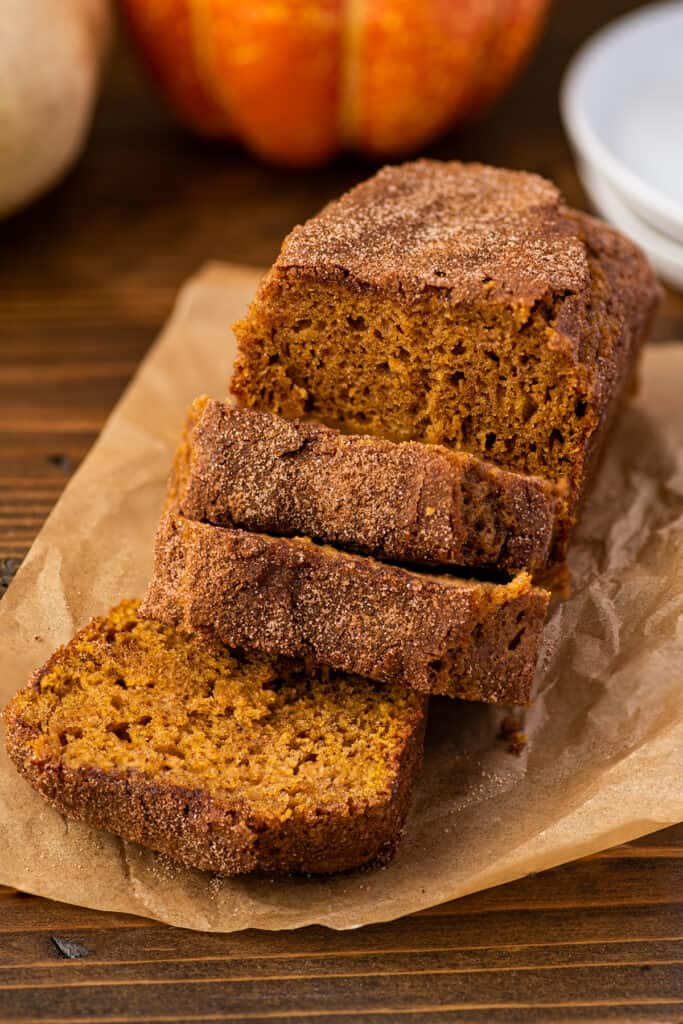
This easy pumpkin bread recipe makes a soft and fluffy loaf of pumpkin bread with a crumbly crunchy streusel topping and maple glaze.
The number one request was for pumpkin bread (an excellent choice), so I’m here today with the recipe for my very favorite pumpkin bread.

This is a classic recipe. It’s the one I grew up with, and over the years, I’ve found that when people tell me they have an old family recipe for pumpkin bread, written in their grandmother’s handwriting on a well-used recipe card, it’s usually this one.
And there’s a reason this recipe’s a classic. It makes some really good, really easy pumpkin bread.
The batter comes together in about 5 minutes, and you get a perfectly soft and fluffy loaf that bakes up beautifully and makes your kitchen smell like fall.
An Upgraded Classic
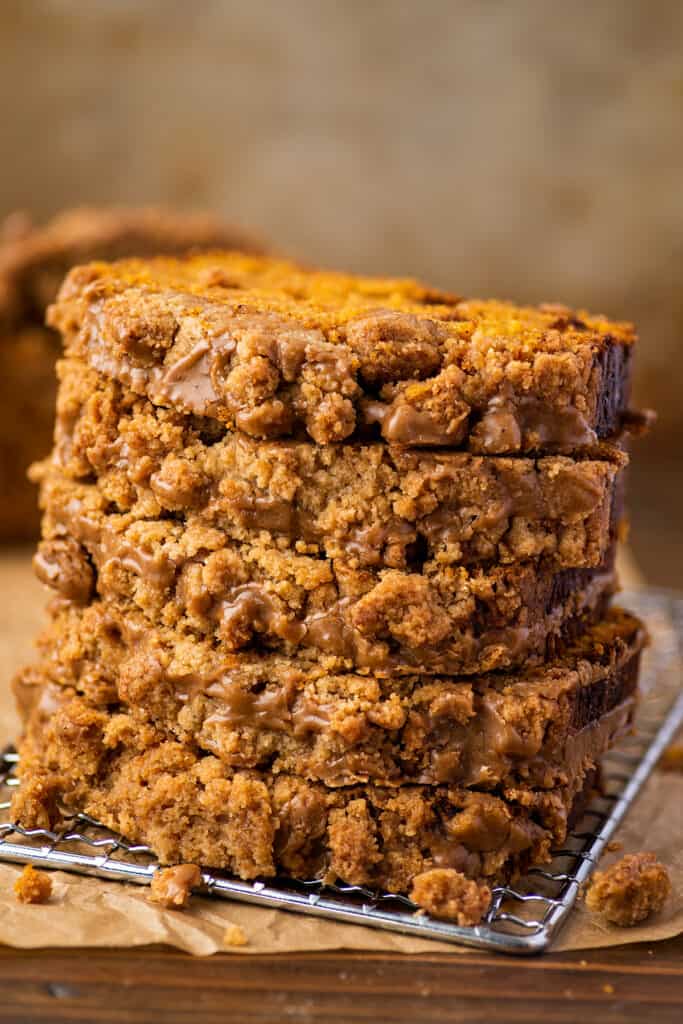
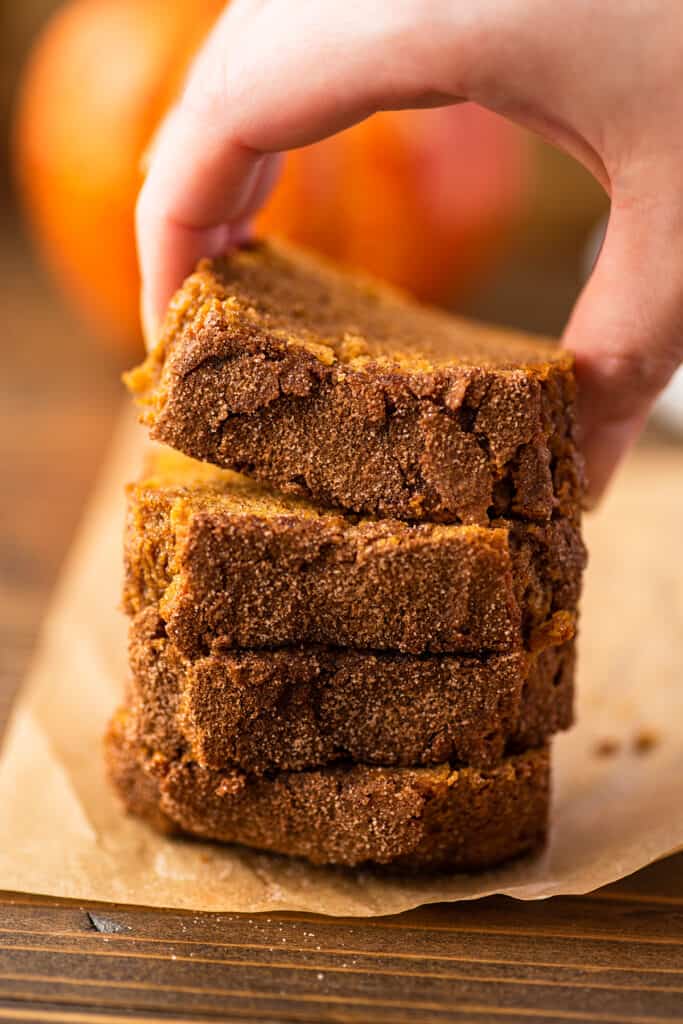
And because I think that even the classics can be improved upon, I’ve added my favorite brown sugar streusel and a maple glaze to the bread.
This gives the top of the loaf a completely irresistible crumbly crunch that makes a sweet and simple slice of pumpkin bread feel like a decadent treat.
Ingredient Notes

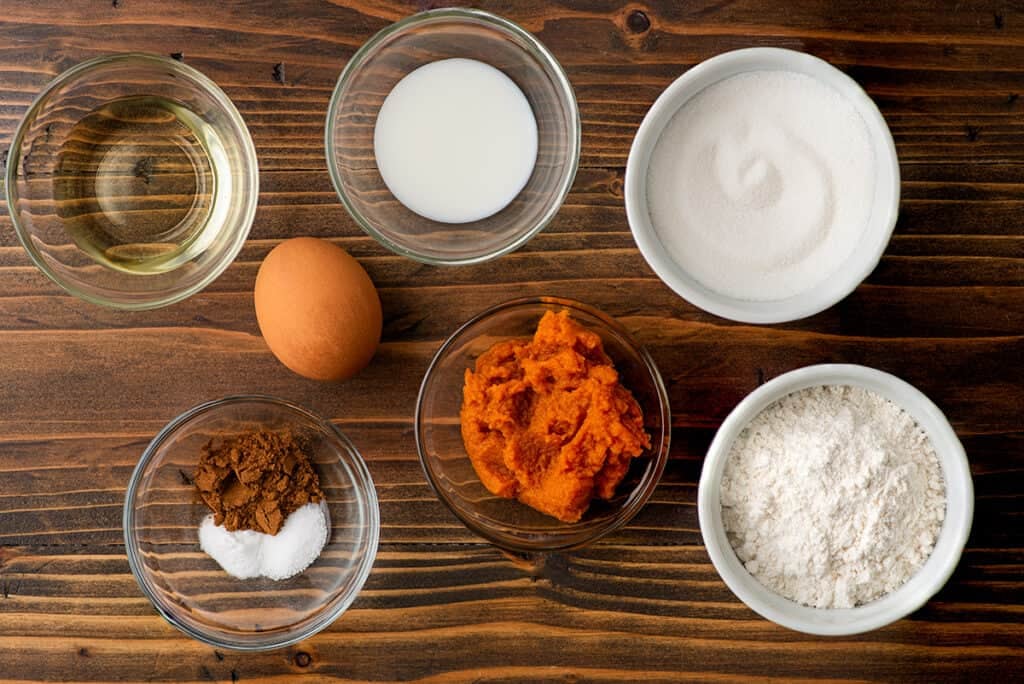
- Cool room-temperature butter: You’ll need softened butter for the crumble topping, but if your kitchen is warm, be careful not to let the butter get too soft or it will be difficult to work with. You should just be able to press an indentation into it with a little force. It should not be greasy or at all melty. The recipe is written using salted butter, but if all you have is unsalted, add a generous pinch of salt along with the flour and sugar.
- Pumpkin puree: This recipe will use about half a can of pumpkin puree. Not sure what to do with the leftovers? Check out my post What to Do With Leftover Pumpkin Puree (I recommend a batch of Pumpkin Pancakes ).
- Spices: The recipe calls for a mix of cinnamon, nutmeg, cloves, and ginger, but if you have pumpkin pie spice , you can replace the spices with 1½ teaspoons of pumpkin pie spice.
How to Make Classic Pumpkin Bread

- Make the streusel by combining flour, brown sugar, and butter. Use clean hands or a fork to mix the ingredients until they clump into crumbs and no dry flour or sugar is left at the bottom of the bowl.
Place the streusel in the freezer while you make the bread (chilled streusel will give you prettier, more defined streusel crumbs after baking).
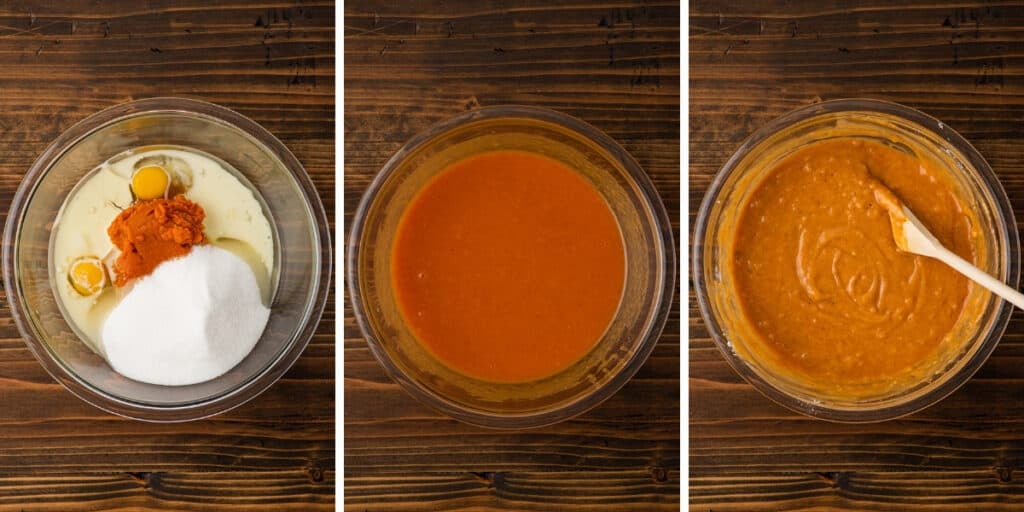
Whisk together flour, baking soda, salt, cinnamon, nutmeg, cloves, and ginger. In a second bowl, combine pumpkin puree, eggs, vegetable oil, milk, and granulated sugar. Whisk until well-combined.
Pour flour mixture into the wet ingredients. Switch to a wooden spoon and stir until just combined. There should be no dry flour left in the bowl, but don’t overmix or your bread can become tough.
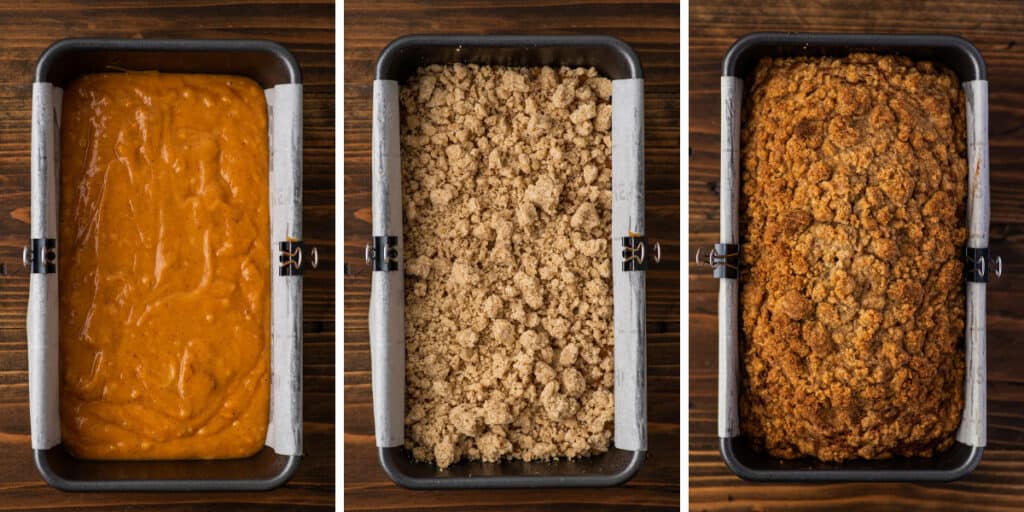

Transfer batter to a greased baking dish lined with a parchment paper sling. The parchment paper sling will allow you to lift the bread out of the pan without disturbing any of the streusel on top.
Remove streusel from the freezer and sprinkle it over the batter. If the streusel pieces are too large, gently break them up. If they’re too small, smash them together in your hand to form larger crumbs.
Bake until a toothpick inserted into the center of the bread comes out clean or with just a few crumbs.
Whisk together powdered sugar, extract of choice, and milk and drizzle glaze over the warm bread. Allow at least 20 minutes for the glaze to set and the bread to cool before cutting and serving.
Pumpkin Bread Variations
- Classic pumpkin bread: If you don’t want the extra sweetness, you can skip the glaze and streusel and bake the bread without any added toppings.
- Cinnamon sugar: Combine 2 tablespoons granulated sugar and 1½ teaspoon ground cinnamon. Sprinkle over batter just before baking.
- Vanilla or maple glaze: Double the glaze in the recipe below and spread it over the bread while it’s still warm.
- Mini pumpkin bread: For a mini loaf of pumpkin bread, go check out my small-batch version of this bread.

I love this bread! Can I double the recipe?
Go for it. To change the recipe yield, hover over the serving size in the recipe card below or click if you’re on mobile, and slide the slider.
If doubling the recipe, you can use a single 15-ounce can of pumpkin puree to make 2 loaves of bread. You will be slightly shy of the 2 cups a double batch would call for, but your bread will still come out beautifully.
Can you freeze pumpkin bread?
Absolutely! Pumpkin bread freezes well. Wrap slices individually in plastic wrap and store in a freezer bag for up to 2 months. To eat, defrost unwrapped at room temperature for 15 minutes.

What’s the best way to store pumpkin bread?
Store pumpkin bread tightly wrapped at room temperature for up to 4 days. For longer storage, freeze slices.
More Fall Favorites
Dutch Apple Pie Cinnamon Sugar Baked Pumpkin Donuts Cinnamon Apple Crumb Muffins White Hot Chocolate
Recipe Notes
- Streusel can make checking for doneness a little challenging. If you’re not sure your bread is ready to come out of the oven, give the top a little press with your finger. When the bread is done, it will spring back when lightly pressed. If it stays sunken in, it’s not ready. Give it more time in the oven.
Equipment
- 9x5-inch loaf pan
- Parchment paper
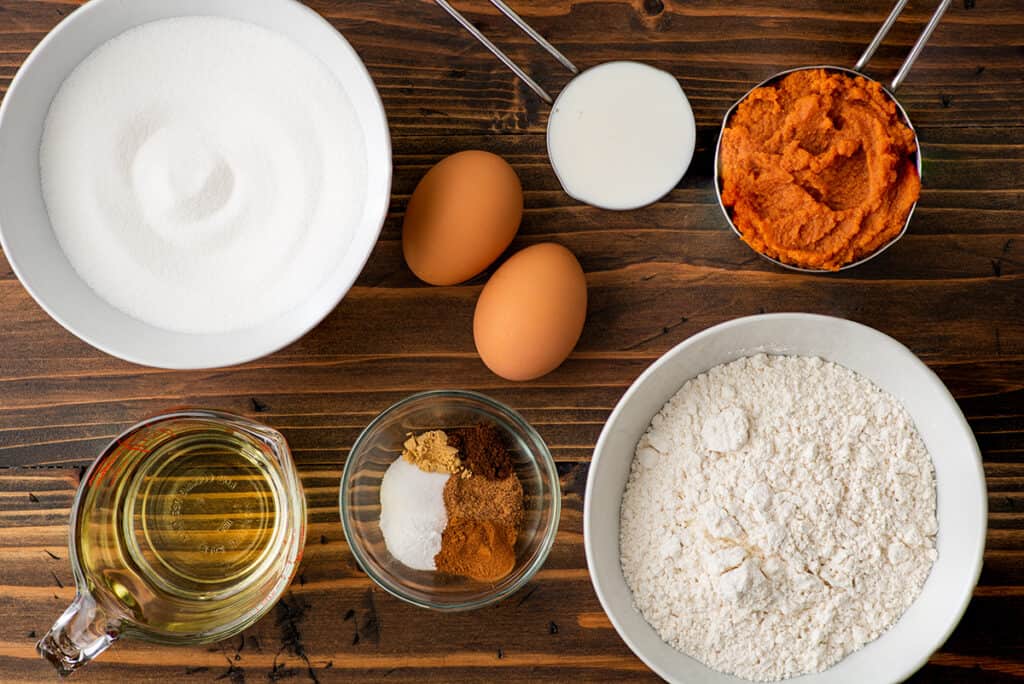
Ingredients
Streusel (optional)
- ▢ ½ cup ( 65g ) all-purpose flour
- ▢ ¼ cup + 2 tablespoons (75g ) packed brown sugar
- ▢ 4 tablespoons ( 56g ) salted butter cut into 1-inch cubes and softened to cool room temperature*
Classic Pumpkin Bread
- ▢ 1¾ cups ( 228g ) all-purpose flour
- ▢ 1 teaspoon baking soda
- ▢ ¾ teaspoon salt
- ▢ ½ teaspoon ground cinnamon *
- ▢ ½ teaspoon ground nutmeg
- ▢ ¼ teaspoon ground cloves
- ▢ ⅛ teaspoon ground ginger
- ▢ 1½ cups ( 300g ) granulated sugar
- ▢ 1 cup ( 244g ) pumpkin puree
- ▢ 2 large eggs
- ▢ ½ cup vegetable oil
- ▢ ⅓ cup milk any percentage
Glaze (optional)
- ▢ ½ cup ( 60g ) powdered sugar
- ▢ ¼ teaspoon maple or vanilla extract
- ▢ 1 tablespoon milk or cream plus more as needed
Instructions
- Preheat your oven to 350°F. Grease a 9x5-inch loaf pan and line it with a parchment paper sling. Set aside.
Streusel
- In a medium bowl, combine flour, brown sugar, and butter. Use clean hands or a fork to mix the ingredients until they clump into crumbs and no dry flour or sugar is left at the bottom of the bowl.
- Place the streusel in the freezer while you make the bread.
Pumpkin Bread
- In a medium bowl, whisk together flour, baking soda, salt, cinnamon, nutmeg, cloves, and ginger. Set aside.
- In a large bowl, combine sugar, pumpkin puree, eggs, vegetable oil, and milk. Whisk until well-combined.
- Pour flour mixture into the wet ingredients. Switch to a wooden spoon and stir until just combined.
- Transfer batter to prepared baking dish. Remove streusel from the freezer and sprinkle it over the batter. If the streusel pieces are too large, gently break them up. If they’re too small, smash them together in your hand to form larger crumbs.
- Bake for about 60 to 70 minutes, until a toothpick inserted into the center of the bread comes out clean or with just a few crumbs.
- Allow to cool in the baking pan until cool enough to handle and then transfer to a cooling rack.
Glaze
- In a small bowl, whisk together powdered sugar, extract of choice, and milk. If needed, add milk by the ¼ teaspoon until the glaze reaches your desired consistency.
- Drizzle glaze over the warm bread and allow at least 20 minutes for the glaze to set and the bread to cool before cutting and serving.
- Enjoy!
Notes
- Cinnamon sugar: Combine 2 tablespoons granulated sugar and 1½ teaspoons ground cinnamon. Sprinkle over batter just before baking.
- Vanilla or maple glaze: Double the glaze in the recipe above and spread it over the bread while it’s still warm.
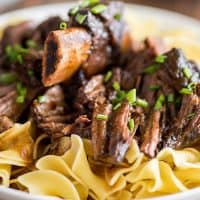
These easy short ribs are fall-off-the-bone tender, decadently rich, and such a show stopper.
Hey, friends. I have another rib recipe for you today, AMAZING, easy braised short ribs.
After my Oven-baked Beef Ribs and Country-style Pork Ribs , these are the ribs I get asked about making most often, and honestly, that makes me so happy, because these ribs are kind of the best things ever.
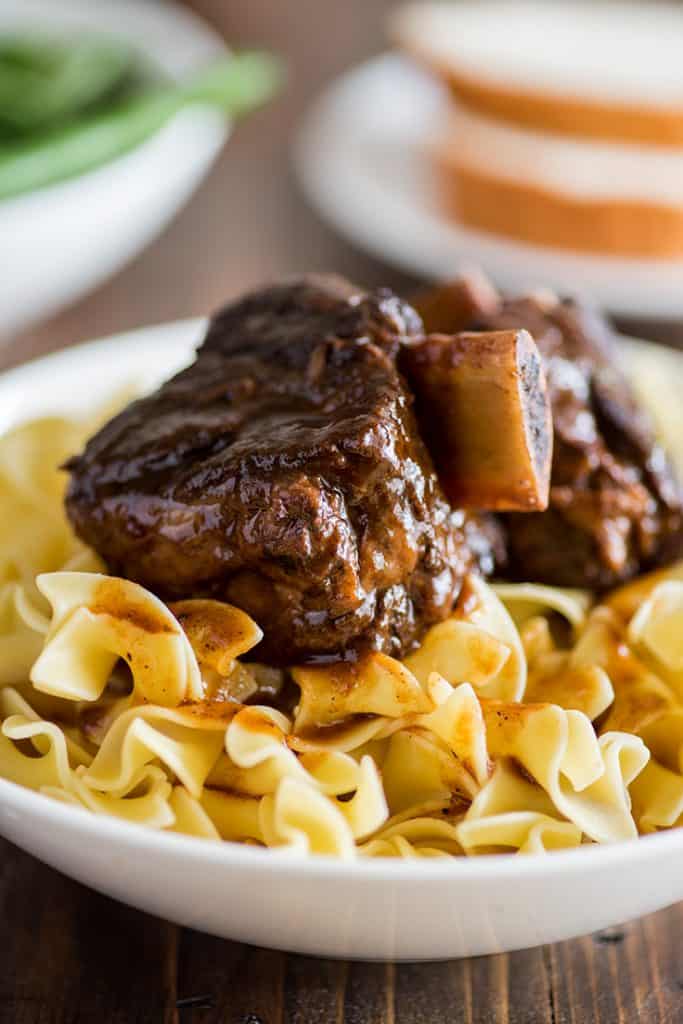

Properly cooked short ribs are fall-off-the-bone tender, decadently rich, and such a show stopper. They’ll make your house smell amazing while they cook, and if you need a meal to impress, braised short ribs are perfect for guests because they’re actually pretty difficult to screw up and are even better when made 24 hours in advance.
This is going to be a longer post than usual. Short ribs are very easy in that there are no difficult techniques you need to master to cook them, but they have a lot of steps, so I’m going to walk you through the cooking process with a few tips and tricks along the way.
If you are feeling confident and just want the printable recipe no prob. Scroll past the photos down to the recipe card for the quick and dirty instructions.
What are Short Ribs?
Short ribs come from the lower section of the rib, under the plate area. Unlike beef back ribs (your typical BBQ rib), which have meat in between long, curved bones, short ribs have a thick layer of meat over straight bones with a lovely marbling of fat throughout.
If you’re curious, this is a really interesting video on how butchers cut short ribs .
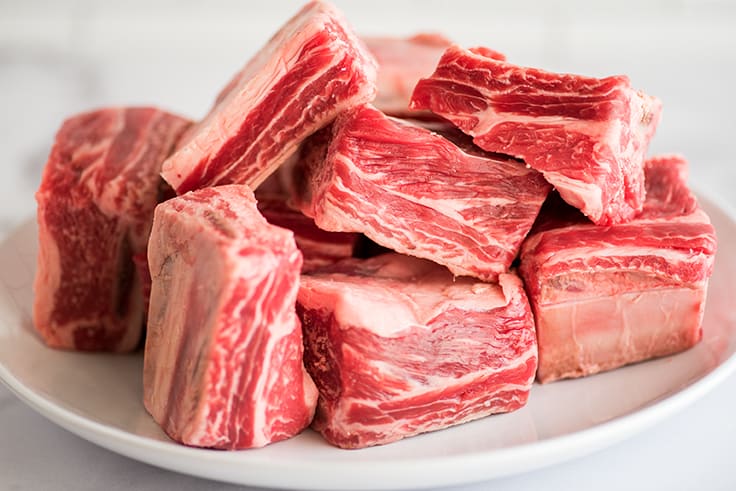

When short ribs are cut across the bone, they’re called flanken-style ribs, but we’ll be using English-cut short ribs today, ribs that have been cut in between the bones so there is only one bone per piece of meat.
If you have the choice, look for ribs that are 2 to 3 inches thick, with a good ratio of meat to fat. If you can get ribs that are all about the same size, that’s ideal, but sometimes the packs that you buy at the grocery store can be pretty mixed, so it’s not the end of the world if there’s some variation.
Overnight Short Ribs
Short ribs are great candidates for making ahead. Their flavor only improves with time and refrigerating the ribs after cooking allows the fat in the dish (of which there is a lot) to solidify so you can scrape it off rather than trying to skim it off the top.
I included instructions in the recipe for same-day and overnight preparation, but given the choice, I recommend making these the day before you’re ready to eat them.
Oven or on the Stovetop Recipe
These ribs can be made in the oven or on the stovetop. If you cook them on the stove, they’ll need a little more babysitting because it’s more difficult to keep them at just the right temperature, but stovetop or oven, your ribs will still come out great.


How to Cook Short Ribs
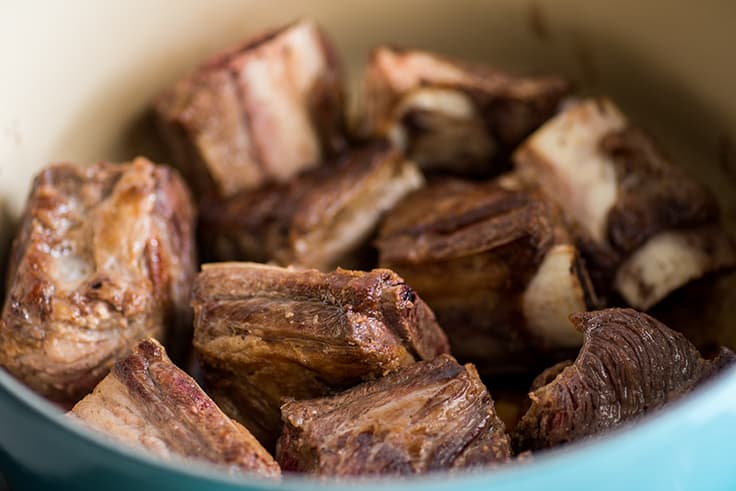
- You’ll start by browning salted and peppered ribs on all sides , which helps to deepen and intensify their flavor. It’s going to take a little while to get them nicely browned, so be prepared to spend about 15 minutes on this step.
Bonus tip: Before you start browning your meat, make sure all of your other ingredients are cut and measured. This will make the rest of the steps much quicker and smoother.

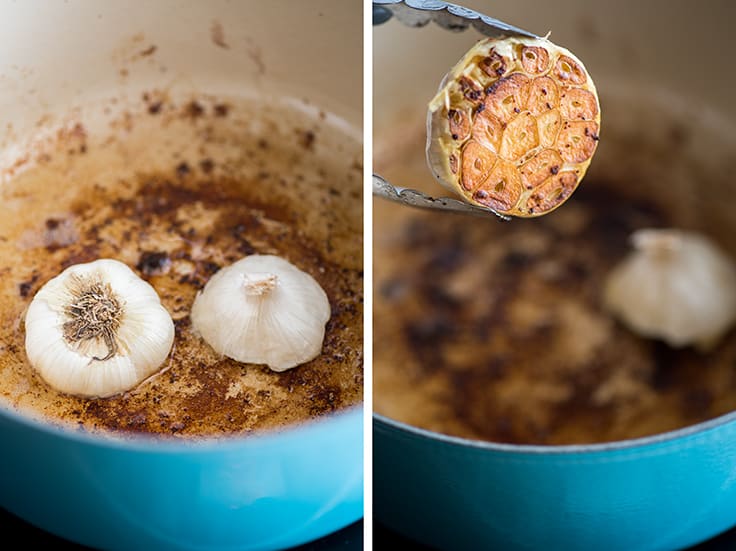
- After browning your meat, you’ll pour off most of the fat, turn down the heat, and brown a couple of garlic halves. Make sure to watch your garlic closely at this point so you don’t burn it.
Don’t worry if your garlic doesn’t cut as neatly as the head in this photo–garlic doesn’t always cooperate. If your halves fall apart a bit, just do the best you can and toss the loose cloves in with the larger pieces. They’ll be strained out at the end anyway.

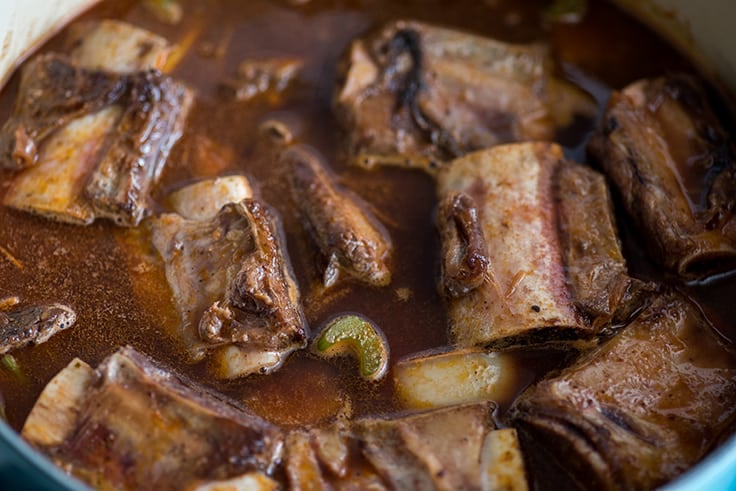
- Next, in go the vegetables followed by the tomato paste and then about half a bottle of red wine followed by beef broth.


- The ribs get returned to the pot and nestled in amongst the vegetables. Before you bring everything back to a simmer, arrange the ribs so that if any parts of them are sticking up out of the liquid, it’s the bone. You want all the meat submerged so that it cooks completely.
Then it’s time for the long slow braising process. These ribs will take about 3½ to 4 hours in the oven or on the stove. They’re done when the meat is fall-apart tender.
At this point, you can serve the ribs or allow them to cool slightly on the counter before refrigerating overnight.

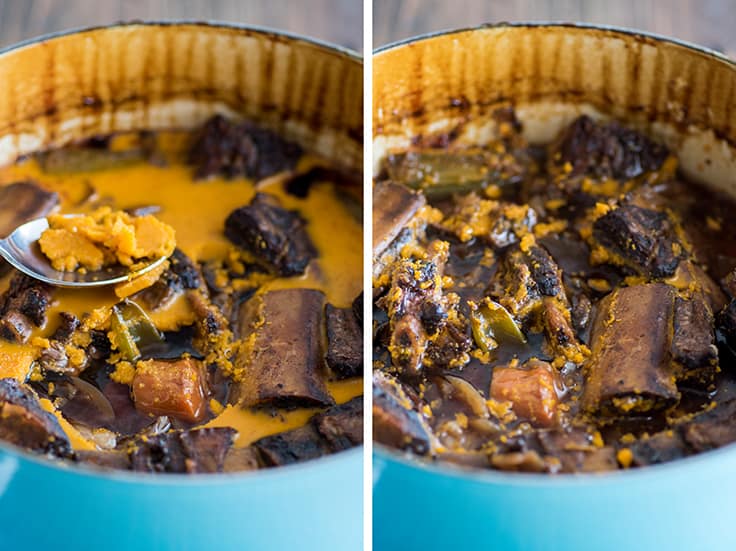
- When you’re ready to reheat the ribs, use a spoon to scrape the solidified fat off the top. Gross, I know, but oddly satisfying too. Reheat the ribs on the stove, discard the veggies (they’re flavorless mush at this point), and strain the braising liquid to remove any small veggie bits.

- If you’d like a thicker sauce, you can bring it to a simmer and let it reduce while you make the rest of your dinner. Serve the ribs over egg noodles, mashed potatoes , or polenta and spoon sauce over the top.
And that’s it. Enjoy!


What do you serve with short ribs?
Because they are so rich, I like to serve short ribs with crusty bread and a simple veggie side like:
- Butter and Garlic Green Beans
- Roasted Broccoli
- Roasted Zucchini
- Roasted Green Beans
Can you freeze leftover short ribs?
Yes! Short ribs freeze really nicely. I recommend removing the meat from the bones and freezing it along with some of the cooking liquid in a freezer bag for up to 3 months. When you’re ready to eat the leftover short ribs, defrost overnight in the refrigerator and simply reheat in the microwave.
How many short ribs should you serve per person?
For serving, 2 large ribs or 3 smaller ribs per person is typically a good serving size.
Recipe Notes
- As with carnitas , these ribs take a long time to cook between browning, braising, and reducing the liquid at the end. If you plan on eating them the same day you’re going to cook them, start cooking early and give them PLENTY of time.
- Have some leftovers? Try Short Rib Mac & Cheese .
More Favorite Recipes for Guests
- Roasted Chicken
- Tri-tip in the Oven
- Easy Stroganoff
- Baked Ziti
Ingredients
Special Equipment
- ▢ Large Dutch oven with a lid
- ▢ Fine mesh strainer optional for straining braising liquid
Short Ribs
- ▢ 2 tablespoons vegetable oil
- ▢ 3 to 5 pounds bone-in short ribs ideally, 2 to 3 inches thick
- ▢ Salt and pepper
- ▢ 1 head garlic sliced in half horizontally
- ▢ 1 medium onion roughly chopped
- ▢ 4 celery ribs roughly chopped
- ▢ 2 medium carrots peeled and roughly chopped
- ▢ 3 tablespoons ( 50g ) tomato paste
- ▢ 2 cups dry red wine *
- ▢ 2 cups beef broth plus more if needed
- ▢ ¾ teaspoon ground thyme or 4 sprigs fresh thyme
Serve Over
- ▢ Egg noodles, polenta, or mashed potatoes
Instructions
- Cut vegetables and measure out your ingredients before you begin. Once you start cooking, there isn’t much downtime to prep other ingredients.
- If making in the oven, preheat your oven to 275°F and adjust your baking racks so your Dutch oven will fit.
- Generously salt and pepper short ribs on all sides.
- In a large Dutch oven, heat oil over medium-high heat. In batches, if necessary, deeply brown ribs on all sides. This may take 15 minutes or more.
- Transfer ribs to a plate and pour off all but about 2 tablespoons of the fat (it doesn’t need to be precise).
- Turn heat down to medium and return pan to heat. Add garlic halves, cut-side down, and cook until deeply golden but not burned (watch garlic closely!), 1 to 2 minutes.
- Add the onions, carrots, and celery, and stir. Cook, stirring occasionally for 5 minutes, until the very edges of the onions are starting to turn translucent.
- Add tomato paste and stir to coat the veggies. Cook for about 3 minutes, until the tomato paste begins to caramelize and stick to the bottom of the pot.
- Pour in red wine and bring to a simmer. Use a wooden spoon to scrape any remaining browned bits from the bottom of the pot. Simmer for 2 minutes.
- Add the beef broth and thyme, and stir.
- Return the ribs to the pot, bone-side up, and press them down so they are completely submerged. If any meat is sticking up out of the liquid (bone is fine), add just enough broth to cover.
- Bring the liquid to a simmer over medium-high heat.
- If making in the oven, cover pot and transfer it to the oven. If making on the stove, reduce heat so liquid is just barely at a simmer before covering the pot.
- Cook (in the oven or on stovetop) for 3½ to 4 hours, checking occasionally to make sure meat is completely submerged and braising liquid is just barely simmering. Short ribs are done when meat is very tender and can be easily pulled apart with a fork.
- If serving immediately, skim fat off the top and skip to step 18. If making in advance, refrigerate overnight or until ready to serve.
- About 40 minutes before you are ready to eat, take ribs out of the refrigerator and use a large metal spoon to scrape solid fat off as best you can. Don’t worry if you can’t get every single bit.
- Heat over medium heat and bring to a simmer. If necessary, move meat around so all the meaty bits are submerged. Once at a simmer, cover and cook until meat is heated through, about 5 to 10 minutes.
- Set water on the stove to boil for egg noodles or begin prepping your mashed potatoes.
- Transfer meat to a plate and top with foil to keep warm. Remove and discard the majority of the vegetables with a slotted spoon. Strain the liquid through a fine-mesh strainer into a large bowl or measuring cup.
- Rinse out the pot and return the strained liquid to the pot. Simmer while your pasta/potatoes cook to reduce the liquid slightly.
- Return meat to the pot for the last minute or two of cooking time to reheat.
- Serve ribs over egg noodles or mashed potatoes and spoon sauce over the top. Enjoy!
Video
Notes
Recipe Adapted From The New York Times
This mini pumpkin bread recipe makes a single small loaf of soft and moist pumpkin bread with a ridiculously good cinnamon sugar crust.
Monday I shared my favorite pumpkin bread recipe on the blog.
Today, for all my small-batch friends, I have a mini pumpkin bread recipe so you can make pumpkin bread all season long whether you’re baking for a crowd or just one or two.

Everything I wrote about the full-size version of this recipe is true for this miniature one.
The batter is super quick and simple to throw together, and it makes a very cute single small loaf of pumpkin bread that’s soft, moist, and perfectly pumpkin spiced.
Equipment and Ingredient Notes

- 5.5 x 3-inch loaf pan: I used a 5.5 x 3-inch pan , but any mini loaf pan should work. Just be sure to fill the pan no more than ⅔ full so it doesn’t overflow in the oven.
- Pumpkin puree: If you don’t regularly buy canned pumpkin puree, you can usually find it in the baking aisle near the premade pie crusts and pie filling. (Be sure you’re grabbing pumpkin puree and not pumpkin pie filling!) The recipe won’t use up an entire can of pumpkin puree, so see my post What to Do With Leftover Pumpkin Puree for storage tips and recipe ideas for the leftovers. I recommend whipping up a little batch of Pumpkin Snickerdoodles.
- Spices: If you don’t keep pumpkin pie spice stocked, you can replace it with ⅛ teaspoon ground cinnamon, ⅛ teaspoon ground nutmeg, a generous pinch of ground cloves and a generous pinch of ground ginger.
- Cinnamon sugar: I love a good cinnamon sugar crust on pumpkin bread, but if you don’t want the added sweetness, you can skip the cinnamon sugar.
How to Make a Mini Loaf of Pumpkin Bread


Preheat your oven to 350°F. Lightly grease a mini loaf pan and line it with a parchment paper sling. This will make it easier to lift your pumpkin bread out of the pan without dislodging any of the cinnamon sugar topping.
Whisk dry ingredients (minus sugar) together in one bowl, and the wet ingredients along with the sugar in a second bowl.
Pour the dry mixture into the wet ingredients and use a wooden spoon to stir until just mixed and there is no dry flour in the bowl. Don’t overmix! Overmixing can cause your bread to become tough. Transfer batter to prepared loaf pan.


Sprinkle cinnamon sugar over the top of the batter and bake until a toothpick inserted into the center of the loaf comes out clean and the top of the bread springs back when lightly pressed.
Cool in the pan until cool enough to handle and then transfer to a cooling rack. Cool for an additional 10 minutes, serve, and enjoy!
Variations
- Glazed: For a simple glaze, combine ¼ cup of powdered sugar with 1 teaspoon milk, plus a couple drops of vanilla or maple extract. Stir together until a smooth glaze forms, adding just a bit more milk or powdered sugar as needed to reach a drizzling consistency.
- Streusel: If you’d like to top your bread with streusel, try the half-batch measurements for my favorite streusel recipe . Be sure to fill the loaf pan no more than ⅔ full or the streusel crumbs can overflow the pan.

I love this loaf, can I make a full-size version?
You sure can. I posted the full-size version of this pumpkin bread recipe earlier this week.
I don’t have a mini loaf pan. What can I use instead?
If you don’t have a mini loaf pan, go make my small-batch pumpkin muffins . They use the same ingredients but are designed to be baked into muffins instead of a loaf pan.


How to store pumpkin bread?
Store the bread tightly wrapped at room temperature for 3-4 days.
More Small-batch Favorites
- Pumpkin Cupcakes
- Apple Crumb Muffins
- Small-batch Cinnamon Rolls
- One Banana Banana Bread

Equipment
- 5.5 x 3-inch loaf pan*
- Parchment paper
Ingredients
Cinnamon Sugar Topping (optional)
- ▢ 1 teaspoon ( 4g ) granulated sugar
- ▢ ¼ teaspoon ground cinnamon
Pumpkin Bread
- ▢ ½ cup ( 65g ) all-purpose flour
- ▢ ¼ teaspoon baking soda
- ▢ ¼ teaspoon salt
- ▢ 1 teaspoon pumpkin pie spice *
- ▢ ½ cup ( 100g ) granulated sugar
- ▢ ¼ cup ( 61g ) pumpkin puree
- ▢ 1 large egg
- ▢ 2 tablespoons vegetable oil
- ▢ 1 tablespoon milk any percentage
Instructions
- Preheat your oven to 350°F. Lightly grease a mini loaf pan and line it with a parchment paper sling.
Cinnamon Sugar Topping
- In a small bowl, stir together sugar and cinnamon. Set aside.
Pumpkin Bread
- In a medium bowl, whisk together flour, baking soda, salt, and pumpkin pie spice. Set aside.
- In a medium bowl, whisk together sugar, pumpkin puree, egg, vegetable oil, and milk.
- Pour the flour mixture into the wet ingredients and use a wooden spoon to stir until just mixed. Transfer batter to prepared loaf pan.
- Sprinkle cinnamon sugar over the top of the batter.
- Bake for 32 to 38 minutes, until toothpick inserted into the center of the loaf comes out clean and the top of the bread springs back when lightly pressed.
- Cool in the pan until cool enough to handle and then transfer to a cooling rack. Cool for an additional 10 minutes, serve, and enjoy!
Notes

Classic Pumpkin Bread
Equipment
- 9x5-inch loaf pan
- Parchment paper
Ingredients
Streusel (optional)
- ½ cup ( 65g ) all-purpose flour
- ¼ cup + 2 tablespoons (75g ) packed brown sugar
- 4 tablespoons ( 56g ) salted butter cut into 1-inch cubes and softened to cool room temperature*
Classic Pumpkin Bread
- 1¾ cups ( 228g ) all-purpose flour
- 1 teaspoon baking soda
- ¾ teaspoon salt
- ½ teaspoon ground cinnamon *
- ½ teaspoon ground nutmeg
- ¼ teaspoon ground cloves
- ⅛ teaspoon ground ginger
- 1½ cups ( 300g ) granulated sugar
- 1 cup ( 244g ) pumpkin puree
- 2 large eggs
- ½ cup vegetable oil
- ⅓ cup milk any percentage
Glaze (optional)
- ½ cup ( 60g ) powdered sugar
- ¼ teaspoon maple or vanilla extract
- 1 tablespoon milk or cream plus more as needed
Instructions
- Preheat your oven to 350°F. Grease a 9x5-inch loaf pan and line it with a parchment paper sling. Set aside.
Streusel
- In a medium bowl, combine flour, brown sugar, and butter. Use clean hands or a fork to mix the ingredients until they clump into crumbs and no dry flour or sugar is left at the bottom of the bowl.
- Place the streusel in the freezer while you make the bread.
Pumpkin Bread
- In a medium bowl, whisk together flour, baking soda, salt, cinnamon, nutmeg, cloves, and ginger. Set aside.
- In a large bowl, combine sugar, pumpkin puree, eggs, vegetable oil, and milk. Whisk until well-combined.
- Pour flour mixture into the wet ingredients. Switch to a wooden spoon and stir until just combined.
- Transfer batter to prepared baking dish. Remove streusel from the freezer and sprinkle it over the batter. If the streusel pieces are too large, gently break them up. If they’re too small, smash them together in your hand to form larger crumbs.
- Bake for about 60 to 70 minutes, until a toothpick inserted into the center of the bread comes out clean or with just a few crumbs.
- Allow to cool in the baking pan until cool enough to handle and then transfer to a cooling rack.
Glaze
- In a small bowl, whisk together powdered sugar, extract of choice, and milk. If needed, add milk by the ¼ teaspoon until the glaze reaches your desired consistency.
- Drizzle glaze over the warm bread and allow at least 20 minutes for the glaze to set and the bread to cool before cutting and serving.
- Enjoy!
Notes
- Cinnamon sugar: Combine 2 tablespoons granulated sugar and 1½ teaspoons ground cinnamon. Sprinkle over batter just before baking.
- Vanilla or maple glaze: Double the glaze in the recipe above and spread it over the bread while it’s still warm.
