This chicken bacon ranch pizza is a fun twist on traditional pizza night. Top your favorite pizza crust with ranch, chunks of juicy chicken, bacon, and lots of melty mozzarella for a quick and easy dinner that everyone will love.
Chicken bacon ranch pizza is one of my favorite clean-out-the fridge recipes. Have some leftover chicken? Perfect excuse to make a pizza! Bacon you need to use up? Put it on a pizza!! Half a bottle of ranch you’re tired of looking at? It’s pizza sauce now!
You can throw this pizza together with almost no effort, and because it’s pizza that involves bacon, ranch, and chicken, you know it’s going to be delicious.

What’s on a chicken bacon ranch pizza?
Chicken bacon ranch pizza toppings vary from restaurant to restaurant and household to household, but they always start with a ranch base instead of pizza sauce, chicken, and bacon. The most popular other toppings are onions, tomatoes, and peppers.
Ingredient Notes
- Cooked chicken: Leftover cooked chicken from a roasted chicken works great here or grab a rotisserie chicken from the store and chop up the breast meat for your pizza. If you have some raw chicken breasts in your fridge, I also included instructions for my favorite way to cook chicken to use in recipes in the recipe notes below.
- Ranch dressing: Use your favorite ranch as a base. Any brand will work, including homemade.
- Bacon: When making bacon for your pizza, cook it until it is just crispy, not too browned and crunchy. Since the cooked bacon will be going in the oven with the pizza, you don’t want it to become overcooked and hard.
How to Make a Chicken Bacon Ranch Pizza at Home


- Spread ranch over your prepared pizza dough. Top the dough with half of the cheese.
- Add the rest of the toppings and then remaining cheese.
- Bake according to your pizza dough instructions. If your dough didn’t come with instructions, bake at 400°F until crust is browned and cheese is bubbly and melted.
What can I use instead of pizza crust?
Don’t have pizza crust? Try it with one of these crust alternatives:


Can I freeze this pizza?
Yes. You can freeze the pizza baked or unbaked. Store slices in a freezer bag or double wrap the entire pizza in plastic wrap and then foil. Store in the freezer for up to 3 months.
To reheat, unwrap and bake in a 400°F oven until heated through.
Can I assemble the pizza ahead of time and bake it later?
Maybe. If you’re using a yeasted dough, you’re going to want to bake the pizza right away unless your dough recipe says otherwise. If using a premade store-bought crust, it shouldn’t be a problem. Assemble your pizza up to 24 hours in advance, store covered, and bake according to the recipe instructions.


More Pizza Recipes
- The Best Pizza Sauce
- BBQ Chicken Pizza
- Naan Pizza

Ingredients
- ▢ 1 medium-to-large pizza crust unbaked
- ▢ 1 tablespoon olive oil
- ▢ ⅓ cup ranch
- ▢ 1½ cups (6oz) shredded mozzarella cheese
- ▢ 1½ cups cubed or shredded cooked chicken *
- ▢ ½ red onion onion cut in half root to tip, sliced, and layers separated
- ▢ 1 to 2 roma tomatoes diced, optional
- ▢ 6 slices cooked bacon chopped*
Instructions
- Preheat oven according to crust package or pizza crust recipe instructions or 400°F.
- Brush unbaked pizza crust with a light layer of olive oil and transfer crust to a lightly greased or parchment paper-lined baking sheet.
- Spread ranch over the crust, leaving a 1-inch border around the edges.
- Top crust with half of the mozzarella cheese, followed by the cooked chicken, red onion slices, tomatoes, and bacon.
- Sprinkle remaining half of the mozzarella over the top and bake pizza according to crust package or pizza crust recipe instructions, until the cheese is melted and crust is browned.
- Slice, serve, and enjoy!
Notes
- Start with 12 ounces of raw chicken, about 1 large chicken breast. Generously salt and pepper both sides of your chicken breast.
- Heat a medium skillet with a lid over medium-high heat. Grease with cooking spray or a light drizzle of olive oil. Place chicken in the pan and cook for 2 to 3 minutes, until well-browned. Flip chicken and repeat. Once both sides are browned, add about 1/2-inch of filtered water to the bottom of the pan. Cover the skillet and turn heat down to medium.
- Cook for 8 to 12 minutes, until chicken is cooked through and an instant-read thermometer inserted into the center of the breasts reads 165°F (170°F if you’re going to shred the chicken). Check occasionally to make sure the water hasn’t all evaporated, adding more if necessary. Larger breasts will take longer to cook, so be sure to check for doneness before removing from heat.
- Transfer chicken to a cutting board and allow it to rest for 10 minutes before slicing or shredding.
Crispy and tender, with tons of flavor, these easy Slow Cooker Carnitas will knock your socks off.
Hey you, yes you. Have you ever made carnitas at home?
If yes, good job. Gold star for you. Never stop.
If no, you should definitely start today. Right now. Drop everything.

Why should you be making carnitas this very second?
- Because they are SO GOOD, and you deserve good things.
- Crispy AND tender, with tons of flavor, they’ll knock your socks off.
- Because maybe you’re having some friends over, and they’re the ultimate party food since they look and taste like a million bucks but are impossible to screw up. Everyone will be SO impressed.
- Best of all, carnitas are made with pork shoulder roast which is super inexpensive, so you get a ton of really excellent food CHEAP.
If you’re not convinced by all that, there’s no hope left for you. Go eat some dry toast and be sad. ❤️
Slow Cooker Carnitas
I actually already have an excellent, easy recipe on the site for carnitas , but they’re cooked on the stove and require a bit of a time commitment that I know not everyone is willing or able to make.
So I took that recipe and modified it to work in a slow cooker so you don’t have to babysit them for three hours, turning carnitas from a weekend project to an everyday sort of meal.
And truly, once you try this recipe, you’ll be wanting to make it every day.
Ingredient Notes
- Pork shoulder roast: The best cut of meat for carnitas is pork shoulder AKA pork butt AKA Boston butt because it is well-marbled with fat and cooks up incredibly tender with a long braise.
- Large onion: A yellow, white, or red onion all work here.
- Lime juice: Fresh or bottled lime juice works just fine.
- Chicken broth: You can use homemade chicken broth if you have it, but this will be just as good with the canned stuff.
How to Make Carnitas in a Slow Cooker
- Prep the meat: Take a 4-to-6-pound pork shoulder roast, bone-in or boneless, debone if necessary, remove any huge chunks of fat and silver skin (the silvery blue membrane that sticks tightly to the meat) and cut it into large chunks, about the size of a fist.
- Sear: Then you sear the meat on the stove. If you are in a hurry, you can skip this step, but it adds a lot of flavor to the meat, so if you have the time, do it.
- Transfer to the Crockpot: Add browned pork and any juices from the pan to your slow cooker, and return the pan to the stove. Deglaze it with a bit of chicken broth, scraping the bottom of the pan clean, and pour that liquid into your slow cooker as well. (This makes sure you get all those super flavorful browned bits in with your meat AND makes your pan way easier to wash. Win win.)
- Assemble and cook: Then just add the rest of your ingredients, set your slow cooker to low, and forget about it for 7 to 8 hours. The meat’s done when you can easily shred it with a fork.
- Shred and crisp: Once the meat’s shredded, it’s time to make it crispy.
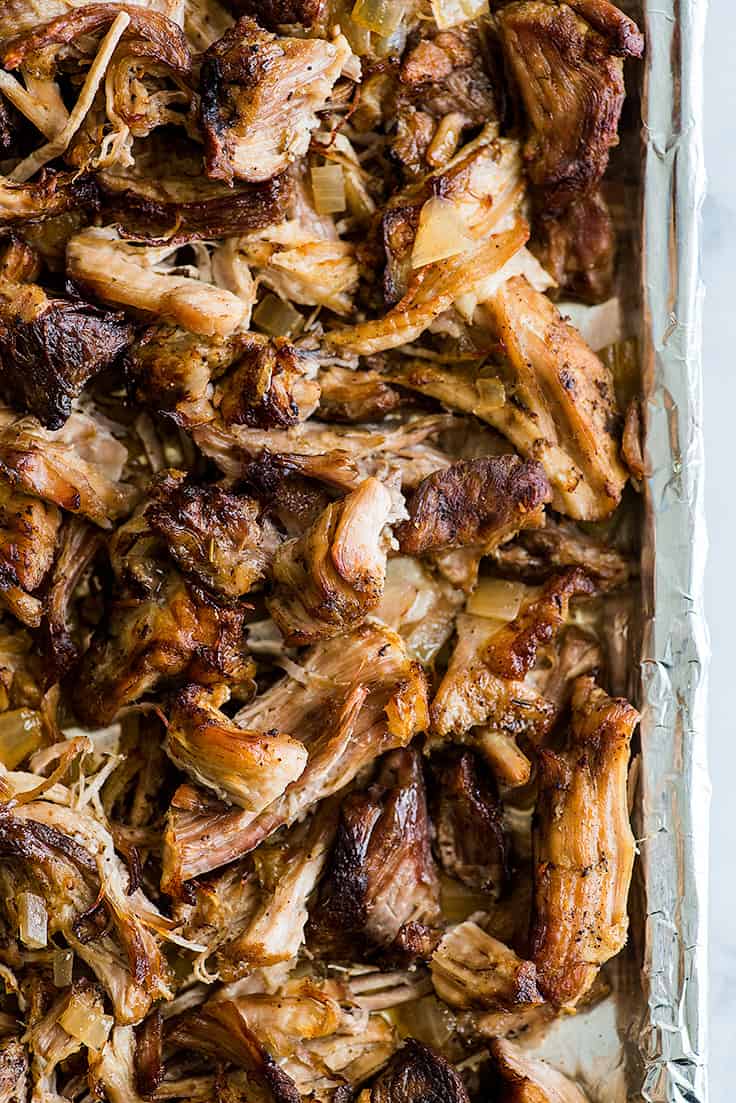

How to Make Crispy Pork
You have a couple of options for crisping up your pork. You can do it under the broiler or turn your oven temp way up and bake the shredded meat for about 30 minutes. Both ways have pros and cons, so the method you choose is really going to depend on how clean you want to keep your oven, how much of a hurry you’re in, and how crispy you want your meat.
Carnitas Broiler vs Oven
Broiler Pros: Broiling is way faster. Your carnitas will get crispy in less than 10 minutes, and it gets the edges and tops of the meat extra crispy with almost burnt bits that everyone will want to eat first. Cons: Broiling carnitas can be messy. Remaining fat in the meat pops quite a bit, and during one test batch, I opened the oven and had fat dripping from the oven ceiling. Also, under the broiler, only the tops and edges of the meat get crispy.
Oven Pros: Less messy (though I still don’t recommend cleaning your oven right before making these). Pork will get much crispier all over. Cons: Takes three times as long and you won’t get those really crispy burnt edges like you would from the broiler.
I use both methods depending what mood I’m in, sometimes I even combine them when I want extra crispy carnitas, so just experiment and see what works best for you.
What to Make with Carnitas
4 pounds of (deboned and trimmed of fat) meat will make a little less than 10 cups of cooked carnitas. That’s a lot of meat to make into a lot of good things.
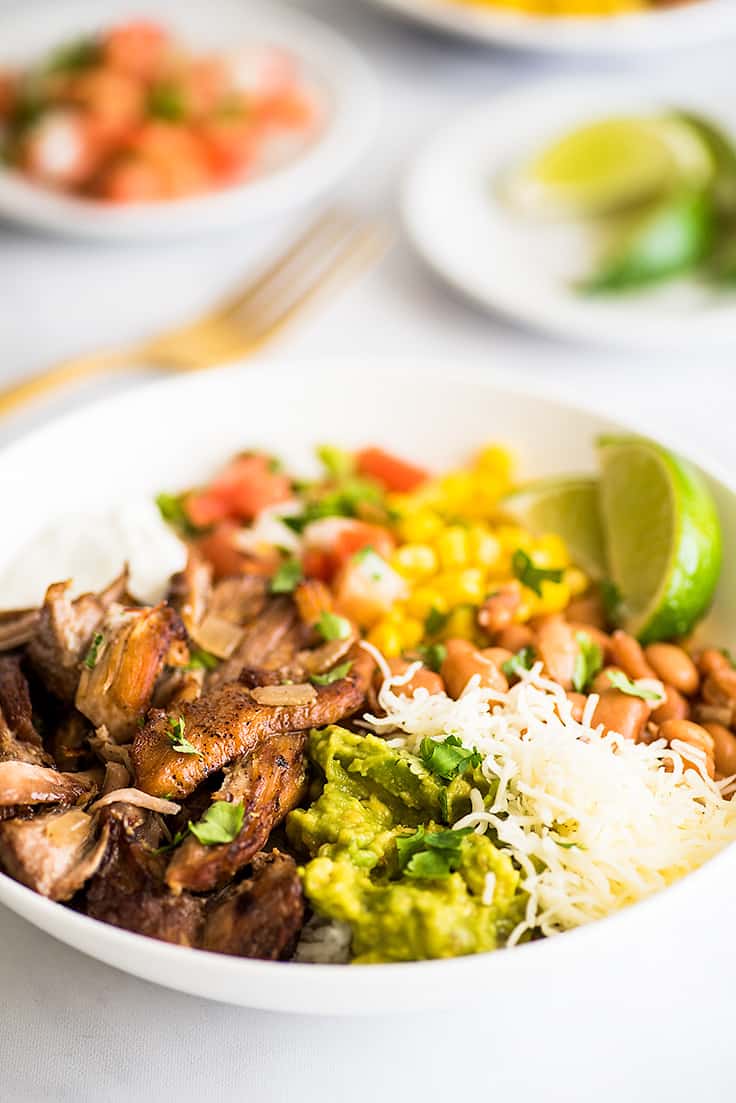
My favorite way to eat carnitas is picked hot off the tray, but they are absolutely stellar used in:
- Burrito Bowls with Cilantro Lime Rice
- Carnitas Enchiladas
- Carnitas Tacos
- Carnitas Nacho Fries
- Burritos
Also, if you’re low-carb or keto, a bowl of carnitas, some Pico de Gallo , cheese, sour cream, and a little hot sauce is a real good time. 😉
What cut of meat is best for carnitas?
The best cut of meat for carnitas is pork shoulder. It’s well-marbled with fat and cooks up rich and tender after a long, slow cooking time. You’ll find bone-in and boneless pork shoulder roasts at the grocery store, and both will work great for carnitas, but if you have the option, go with a boneless roast.
The bone in the bone-in shoulder roast is Y-shaped and a little irritating to cut around, so if you can avoid it, all the better.
How long should you cook pork in a slow cooker?
Cook the pork for 3 to 4 hours on high or 7 to 8 hours on low. You’ll know the carnitas are ready when you can easily pull the meat apart with a couple of forks.
Can you freeze slow cooker carnitas?
Absolutely. Because the cut of meat you need for carnitas comes as a pretty large roast, even if you’re part of a small household, I still recommend making the full-size carnitas recipe rather than trying to cut it down because carnitas freeze really well.
To Freeze: Freeze meal-sized batches with a few spoonfuls of the cooking liquid in freezer-safe storage bags for up to 3 months.
To Reheat: When you’re ready for more carnitas, defrost in the refrigerator. Microwave until warm or spread on a baking sheet and bake, loosely covered with foil at 350°F until heated through (usually 10-15 minutes). Remove the foil and broil on high for just a minute or two until the edges are crisp.
You Might Also Enjoy
- Country-style Pork Ribs
- Slow Cooker Tri-tip Sandwiches
- Slow Cooker Beef Ribs
- Chipotle Chicken Tacos

Recipe Tips
- If you know your morning is going to be rushed, measure your spices and cut your meat the night before (especially if you have a bone-in roast as cutting can take a little while), so everything is ready to go in the morning.
Ingredients
For Slow Cooker Carnitas
- ▢ 4-6 pound pork shoulder roast boneless or bone-in, trimmed of fat cap and cut into fist-sized chunks
- ▢ Salt and pepper
- ▢ ¼ cup vegetable oil
- ▢ 6-8 cups ( 3-4 ) 14.5 ounce cans chicken broth *
- ▢ 1 large onion diced
- ▢ 1 clove garlic crushed
- ▢ 3 tablespoons lime juice
- ▢ 1 tablespoon chili powder
- ▢ ½ teaspoon dried oregano
- ▢ ½ teaspoon ground cumin
For Carnitas Tacos
- ▢ Tortillas flour or corn
- ▢ Cilantro chopped
- ▢ White onion finely diced
- ▢ Limes quartered
Instructions
Slow Cooker Carnitas
- Generously salt and pepper chunks of meat on all sides.
- In a large dutch oven, heat oil over medium-high heat. Once hot, add meat to the pan and brown on all sides. You may need to do this in batches, and it will take 10 to 15 minutes.
- Transfer meat and any juices to your slow cooker and return pan to the stove. Add a splash of the chicken broth and deglaze the pan over medium-high heat, using a wooden spoon or spatula to scrape all the crispy browned bits off the bottom of the pan. Pour everything over the top of the meat in the slow cooker.
- To the slow cooker, add onions, garlic, lime juice, spices, and enough chicken broth to just cover the top of the meat. Cook on high for 3 to 4 hours or low for 7 to 8. The meat is ready when it can be easily shredded with a fork.
- Preheat the oven to 400°F. Transfer the meat, a few pieces at a time, to a plate and shred. Place shredded meat on a baking sheet and sprinkle with salt. If you had a large roast, you may need to split the meat between two baking sheets. Pour ¼ cup of the cooking liquid over the top of the meat. Bake until crispy, about 30 minutes, checking every 10 minutes and adding more cooking liquid if meat seems to be drying out.
- Or broil meat on high for 5 to 10 minutes until crispy, checking on frequently. DO NOT leave broiling meat unattended as it can burn very quickly.
Carnitas Tacos
- After carnitas are done, pop tortillas into the still-hot oven (or cover with a damp paper towel and microwave) until warmed.
- Top each tortilla with carnitas, chopped cilantro, onion, and a squeeze of lime juice. Serve and enjoy!
Notes
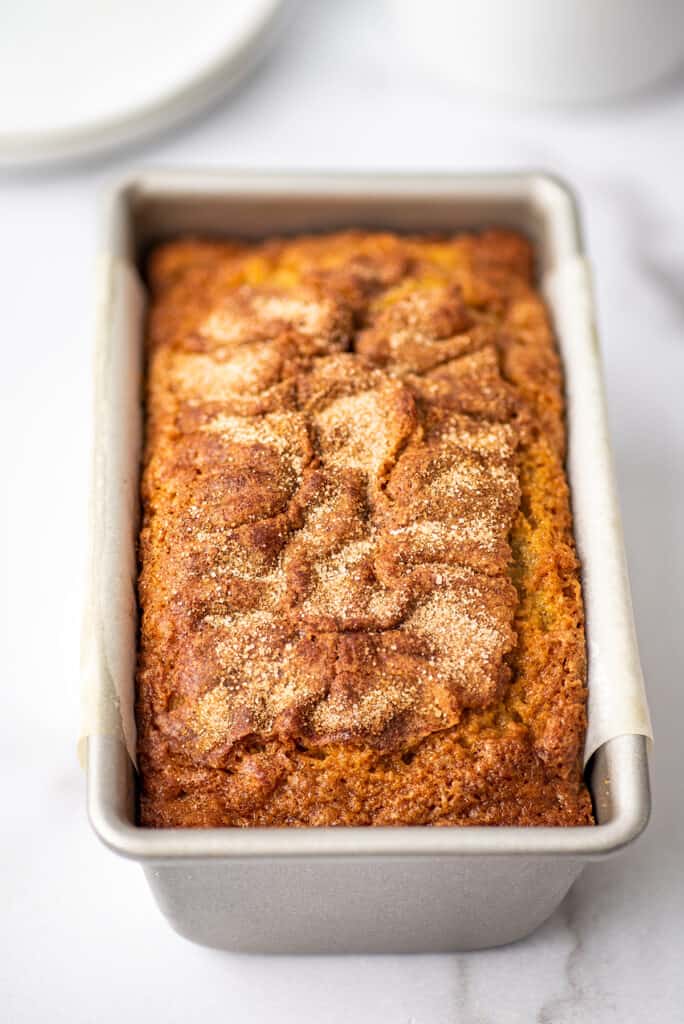
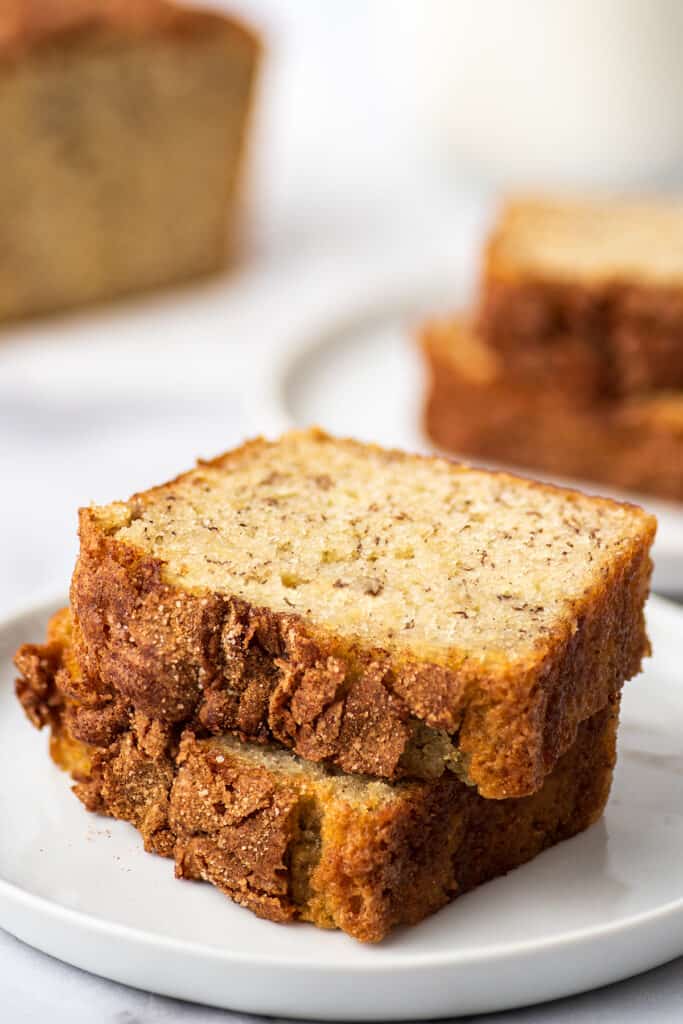
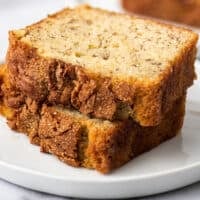
This quick and easy one-banana banana bread recipe can be made with just one banana and a few pantry staples. It bakes up moist and sweet with a decadent cinnamon sugar crust.
Last week, I shared Dominique Ansel’s banana bread (AKA my favorite banana bread recipe in the entire world) with you, and promised in the post that I’d make a mini version for all you small-batch bakers out there.
As promised, here is a cute little mini version of my favorite banana bread.

Small-batch Banana Bread
This mini version bakes in a 5.5 x 3-inch loaf pan (or can be baked as muffins in a muffin tin) and like my small-batch banana muffins , it can be made with just a single brown banana.
The bread is soft, moist, buttery, and just such a treat. And to make things even better, there’s a crinkly cinnamon sugar crust over the top that is just SO good.
Ingredient Notes


- One brown banana: You need just one brown banana for this recipe. If you have a banana, but it’s not quite brown enough for baking, check out my post on how to quickly ripen bananas .
- Butter: You can use salted or unsalted butter here, just make sure to read the recipe notes and add more or less salt depending on which you’re using.
- Cinnamon sugar: The cinnamon sugar crust, is optional (but highly recommended). If you’re not a huge fan of cinnamon or don’t want the extra sweetness, you can skip it.
How To Make One-banana Banana Bread


Combine Dry Ingredients: In a medium bowl, whisk together sugar, flour, baking powder, baking soda, nutmeg, and salt.
Combine most of the wet ingredients: In a separate medium bowl, mash the banana and whisk in the egg until well-combined. Pour banana mixture into the dry ingredients and mix until just-combined.
Add butter: Add melted butter, and mix until butter is incorporated into the batter. Don’t over mix, but there should not be melted butter remaining around the edges of the batter (note the way the batter looks in the last photo above).


Bake: Transfer the batter to your prepared loaf pan, leaving ¾-inch of space from the top of the pan (discard extra batter if there is too much). Sprinkle cinnamon sugar evenly over the top of the batter, and bake until a toothpick or knife inserted into the center of the loaf comes out clean.
Enjoy: Allow to cool in the pan for 15 to 20 minutes before removing and slicing.


I love this recipe, can I make a full-size version?
Absolutely! If you want to make a full-size loaf of this banana bread, go check out my post My Favorite Banana Bread .
How do I store this banana bread?
Store the bread tightly wrapped at room temperature for up to 3 days.
I don’t have a 5.5 x 3-inch loaf pan. What can I use instead?
Any mini loaf pan around that size will work, so if you have something that’s similar in size but not exact, feel free to use it. Just be sure to leave about ¾ of an inch of space from the top of the pan when you add your batter so it doesn’t overflow in your oven.
If you don’t own a mini loaf pan at all, these are the ones I own , or you can bake the batter in a muffin tin. It will make 5 to 6 banana muffins. Bake at 350°F for 17 to 22 minutes.

More Small-batch Breakfast Recipes
- Pancakes for One
- Homemade Mocha
- Cream Scones
- The Best Cinnamon Toast
More Banana Recipes
- Small-batch Chocolate Banana Muffins
- Banana Milkshake
- Banana Pancakes
- 20+ Banana Recipes to Use Up Your Brown Bananas
Ingredients
- ▢ ½ cup ( 100g ) granulated sugar
- ▢ ½ cup ( 60g ) all-purpose flour
- ▢ ¼ teaspoon ground nutmeg
- ▢ ¼ teaspoon baking powder
- ▢ ⅛ teaspoon baking soda
- ▢ ⅛ teaspoon salt *
- ▢ 1 medium overripe banana
- ▢ 1 large egg
- ▢ 3 tablespoons ( 42g ) salted butter melted*
Cinnamon Sugar Crust
- ▢ 1 teaspoon ( 4g ) granulated sugar
- ▢ ¼ teaspoon ground cinnamon
Instructions
Directions
- Preheat your oven to 350°F. Grease a mini loaf pan, line with parchment paper sling (optional), and set aside.
- In a medium bowl, whisk together sugar, flour, nutmeg, baking powder, baking soda, and salt.
- In a separate medium bowl, mash the banana and whisk in the egg until well-combined. Pour banana mixture into the dry ingredients and mix until just-combined.
- Add melted butter, and mix until butter is incorporated into the batter. Don’t over mix, but there should not be pools of butter remaining around the edges of the batter.
- Transfer the batter to your prepared loaf pan, leaving ¾ inch of space from the top of the pan (discard extra batter if there is too much).
Optional Cinnamon Sugar Crust
- In a small bowl, stir together sugar and cinnamon and sprinkle evenly over the top of the batter.
Bake
- Bake for 30 to 38 minutes, until a toothpick or knife inserted into the center of the loaf comes out clean.
- Allow to cool in the pan for 15 to 20 minutes before removing and slicing.
- Serve and enjoy.
Notes

Chicken Bacon Ranch Pizza
Ingredients
- 1 medium-to-large pizza crust unbaked
- 1 tablespoon olive oil
- ⅓ cup ranch
- 1½ cups (6oz) shredded mozzarella cheese
- 1½ cups cubed or shredded cooked chicken *
- ½ red onion onion cut in half root to tip, sliced, and layers separated
- 1 to 2 roma tomatoes diced, optional
- 6 slices cooked bacon chopped*
Instructions
- Preheat oven according to crust package or pizza crust recipe instructions or 400°F.
- Brush unbaked pizza crust with a light layer of olive oil and transfer crust to a lightly greased or parchment paper-lined baking sheet.
- Spread ranch over the crust, leaving a 1-inch border around the edges.
- Top crust with half of the mozzarella cheese, followed by the cooked chicken, red onion slices, tomatoes, and bacon.
- Sprinkle remaining half of the mozzarella over the top and bake pizza according to crust package or pizza crust recipe instructions, until the cheese is melted and crust is browned.
- Slice, serve, and enjoy!
Notes
- Start with 12 ounces of raw chicken, about 1 large chicken breast. Generously salt and pepper both sides of your chicken breast.
- Heat a medium skillet with a lid over medium-high heat. Grease with cooking spray or a light drizzle of olive oil. Place chicken in the pan and cook for 2 to 3 minutes, until well-browned. Flip chicken and repeat. Once both sides are browned, add about 1/2-inch of filtered water to the bottom of the pan. Cover the skillet and turn heat down to medium.
- Cook for 8 to 12 minutes, until chicken is cooked through and an instant-read thermometer inserted into the center of the breasts reads 165°F (170°F if you’re going to shred the chicken). Check occasionally to make sure the water hasn’t all evaporated, adding more if necessary. Larger breasts will take longer to cook, so be sure to check for doneness before removing from heat.
- Transfer chicken to a cutting board and allow it to rest for 10 minutes before slicing or shredding.
