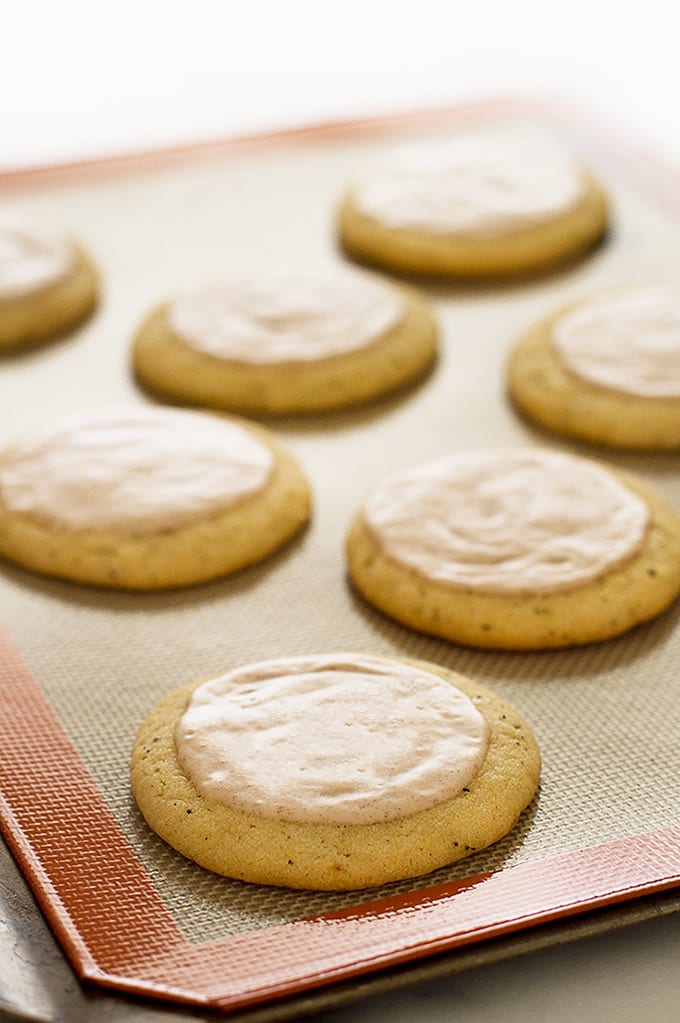
Chai sugar cookies with eggnog glaze might just be the perfect Christmas cookie.
(11/5/16 Update) Hey all, this post is one of the very earliest posts on Baking Mischief, so I gave it a little face lift. I updated the photos, cleaned up the text, and edited the recipe for clarity. I also upped the amount of eggnog glaze on the chai sugar cookies by 50 percent, because I always felt it got a little thin by the time you finished decorating. This means the calories have also been adjusted.
I did leave one older photo for posterity, so if you’d like a little blast from iPhone Christmas past, scroll all the way to the bottom of the post. 🙂

Do you have a favorite Christmas cookie, like Hot Chocolate Cookies maybe or Butterscotch Shortbread Thumbprints perhaps? To be honest, growing up, I never did. Then last year I was made aware of these chai sugar cookies by a certain someone, maybe you’ve heard of her, just my imaginary BFF, Taylor Swift.
T-Swifty (in my imagination, we have affectionate nicknames for each other) has given me many things over the years: some great music, a few really entertaining memes, the disturbingly strong desire to wear adorable, retro, belly-button-covering bikinis–some of those gifts were better than others.
But last year, with a single Tumblr post , Taylor gave me the greatest gift one could ever hope to receive from a pop star: the recipe for the perfect Christmas cookie.
Guys, snickerdoodles are a classic (even better if you make them snickerdoodle sandwich cookies and throw in some eggnog buttercream), the store-bought sugar cookies we all decorated as kids are evergreen, but chai sugar cookies with eggnog icing? These things are a Christmas party in your mouth.
The cookies themselves are just a little bit crunchy and the chai is the perfect complement to the eggnog glaze that’s just waiting there to remind you, hey, it’s Christmas .
So thank you, Taylor. I may hate the way the lob you helped inspire me to cut my hair into this summer is growing out, but we will always have our perfect Christmas cookie.

Chai Sugar Cookie Recipe Notes
- This recipe calls for a chai tea packet to be added directly to your cookie batter. Make sure you are using one with fairly finely chopped fragments (you don’t want giant crunchy bits in your cookies!). I’ve used both Tazo * and Twinings (their decaff is my chai of choice) brands with great success.
- These cookies SPREAD when baked. You can fit them on two cookie sheets, but the edges will end up touching. If you want perfectly round cookies for gifting or serving to guests, bake them in 3 batches.

Ingredients
Cookies
- ▢ 1/2 cup ( 4 oz) unsalted butter room temperature
- ▢ 1/2 cup vegetable oil
- ▢ 1/2 cup ( 100 g) granulated sugar
- ▢ 1/2 cup ( 60 g) powdered sugar
- ▢ 1 large egg
- ▢ 2 teaspoons vanilla extract
- ▢ 1 chai tea packet cut open*
- ▢ 2 cups ( 280 g) all-purpose flour
- ▢ 1/2 teaspoon baking soda
- ▢ 1/4 teaspoon salt
Glaze
- ▢ 1 1/2 cup ( 180 g) powdered sugar sifted
- ▢ 1/4 heaping teaspoon nutmeg
- ▢ 1/4 heaping teaspoon cinnamon
- ▢ 3 tablespoons eggnog or milk
Instructions
Cookies
- Using a stand mixer, beat butter until creamed. Add the oil and mix on medium for about thirty seconds. Scrape sides and bottom of the bowl and add the granulated sugar, powdered sugar, egg, vanilla, and the contents of the chai tea packet. Mix on medium until everything is incorporated.
- On low, mix in flour, baking soda, and salt until just combined.
- Refrigerate dough for about 1 hour until firm enough to handle.
- Preheat your oven to 350 degrees F. Line 3 baking sheets with parchment paper or grease well.
- Scoop heaping tablespoons of dough (just over 1 ounce) onto your cookie sheet, 8 to a sheet (these cookies spread!). With the palm of your hand, flatten dough until it is 1/4-inch thick. For more uniform-looking cookies, roll your dough into balls before you flatten them.
- Bake for 8-10 minutes until the edges are just lightly golden. Cool completely before adding the glaze.
Glaze
- In a small bowl, combine powdered sugar, nutmeg, cinnamon and eggnog, whisk together until well-combined. If glaze is too thick, continue to add liquid 1/4 teaspoon at a time until it reaches your desired consistency.
- Spread 1 heaping teaspoon of glaze on each cooled cookie.
Chai Sugar Cookies Nutritional Information Adapted from Taylor Swift , and The Pastry Queen * via Joy the Baker
Original Post Photo, circa 2015 (iPhone 5)


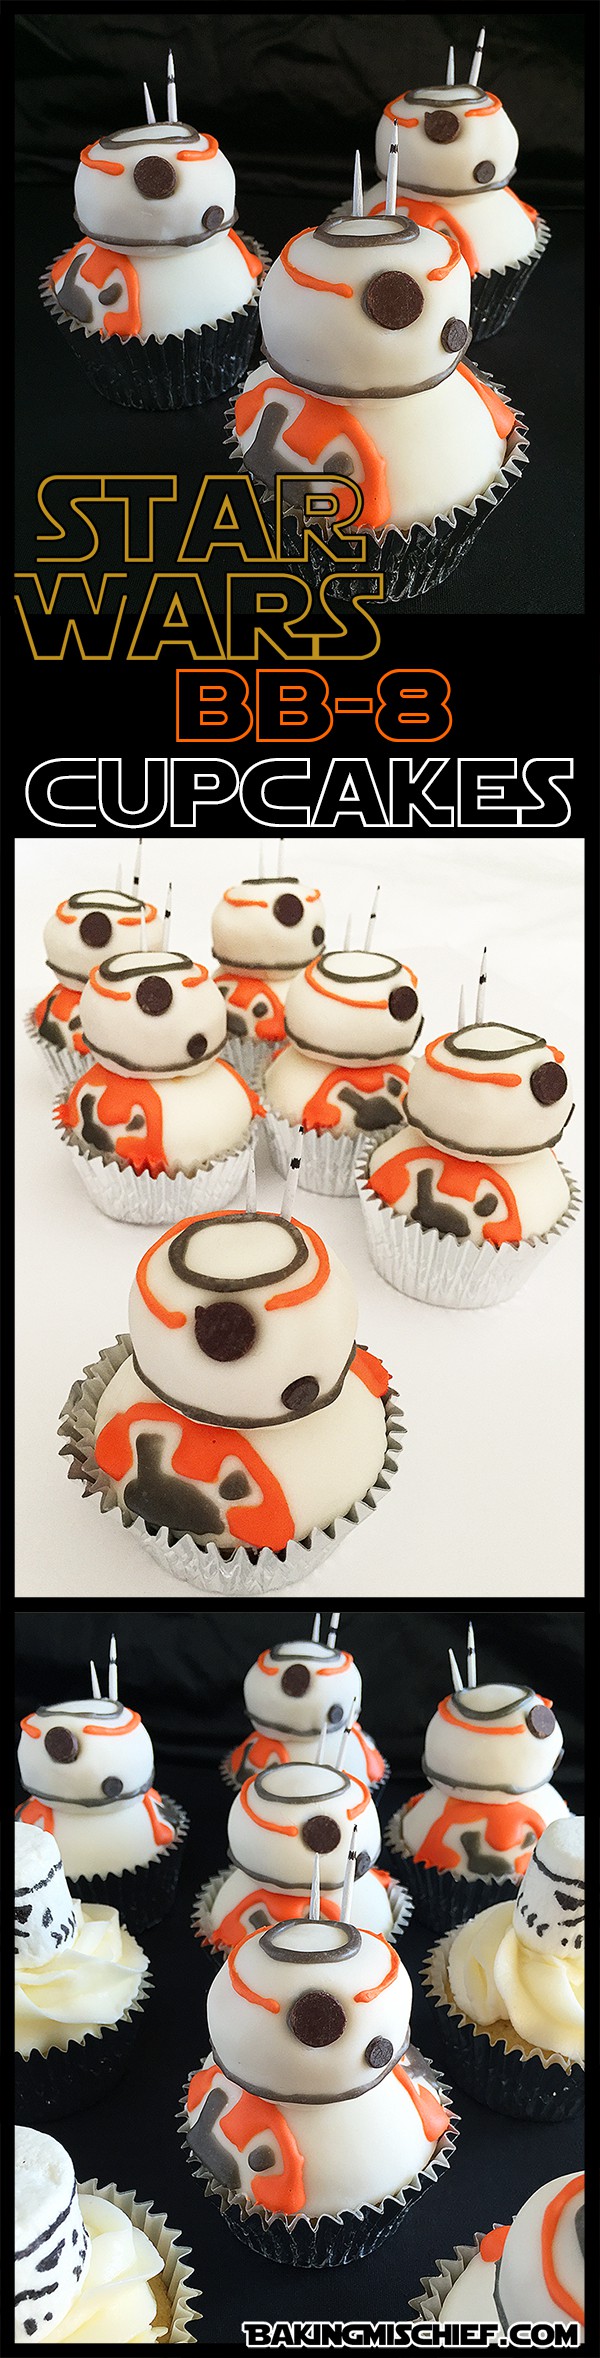
These are the droids you’re looking for! Adorable and easy(ish) Star Wars BB-8 cupcakes that anyone can make.

So, you probably haven’t heard, but there’s a new Star Wars movie coming out this month. I know, crazy. You’d think we’d have seen at least a little advertising. She says, trying to keep a straight face.
Are you excited? I’m excited.
I went through a massive Star Wars phase growing up. My first crush was Han Solo, I had a Star Wars -themed tenth-birthday party. I thought the third movie was the most romantic thing ever. I was a weird kid.
As an adult, I was sure my love for space operas had waned in the years in between, and then that full-length Star Wars: The Force Awakens trailer dropped and ten-year-old fangirl Tracy came roaring back to life.
There was space friendship, grown up Leia and Han, and the cutest droid you ever did see, and I lost my mind a little. Let’s just say, my tickets are bought, and my butt will be in a theater seat come opening weekend.
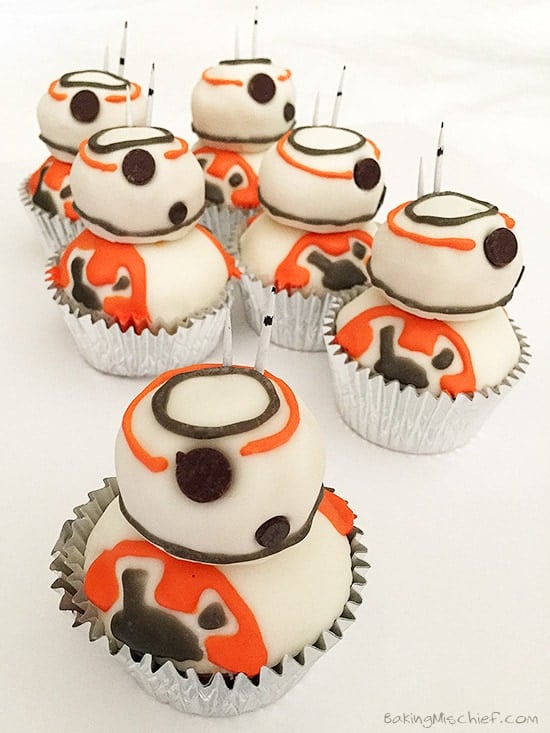

So, in honor of my very first fandom, I wanted to do something Star Wars -themed for the blog. BB-8 seemed the perfect candidate, given that she is the break-out star of the trailers (and that she is mercifully free of all the angles and fur of the other characters). She was basically just begging to be turned into a cupcake!
This was such a fun project. I’ve only worked with fondant once before and that was to sculpt Smauglock for a gingerbread house a couple of years ago (more on that another time). I wasn’t sure how covering the cupcakes and decorating them would go, but it ended up being super easy. If I can do it, anyone can make these cupcakes!
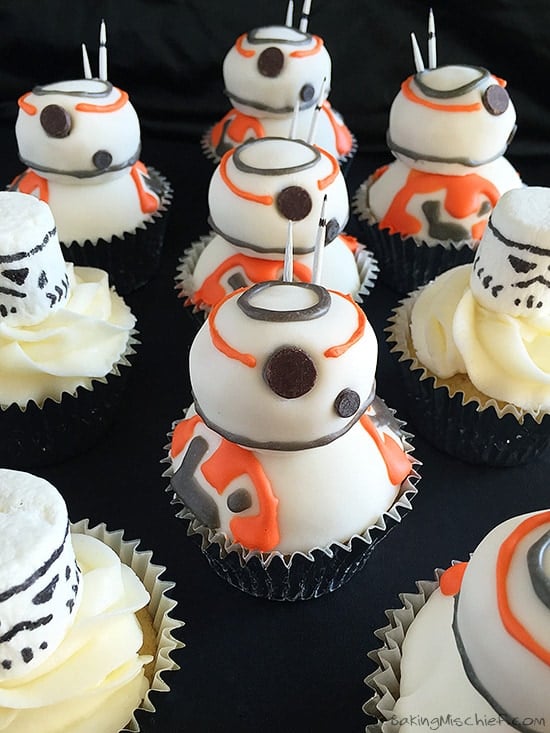

These BB-8 cupcakes can be as homemade as you want. I made my fondant, royal icing, and cupcakes, but you can also buy everything to save time. I’ve actually seen fondant at my local Vons lately, so you might be able to get everything in one trip to your grocery store.

Ingredients
- ▢ 12 cupcakes in white or silver liners - I used a double batch of Martha Stewart’s Vanilla Cupcakes
- ▢ 12 mini cupcakes - See above
- ▢ 24 ounces white frosting - I used Savory Sweet Life’s Buttercream Frosting
- ▢ 16 ounces fondant - I used The Bearfoot Baker’s Easy Fondant
- ▢ Corn starch for dusting powdered sugar will also work in a pinch
- ▢ inch 3-inch biscuit cutter or glass
- ▢ 12 chocolate chips
- ▢ 12 mini chocolate chips
- ▢ Royal icing in orange and silver/grey - I used Cake Wiz’s Royal Icing
- ▢ A piping bag w/ small tip
- ▢ 12 white toothpicks cut in half and black tips colored on in sharpie
Instructions
Prep
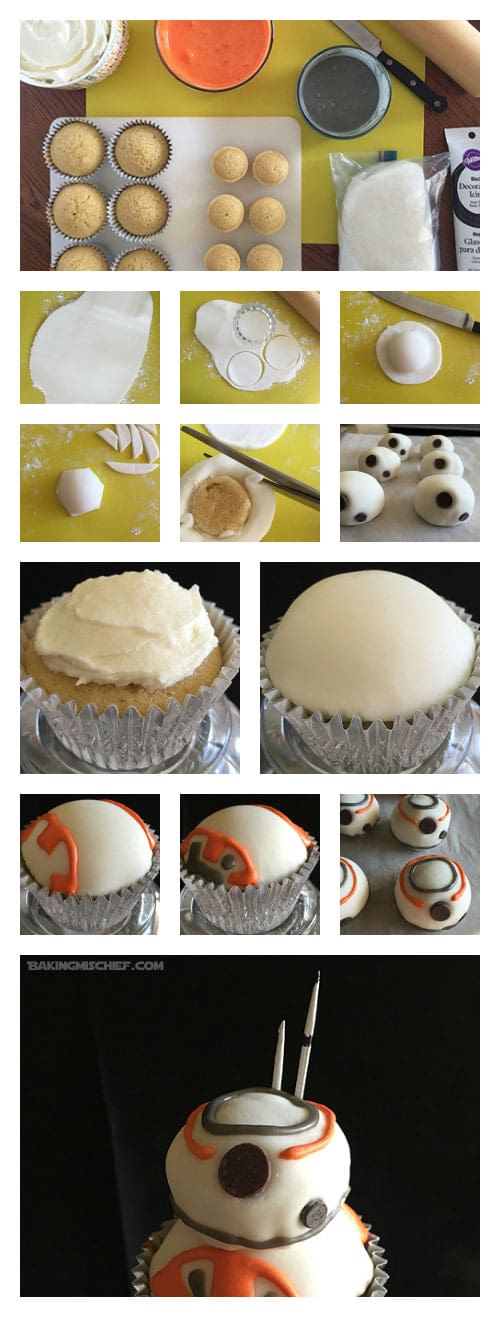
- If your mini cupcakes baked up so tall that they look too large for your bases, cut a bit off their bottoms, until they look appropriately head-sized. Set aside and make sure your work surface is crumb-free before you roll out your fondant.
- Sprinkle your work surface with a bit of corn starch and knead the fondant until it is pliable and easy to work with. If you are using marshmallow fondant, a quick 5-10 seconds in the microwave can help speed things along. Just be careful. If left in too long, it will be HOT.
Covering the Cupcakes
- Start with the heads. Because my fondant was a little dry, I rolled, cut and attached the fondant to the mini cupcakes a couple at a time. If your fondant is holding up well, go ahead and cut out all twelve at once. When your fondant is not in use, make sure to keep it in an air-tight container.
- Roll out fondant slightly thinner than 1/8 inch thick and cut out your three-inch disks. Take the mini cupcakes one at a time, frost the entire thing (sides includelightly and lay a fondant disk over it. Carefully, smooth it down so there are no folds or bubbles. Cut the excess, leaving a little space around the edges and then pick up the covered mini cupcake and, using scissors, trim the rest of the excess.
- Press a chocolate chip into the top half of the head for the eye and a mini chocolate chip to the lower right. Use a little bit of royal icing in the socket to secure them. Complete the rest of the heads and set aside.
- Roll the remaining fondant to 1/8-inch thickness and cut into 12 three-inch rounds.
- Spread frosting on top of each large cupcake. Your layer can be as thick or as thin as you’d like it, but make sure not to put a heavy coat around the edges or the frosting may squeeze out. Cover frosting with the fondant and smooth. If your cupcakes don’t have a huge dome on them and your fondant is too large, just cut it down with clean scissors (alternatively, you could just pile more frosting underneath to fill up the extra space). Finish all of the cupcakes and set aside.
Decorating
- Using a piping bag and a small tip, pipe the orange designs on the base and head. I found it helpful to use a toothpick in the head and spin it as I piped the lines. You can get as complex as you’d like.
- Switch to silver and pipe the insides of the gears and finish the head. Insert the toothpicks/antennae into the heads and let sit until the icing is dry (it won’t take long). Dab a little frosting or royal icing where you want to attach the head. Place the head on the body and you are done!
Notes


Looking for moreStar WarsTreats?


Check out my Poe’s Jacket Star Wars Cookies with Printable Stickers!
These Miniature Hot Chocolate cookies are rich, chocolatey, and adorable!
(November 2016 Update) This post has been updated with new, non-iPhone photos and edited to update some of the text and recipe notes.
If you miss the old photography, I saved one of the old photos beneath the recipe to remember the good times. 😉

How is your Christmas prep going? Mine’s going great, if by great, you mean I have bought a grand total of one present and don’t yet have a tree.
Fortunately, my family is small and mostly local so the biggest part of holiday planning is coordinating Christmas dinner and deciding what holiday-themed movies to watch this year. I can’t imagine how all of you with huge extended families who travel for the holidays handle it.
While I’ve been shirking my holiday prep duties, I have been busy in the kitchen. This week alone, I’ve made a batch of my Chai Sugar Cookies with Eggnog Glaze , Snickerdoodle Sandwich Cookies , and now these adorable little Hot Chocolate Cookies.
I’d been meaning to make these cookies since I first saw them last year, long before Baking Mischief was even a dream of an idea, but Christmas came and went and they got stashed away in my next-year file.
So as soon as it got chilly enough for a sweater, I pulled these babies out and gave them a spin. The (gorgeous) originals are huge and use jumbo marshmallows, something I just don’t keep on hand. So I miniaturized them to make them the right size to use the mini marshmallows I had in the pantry, and they turned out so cute!

These things are perfect three-bite cookies, and man, are they RICH. I would never say stop at just one baby cookie, but you totally could.
Eaten warm, they are more like the most decadent, chocolatiest brownies you have ever tasted. Cooled, the deep chocolate flavor really pops and the little bite of hard chocolate in the center is perfection. I say eat warm with milk, cool with coffee, because they are definitely best paired with something to offset that sweetness!

More Cozy Recipes
- Perfect Snickerdoodles
- Easy Hot Chocolate
- White Hot Chocolate
- Dutch Apple Pie
- Snickerdoodle Hot Chocolate
Miniature Hot Chocolate Cookies Recipe Notes
- This recipe makes 24 small cookies. If serving to people, I would recommend 3 per person.
- I generally prefer to make my cookies in a stand mixer, but this is technically a small-batch cookie recipe with about 1/3 the amount of dough you would normally produce and requires no creaming of any ingredients. I’ve made it both ways and it’s simpler just to make in a bowl with a whisk.

Ingredients
- ▢ 3 tablespoons ( 1.5 oz) unsalted butter
- ▢ 1 cup ( 6 oz) semi-sweet chocolate chips divided
- ▢ 1/3 cup + 1 heaping tablespoon ( 85 g) brown sugar
- ▢ 1 large egg
- ▢ 3/4 teaspoon vanilla extract
- ▢ 1/2 cup ( 70 g) all-purpose flour
- ▢ 1 tablespoon + 1 teaspoon ( 10 g) cocoa powder
- ▢ 1/2 teaspoon baking powder
- ▢ 1/8 teaspoon salt
- ▢ 24 mini marshmallows
- ▢ Finely chopped chocolate for topping optional
Instructions
- In a small bowl, melt butter and 2/3 cup of the chocolate chips together in the microwave. Heat for 30 seconds and stir. Then continue in 15-second bursts, stirring in between until smooth. Set aside to cool slightly for about five minutes.
- Mix brown sugar, egg, and vanilla in a large bowl until just combined. Beat in the cooled chocolate mixture.
- Mix in flour, cocoa powder, baking powder, and salt, until just combined.
- Cover and chill for 45 minutes until the dough is firm enough to handle.
- Preheat oven to 325 degrees Grease or cover two cookie sheets with parchment paper.
- Scoop dough and roll into 1-inch balls. Place them on the baking trays 2-inches apart.
- Bake for 7 minutes before removing the cookies from the oven. Place 2-3 chocolate chips in the center of each cookie and top with a mini marshmallow. Press the marshmallow firmly into the chocolate and place the tray back into the oven.
- Bake cookies for an additional 4 minutes and remove pan from the oven. While the cookies are still hot, sprinkle with chopped chocolate, if so desired.
Nutritional Information Adapted from Stepable
Original Post Photography, circa 2015 (iPhone 5)

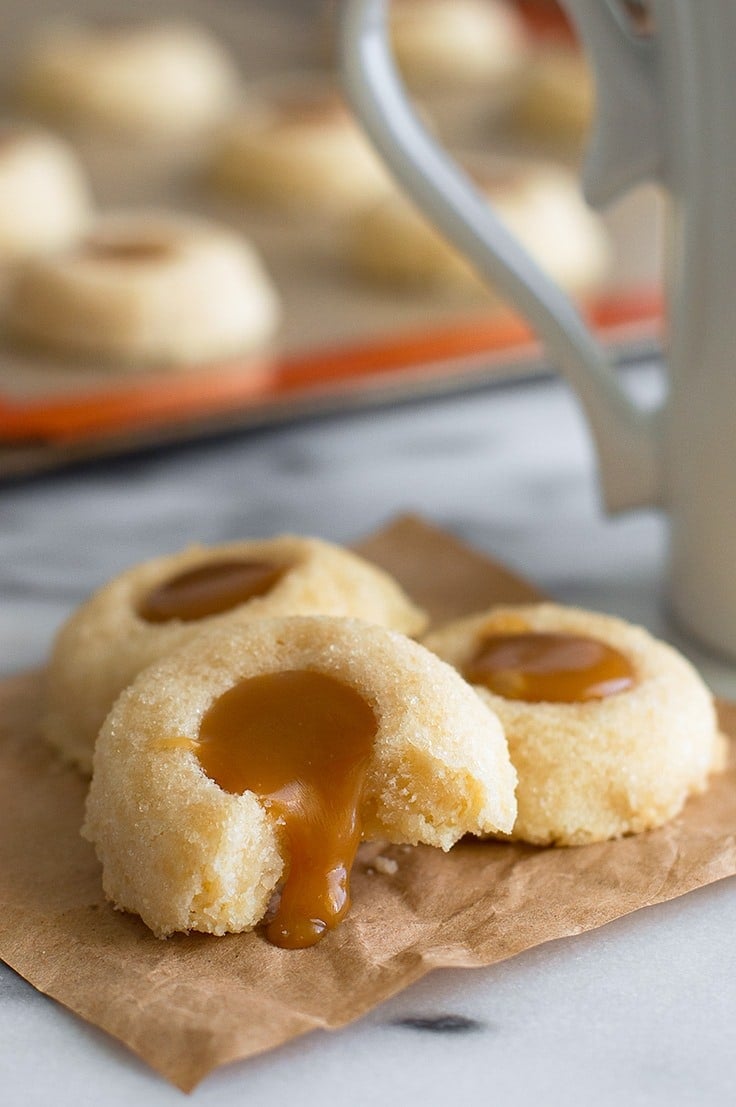
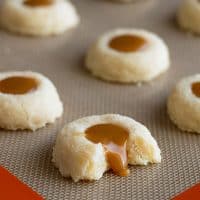
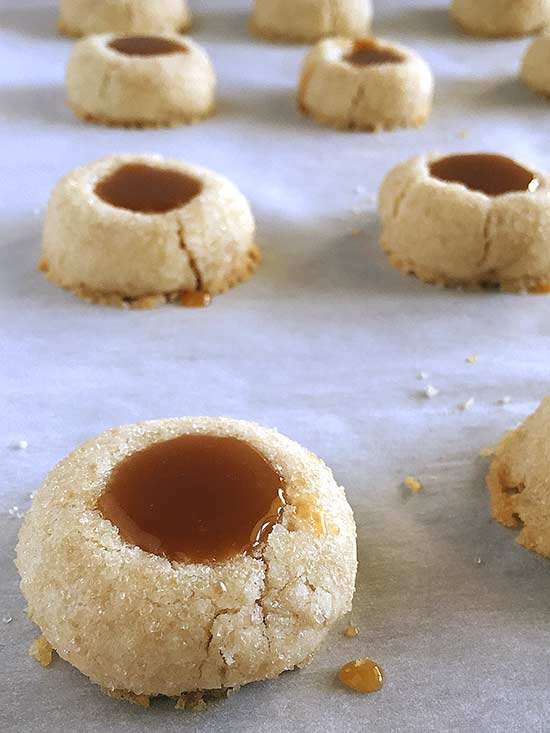
Classic shortbread thumbprint cookies with delicious homemade butterscotch filling.

Photos have been updated. Don’t worry, you’re in the right place. :)
I’m so excited to hit publish on my very first blog post today!
I wanted the inaugural post to be something that reflected the spirit of the blog to come, one that was representative of my passion for healthy recipes, eating your veggies, and branching out of your culinary comfort zone. But honestly, it’s December. It’s pretty much all cookies all the time coming out of my kitchen right now (stay tuned for salad in January).
So instead, I’m starting today with a classic cookie, my current obsession, shortbread thumbprint cookies with homemade butterscotch filling.

This is going to sound crazy, but I wasn’t a shortbread fan for most of my life. Beyond a few tried-and-true family recipes, we weren’t really bakers in my house growing up, nor were we cookie people.
I know I ate shortbread. I vaguely remember turning my nose up at those shiny blue tins of the stuff every year at Christmas, and I’d used it as a base in bars, but I didn’t understand the sweet and buttery goodness that was the homemade shortbread cookie until my sister baked up a batch for me.
My immediate reaction was, This is amazing. I never want to not be eating these. And then, Hey, World, what other wonders have you been holding out on me?!!!
Since that day, I’ve made this recipe waaaaay too many times in way too many variations (rolled in sugar, rolled in sprinkles, icing, no icing, chocolate drizzles, etc.) and have finally settled on my perfect variation: rolled in sanding sugar * or turbinado sugar *, turned into a thumbprint cookie and filled with butterscotch.
The butterscotch is the perfect, creamy complement to the buttery cookie and the sugar gives it a crunch to keep things interesting. These cookies are so good you’ll never want to let your shortbread go naked again!

Ingredients
Cookies
- ▢ 1 cup ( 8 oz) unsalted butter room temperature
- ▢ 1/2 cup ( 60 g) powdered sugar sifted
- ▢ 2 cups ( 280 g) all-purpose flour
- ▢ 1/8 teaspoon salt
- ▢ 1/4 cup sanding sugar optional
Butterscotch
- ▢ 2 tablespoons ( 1 oz) unsalted butter
- ▢ 1/4 cup ( 50 g) packed brown sugar
- ▢ 1/4 cup heavy cream
- ▢ 1/4 teaspoon salt
- ▢ 3/4 teaspoons vanilla
Instructions
Cookies
- In a large bowl, cream together the butter and sugar. Stir in flour and salt, mixing until just combined, making sure to scrape the sides and bottom of your bowl.
- Cover and chill the dough in the refrigerator until it is firm enough to handle, about 15-30 minutes. You should be able to shape scoops of it into a ball without it being too sticky or cracking. If it is over-chilled and difficult to work with, leave it out on the counter for a few minutes.
- Preheat the oven to 350°F and line a baking sheet with parchment paper.
- Using a tablespoon, scoop dough and roll into balls (slightly under 1 ounce each). If desired, roll balls in sanding sugar until completely covered. Place dough cookie sheet, 2 inches apart.
- Bake for 10 to 12 minutes. The cookies are done when their bottoms are lightly browned.
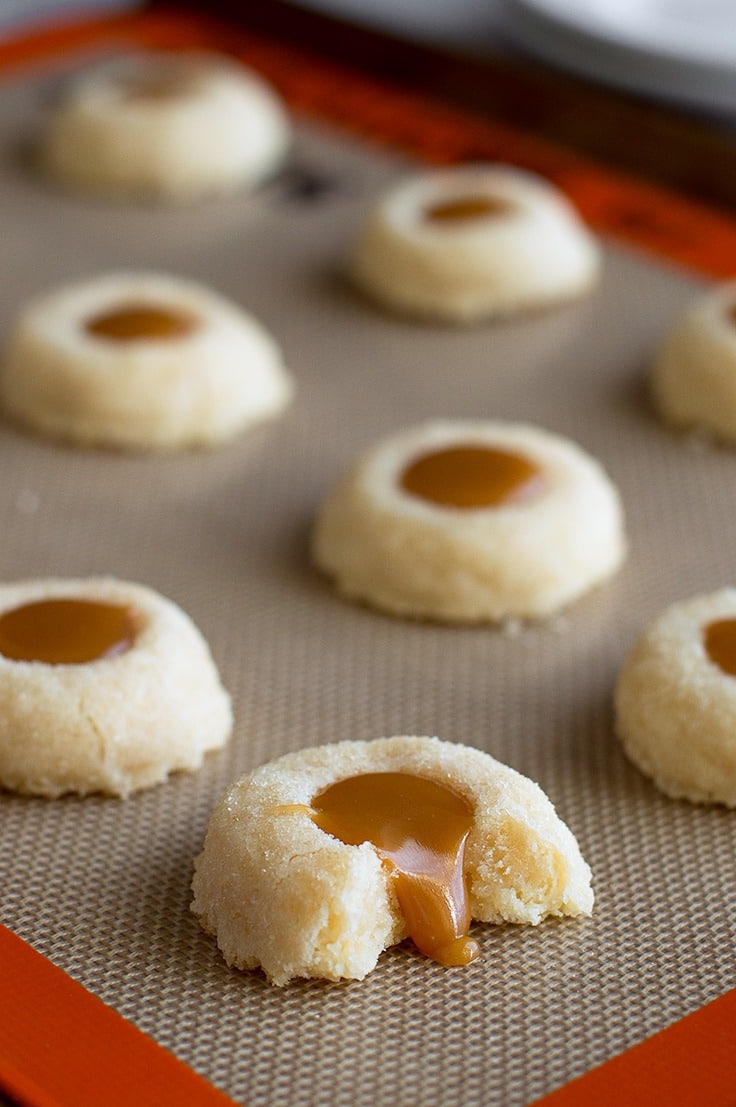
- As soon as they come out of the oven, use a round teaspoon or the back of a wooden spoon to create shallow wells in the center of each cookie. Be careful not to press too hard or you can cause the cookies to crack. Set aside.
Butterscotch
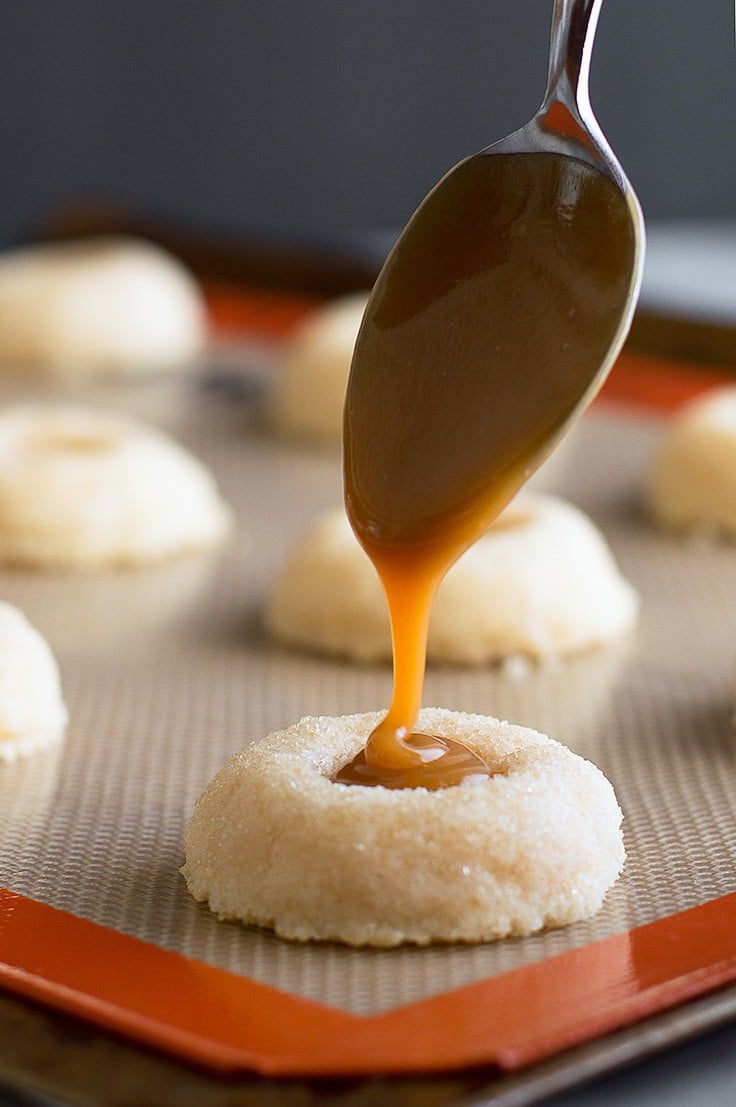
- Melt butter in a small, heavy-bottomed saucepan. Add brown sugar, salt, and cream. Stir to combine. Bring to a simmer and, stirring occasionally, cook on medium for 5 minutes.
- Remove pot from heat and stir in the vanilla. Use a teaspoon to spoon butterscotch into the thumbprints. Allow the butterscotch to cool slightly before serving.
Notes
Butterscotch Shortbread Thumbprint Cookies Nutritional Information Adapted From: In the Kitchen with Stefano Faita Butterscotch Filling Adapted From: Smitten Kitchen
Small-batch Instructions: This cookie recipe halves cleanly, just use a pinch of salt instead of 1/8 teaspoon. For the butterscotch, simmer for 4 minutes instead of 5 in a 1-quart pot, and use 1/2 teaspoon vanilla.
Original iPhone Photography, Circa 2015


Chai Sugar Cookies with Eggnog Glaze
Ingredients
Cookies
- 1/2 cup ( 4 oz) unsalted butter room temperature
- 1/2 cup vegetable oil
- 1/2 cup ( 100 g) granulated sugar
- 1/2 cup ( 60 g) powdered sugar
- 1 large egg
- 2 teaspoons vanilla extract
- 1 chai tea packet cut open*
- 2 cups ( 280 g) all-purpose flour
- 1/2 teaspoon baking soda
- 1/4 teaspoon salt
Glaze
- 1 1/2 cup ( 180 g) powdered sugar sifted
- 1/4 heaping teaspoon nutmeg
- 1/4 heaping teaspoon cinnamon
- 3 tablespoons eggnog or milk
Instructions
Cookies
- Using a stand mixer, beat butter until creamed. Add the oil and mix on medium for about thirty seconds. Scrape sides and bottom of the bowl and add the granulated sugar, powdered sugar, egg, vanilla, and the contents of the chai tea packet. Mix on medium until everything is incorporated.
- On low, mix in flour, baking soda, and salt until just combined.
- Refrigerate dough for about 1 hour until firm enough to handle.
- Preheat your oven to 350 degrees F. Line 3 baking sheets with parchment paper or grease well.
- Scoop heaping tablespoons of dough (just over 1 ounce) onto your cookie sheet, 8 to a sheet (these cookies spread!). With the palm of your hand, flatten dough until it is 1/4-inch thick. For more uniform-looking cookies, roll your dough into balls before you flatten them.
- Bake for 8-10 minutes until the edges are just lightly golden. Cool completely before adding the glaze.
Glaze
- In a small bowl, combine powdered sugar, nutmeg, cinnamon and eggnog, whisk together until well-combined. If glaze is too thick, continue to add liquid 1/4 teaspoon at a time until it reaches your desired consistency.
- Spread 1 heaping teaspoon of glaze on each cooled cookie.
