Broccoli potato soup is pure comfort food in a bowl. Packed with bacon, broccoli, and potatoes, this soup is rich and warming, but quick and easy enough for busy weeknights.
We did it, friends! We made it through the long, hot days of summer and back around to comfort food season.
No more summer salads for us. We’re doing soups , we’re doing stews , and we’re doing the most indulgent, warming, feed-your-soul sort of recipes possible.
Today I have for you, a cheesy, bacon-filled broccoli potato soup that definitely qualifies as indulgent, and should absolutely be added to your fall/winter soup rotation immediately.
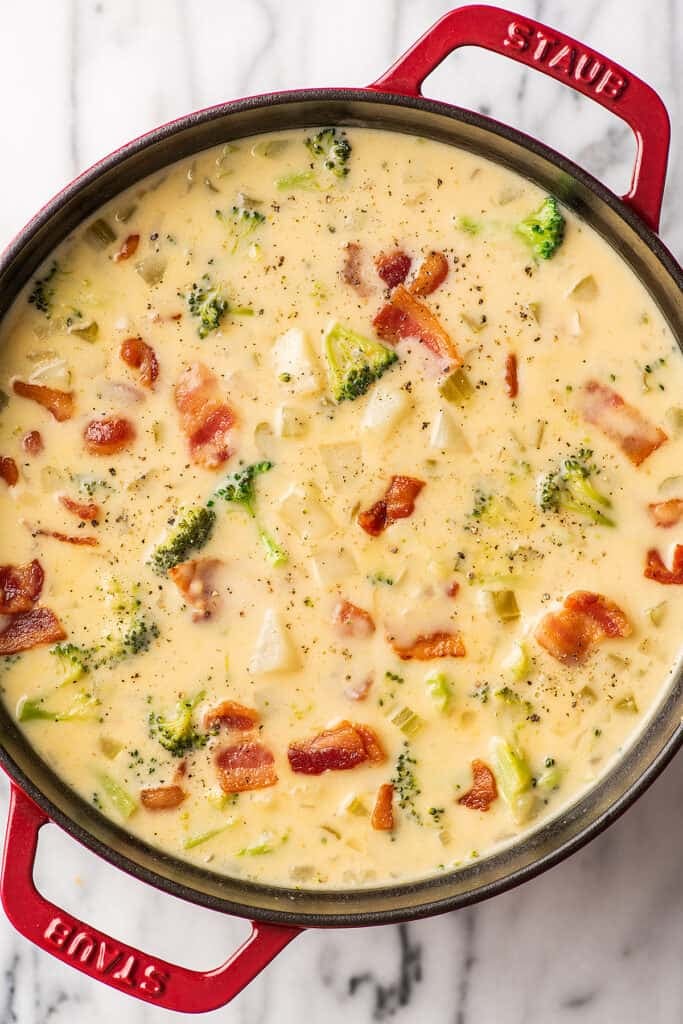

This soup is creamy and cheesy with vegetables that are cooked in bacon grease so the entire thing has a rich, lightly smokey flavor.
It’s thickened twice, once by smashing some of the potatoes into the broth, and then again with a thick and creamy cheese sauce made with butter, flour, milk, and cheese.
You end up with a totally satisfying bowl of soup that’s filling, packed with broccoli and potatoes, and perfect for chilly weeknights.
Ingredient Notes


- Bacon: Use whatever bacon you keep on hand here. I used thick-cut bacon, but thinner slices and bacon ends would work great too. For bacon substitutions, see the variations section below.
- Milk: You can use any percentage milk, but the higher fat the milk, the richer your soup will be. For an extra rich soup, you can substitute some half and half or heavy cream for part of the milk.
- Chicken broth: Homemade chicken stock , low-sodium, and regular chicken broth can all be used in this recipe. Just be sure to taste and adjust the salt as needed. Homemade and low-sodium broths will probably require quite a bit of additional salt.
How to Make Broccoli Potato Soup
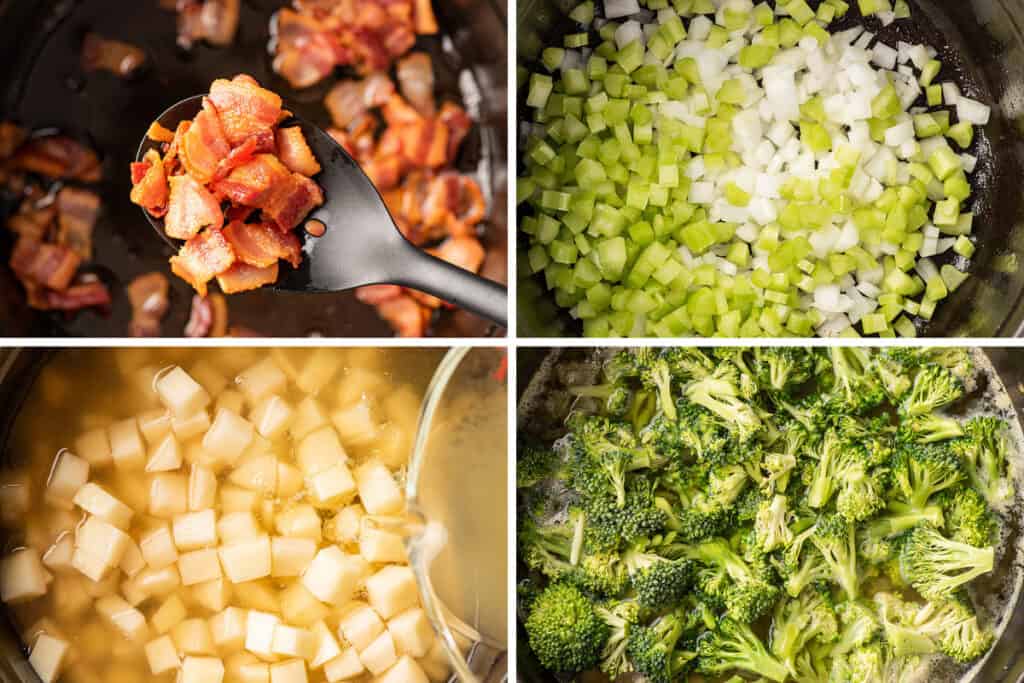

Cook bacon: In a large pot, cook bacon until just cooked through but not too crunchy. Really crispy bacon is delicious, but it’s not great in soup, so don’t overdo it. Use a slotted spoon to transfer the bacon to a paper-towel-lined plate and set aside.
Discard some of the bacon fat: Spoon off and discard all but about 1 tablespoon of bacon grease from the pot and cook the onions and celery in the grease. It might be tempting to keep more of the grease, but too much can leave a greasy sheen on the top of your soup.
Simmer: Add potatoes and chicken broth and bring to a simmer. Simmer for 10 minutes and then stir the broccoli into the soup. Bring the soup back to a simmer and cook for an additional 5 minutes or until broccoli and potatoes are tender.


Make the roux: If you don’t mind keeping an eye on two things at once, you can start the roux while your veggies simmer. Melt butter in a medium pot over medium heat. Add flour and whisk continuously for 30 seconds to 1 minute, until the flour begins to turn lightly golden. This will cook the raw taste out of your flour.
Add milk: Slowly whisk in milk, whisking out any lumps as they begin to form. Cook, whisking continuously until the mixture thickens and bubbles around the edges, about 5 minutes.
Cheese sauce time: Remove sauce from heat and stir in shredded cheese one handful at a time. When all the cheese has been incorporated, pour the cheese sauce into the soup and stir until everything is well mixed.
Finish the soup: Stir in the cooked bacon and add pepper. Taste, and add salt and more pepper if needed. Serve topped with additional cheese if desired, and a side of 20-minute cream biscuits , and enjoy!


Variations
This soup uses the same base as my other potato soup recipes, so you can mix and match ingredients as you’d like.
- Ham and potato soup: Replace the bacon with ham and instead of cooking the vegetables in bacon grease, use 1 tablespoon of olive oil. Omit the broccoli and the cheese from the sauce, and make the rest of the recipe as written.
- Cheesy bacon potato soup: Omit the broccoli from the soup.
- Cheesy sausage potato soup: Swap the bacon for chopped smoked sausage. Brown the sausage pieces and set aside. Use 1 tablespoon of olive oil to cook the vegetables instead of bacon grease. Omit the broccoli.
Can I make this ahead of time?
Yes. You can make the soup up to 48 hours in advance. It will thicken as it cools, but that’s normal. Reheat gently over medium heat until heated through.
Can I freeze broccoli potato soup?
I’m on the record as not being a huge fan of freezing potato-based soups. The texture of the potatoes doesn’t hold up well to freezing. BUT a lot of people don’t mind the texture change, so if you want to give it a try, freeze a serving and see what you think.
To freeze the soup, ladle individual servings into freezer bags or airtight freezer containers and freeze for up to 2 months. Defrost in the refrigerator and reheat gently on the stove or in the microwave.
This looks good, but how can I make a “healthier” broccoli potato soup?
If you’d like to cut the fat/calories in this dish, not a problem. You can reduce the amount of bacon by half or two-thirds and just use it for topping the soup. Then use nonfat milk in the sauce and omit the cheese as well. Cook the rest of the soup as directed in the recipe. This will significantly cut the calories, but the soup will still be delicious!


More Favorite Soup Recipes
- Creamy Chicken Noodle Soup
- Chicken Tortellini Soup
- Easy Tomato Soup
- Tomato Tortellini Soup
- Chicken Pot Pie Soup

Ingredients
- ▢ 12 ounces uncooked bacon sliced into 1-inch pieces
- ▢ ½ medium onion diced small
- ▢ 2 celery ribs diced small
- ▢ 3 ½ cups (about 2 large) russet potatoes peeled and diced medium
- ▢ 4 cups ( 2 15oz cans) chicken broth
- ▢ 3 to 4 cups (about 6 to 8oz) broccoli florets cut into small bite-sized pieces
- ▢ 5 tablespoons ( 70g ) butter
- ▢ ¼ cup and 1 tablespoon (44g) all-purpose flour
- ▢ 2 cups milk (any percentage)
- ▢ 6 ounces ( about 1 ½ cups ) shredded cheddar cheese plus more as desired for topping
- ▢ ¼ teaspoon black pepper
- ▢ Salt
Instructions
- To a large pot, add bacon and turn heat to medium. Cook bacon until just cooked through but not too crunchy. Use a slotted spoon to transfer the bacon to a paper-towel lined plate and set aside.
- Spoon off and discard all but about 1 tablespoon of bacon grease from the pot. Add onions and celery and cook over medium heat for about 5 minutes, until the onions begin to turn translucent around the edges.
- Add potatoes and chicken broth and bring to a simmer. Simmer for 10 minutes and then stir the broccoli into the soup.
- Bring the soup back to a simmer and cook for an additional 5 minutes or until broccoli and potatoes are tender.
- In a medium pot, melt butter over medium heat. Add flour and whisk continuously for about 1 minute, until the flour begins to turn lightly golden.
- Slowly whisk in milk, whisking out any lumps as they begin to form. Cook, whisking continuously until the mixture thickens and bubbles around the edges, about 5 minutes.
- Remove sauce from heat and stir in shredded cheese one handful at a time. When all the cheese has been incorporated, pour the cheese sauce into the soup and stir until everything is well mixed.
- Stir in the cooked bacon.
- Add pepper. Taste, and add salt and more pepper if needed.
- Serve with additional cheese if desired, and enjoy!
Three different ways to make delicious, easy homemade whipped cream.
Whipped cream is one of those things you don’t really need a recipe for. You get some cream, add some sugar, and agitate the mixture until it resembles something that usually comes out of a spray can.
But it’s nice to have a starting point, especially if you’re like me and can never remember the ideal ratios, so let’s have a little chat about homemade whipped cream.

Ingredient Notes

- Heavy cream/heavy whipping cream: You can use heavy cream (30–36% milk fat) and heavy (whipping) cream (36%+ milk fat) interchangeably when making whipped cream. Heavy whipping cream with its higher milk fat content will give you a slightly more stable whipped cream, but the difference is negligible. Have leftover whipping cream? Check out What to Do With Leftover Whipping Cream for ideas on using up the leftovers.
- Granulated or powdered sugar: I prefer to use powdered sugar in whipped cream because it contains cornstarch which also helps stabilize whipped cream (makes it less prone to slumping and weeping), but use whichever sugar you have on hand. Just keep in mind that by weight, 1 tablespoon of granulated sugar is almost twice as much as 1 tablespoon of powdered sugar, so whipped cream made with the same volume of granulated sugar will be much sweeter than whipped cream made with powdered sugar.
- Extracts and additional flavorings: Extra flavoring is optional, but a little vanilla is always a welcome addition. Other good options are citrus extracts, peppermint extracts, or even a bit of alcohol (more on that later).
How to Make Whipped Cream (3 Ways)
There are three main ways to make whipped cream at home, using a stand mixer, a bowl and whisk (or handheld mixer ), or using a mason jar, and while your tools may vary, the method is pretty much the same for all of them.
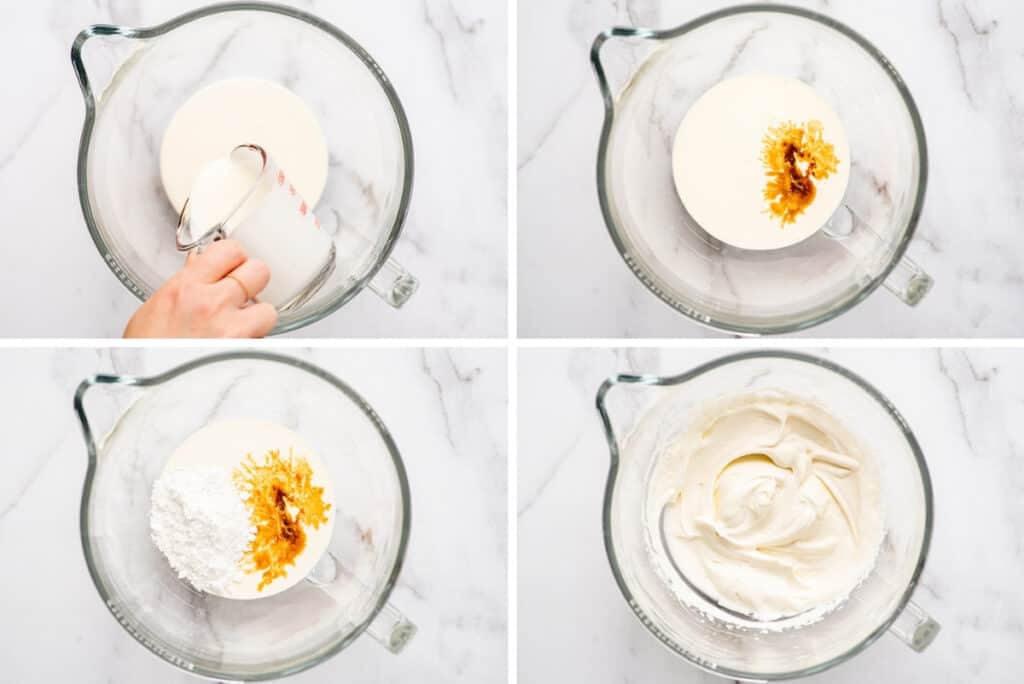

Combine all your ingredients in a bowl (or jar).
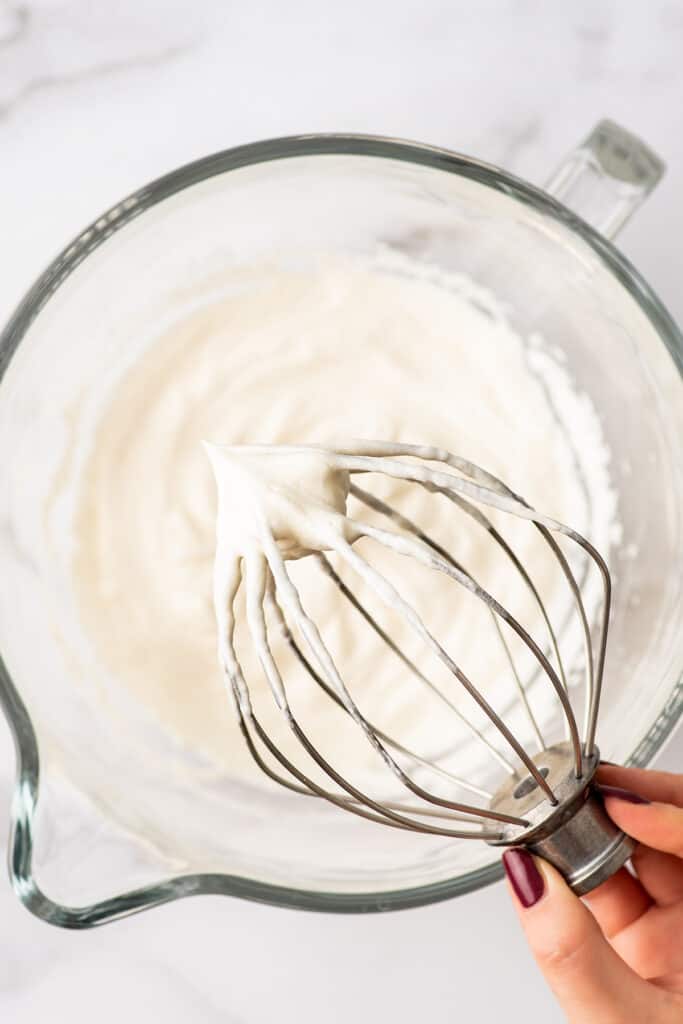
Vigorously mix ingredients until the whipped cream reaches your desired consistency. This could take as little as 2 minutes for a small amount of cream in your stand mixer or up to 15 minutes using the mason jar method.
Making Whipped Cream With a Stand Mixer
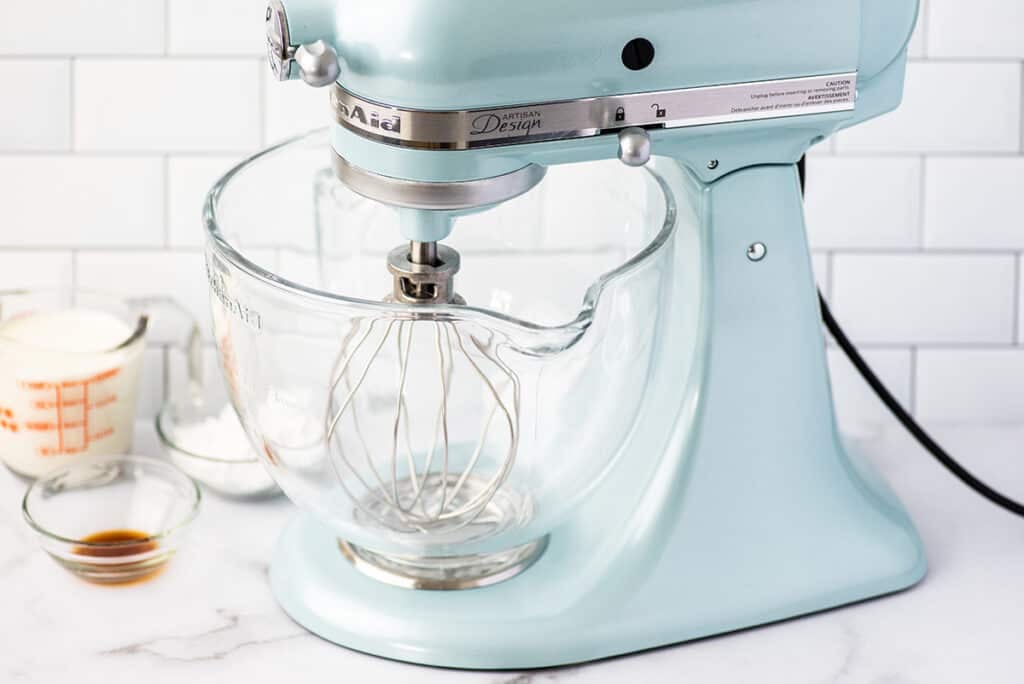

This is my favorite method, especially if I’m whipping a large amount of cream.
- Pros: This is the fastest way to make whipped cream, and the high sides of a stand mixer bowl mean that you won’t splatter cream around your kitchen while making it.
- Cons: Stand mixers are expensive and not everyone has (or needs!) one. It’s easy to whip your cream too much and accidentally start to make butter. Depending on your stand mixer, it may not be able to handle whipping small amounts of cream. My model’s limit is anything under about ½ cup of cream.
Making Whipped Cream With a Bowl and Whisk (or Handheld Mixer)
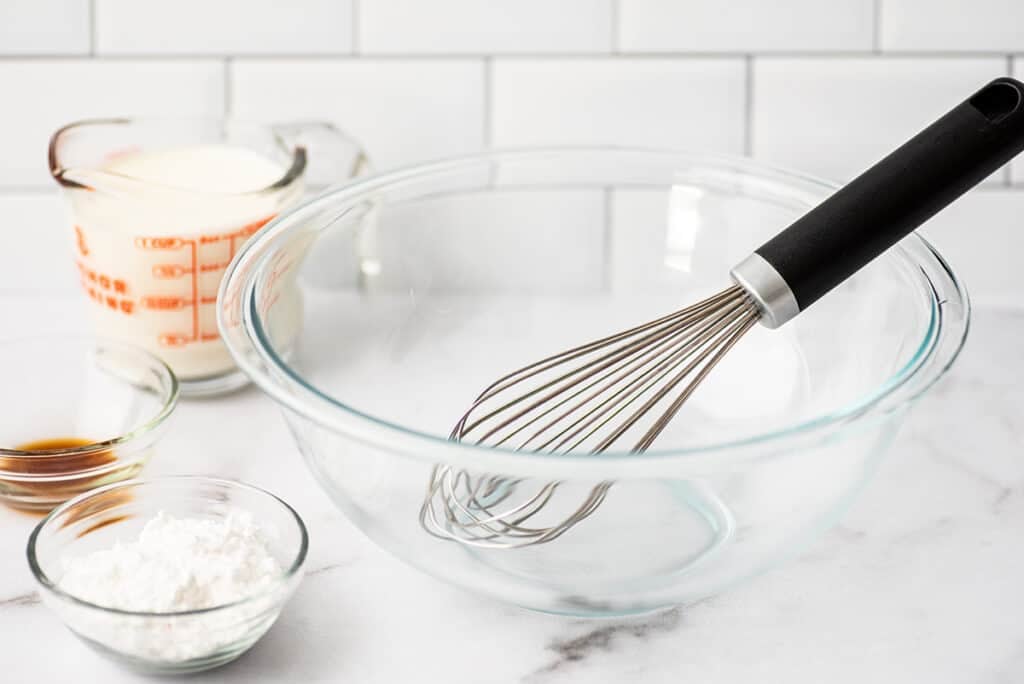

Because I make so many small-batch recipes, this is actually the method I use most often since it works well with almost any amount of cream.
- Pros: More convenient to pull out than a bulky stand mixer and much cheaper. Can whip even small amounts of cream and you have better control over the consistency of the final product since you can monitor it more closely.
- Cons: Takes longer, especially when using just a whisk. Your arm’s probably going to get tired. 😉
Making Whipped Cream With a Mason Jar
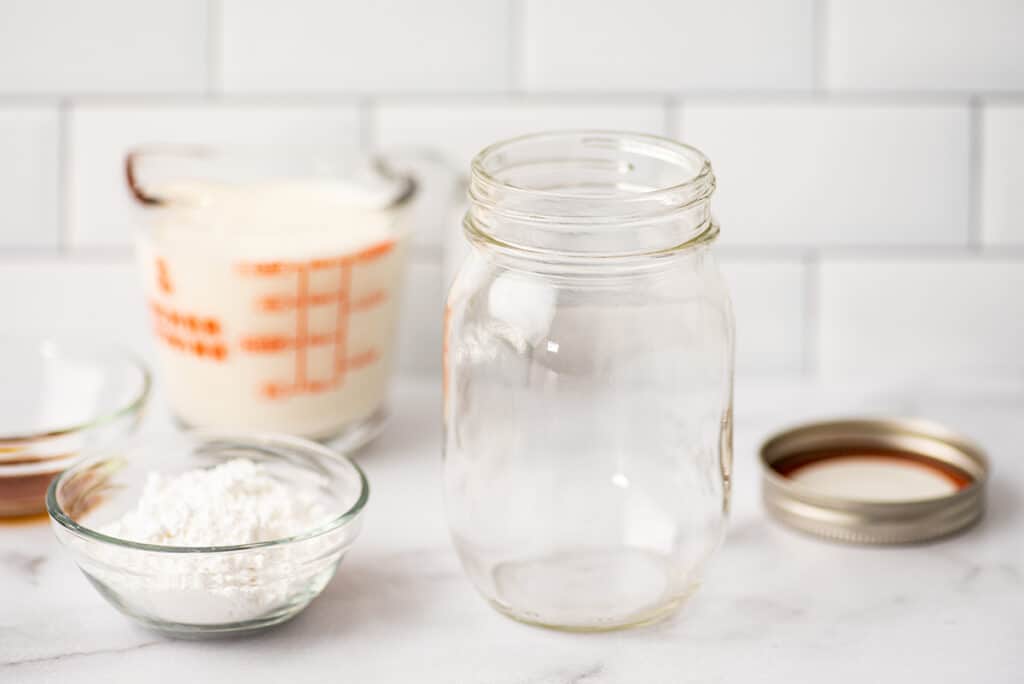

The mason jar method, where you put heavy cream in a jar, seal it, and then shake to whip it, technically works, but it’s definitely my least favorite of the bunch, and I only recommend it under pretty specific circumstances.
- Pros: Great for occupying tiny kitchen “helpers” or as a fun afternoon project. A solid backup in the unlikely event that you find yourself in a kitchen with no bowls and no whisks.
- Cons: A lot of work and not at all time-efficient. It’s difficult to get the cream past very soft peaks, so whipped cream made this way is best for spooning over drinks. You definitely will not be able to pipe it.
Variations
Customize your whipped cream with the following modifications (all mix-in measurements are for the full batch of whipped cream using 1 cup of heavy cream).
- Cream cheese whipped cream: Use 4 ounces of cream cheese. Beat the sugar and vanilla into softened cream cheese until well-mixed. In a separate bowl, whip heavy cream into stiff peaks and then fold the whipped cream into the cream cheese mixture until uniform in color.
- Chocolate whipped cream: Sift 3 tablespoons of cocoa powder in along with the sugar before whipping.
- Peanut butter whipped cream: Add ¼ cup of peanut butter before whipping.
- Coffee whipped cream: Add 2 teaspoons instant espresso powder along with the rest of the ingredients.
- Cinnamon Whipped Cream: Add ½ teaspoon ground cinnamon along with the rest of the ingredients.

How much whipped cream will this make?
A good rule of thumb is that whipping cream will double its volume. So whipping 1 cup of heavy cream will make (about) 2 cups of whipped cream.
Can you make whipped cream with half and half?
No. Cream must contain at least 30% milk fat to whip. Half and half, which contains 10.5–18% milk fat will not whip into whipped cream no matter how long you work at it.
Can you freeze leftover whipped cream?
Yes (but…). Whipped cream freezes pretty well. I like to freeze leftovers to use in my hot chocolate or for topping quick desserts, but I wouldn’t make whipped cream just to freeze it because it can separate and begin to deflate after being frozen and thawed.
It’s also prone to picking up an “off” taste from the freezer, so you want to use it fairly quickly, within a couple of weeks.
To freeze whipped cream , pipe or spoon individual servings onto a parchment paper-lined plate or baking sheet and freeze until solid. Once solid, cut the parchment paper into squares and transfer the whipped cream (still on the paper) to a freezer bag.
When you’re ready to use the whipped cream, you can add it frozen straight to warm drinks or allow it to sit at room temperature for 15 to 20 minutes to thaw.
Can I double this recipe?
Absolutely. To change the recipe yield, hover over the serving size in the recipe card below or click if you’re on mobile, and slide the slider.
Doubling note: If doubling the recipe and using the mason jar method, you’ll need to size up to a quart-size mason jar.
Recipe Notes
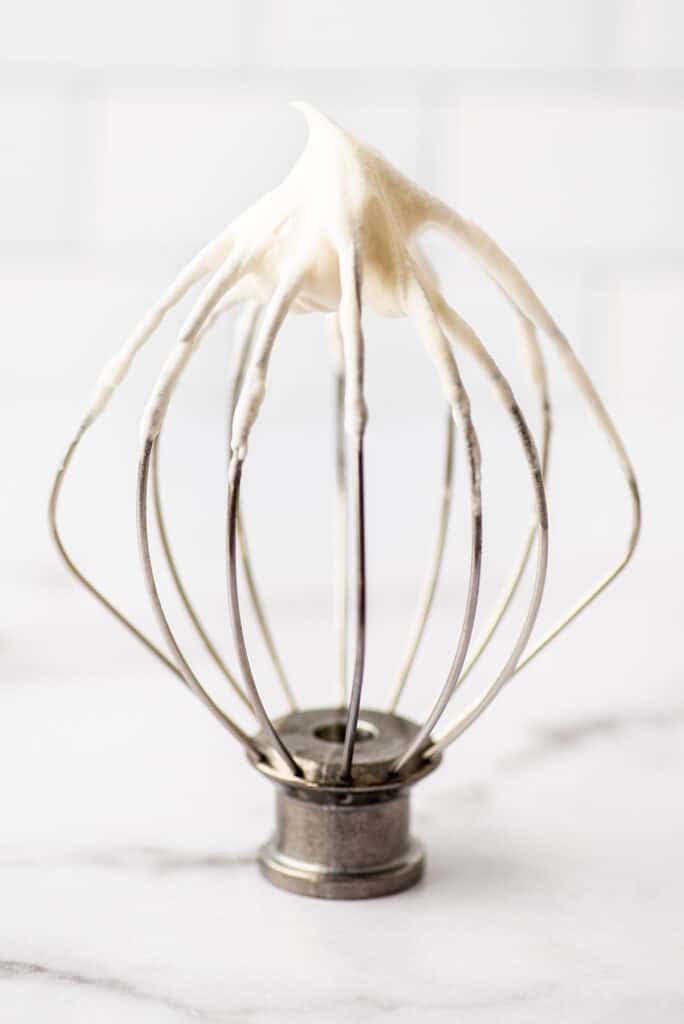
- Soft, medium, or stiff peaks: This refers to the what happens to the cream when you lift the whisk straight out. Soft peaks will start to stand up and then sort of collapse back into the cream. Medium peaks will stand but flop over at the tip. Stiff peaks will stand straight up. In different recipes, you’ll see instructions out there for all three because it’s really up to you and your personal preference. If I’m spooning whipped cream over a drink, soft peaks are fine. If you are going to pipe the whipped cream or pile berries on top of it, you are going to want to beat it to stiff peaks. Stiff peaks also seem to hold up better if you are not serving the whipped cream right away. Just be careful not to over-beat and turn your cream into butter!
- Infusing with alcohol: I usually find that 1 tablespoon of alcohol to 1 cup of cream is a good amount–too much liquid and your cream might not whip up. Make sure the alcohol is very cold and add it to the cream and sugar before whipping.


Drink Recipes to Top With Whipped Cream
- Hot Chocolate
- Crockpot Hot Chocolate
- The Best Chocolate Milkshake
- Homemade Mocha
Recipes to Top With Whipped Cream
- The Best Waffles
- Banana Pudding
- Oreo Cheesecake Bites
- Mini Pumpkin Pie

Ingredients
Full Batch
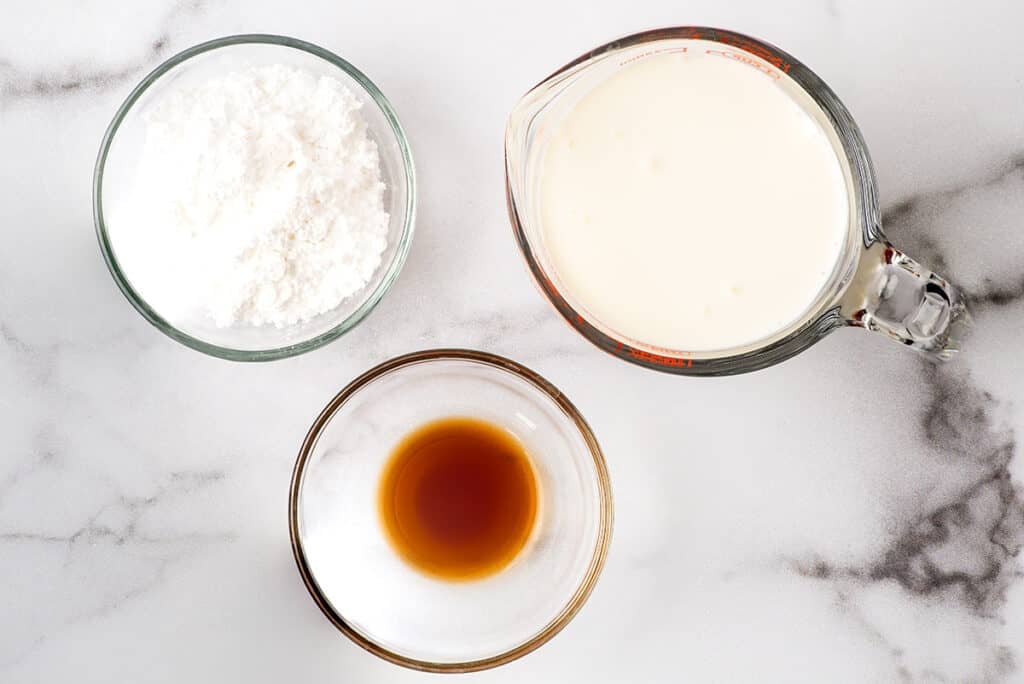
- ▢ 1 cup heavy cream
- ▢ ½ teaspoon vanilla extract optional
- ▢ 2 tablespoons to ¼ cup (15-30g ) powdered sugar *
Single Serving
- ▢ 2 tablespoons heavy cream
- ▢ A couple drops vanilla extract
- ▢ 1 to 2 teaspoons ( 3-5g ) powdered sugar *
Instructions
Stand Mixer
- Combine ingredients in the bowl of your stand mixer and using the whisk attachment, mix, starting on low, working up to medium-high, until cream reaches your desired consistency, 3 to 6 minutes.
Bowl and Whisk/Handheld Electric Mixer
- Place bowl and whisk in the freezer for 15 minutes.
- Once bowl is cold, remove from the freezer and combine heavy cream, vanilla, and sugar.
- Whisk vigorously until cream reaches desired consistency, 5 to 15 minutes depending on the amount of cream.
Mason Jar
- Place your mason jar and lid in the freezer for at least 15 minutes, until it is very cold.
- Pour ingredients into the mason jar, top tightly with the lid, and shake until the contents of the jar no longer sound like liquid, 5 to 7 minutes. Check consistency and continue to shake if it is not done.
Notes
How to make chicken stock: your complete guide to making an easy, rich, and delicious chicken stock at home.
A while back I posted an epic guide to making Roasted Chicken (which you should definitely go read if you haven’t already!). And as a follow-up, I have another guide for you: How to make chicken stock (from the leftover chicken carcass).
If you’ve never made homemade chicken stock before, friend, you are in for such a treat.

Why You Should Make Chicken Stock at Home
There’s a richness and depth of flavor to homemade chicken stock that you just can’t get from stock that comes from a box. The store-bought stuff is perfectly fine and serviceable; I use it all the time. But when you taste something made with homemade stock, oh man, can you taste the difference.
The good news is that while making homemade chicken stock is definitely a time commitment–it needs about 4 hours of simmering time–it’s not tough to make or labor-intensive.
You can let it simmer on a lazy Sunday so your house smells like a holiday while you watch Netflix, or throw it on the stove in the morning while you’re deep cleaning the house and feel doubly productive when you’re loading freshly made stock into your fridge around mid-afternoon.


What You Need to Make Chicken Stock
- Roasted chicken carcass: (Turkey will also do.) If using the carcass of a smaller (less than 3 pounds) chicken, like a small store-bought rotisserie chicken, you might want to use two to make sure your stock has enough flavor.
- Vegetables: You want flavorful but neutral veggies that are going to complement the chicken flavor and not clash with anything you might use the stock in later. Carrots, celery, and onion are the most common stock veggies, but some people also use things like leeks, garlic, and parsnips.
Veggie Notes: I threw some green onions in this batch of stock because they were about to go bad in my crisper and I only had half a yellow onion.
You don’t need to be too precise with your measurements. But, if you’re not sure where to start, three large carrots, three celery ribs, and one whole onion can do no wrong.
- Filtered water : You don’t have to use filtered water, but if you don’t drink tap water because you don’t like the taste, don’t use it in your stock.
- Vinegar: Vinegar, white or apple cider, is optional, but it helps break down the bones for a richer and luxurious stock. You might smell the vinegar for the first hour or two of cooking (if you really try), but don’t worry, it will not make your stock taste vinegary.
- Fine-mesh strainer : A fine-mesh strainer will strain out all the little vegetable and bone bits. You can use the strainer alone, or for perfectly strained stock, use it with cheesecloth.
- Cheesecloth : Cheesecloth will make sure all solid bits are filtered out of your stock. You can find cheesecloth at most grocery stores, usually in the baking aisle or order it cheap online .
Making Chicken Stock With Frozen Vegetables and Chicken Carcass
I almost always make my chicken stock with frozen ingredients. It’s a great way to reduce kitchen waste and means you can make the stock when you feel like it, not just when you have a chicken freshly roasted.
I freeze chicken carcasses immediately after they’ve been picked clean and keep a separate zip top bag in the freezer for spare vegetable ends and pieces. Any time I cut the top off an onion or stalk of celery, cut too many carrots, or have some veggies that look like they’re on their last leg, I scrub them, chop them, and toss them in the bag.
I know it’s time to make stock when a gallon bag’s about half full and has about equal amounts of celery and carrots with some onion in there.
You’ll use the frozen ingredients exactly the same way as fresh, they’ll just take longer to bring up to a simmer.
How to Make Chicken Stock
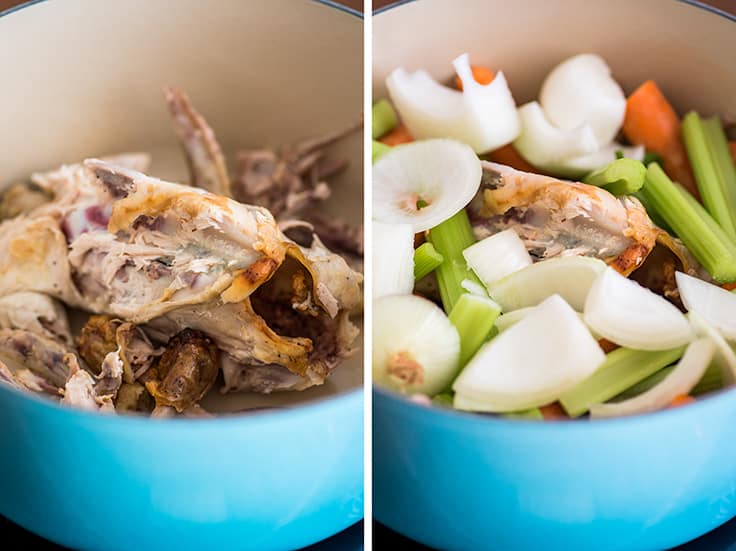

- In a large Dutch oven, combine chicken carcass and vegetables.
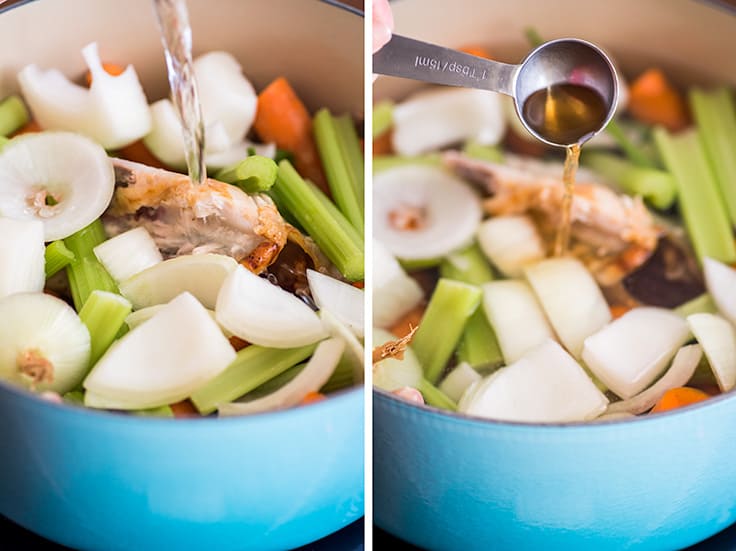

- Add 8 to 12 cups of water, enough to mostly cover the carcass and vegetables. Then pour in a tablespoon of apple cider or white vinegar to help break down the bones.
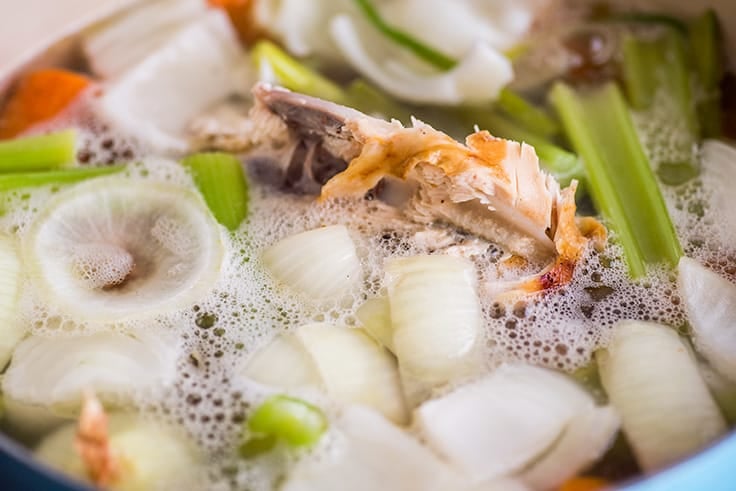

- Bring the stock to just barely a simmer. It’s hard to show in photos, but you don’t want a rolling boil, just small bubbles rising to the surface. A continuous boil can make your stock cloudy, which doesn’t hurt anything, but doesn’t look quite as pretty.
Cook for 3 to 4 hours, skimming fat off the surface occasionally, and checking to make sure the stock has not come to a boil.
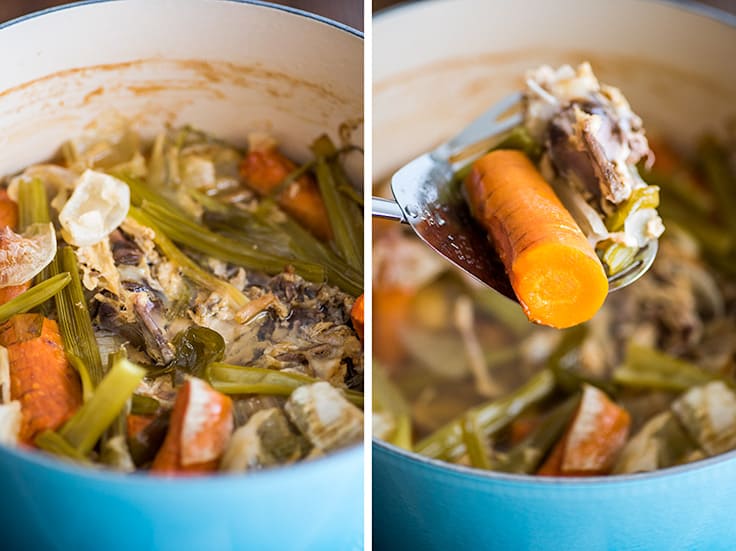

- Once the stock has simmered, and reduced by one-half to two-thirds, use a slotted spoon to remove and discard the vegetables and bones.


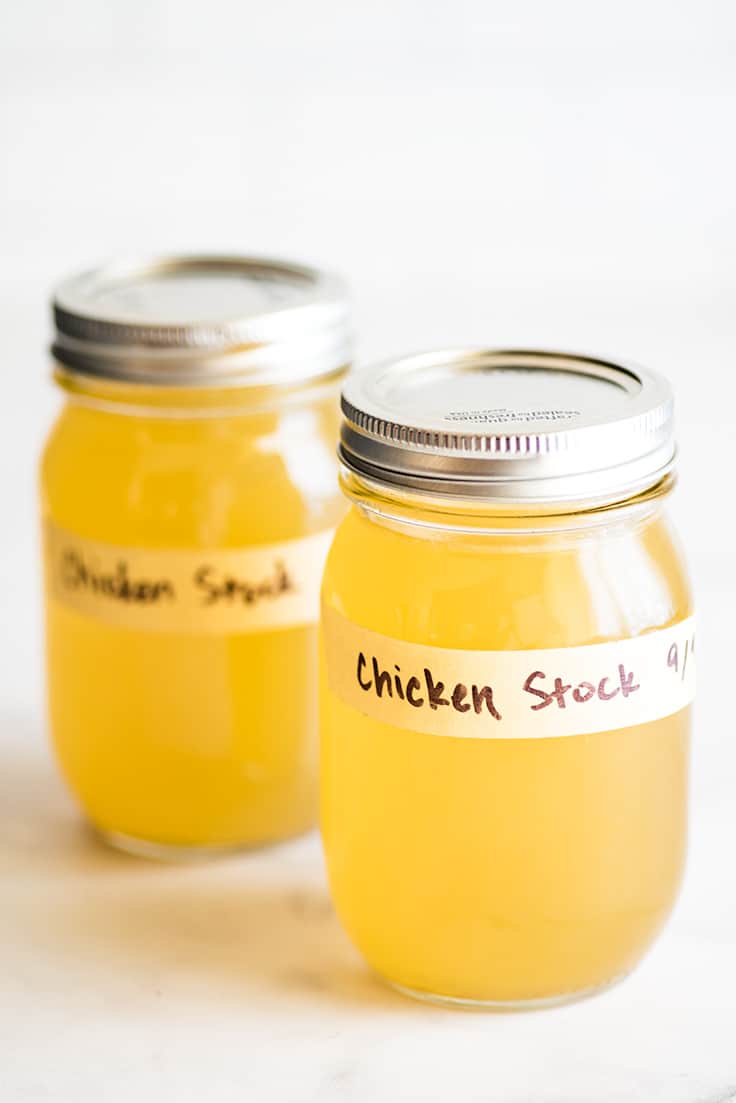
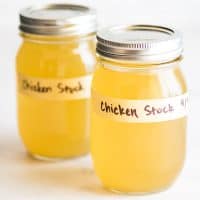
- Strain the chicken stock through a fine-mesh strainer and (optionally) a couple layers of cheesecloth folded together. Transfer it to mason jars and store in the refrigerator for up to 4 days.
The stock will become gelatinous when chilled (it will set and jiggle), and any fat will rise to the top. Scrape the fat layer off before using, and 30 seconds to a minute in the microwave will return the stock to its liquid state.
Using Homemade Chicken Stock
Chicken Stock can be used in any recipe that calls for chicken broth or stock. When using homemade chicken stock in recipes that call for broth, use half chicken stock and half water (if a recipe calls for 8 cups of chicken broth, use 4 cups stock and 4 cups water). You want to dilute the stock because it’s very rich and adds a ton of flavor, which can sometimes overpower clear soups.
The one thing to remember when making things with homemade stock is ALWAYS ADD SALT. Store-bought stocks and broths are usually quite salty, so don’t be alarmed if you find yourself adding a lot of salt to compensate.
My favorite recipes to use with homemade stock are:
- Ham and Potato Soup
- Creamy Chicken Noodle Soup
- Quick Chicken Tortellini Soup
- Creamed Turkey
- Peasant Soup
- Ground Turkey Vegetable Soup
How much stock will this make?
This should make about 4 cups/1 quart of very rich and flavorful chicken stock. If a ton of the liquid has evaporated and you are left with a more concentrated stock that is less than 4 cups, simply add water back until you reach 4 cups.
If you plan on using the chicken stock in recipes calling for chicken broth, dilute the stock using 1 cup of water to 1 cup of stock so you will get 8 cups/2 quarts of less concentrated stock that is so good in soups.
Can I freeze chicken stock?
Absolutely. You can freeze chicken stock for up to 3 months. If freezing in glass jars, be sure to leave plenty of headspace at the top so when the stock expands as it freezes it doesn’t crack the jar.
For more on my favorite freezing tips and tricks, go check out my post, How to Freeze Soup .
What’s the difference between chicken stock and broth?
This is really simple. Stock is water simmered with bones. Good stock will jiggle when chilled due to the collagen released from the bones and have a rich flavor and mouthfeel.
Broth is water simmered with meat (and sometimes bones) for a shorter period of time. It’s faster to make, less rich, and is usually seasoned while cooking.
They can be used mostly interchangeably, but you might miss some flavor and richness when using broth for a recipe calling for stock, and homemade stock should usually be thinned with water when using in recipes calling for broth.


For more How To Tutorials, you might also enjoy:
- How to Cook Chicken Breast for Salads and Sandwiches
- How to Cook Shredded Chicken
- How to Cook Chicken for Recipes
Ingredients
Special Equipment
- ▢ Fine-mesh strainer
- ▢ Cheesecloth optional
Homemade Chicken Stock
- ▢ 1 chicken carcass picked mostly clean of meat
- ▢ 3 large carrots peeled and cut into large chunks
- ▢ 3 large celery ribs cut into large chunks
- ▢ 1 large onion cut into large chunks
- ▢ 8 to 12 cups filtered water
- ▢ 1 tablespoon white or apple cider vinegar optional
Instructions
- In a large Dutch oven, combine chicken carcass and vegetables.
- Add 8 to 12 cups of water, enough to mostly cover the bones and vegetables. Add vinegar.
- Over medium-high heat, bring the stock to a simmer. Once the stock begins to simmer, turn heat down to keep it just barely simmering.
- Cook for 3 to 4 hours, skimming fat off the surface occasionally, and checking to make sure the stock has not come to a boil.
- Once the stock has simmered, and reduced by one-half to two-thirds, use a slotted spoon to remove and discard the vegetables and bones.
- Strain the stock through a fine-mesh strainer and a couple layers of cheesecloth folded together.
- Transfer the stock to mason jars, leaving plenty of headspace for expansion if freezing, and store in the refrigerator for up to 4 days or the freezer for 2 to 3 months.
Notes

Broccoli Potato Soup
Ingredients
- 12 ounces uncooked bacon sliced into 1-inch pieces
- ½ medium onion diced small
- 2 celery ribs diced small
- 3 ½ cups (about 2 large) russet potatoes peeled and diced medium
- 4 cups ( 2 15oz cans) chicken broth
- 3 to 4 cups (about 6 to 8oz) broccoli florets cut into small bite-sized pieces
- 5 tablespoons ( 70g ) butter
- ¼ cup and 1 tablespoon (44g) all-purpose flour
- 2 cups milk (any percentage)
- 6 ounces ( about 1 ½ cups ) shredded cheddar cheese plus more as desired for topping
- ¼ teaspoon black pepper
- Salt
Instructions
- To a large pot, add bacon and turn heat to medium. Cook bacon until just cooked through but not too crunchy. Use a slotted spoon to transfer the bacon to a paper-towel lined plate and set aside.
- Spoon off and discard all but about 1 tablespoon of bacon grease from the pot. Add onions and celery and cook over medium heat for about 5 minutes, until the onions begin to turn translucent around the edges.
- Add potatoes and chicken broth and bring to a simmer. Simmer for 10 minutes and then stir the broccoli into the soup.
- Bring the soup back to a simmer and cook for an additional 5 minutes or until broccoli and potatoes are tender.
- In a medium pot, melt butter over medium heat. Add flour and whisk continuously for about 1 minute, until the flour begins to turn lightly golden.
- Slowly whisk in milk, whisking out any lumps as they begin to form. Cook, whisking continuously until the mixture thickens and bubbles around the edges, about 5 minutes.
- Remove sauce from heat and stir in shredded cheese one handful at a time. When all the cheese has been incorporated, pour the cheese sauce into the soup and stir until everything is well mixed.
- Stir in the cooked bacon.
- Add pepper. Taste, and add salt and more pepper if needed.
- Serve with additional cheese if desired, and enjoy!
