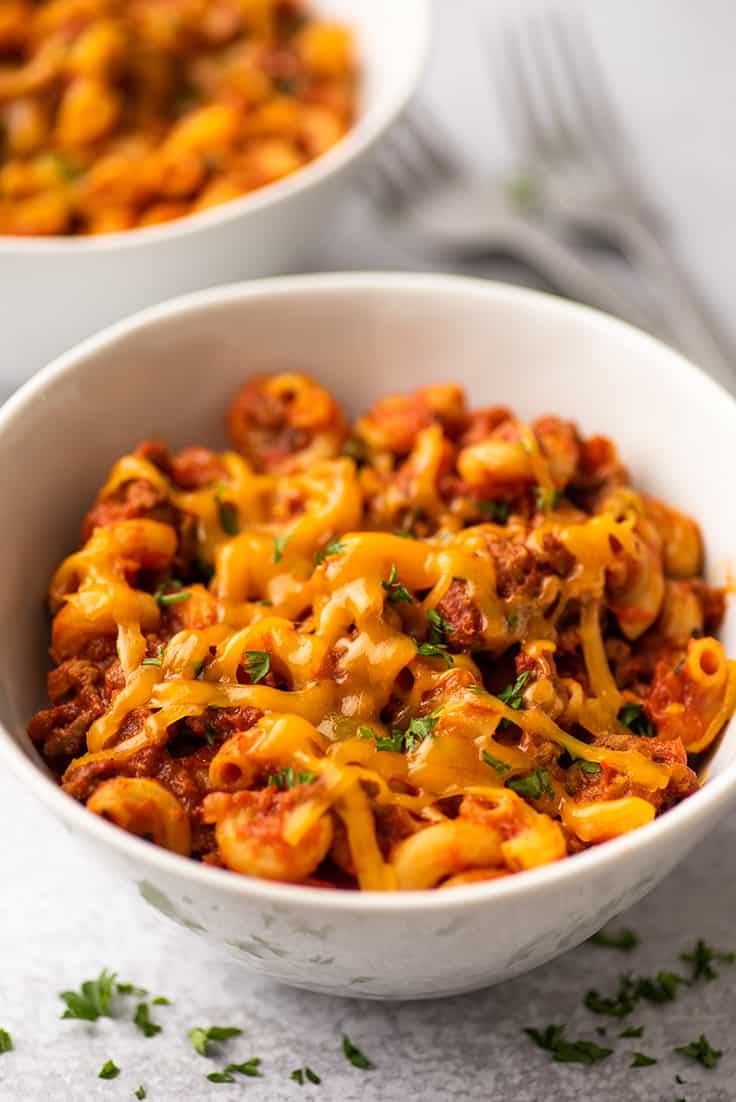
This American goulash recipe is an easy one-pot meal made with ground beef and macaroni pasta in a tangy red sauce and covered with cheddar cheese. It’s classic American comfort food.
Did you eat American goulash growing up? I didn’t, but I got completely obsessed with it a while back when I was working on my Hungarian goulash recipe . This American version has total grown-up Hamburger Helper vibes and feels like such a nostalgic treat every time you make it.
It’s simple to throw together, and even though it requires a slightly longer cooking time than most of my favorite weeknight meals, most of the cooking time is hands-off so it’s still a great candidate for busy nights when you need something easy and filling for dinner.

What is American goulash?
American goulash, also known as chop suey and in casserole form, the Johnny Marzetti, is an Americanized version of Hungarian goulash, a dish that was brought to the United States by Hungarian immigrants.
It’s almost always made with ground beef, pasta (usually macaroni), and tomato sauce (either homemade or store-bought), and seasoned with Italian seasonings.
Ingredient Notes
- Ground beef: I prefer to use 85% ground beef in this recipe, but you can use whatever ground beef you have on hand.
- Tomato paste: Tomato paste helps add depth of flavor to the sauce. You won’t use a full can in this recipe, so check out my post What to Do With Leftover Tomato Paste for storage tips and recipe ideas to use up the leftovers.
- Crushed tomatoes: This is my preferred brand of canned tomatoes. If all you have are diced, diced will work here too. You’ll just have a chunkier red sauce.
- Elbow macaroni: Classic American goulash uses elbow macaroni, but you could also use other small-to-medium pasta in this dish like medium shells or rotini.
How to Make American Goulash
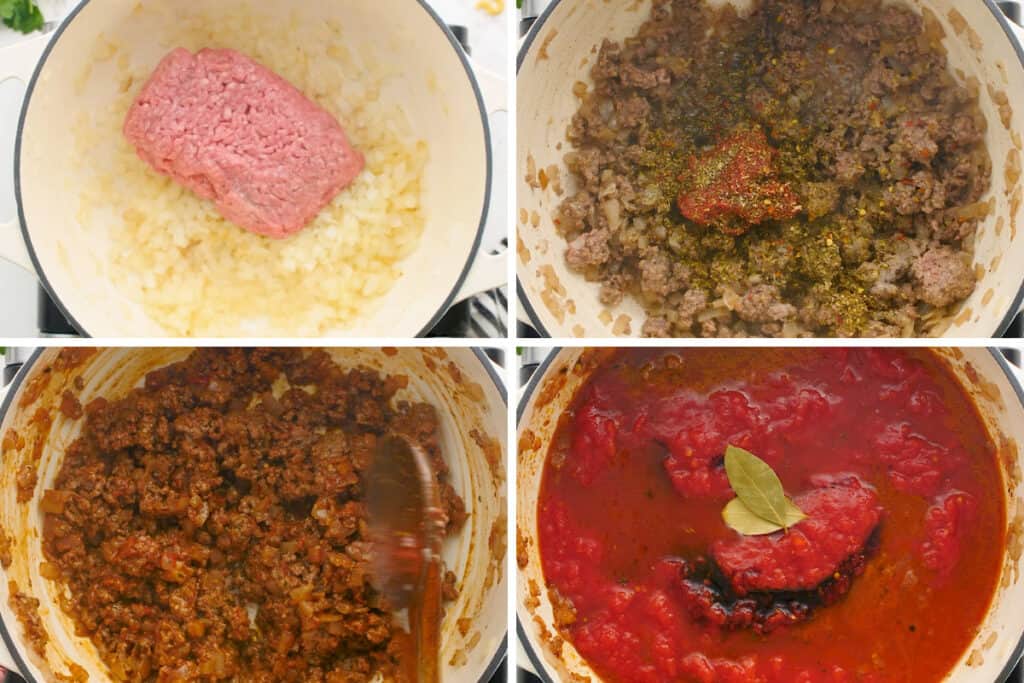

Cook the onions in olive oil until they begin to soften.
Brown the beef, breaking it up into crumbles as it cooks.
3 Add the garlic and then the tomato paste and spices. Cook them until the garlic and spices start to smell amazing.
- Add the rest of the sauce ingredients, give everything a good stir, and then simmer covered for 25 minutes to let the flavors meld.
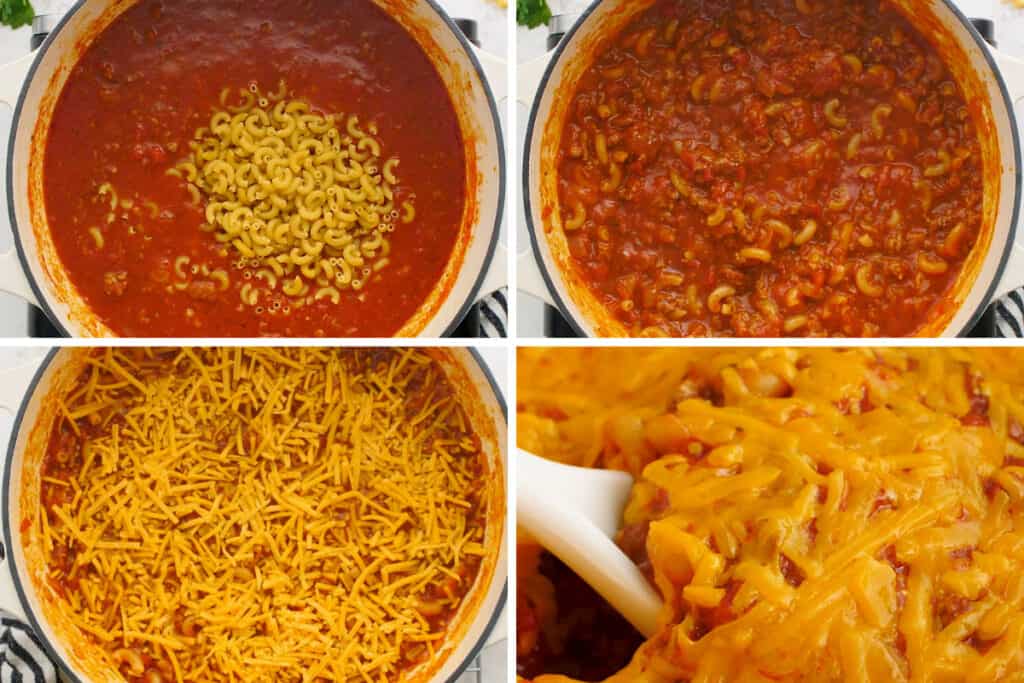

Stir in the pasta and cook until al dente.
Add cheese, cover the pot, and let it sit for 2 to 3 minutes for the cheese to melt.
Uncover, admire all that beautiful melty cheese, serve, and enjoy!
What to serve with American goulash?
Serve the goulash with a couple slices of crusty bread and a simple vegetable side like:
- Garlic and Butter Green Beans
- Broccoli in the Oven
- Roasted Zucchini
- Roasted Green Beans
What is the difference between American and Hungarian goulash?
Even though American goulash evolved from Hungarian goulash , they are two extremely different dishes. Where American goulash is usually made with hamburger and macaroni, Hungarian goulash is made with chunks of beef chuck roast, which cooks with thinly sliced onions and beef broth for about 2 hours to make a thick and rich stew, that is served over egg noodles or potatoes.
Both versions are delicious but are very different.
Can I freeze American goulash?
I don’t love freezing recipes that contain pasta as the pasta will bloat slightly in the freezer and have a different texture after reheating. But if you don’t mind the slight texture change, you absolutely can freeze this dish.
Just freeze in an airtight container for up to 3 months and defrost overnight in the fridge before reheating. DO NOT try to microwave still-frozen pasta to reheat. It will turn the pasta to mush.

Can I make this ahead of time?
Yes. Make the dish completely but don’t add the cheese. Store covered in the refrigerator. When you’re ready to eat, reheat the goulash gently on the stove. Once hot, add the cheese, cover and let sit until the cheese is melted and then serve and enjoy!
Why are my noodles taking forever to cook!!?
I feel your pain! Pasta in one-pot pasta dishes always takes longer to cook than when boiled in water, so don’t worry if your pasta seems to be taking a while. Just keep cooking it with the lid on, stirring every few minutes, and it will reach al dente eventually. I promise!
More Comfort Food Favorites
- Easy Stroganoff
- Pork Ragu
- Beef Short Ribs
- Sheet Pan Sausage and Veggies
- Easy Lasagna

Ingredients
- ▢ 1 tablespoon olive oil
- ▢ ½ large onion diced
- ▢ 1 pound ground beef *
- ▢ 4 cloves garlic crushed or minced
- ▢ ¼ cup ( 60g ) tomato paste
- ▢ ½ teaspoon salt
- ▢ ½ teaspoon dried oregano
- ▢ ½ teaspoon dried basil
- ▢ ¼ teaspoon ground black pepper
- ▢ Pinch red pepper flakes optional
- ▢ 1 28-ounce can crushed tomatoes *
- ▢ 2 cups chicken broth
- ▢ 1 tablespoon soy sauce
- ▢ 2 bay leaves
- ▢ 6 ounces ( about 1 ½ cups ) elbow macaroni
- ▢ 1 cup ( 4oz ) shredded cheddar cheese preferably sharp
Instructions
- In a large pot with a lid, heat oil over medium heat. Add onions and cook until the edges begin to turn translucent, about 5 minutes.
- Add ground beef and cook, breaking the meat into crumbles as you go, until meat is browned.
- Stir in garlic and cook for 30 seconds before adding tomato paste, salt, oregano, basil, pepper, and optional red pepper flakes. Stir until the meat is well-coated and you can really begin to smell the garlic and spices, 1 to 2 minutes.
- Add crushed tomatoes, chicken broth, soy sauce, and bay leaves and bring to a simmer. Cover and simmer, stirring occasionally, for 25 minutes.
- Remove bay leaves, stir in the macaroni, and cover. Simmer covered, stirring occasionally, until pasta is al dente, about 10 to 15 minutes.
- Turn off heat and add cheese. Replace lid and let sit for 2 to 3 minutes until cheese is melted. Serve and enjoy!
Notes
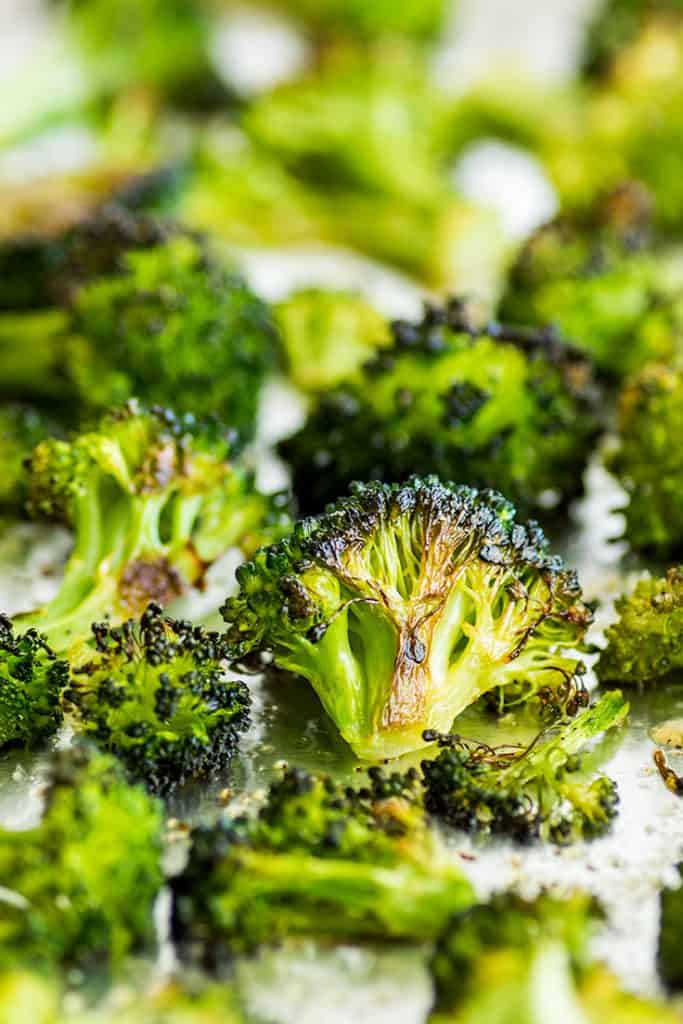
How to Cook Broccoli in the Oven: your complete guide to making the best, crispiest oven-roasted broccoli.
Hey, friends. I have another simple side dish tutorial for you today, how to cook broccoli in the oven.
And I am SO excited about this one because if this isn’t how you’ve been oven-roasting your broccoli, your life will from here on forever be changed for the better.
Because this broccoli is the best broccoli.
We’re talking crispy, crunchy, toasty, roasty broccoli tops and creamy, dreamy broccoli stems.
We’re talking literally 5 minutes of prep time and 15 minutes in the oven.
And we’re talking broccoli so good that if you’re not careful, you’ll eat half of it off the baking tray before it ever makes its way to a plate.

If you’ve read some of my earlier side dish tutorials like How to Steam Broccoli in the Microwave , How to Cut Butternut Squash , and How to Steam Cauliflower in the Microwave , you’ll know I usually keep these posts pretty short and sweet, but this one’s a bit longer because it’s full of tons of broccoli tips and tricks from how to prep broccoli in advance to how to get the crispiest roasted broccoli.
But if you’re in a hurry, feel free to scroll right past to the recipe. 😉
Okay, let’s talk all about roasting broccoli in the oven.
How to Prepare Broccoli for Roasting
Prepping broccoli for roasting is easy. You just need to start with clean, dry(-ish), broccoli florets cut into bite-size pieces.
Why start with dry broccoli? Because wet broccoli heads will steam rather than crisp up, so for the crispiest broccoli, get it as dry as possible before roasting.
To dry your broccoli, you can leave it to dry on a towel on the counter for an hour, use a salad spinner , or wrap it in a towel and shake off as much liquid as possible.
How large of florets to cut your broccoli for roasting is up to you. I do find that smaller florets end up crispier, so I usually cut mine into small bite-size pieces.
Packaged pre-washed and cut broccoli works perfectly well for oven-roasting, and while I don’t love the extra cost or packaging, sometimes the convenience can be a real lifesaver. If using pre-cut florets, don’t be afraid to cut them into smaller chunks.

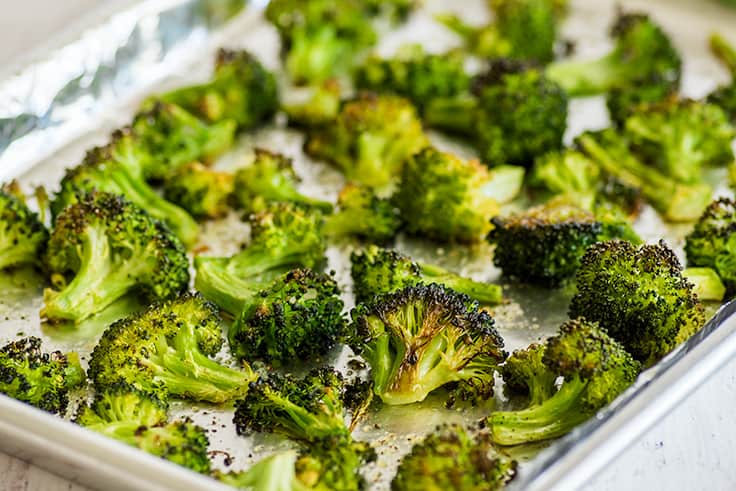
How to Get the Crispiest Broccoli
Everyone knows crispy broccoli is the best. To get the crispiest broccoli with toasted, almost burnt edges, this is what you’re going to want to do:
- Start with dry broccoli (we already covered the why above).
- Don’t crowd the broccoli. There should be enough space to lay the broccoli out in a single layer so all the edges can get crispy.
- Smaller florets = crispier broccoli.
- Flip if you really want to. Flipping your broccoli half-way through will give you slightly crispier broccoli, but I hate doing it unless I’m roasting large chunks because it takes forever. I find smaller florets already get really crispy without this step. But if you’re roasting larger florets, give it a go or use a spatula to stir the broccoli halfway through.
Those are all the tips and tricks I have for you today. Ready to roast some broccoli?
How to Cook Broccoli in the Oven
- Start with clean, dry broccoli cut into small florets.


- On the baking tray, combine broccoli and oil and use your hands to toss the broccoli so all sides are coated. For the crispiest broccoli, I recommend using the full 2 tablespoons, but if you are trying to cut back the amount of oil you cook with, you can get away with just 1 tablespoon. Arrange broccoli in a single layer.


- Sprinkle generously with salt, pepper, and garlic powder (and/or other preferred spices). Bake at 450° for 12 to 20 minutes, until stems are fork-tender.
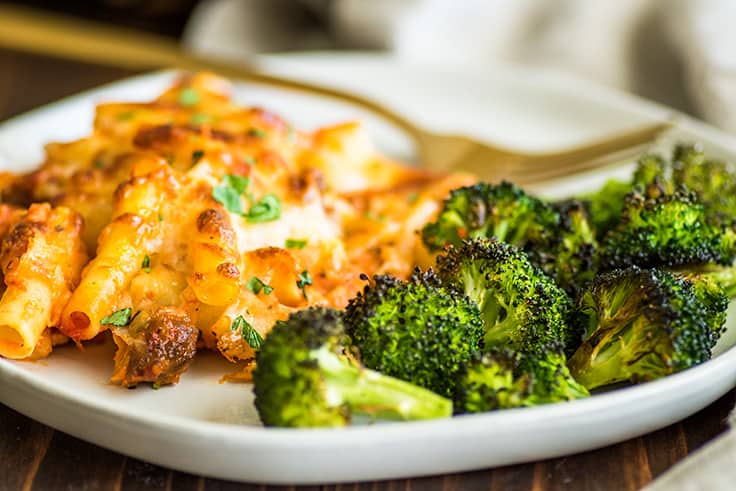
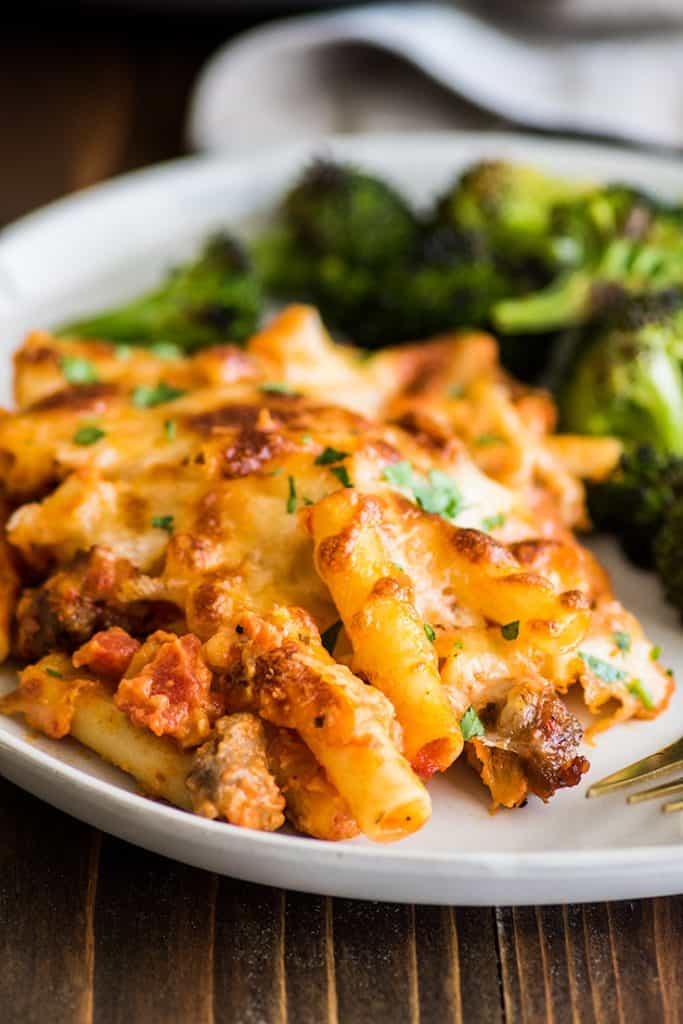
- And that’s it! Serve alongside something delicious (like Homemade Carnitas , Oven-roasted Tri-tip , Baked Ziti, or Salsa Chicken ) before your broccoli gets cold, and try not to hog all the crispiest bits. 😉
Can I prep broccoli in advance for roasting?
Absolutely. Prepping a big batch of broccoli in advance is a great way to make sure that you have an easy vegetable side available at all times. Wash and cut your broccoli and then dry completely.
Store broccoli in a loosely covered (not air-tight) container or half-closed bag with a folded dry paper towel to help absorb moisture. Properly prepped broccoli will keep for 3 to 4 days, up to a week if you’re lucky.
When you’re ready to serve the broccoli, all you have to do is transfer it to a baking sheet, toss with oil and seasoning, and bake.
Does roasted broccoli make good leftovers?
Yes and no. Roasted broccoli is best right out of the oven when it’s still hot and crispy. Once cooled and reheated, it still maintains all that delicious roasted broccoli flavor, but it becomes quite soft and no longer has all those little crispy bits. I’ll happily eat leftover reheated roasted broccoli, but I’d rather just prep a big batch of precut, prewashed broccoli at the beginning of the week and roast it fresh every meal.
Can I roast frozen broccoli?
Yes. I find that frozen broccoli doesn’t come out crispy the way fresh broccoli does, but it still roasts up beautiful and delicious. Follow the recipe as written when cooking frozen broccoli. No changes are needed.
How can I get really dark, almost burnt broccoli?
Okay, if you’re like me and prefer broccoli that’s basically been charred within an inch of its life, here’s a little extra tip for you.
After prepping your broccoli on the pan with olive oil and seasoning, give it a light spray all over with a cooking spray like PAM. The extra oil will really help everything crisp up extra well.
Bake for an additional 5 minutes or so over the recommended cooking time, until the florets are as charred as you want them, keeping a close eye on the broccoli in the last few minutes of cooking time.
More Easy Vegetable Sides
- Roasted Green Beans
- Roasted Zucchini
- Microwave Corn on the Cob
- Microwave Baked Potato
- Microwave Sweet Potato

Ingredients
- ▢ 1 pound of broccoli
- ▢ 1 to 2 tablespoons olive oil
- ▢ Salt
- ▢ Pepper
- ▢ Garlic powder
Instructions
- Preheat oven to 450°F.
- Start with clean, dry broccoli and cut it into small bite-size florets.
- On a baking sheet, combine broccoli and oil and use your hands to toss the broccoli so all sides are coated. Arrange broccoli in a single layer.
- Sprinkle generously with salt, pepper, and garlic powder (and/or other preferred spices). Bake for 12 to 20 minutes, until stems are fork-tender.
- Serve and enjoy immediately.
This easy baked ziti recipe is a fabulous no-stress, no-fail dinner recipe that tastes great, looks beautiful, and couldn’t be simpler to throw together.
Hello, lovely friends, I’ve got another cheesy pasta recipe for you today, baked ziti!
And not just any ziti: super easy, super delish, made with SAUSAGE, crushed tomatoes, and just a hint of cream, ziti.
You’re going to love it.


Why You Should Make This Baked Ziti Immediately
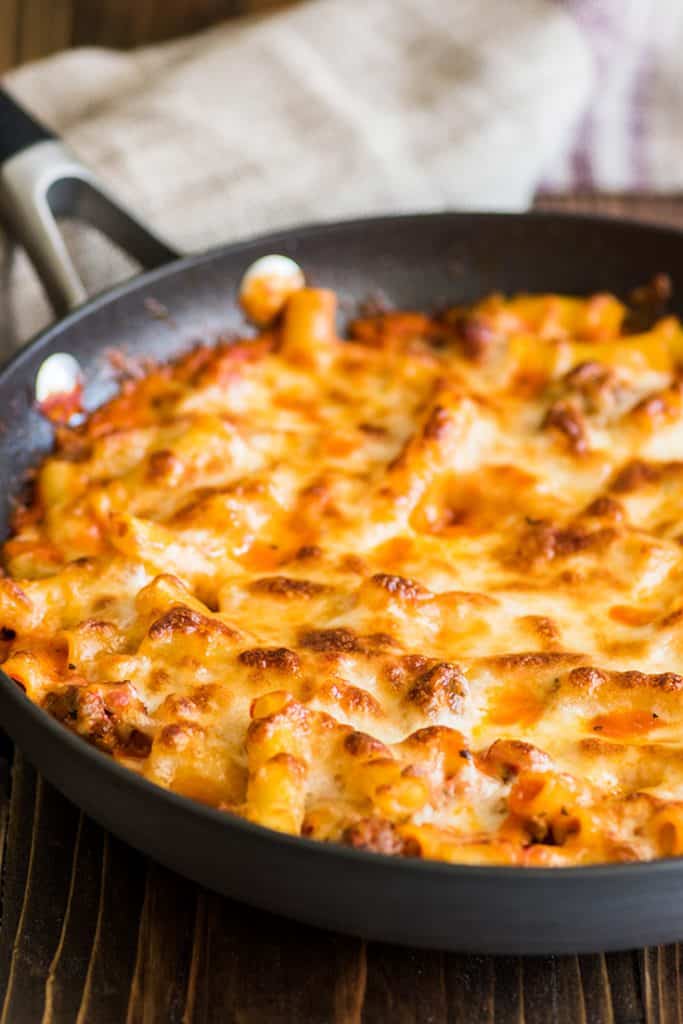
First, because this is an A++ pasta experience from beginning to end. You’ll feel like an absolute kitchen rockstar when you pull the ziti out of the oven with the skillet sizzling and the cheese browned and beautiful.
And you’re going to feel like an even bigger rockstar when you try the first bite because this is some real good cheesy, meaty pasta. Using Italian sausage instead of hamburger gives the dish tons of extra flavor, and a couple tablespoons of cream in the sauce add just a slightly creamy, rich base note that makes such a difference.
Reason two is that this is one of the easiest dinners you’ll ever make. Seriously, if you can open a can of tomatoes and operate a kitchen timer, you’ve got this with your eyes closed.

Ingredient and Tools Notes
- Italian sausage: Hot, mild, or sweet Italian sausage will all work in this dish. If you don’t usually cook with/buy Italian sausage, you can generally find packages of it near the hamburger in the meat department. If your sausage came in links, you’ll want to remove the casings before cooking. To remove sausage casings, you can make a shallow slice down the sausage lengthwise and peel it off, or just squeeze the sausage until it bursts out the top or bottom and squeeze the meat into a bowl.
- Pasta: Obviously, ziti is traditional here, but penne or rigatoni work great as well.
- Heavy cream: This recipe won’t use up an entire carton of heavy cream. If you need some ideas to use up the leftovers, check out my post on What to Do With Leftover Heavy Cream .
- An oven-safe skillet with a lid: This recipe is designed to go from stovetop to oven. If you don’t own an oven-safe skillet, you can make the sauce in a regular skillet and then transfer it to a baking dish before baking. And if your oven-safe skillet doesn’t have a lid, you can cook the sauce uncovered. Just add ¼ cup of water along with the tomatoes and add another tablespoon or two of liquid towards the end of the cooking time if it seems like too much liquid has evaporated. I also recommend using a splatter screen if you own one because the sauce will pop and make a bit of a mess on the stovetop.
How to Make Baked Ziti
To make this baked ziti, all you have to do is cook some pasta, ziti if you’ve got it, penne or rigatoni if you don’t, farfalle or rotini if you’re feeling like a rebel. While that cooks, you’ll brown some sausage and then a bit of garlic and red pepper flakes.
In goes a can of crushed tomatoes and a bit of salt and pepper. You let that simmer for 15 minutes, stir in the cooked pasta, cream, Parmesan, and basil, top with mozzarella, and then bake.
10 minutes later you pull that beautiful, bubbly pan of ziti out of the oven.
Stop for a moment and appreciate the sizzle.
Then serve with a delicious veggie side ( butter and garlic green beans, roasted zucchini , or oven-roasted broccoli are, as always, HIGHLY recommended) and dig in.
Can you freeze baked ziti?
You can freeze baked ziti, but the pasta will have a slightly softer texture after being frozen and reheated and the cheese texture will suffer slightly.
My prefered way to freeze ziti is to just freeze the sauce. Cook the sauce as instructed in the recipe and then transfer half of it (or whatever portion you’re not going to eat) to a freezer bag and freeze for up to 3 months.
When you’re ready for more ziti, defrost the sauce, mix it with freshly cooked pasta and cheese, and bake. There’s zero loss in quality, and it takes almost no effort to throw together once the sauce is defrosted.
Can I make this baked ziti for two?
Absolutely. This recipe was originally written for two, and you can find that smaller version here , but I found that I and most readers were doubling the recipe when we made it, so I scaled it back up.
While you can make the original smaller version, even if you’re cooking for one or two, I actually recommend just making a full batch of the sauce and freezing half of it following the instructions above. It works super well, and even if you don’t want to use the sauce for baked ziti in the future, you can toss reheated sauce with any pasta for a quick creamy sausage pasta .
I don’t like/have sausage. Can I use hamburger/ground turkey instead?
You can, but the dish won’t have quite as much flavor. Make sure to salt the meat generously while it’s cooking, and I’d add a teaspoon of Italian seasoning as well.
Can I leave out the heavy cream?
You can, but the cream adds a really spectacular richness to the dish. I don’t recommend omitting it.

Easy Baked Ziti Recipe Notes
- As written, this recipe will make four huge servings or six smaller ones.
More Easy Pasta Dishes
- Mac and Cheese for One
- Pesto Chicken Pasta
- Creamy Chicken Pasta
- The Best Beef Stroganoff
- Easy Lasagna
- 15-minute Vodka Sauce

Ingredients
Special Equipment
- ▢ Large oven-safe skillet with a lid
Baked Ziti
- ▢ 1 tablespoon olive oil
- ▢ 8 ounces (about 2⅔ cups ) uncooked ziti penne, or rigatoni
- ▢ 1 pound Italian sausage mild or hot, casings removed
- ▢ 6 cloves garlic pressed or minced
- ▢ Pinch red pepper flakes
- ▢ 2 14-ounce cans crushed tomatoes
- ▢ Salt and pepper
- ▢ ⅓ cup heavy cream
- ▢ ½ cup ( 2oz ) shredded Parmesan
- ▢ 1 teaspoon dried basil
- ▢ 1½ cup ( 6oz ) shredded mozzarella
Instructions
Start Pasta
- Preheat oven to 475°F.
- Bring a medium pot of lightly salted water to a boil and cook ziti according to package instructions until just barely al dente. Don’t overcook the pasta as it will become too soft after baking. Drain and set aside.
Sauce
- While your water boils and pasta cooks, in a large, oven-safe skillet with a lid, heat oil over medium heat. Brown sausage, breaking it into crumbles as it cooks. If there is a lot of grease in the pan, drain sausage or use a paper towel to absorb some of the grease.
- Stir in garlic and red pepper flakes and cook for 30 seconds. Add tomatoes and a sprinkle of salt and pepper. Turn heat up to medium-high and bring to a simmer. Once simmering, reduce heat to medium-low and cover. Simmer, covered, for 15 minutes, stirring occasionally.
- Stir in cooked pasta, cream, Parmesan, and basil. Add more salt and pepper to taste.
Bake
- Sprinkle mozzarella over the top and bake for 10 to 15 minutes until cheese is melted and bubbly. Serve and enjoy!
Notes

Easy American Goulash
Ingredients
- 1 tablespoon olive oil
- ½ large onion diced
- 1 pound ground beef *
- 4 cloves garlic crushed or minced
- ¼ cup ( 60g ) tomato paste
- ½ teaspoon salt
- ½ teaspoon dried oregano
- ½ teaspoon dried basil
- ¼ teaspoon ground black pepper
- Pinch red pepper flakes optional
- 1 28-ounce can crushed tomatoes *
- 2 cups chicken broth
- 1 tablespoon soy sauce
- 2 bay leaves
- 6 ounces ( about 1 ½ cups ) elbow macaroni
- 1 cup ( 4oz ) shredded cheddar cheese preferably sharp
Instructions
- In a large pot with a lid, heat oil over medium heat. Add onions and cook until the edges begin to turn translucent, about 5 minutes.
- Add ground beef and cook, breaking the meat into crumbles as you go, until meat is browned.
- Stir in garlic and cook for 30 seconds before adding tomato paste, salt, oregano, basil, pepper, and optional red pepper flakes. Stir until the meat is well-coated and you can really begin to smell the garlic and spices, 1 to 2 minutes.
- Add crushed tomatoes, chicken broth, soy sauce, and bay leaves and bring to a simmer. Cover and simmer, stirring occasionally, for 25 minutes.
- Remove bay leaves, stir in the macaroni, and cover. Simmer covered, stirring occasionally, until pasta is al dente, about 10 to 15 minutes.
- Turn off heat and add cheese. Replace lid and let sit for 2 to 3 minutes until cheese is melted. Serve and enjoy!
