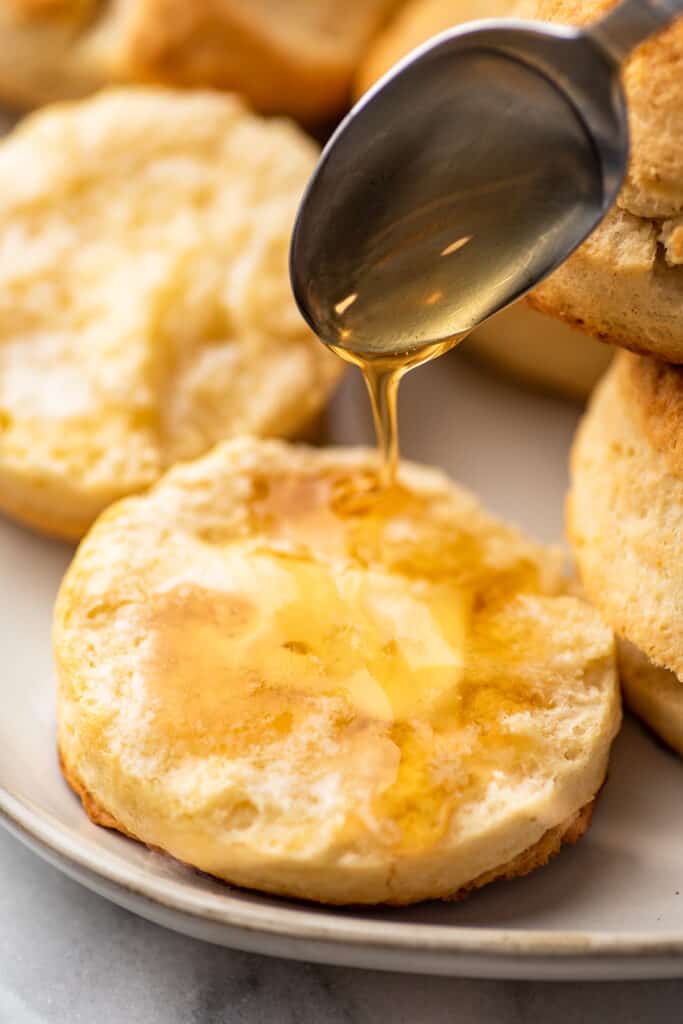
These cream biscuits can be on your table in about 20 minutes. With buttery, lightly crispy outsides and soft, fluffy interiors, they’re a quick and crowd-pleasing side dish.
Everyone should have a good biscuit recipe up their sleeve.
And for nights when you have a pot of soup simmering on the stove and need a quick and easy side dish to serve alongside, you couldn’t ask for a better biscuit recipe than this one.

Quick and Easy Biscuits
These biscuits can be mixed, baked, and on your table slathered in butter and honey in about 20 minutes.
Unlike traditional buttermilk biscuits which require you to rub chilled butter into flour, cream biscuits are made with heavy cream, so all you have to do is whisk together 4 ingredients and then stir in cream.
Once the dough is cut out, the biscuits are brushed with melted butter, so they bake up perfectly soft and fluffy with buttery, slightly crispy exteriors and are completely irresistible.
Ingredient Notes
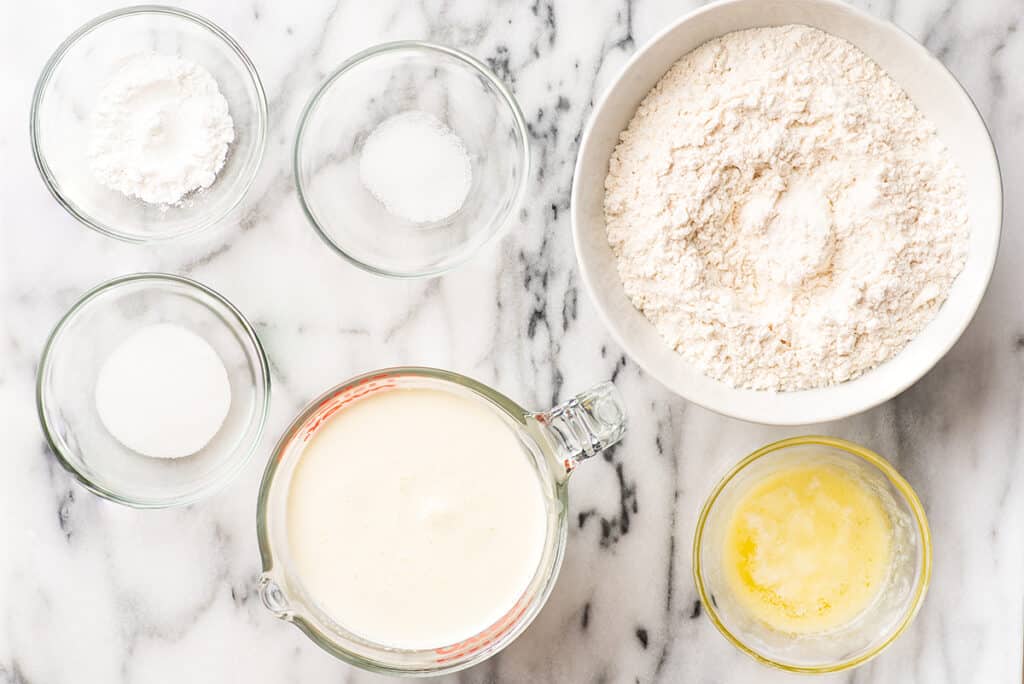

- All-purpose flour: Proper flour measurement is fairly important in this recipe (too much flour and your dough isn’t going to come together), so be sure to follow the measuring instructions in the recipe.
- Heavy cream: This recipe won’t use up an entire carton of heavy cream. Check out my post What to Do With Leftover Heavy Cream for storage tips and recipe ideas for the leftovers.
- Melted butter: The biscuits are brushed lightly with melted butter before baking to help a bit with browning and then again after they come out of the oven so you get plenty of buttery flavor. Salted or unsalted butter will work fine here.
How to Make Cream Biscuits
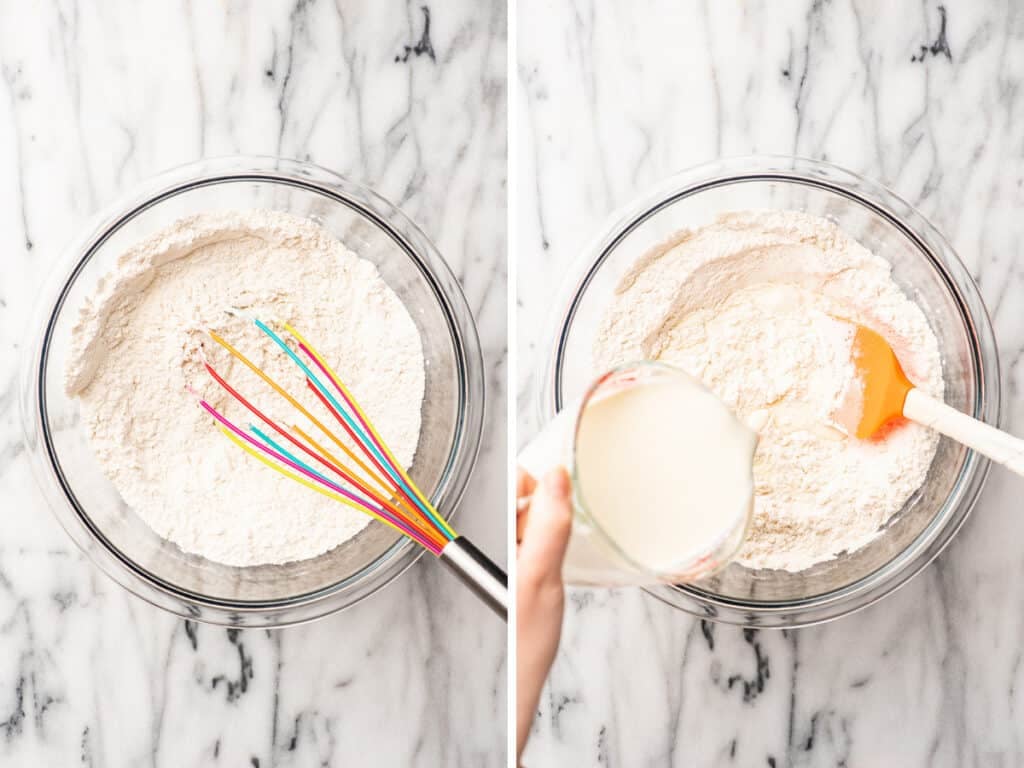

Mix the dry ingredients: In a large bowl, combine flour, baking powder, and salt. Whisk together until well combined.
Stir in the cream: Switch to a wooden spoon or silicone spatula and stir in the cream until a shaggy dough forms. Try not to over-mix, you just want to get to the point where no dry flour remains at the bottom of the bowl.
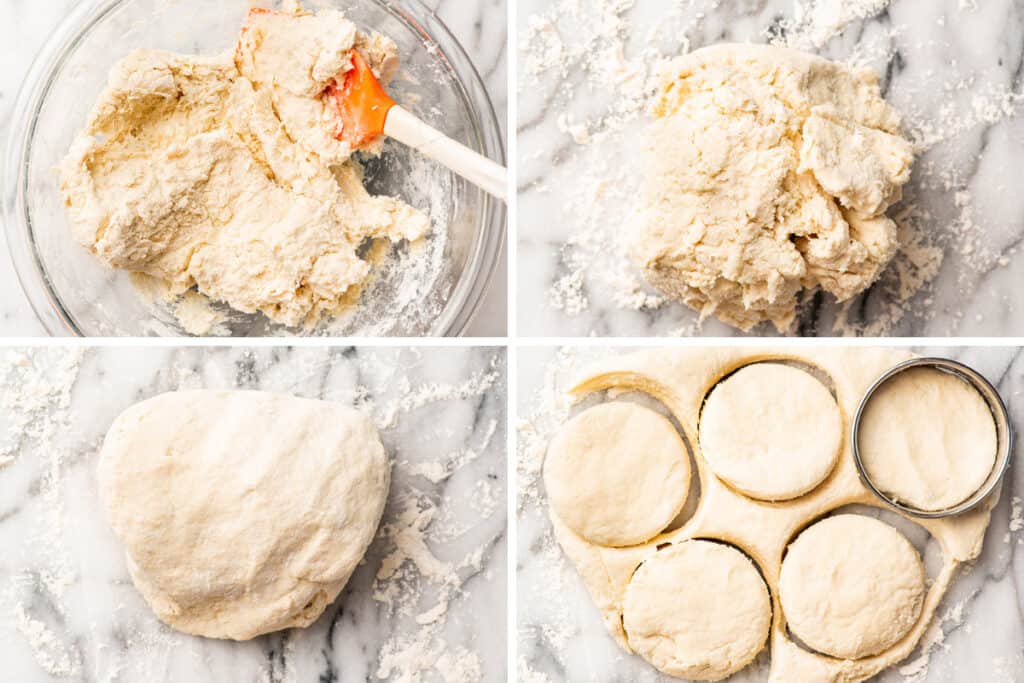

- Cut out the biscuits: Pat the dough out to about 3/4-inch thick. Use a 2-to-3-inch biscuit cutter to cut the dough into rounds. Do not twist the biscuit cutter as this can seal the edges of the biscuits causing them not to rise to their full height.
After the first cutting, gather the scraps repeat to get 1 or 2 more biscuits out of the dough.
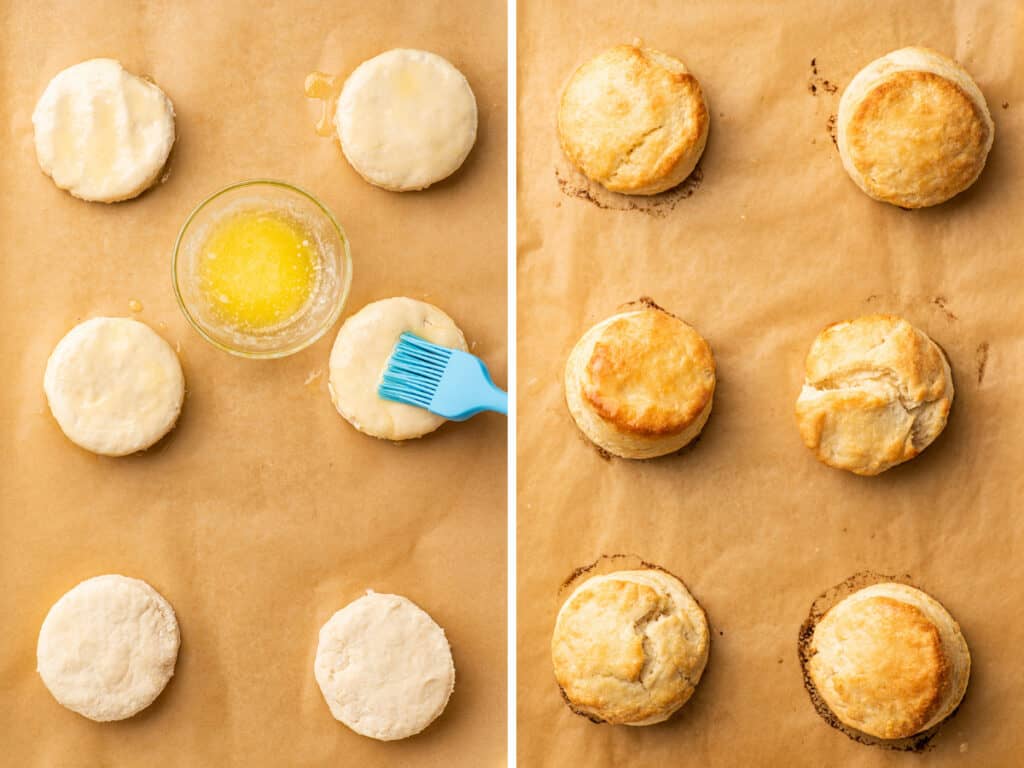

5: Brush with butter: Transfer the biscuits to your prepared baking sheet and brush the tops lightly with melted butter (reserve remaining melted butter).
Don’t go too heavy with the butter. You don’t want it to pool at the bottom edges of the biscuit because the milk solids in the butter can burn (you can actually see where I got a little too enthusiastic about the butter in the photo above). Stick to a thin layer on the top to help with browning.
- Bake: Bake on the center rack of your oven for 11 to 14 minutes, until the biscuits are golden brown.
Transfer the biscuits to a cooling rack and brush them with the remaining butter. Serve and enjoy!


Can I make a small batch of cream biscuits?
Yes! A half-batch of these biscuits is my very favorite way to make small-batch biscuits. Just cut the recipe in half (to change the recipe yield, hover over the serving size in the recipe card below or click if you’re on mobile, and slide the slider) and it will make 4 perfect biscuits.
To make things even quicker, instead of using a biscuit cutter, shape the dough into a square that is 3/4-inch thick, and then use a sharp knife to cut the dough into 4 even pieces. Transfer the biscuits to your baking sheet and they’re ready to go!
I don’t have a biscuit cutter. What can I use instead?
If you’re really attached to the idea of having round biscuits, you can use a 2 to 3-inch cup to punch out your rounds, but since cups don’t have a sharp edge, they can actually seal the edges of your biscuit so they don’t rise as high as they should.
What I recommend instead is using the method I described above for small batches, and just shaping your dough into a rectangle and using a sharp knife to cut your biscuits into squares. This way there’s no wasted dough and you get tall and fluffy biscuits.
What to serve with cream biscuits?
Cream biscuits pair perfectly with soup. Some of my favorites are:
- Chicken Pot Pie Soup
- Creamy Chicken Noodle Soup
- Sausage Potato Soup
- Broccoli Potato Soup

Can these be made ahead of time?
Cream biscuits are best hot out of the oven, but can be reheated gently in the microwave or oven.
You can also make the dough up to 24 hours in advance. Store the cut-out biscuits tightly wrapped in the refrigerator. When you’re ready to bake them, the biscuits can go straight from the fridge to the oven.
Recipe Notes
- Yield: This will make approximately 10 2-inch biscuits or 6 to 7 3-inch biscuits.
- Parchment paper: Most parchment paper is only recommended for use up to 425°F. This is because above that, parchment paper can become brittle. That’s not really an issue with this recipe since it’s not cooking long enough for that to happen, but if you don’t feel comfortable using parchment paper at this temperature, you can also lightly grease your baking sheet with cooking spray instead. Biscuit cutters: Use 2 to 3-inch biscuit cutters for this recipe. I used a 3-inch cutter for the biscuits in the photos.

Equipment
- 2-to-3-inch biscuit cutter
Ingredients
- ▢ 2 cups ( 260g ) all-purpose flour plus more for dusting, measured by weight or using the spoon and sweep method*
- ▢ 2½ teaspoons baking powder
- ▢ 1 tablespoon ( 12g ) granulated sugar
- ▢ ¾ teaspoon salt
- ▢ 1½ cups heavy cream
- ▢ 2 tablespoons melted butter optional
Instructions
- Preheat your oven to 475°F and line a baking sheet with parchment paper.
- In a large bowl, combine flour, baking powder, sugar, and salt. Whisk together until well combined.
- Switch to a wooden spoon or silicone spatula and stir in the cream until a shaggy dough forms and no dry flour remains at the bottom of the bowl.
- Turn the dough out on a lightly floured surface and knead the dough, folding it over on itself 5 or 6 times until the dough comes together, adding more flour if needed.
- Pat the dough out to about ¾-inch thick. Use a 2-to-3 inch biscuit cutter to cut the dough into rounds. After the first cutting, gather the scraps and repeat to get 1 or 2 more biscuits out of the dough.
- Transfer the biscuits to your prepared baking sheet and brush the tops lightly with melted butter (reserve remaining melted butter).
- Bake on the center rack of your oven for 11 to 14 minutes, until the tops of the biscuits are golden brown.
- Transfer the biscuits to a cooling rack and brush them with the remaining butter. Serve and enjoy!
Notes
My mom’s famous red wine pot roast recipe takes a chuck roast and braises it in red wine until tender with carrots, celery, and potatoes.
I’ve shared a few of my Mom’s recipes here over the years. Her easy carrot cake is a reader favorite as is her stroganoff recipe .

This is the roast my family makes on Christmas almost every year. It’s always a total show-stopper, and it’s my favorite pot roast recipe in the entire world because it is ridiculously good and ridiculously easy to make.
You take a chuck roast, fill it with slices of garlic, and then braise it low and slow in a mixture of red wine and tomato sauce until it is incredibly tender.
It makes your house smell delicious and best of all, once your roast is seared and simmering, the rest of the cooking is mostly hands-off.
Check on it once in a while and add the vegetables halfway through, but otherwise, the work is basically done. Time to tidy up the kitchen (or make someone else handle that) and relax.
Ingredient Notes
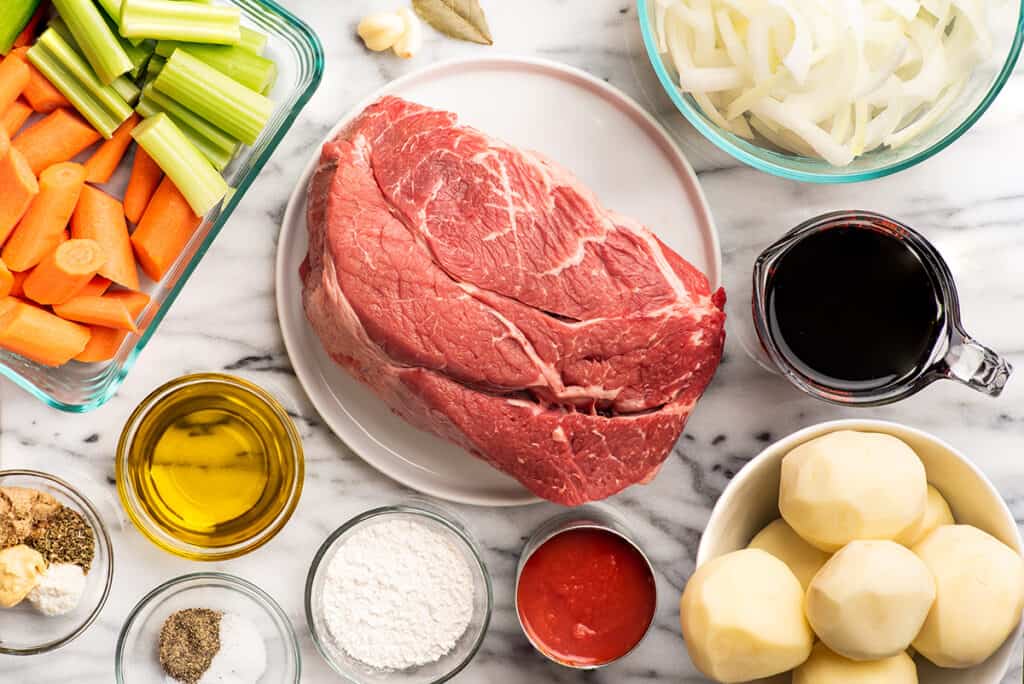

- 3½ to 4 pound chuck roast: If you’re having trouble finding a 3+ pound roast, try asking at the butcher counter (that’s what I had to do for the roast in the photos). I’ve also resorted to just using two 2-pound roasts a couple of times in the past, and that worked fine.
- Dry red wine: Cabernet Sauvignon is my go-to for this dish, but any dry red wine will work.
- Prepared horseradish: There’s only a small amount of horseradish in this dish, but I think it’s worth it to grab a jar at the store if you don’t keep it stocked at home since it’s a fairly inexpensive ingredient (around $2).
- Mustard: Regular yellow mustard or Dijon will both work fine.
- Small-to-medium red potatoes: Pick potatoes that are around 2½ inches to 2¾ inches max. If you’re using really large potatoes, cut them in half.
How to Make (the Best!) Red Wine Pot Roast

Make sauce: In a small bowl, combine tomato sauce, brown sugar, oregano, horseradish, and mustard. Stir until well-mixed and set aside.
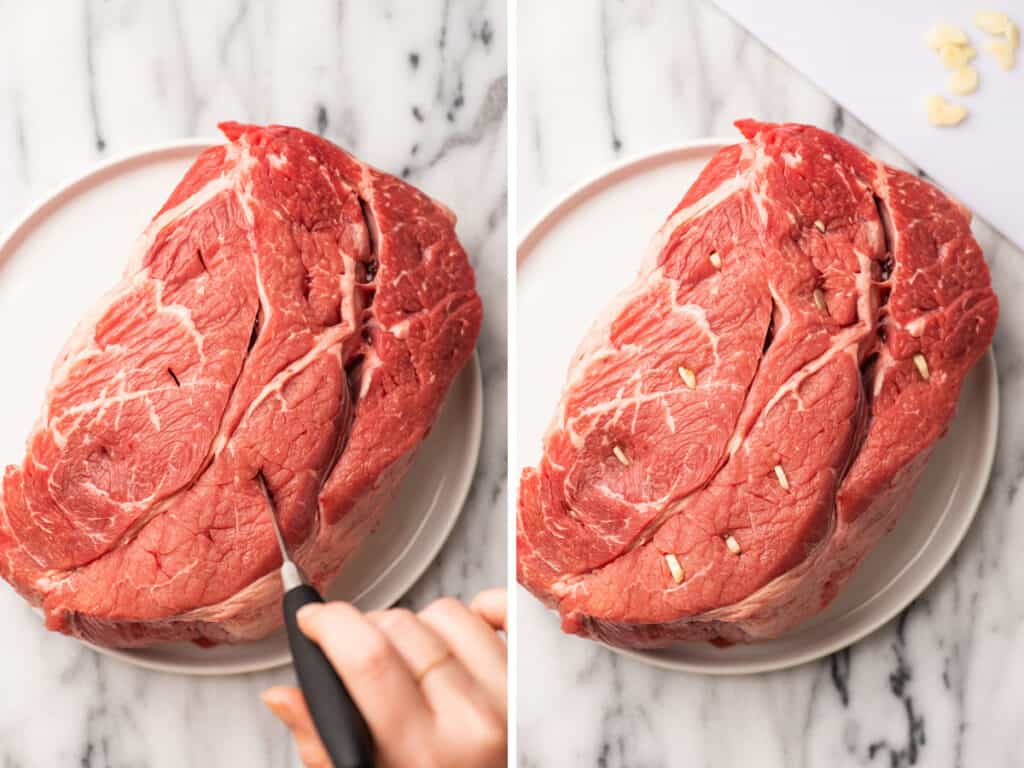
Add garlic slices: Use a paring knife to poke small cuts about 1½ inches deep all over your roast and insert sliced garlic into the slits. This step seems fiddly and unnecessary, but it really helps the garlic flavor penetrate the meat, and when you get a bite of one of the slow roasted garlic pieces, you’ll be so glad you took the extra time for this step.
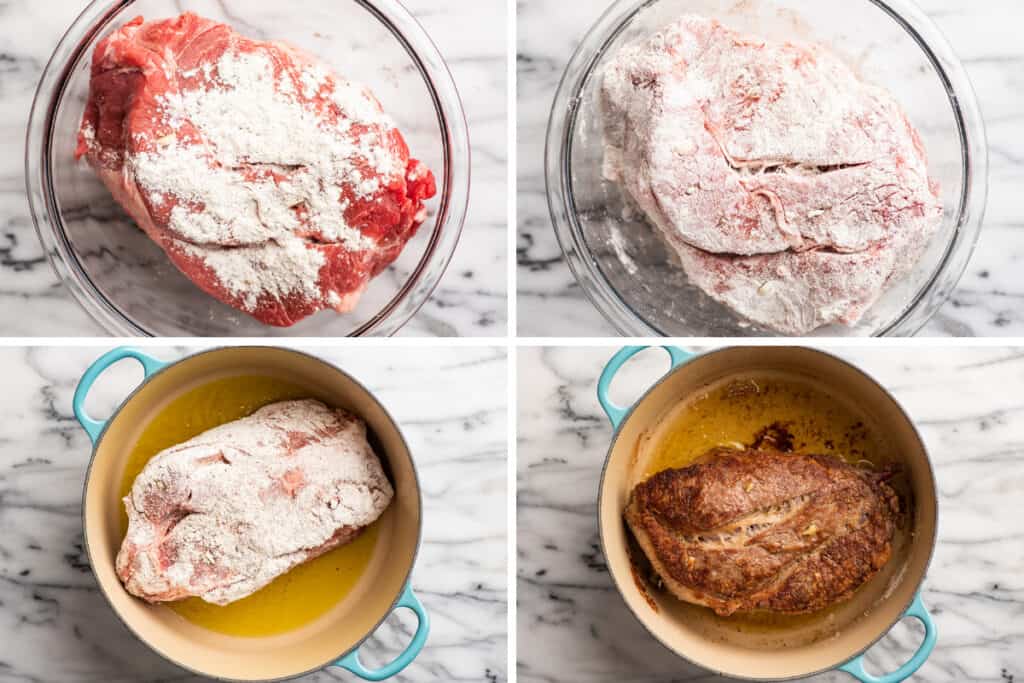

Dredge the roast in flour: Place the roast in a large bowl or plastic bag and sprinkle with flour, salt, and pepper. Rotate the roast as needed until all sides are well-coated.
Sear: In a large Dutch oven, heat oil over medium-high heat. Once hot, add roast to the pot and brown on all sides. Be very careful when you’re turning the roast not to let it fall too quickly and splash hot oil out of the pan.
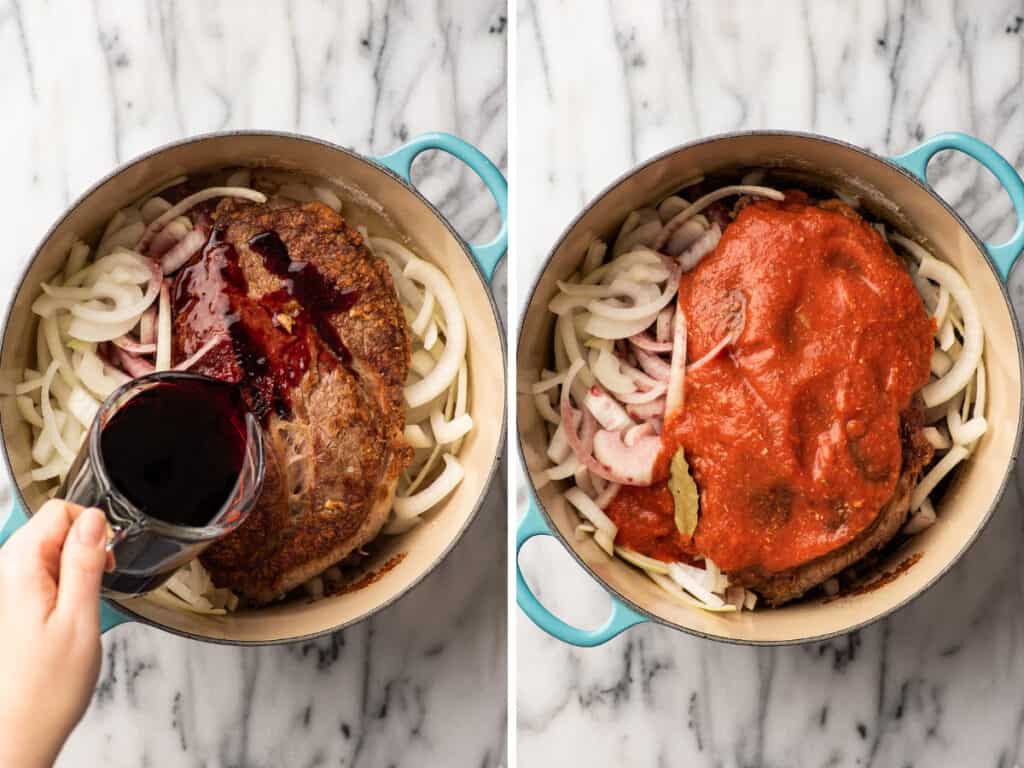

Add red wine and tomato sauce: Add onions to the pot and pour red wine over the top. Pour tomato sauce mixture over the roast, cover the pot and bring the liquid to a simmer. Yes, this is all the liquid you will add, no this is not a problem. The roast will release a lot of liquid as it cooks.
Simmer: Once simmering, reduce the heat to keep it just at a simmer, and cook for 2 1/2 hours. Check on the roast occasionally to make sure it’s maintaining that nice easy simmer, but otherwise, it’s hands off for the next couple hours.
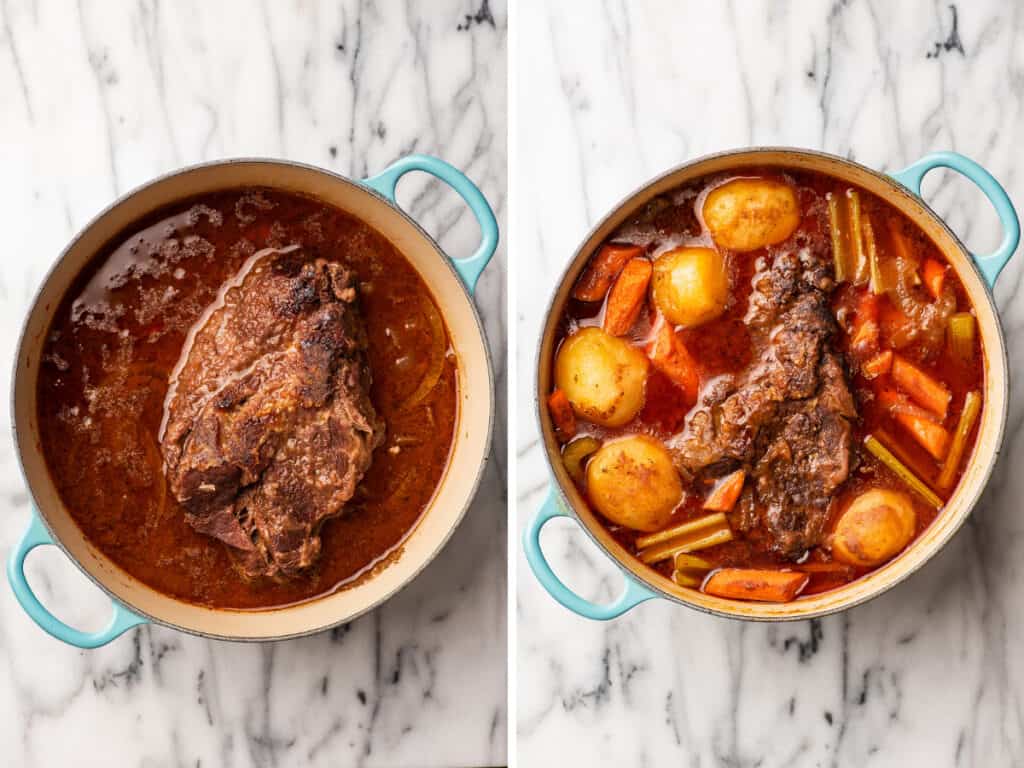

Add vegetables: Flip the roast over (so both sides cook evenly) and then nestle the vegetables around the meat, making sure they’re mostly submerged.
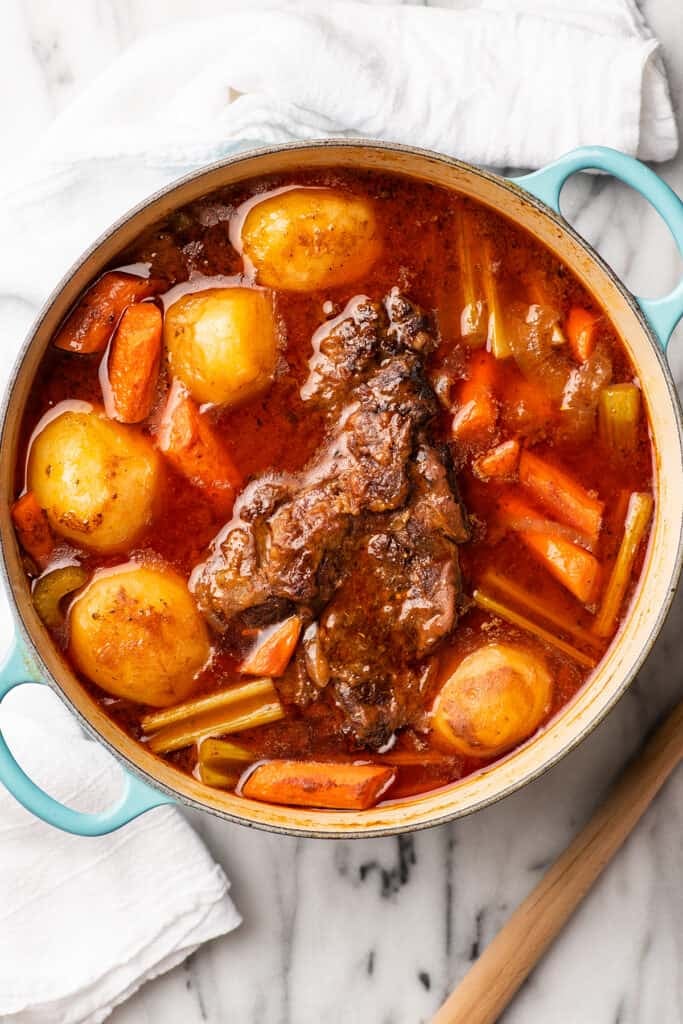
Finish cooking: Place the lid back on the pot, bring the liquid back up to a simmer, and cook for 1 hour more, until the vegetables and meat are tender. You should be able to pierce both the potatoes and the meat easily with a sharp knife.
Optional skim the fat: Between the cooking oil and the fat released from the roast, there will be a thin layer of fat over the top of the cooking liquid. If you would like to skim it off, transfer the roast to a cutting board and use a slotted spoon or spider skimmer to transfer the vegetables to a serving bowl. Let the liquid settle for two minutes, and then use a large spoon to skim the fat from the surface.
If you’re making the roast a day ahead, you can also just refrigerate everything and scrape the solidified fat from the top in the morning.
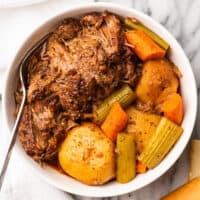
- Dish and eat: Taste the sauce, and add salt and pepper as needed. Serve the roast cut into large chunks alongside the cooked vegetables, with sauce spooned over the top and enjoy!

What is a good red wine to cook with beef?
A nice cabernet sauvignon is my favorite wine to use in beef recipes, but pinot noir and merlot are also great options.
Can I make a smaller roast with this recipe?
Yes. If your roast is less than 3 pounds, you can still follow the recipe exactly as written, but it might not need the full hour of cooking time after you’ve added the vegetables.
If you find that the roast is tender (you can pierce the meat easily with a sharp knife) before the vegetables are done cooking, simply remove the roast and transfer it to the cutting board tented with foil to keep it warm.
When the vegetables are done, if the roast has cooled too much, cut it into pieces and briefly return it to the simmering cooking liquid to reheat before serving.


Can you freeze pot roast?
Yes! Pot roast beef freezes exceptionally well. The carrots, celery, and onions will be softer after freezing and reheating, but freeze okay.
I’m not a huge fan of freezing potatoes because they become slightly mealy after being frozen, so I typically don’t freeze the potatoes and serve the roast over mashed potatoes when I reheat the leftovers.
That being said, if you want to freeze the potatoes, go for it. Most of the rest of my family does, and they don’t mind the texture change.
To freeze the roast: Portion servings of the beef and vegetables along with the sauce in airtight freezer bags, remove as much of the air as possible, and freeze for up to 3 months. Defrost overnight in the refrigerator and reheat in the microwave. (Do not try to thaw the roast in the microwave. It will turn the vegetables to mush.)
More Favorite Beef Recipes
- Easy Short Ribs
- Homemade Carne Asada
- Slow Cooker Beef Ribs
- Roasted Tri-Tip
- Easy Beef Pasties
Red Wine Pot Roast Recipe Notes
- Prepping the vegetables: You don’t need to start prepping your carrots, celery, and potatoes until the roast is simmering. If you’re prepping the potatoes early in the cooking time, place the peeled potatoes in a large bowl and cover them with cold water so they don’t turn brown while they’re waiting to be added to the roast.
Equipment
- Large Dutch oven with a lid
Ingredients
- ▢ 1 8-ounce can tomato sauce
- ▢ 1 tablespoon brown sugar
- ▢ 1 teaspoon dried oregano
- ▢ 1 teaspoon prepared horseradish
- ▢ 1 teaspoon mustard *
- ▢ 3½ to 4 pound boneless chuck roast
- ▢ 2 large garlic cloves thinly sliced
- ▢ ¼ cup all-purpose flour
- ▢ ½ teaspoon salt
- ▢ ½ teaspoon pepper
- ▢ ⅓ cup olive oil
- ▢ 1 medium onion cut in half root to tip and sliced into half moons.
- ▢ 1 cup dry red wine *
- ▢ 1 bay leaf
- ▢ 8 small-to-medium red potatoes peeled*
- ▢ 6 medium carrots peeled and cut into 2-inch pieces
- ▢ 4 celery ribs cut into 2-inch pieces
Instructions
- In a small bowl, combine tomato sauce, brown sugar, oregano, horseradish, and mustard. Stir until well-mixed and set aside.
- Use a paring knife to poke small cuts about 1½ inches deep all over your roast and insert sliced garlic into the slits.
- Place roast in a large bowl or plastic bag and sprinkle with flour, salt, and pepper. Rotate the roast as needed until all sides are well-coated.
- In a large Dutch oven with a lid, heat oil over medium-high heat. Once hot, add roast to the pot and brown on all sides.
- Add onions to the pot around the roast and pour red wine over the top. Pour tomato sauce mixture over the roast and add the bay leaf. Cover the pot and bring the liquid to a simmer.
- Once simmering, reduce the heat to keep the liquid at just a simmer and cook for 2½ hours.
- Flip the roast over and then nestle the potatoes, carrots, and celery around the meat, making sure they’re mostly submerged.
- Place the lid back on the pot, bring the liquid back up to a simmer, and cook for 1 hour more, until the vegetables and meat are tender. (You should be able to pierce both the potatoes and the meat easily with a sharp knife.)
- (Optional) If you would like to skim the fat from the top of the sauce, transfer the roast to a cutting board and use a slotted spoon or spider skimmer to transfer the vegetables to a serving bowl. Let the liquid settle for 2 to 3 minutes, and then use a large spoon to skim the fat from the surface.
- Taste the sauce, and add salt and pepper as needed. Serve the meat cut into chunks with sauce spooned over the meat and vegetables* and enjoy!
Notes
Recipe from Southern Living Five-Star Recipe Collection (appears to be out of print) via my mom 😉
Coffee whipped cream is a sweet and sophisticated alternative to traditional whipped cream. It’s rich, full of coffee flavor, and irresistible spooned over chocolate desserts.
Alright, coffee lovers, I have a little treat for you today.
We all know regular whipped cream is great. A spoonful of chocolate whipped cream is positively sinful, and cream cheese whipped cream should be eaten by the spoonful. But you know what all those recipes are missing?
Caffeine. And that’s clearly a missed opportunity.
That’s right, friends, today let’s caffeinate our whipped topping and make some coffee whipped cream.


Admittedly, the amount of actual caffeine in a serving of coffee whipped cream is probably not going to have a huge effect on your day, but a spoonful of this over a cup of hot chocolate or a slice of chocolate cheesecake is so good, it might just perk you up anyway.
The deep, slightly bitter coffee flavor makes the rich and sweet whipped cream feel positively luxurious. As I was testing this recipe, I was dreaming of all the things that I could top with it.
And then instead, I just stood there at the counter eating it with a spoon, because that’s a real good time too.
Ingredient Notes


- Instant espresso powder: If you don’t keep espresso powder on hand, you can buy it online or find it in the coffee aisle at your grocery store. It’s a handy ingredient to keep around, especially if you bake a lot of chocolate desserts.
- Heavy cream: Have leftover heavy cream after making this recipe? See What to Do With Leftover Whipping Cream for storage tips and recipe ideas for using it up.
- Powdered sugar: You can substitute granulated sugar if you don’t have powdered sugar. Just be sure to read the substitution notes in the recipe card because you’ll need less of it to get the same level of sweetness.
How to Make Coffee Whipped Cream
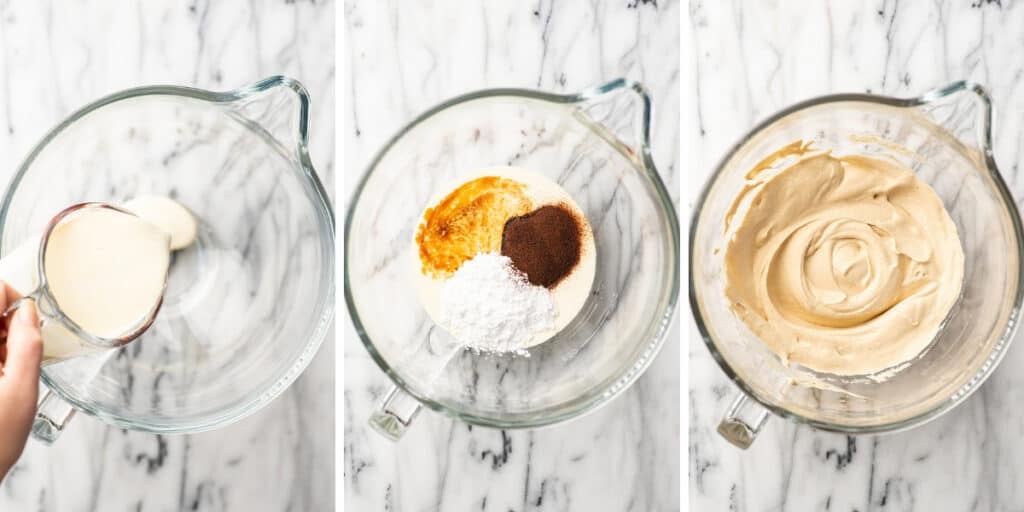

Combine all ingredients. In a bowl or the bowl of your stand mixer, add heavy cream, vanilla extract, sugar, and espresso powder.
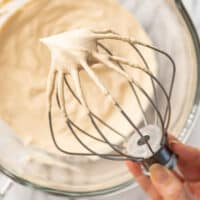
Whisk, whisk, whisk. You can use a whisk, a handheld electric mixer, or the whisk attachment of your stand mixer to whip the cream into billowy peaks.
Stop every once in a while to scrape down the edges of the bowl with a rubber spatula to make sure no espresso powder or lumps of sugar are being left around the edges. Continue to beat the whipped cream until it reaches your desired consistency.
Soft peaks are perfect for spooning over hot chocolate. Stiff peaks are best for piping onto desserts.
- Serve and enjoy!
Variations
- Mocha whipped cream (chocolate coffee whipped cream): This is SO good. Add 3 tablespoons of cocoa powder along with the other ingredients.
Where to Use Coffee Whipped Cream
- On Hot Chocolate (it would be extra amazing on my Rich and Thick Hot Chocolate )
- Over a slice of banana bread
- On chocolate chip waffles
- Over chocolate pudding


Can I use coffee grounds / instant coffee / coffee to make whipped cream?
- Coffee grounds: No. Coffee grounds will not dissolve into the cream.
- Instant coffee: Yes this will work just fine.
- Coffee: Not really. While you can add a little (chilled) coffee to your whipped cream, it’s not going to do much. The amount needed to actually add a detectable coffee flavor would dilute the cream to the point that it would not whip up.
Can I pipe coffee whipped cream/frost a cake with it?
Yes. This whipped cream is stiff enough for piping.
You can frost a cake with with this whipped cream, but like all whipped creams, it’s not going to be nearly as stable or easy to work with as an American buttercream or most other frostings.
More Coffee Favorites
- Homemade Mocha
- Iced White Chocolate Mocha
- Caramel Latte
- Iced Mocha


Recipe Notes
- Storage: Store tightly covered in the refrigerator for up to 48 hours. The cream will begin to deflate and may weep the longer it sits.
- Freezing: To freeze whipped cream , freeze spoonfuls of whipped cream on a parchment-paper-lined baking sheet. Once frozen solid, cut the parchment paper into squares and transfer the whipped cream (still on the squares) to a freezer bag and store for up to 1 month. The cream may separate a bit after freezing and defrosting, but it still works great for drinks and over a quick dessert.
Ingredients
Full batch
- ▢ 1 cup heavy cream
- ▢ ½ teaspoon vanilla extract optional
- ▢ 2 tablespoons to ¼ cup (15-30g) powdered sugar*
- ▢ 2 teaspoons instant espresso powder*
Single serving
- ▢ 2 tablespoons heavy cream
- ▢ A couple drops vanilla extract optional
- ▢ 1 to 2 teaspoons ( 3-5g ) powdered sugar*
- ▢ ¼ teaspoon instant espresso powder
Instructions
- To a large bowl* or the bowl of your stand mixer, add heavy cream, vanilla extract, sugar, and espresso powder.
- Use a whisk, handheld electric mixer, or the whisk attachment of your stand mixer to whisk the cream, stopping to scrape down the sides of the bowl as needed. Whisk until the cream reaches your desired consistency (soft peaks for spooning over drinks and stiff peaks for piping).
- Serve and enjoy!
Notes

20-minute Cream Biscuits
Equipment
- 2-to-3-inch biscuit cutter
Ingredients
- 2 cups ( 260g ) all-purpose flour plus more for dusting, measured by weight or using the spoon and sweep method*
- 2½ teaspoons baking powder
- 1 tablespoon ( 12g ) granulated sugar
- ¾ teaspoon salt
- 1½ cups heavy cream
- 2 tablespoons melted butter optional
Instructions
- Preheat your oven to 475°F and line a baking sheet with parchment paper.
- In a large bowl, combine flour, baking powder, sugar, and salt. Whisk together until well combined.
- Switch to a wooden spoon or silicone spatula and stir in the cream until a shaggy dough forms and no dry flour remains at the bottom of the bowl.
- Turn the dough out on a lightly floured surface and knead the dough, folding it over on itself 5 or 6 times until the dough comes together, adding more flour if needed.
- Pat the dough out to about ¾-inch thick. Use a 2-to-3 inch biscuit cutter to cut the dough into rounds. After the first cutting, gather the scraps and repeat to get 1 or 2 more biscuits out of the dough.
- Transfer the biscuits to your prepared baking sheet and brush the tops lightly with melted butter (reserve remaining melted butter).
- Bake on the center rack of your oven for 11 to 14 minutes, until the tops of the biscuits are golden brown.
- Transfer the biscuits to a cooling rack and brush them with the remaining butter. Serve and enjoy!
