Three different recipes for quick and easy 2-ingredient pupsicles to keep your dog cool this summer.

Hey, friends, how is your summer treating you? And just as importantly, how is summer treating your four-legged best friend(s)?
Are you guys melting in the heat?
Ella and I are.

Ella, slowly melting.
The only thing keeping us from fully turning into puddles is air-conditioning and oodles and oodles of frozen treats ( Pudding Pops and Wine Popsicles for me, Watermelon and Yogurt Frozen Dog Treats for Ella).
Those watermelon treats have actually been super popular on Pinterest this summer, and because of this, I’ve received multiple requests for more pupsicle recipes.
Which brings us here today.
How to Make Dog Popsicles, AKA Pupsicles

I have a secret for you. You don’t need a recipe for pupsicles. If it freezes, it’s safe for dogs, and your dog likes it, it can be made into pupsicles.
The pupsicle possibilities are literally endless, and all you need to get started are a couple of dog-friendly ingredients ( here’s a good list people foods you should and shouldn’t feed your dog ) and something to freeze your treats in.
I own these molds which make cute bone-and-paw-shaped dog popsicles, but a simple ice cube tray will work just as well.
And once you have something to make your treats in, here are three 2-ingredient pupsicle recipe ideas to try out:


Banana and Peanut Butter Pupsicles (Ella’s Favorite) 2 ripe bananas 2 tablespoons peanut butter (without artificial sweeteners)
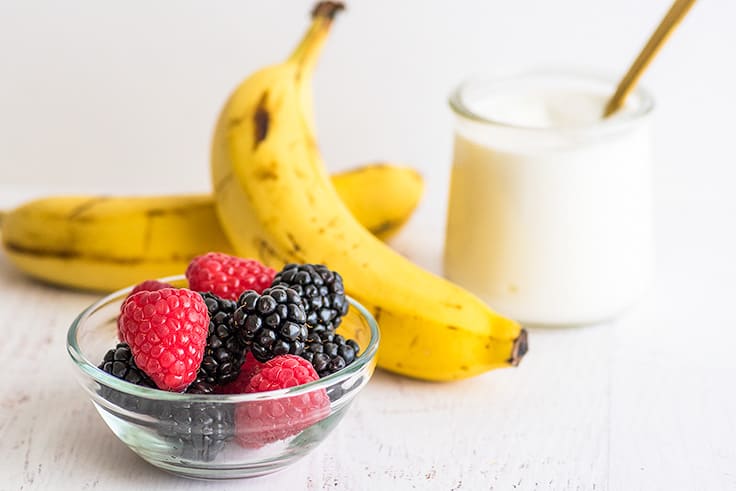
Yogurt and Berries Dog Popsicles 1/2 cup blueberries, strawberries, raspberries, or blackberries 2 5-ounce containers plain yogurt
Pumpkin and Banana Treats 2 ripe bananas 1/4 cup canned pumpkin puree (NOT pumpkin pie filling)
For all three of these recipes, you just combine them in your mold/trays and pop them in the freezer until solid, usually about 3 to 4 hours.
Then grab a pupsicle for your dog, something cold and sweet for yourself, and the two of you can enjoy a summer that’s just a little more bearable.
What molds did you use for the pupsicles?
I used a set of silicone molds to make the pupsicles in the photos. If you’d like a set of your own, you can buy the molds here , but you can also just use a regular old ice cube tray.
Please note, these are all dog-safe ingredients, but some dogs do not process dairy well. If that’s your dog, avoid the yogurt treats, and, as always, consult your vet if you have any questions or concerns about what you’re feeding your pet.
Also, dogs should always be supervised while eating frozen treats. Do not let them wander off with a half-eaten treat as uneaten pieces can melt and stain your carpets.
This recipe calls for plain, unsweetened yogurt and peanut butter without artificial sweeteners. DO NOT use yogurt or peanut butter that has been sweetened with xylitol, as it is toxic to dogs.
More Dog Treat Recips
- Birthday Cupcake Dog Popsicles
- High-value Dog Treats
- Gingerbread Treats for Dogs and Horses
- Watermelon and Yogurt Frozen Dog Treats

2-ingredient Pupsicles (3 Ways)
Ingredients
Special Equipment
- Silicone treat molds or ice cub tray
Banana Peanut Butter Pupsicles
- 2 very ripe bananas mashed
- 2 to 4 tablespoons peanut butter *
Yogurt and Berries Pupsicles
- 1/2 cup chopped strawberries, blackberries or raspberries, pureed, or whole blueberries
- 2 5-ounce containers plain yogurt *
Pumpkin and Banana Pupsicles
- 2 very ripe bananas mashed
- 1/4 cup pumpkin puree NOT pumpkin pie filling
Instructions
- If using floppy silicone molds, place them on a baking sheet or cutting board that will fit in your freezer, and clear enough space in your freezer for the molds to lay flat.
Banana Peanut Butter Pupsicles
- In a small, microwave-safe bowl, microwave peanut butter for 10 to 20 seconds and stir until pourable. To each mold, add a spoonful of peanut butter and enough mashed banana to fill the mold. Use a knife to swirl in the peanut butter if desired.
Yogurt and Berries Pupsicles
- Combine spoonfuls of berries and yogurt until molds are filled.
Pumpkin and Banana Pupsicles
- Combine spoonfuls of pumpkin and mashed banana until molds are filled.
- Freeze until solid, 3 to 4 hours. Remove treats from molds/trays and store in an air-tight freezer bag for up to 3 months.
Notes
Nutrition

It’s been a while since I last posted a salad recipe. The last one was in goes to look it up holy cow, January 2016.
(Also, that salad recipe is great, but the pictures are so old and ugly— go look at them if you want a laugh .)
The reason for the lack of salads is that even though I love them, salad recipes just don’t do that well on the site. They’re consistently some of my least popular recipes in terms of traffic.
BUT I figured it was time to give salad another go because I’ve been making today’s salad a ton lately, and I wanted to share it with you.
I’m obsessed with it. And once you try it, I think you will be too.
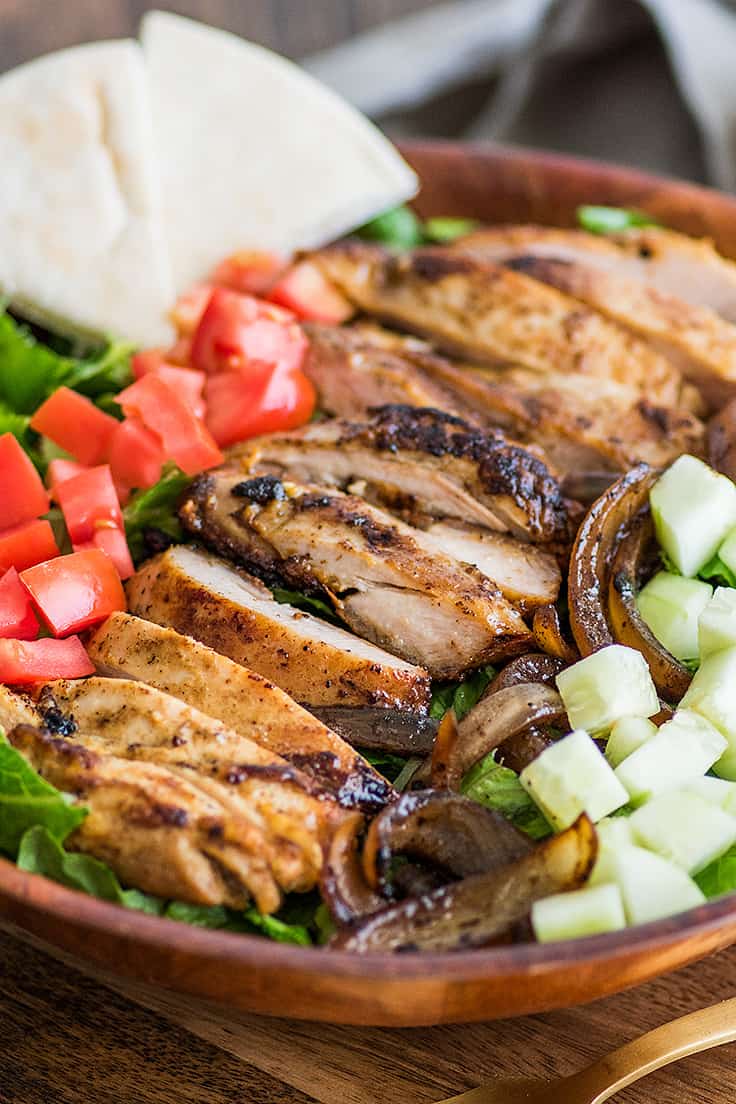
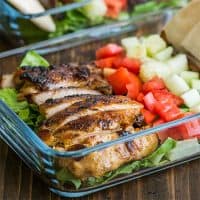
It’s Shawarma Salad!
This recipe is my Pinterest-famous (pinned nearly 200k times) Chicken Shawarma recipe turned into a salad, and friends, it is so, so good.
If you’re looking for a lighter dinner that is super satisfying and easy to make, you’ve come to the right place.
How to Make Shawarma Salad


This salad starts with chicken thighs marinated in a mix of olive oil, lemon juice, garlic, and turmeric and then cooked on the stove.
After the chicken is done, you cook some red onions in the drippings until they are soft and slightly sweet with caramelized edges.
Serve the onions and chicken thighs on crispy romaine with tomatoes and cucumbers, and top with a quick and easy creamy yogurt dressing.
The yogurt dressing is just one container of unsweetened yogurt, lemon juice, garlic, and salt and pepper, with just enough milk added to make it a drizzling consistency. It’s a great light and tangy dressing that can be used on tons of different salads.


This recipe makes about four servings (though if you really wanted to stretch it, you could probably marinate up to six thighs at a time).
It’s fabulous as leftovers, so make it at the beginning of the week and have a salad dinner for a couple of nights, or even better, pack it up for work and make all your coworkers extra jealous with your beautiful meal prepped salads.
Meal Prep Chicken Shawarma Salads
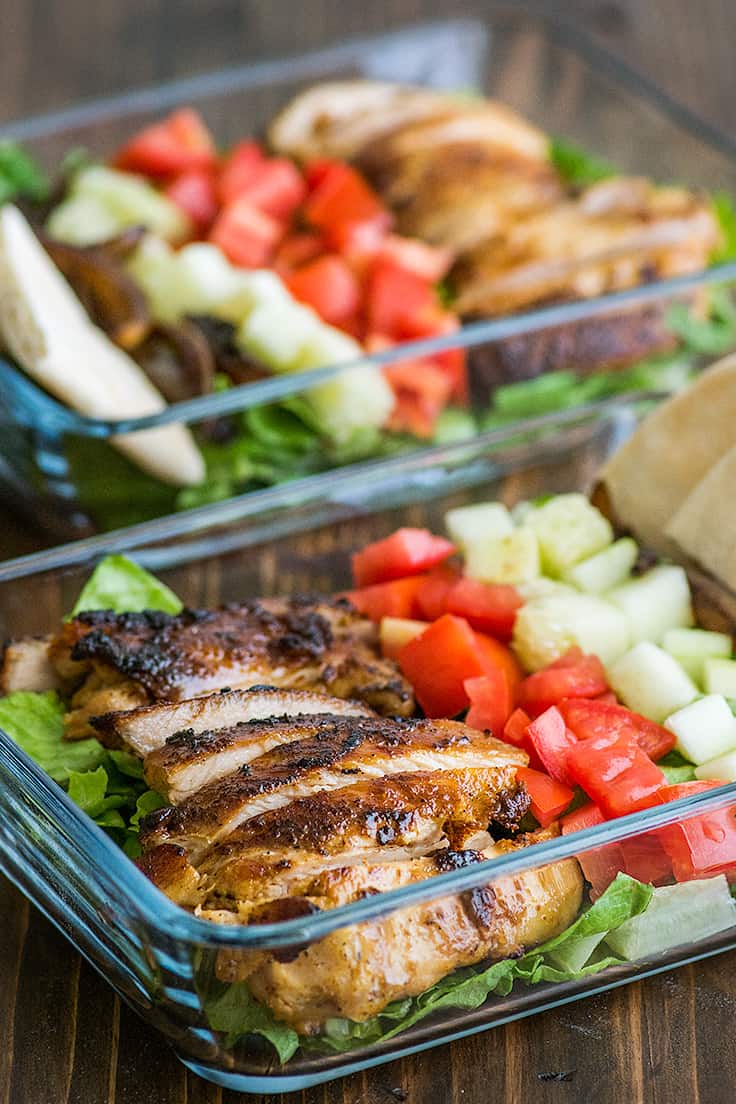

How cute are these all dressed up as meal prep salads? Wouldn’t it feel good knowing you had a couple of these in your fridge for lunches this week?
To pack these meal prep shawarma salads, I recommend these 7×5-inch Pyrex containers . They’re sturdy, stackable, dishwasher-safe, and you can bake mini cakes in them when you finish your salad. Add a little airtight container for your dressing , and you’re all set.
Salads can be eaten right out of the fridge or transfer your chicken to a plate to reheat before eating.
Shawarma Salad Recipe Notes
- I like to use chicken thighs here because they’re easy to cook and come out tender and juicy every time, but if chicken breasts are all you have, they’ll work too. Use the method from my How to Cook Chicken Breasts for Salads and Sandwiches post for best results.
- For a slightly richer dressing, you can add a bit of (delicious) fat by stirring a heaping spoonful of mayonnaise into the yogurt along with the milk.
- Finally, if you’re looking for more simple salad recipes, try this Carne Asada Salad , Asian Chicken Salad, and BLT Salad .
Ingredients
Special Equipment
- ▢ Instant-read thermometer
- ▢ Garlic press
Chicken and Marinade
- ▢ 1/4 cup olive oil
- ▢ 3 tablespoons lemon juice
- ▢ 3 cloves garlic pressed
- ▢ 1 teaspoon ground cumin
- ▢ 1 teaspoon paprika
- ▢ 1/2 teaspoon salt
- ▢ 1/2 teaspoon black pepper
- ▢ 1/4 teaspoon turmeric
- ▢ 4 boneless skinless chicken thighs
Yogurt Dressing
- ▢ 5 to 6 ounces ( 2/3 cup ) plain, unsweetened yogurt*
- ▢ 1 teaspoon lemon juice
- ▢ 1 clove garlic pressed
- ▢ 1 to 3 teaspoons milk
- ▢ 1/8 teaspoon salt
- ▢ Pepper
Vegetables
- ▢ 1/4 cup chicken broth or water
- ▢ 1 small red onion cut into thin wedges
- ▢ 1 head romaine washed and chopped
- ▢ 1 cucumber peeled and chopped
- ▢ 1 large tomato chopped
Instructions
Marinate Chicken
- In a small bowl, whisk together all marinade ingredients. Pour over chicken thighs and toss to coat. Return chicken to the refrigerator and marinate for 30 minutes, up to 2 hours.
Prepare Dressing
- Combine yogurt, lemon juice, garlic, 1 teaspoon of milk, and salt. If desired, add more milk by the 1/2 teaspoon until dressing reaches your desired consistency. Add more salt and pepper to taste.
Cook Chicken and Onions
- On the stove, heat a large skillet over medium-high heat. Once hot, add chicken thighs and cook for 2 to 5 minutes per side, until the internal temperature reaches 165°F. If at any time the outside of the chicken begins to cook too quickly and burn, turn the heat down. Transfer chicken to a plate and cover with foil to keep warm.
- Deglaze the pan over medium-high heat with 1/4 cup of water or chicken broth, scraping all the crispy browned bits from the bottom of the pan, and add the onions. Cook onions until they reach your preferred level of doneness, 2 to 4 minutes.
Assemble
- Slice the chicken and assemble salad. Top with dressing and enjoy!
Notes
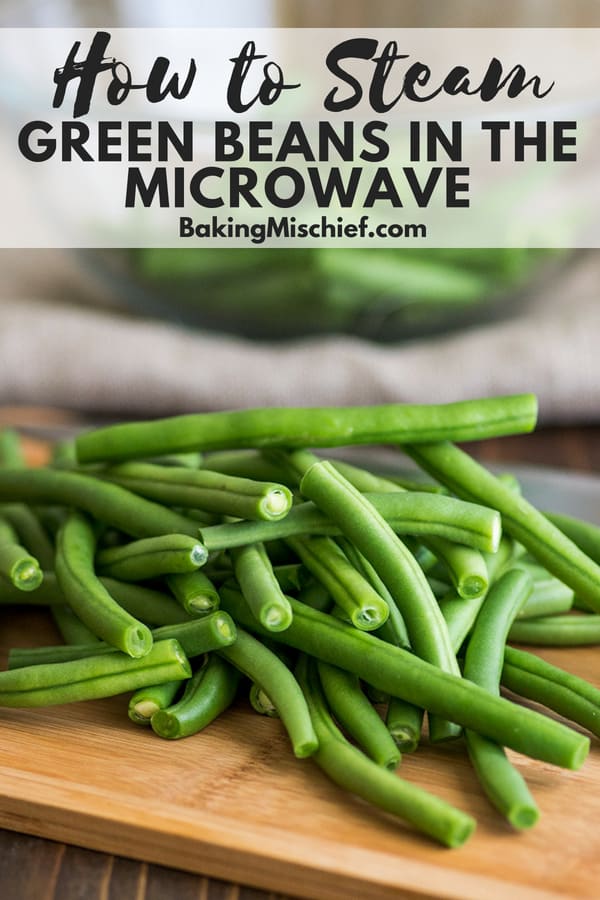
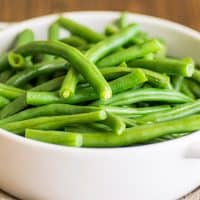
How to Steam Green Beans in the Microwave for a quick, simple, and delicious weeknight side dish.

Hey, need something green for your plate and don’t feel like getting out a pot or pan? How about making some green beans in the microwave tonight?
I’ve shared a couple of these vegetables in the microwave posts on the site over the last year ( Broccoli in the Microwave, Cauliflower in the Microwave, and Corn on the Cob in the Microwave ), and they’ve been pretty popular.
I think a lot of us are looking for the quickest and easiest ways to add more vegetables to our diets, and the best vegetable side is the vegetable side that you will actually make.
With a veggie side this simple, there’s no reason not to.
Steaming green beans in the microwave instead of on the stove gives you the same beautiful, delicious, bright green green beans, tender, with just a little crisp bite left, but no steamer basket required.
Once steamed, you can toss with butter and salt or a little fried garlic like in my No-fail Butter and Garlic Green Beans and serve with something equally delicious and easy like Tri-tip in the Oven , Country-style Pork Ribs , or Salsa Chicken .
How to Cook Green Beans in the Microwave
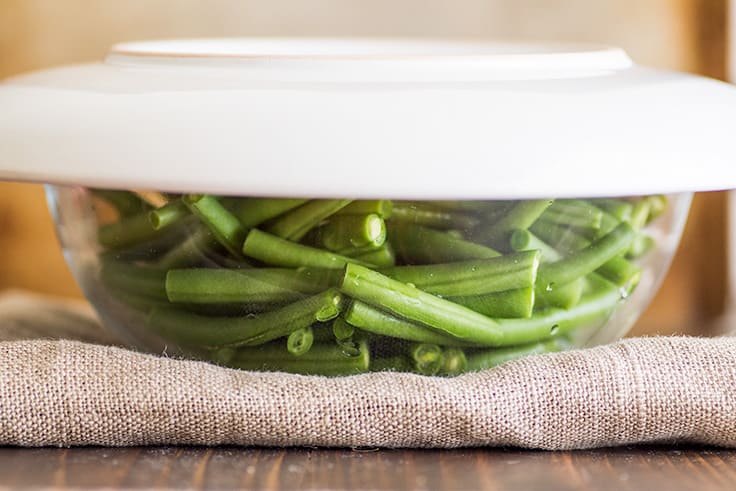
Place washed and trimmed green beans in a microwave-safe bowl. Add just enough water to cover the bottom of the bowl, 2 to 3 tablespoons.


Cover bowl with a plate and microwave for 4 to 6 minutes, until green beans are tender.

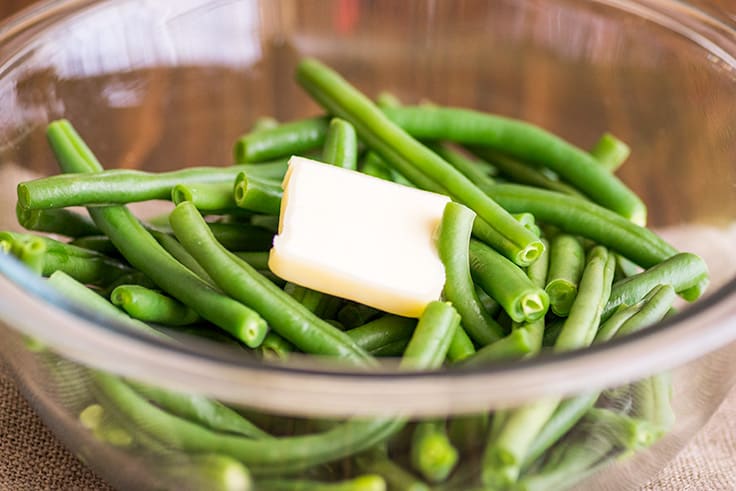
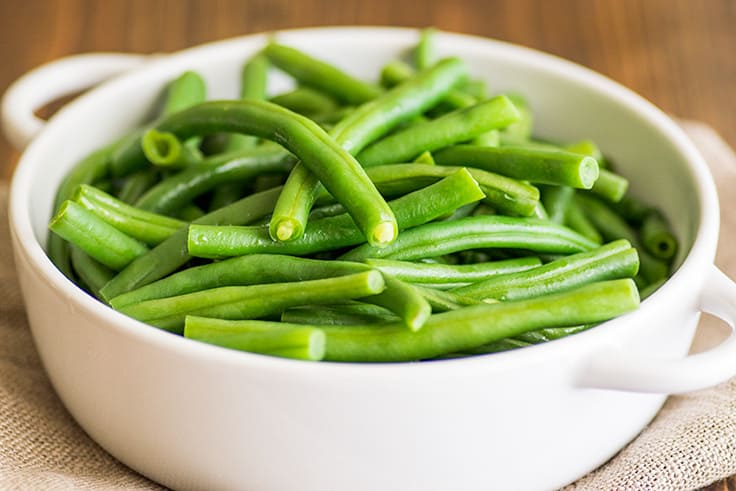
Carefully remove plate (the steam will be hot), drain liquid and add a tab of butter to the bowl. Toss to coat and sprinkle with salt and pepper.

Serve with something simple and easy, and enjoy!

More Easy Vegetable Sides
- Oven-roasted Broccoli
- Roasted Zucchini
- Roasted Green Beans
- Green Beans with Bacon
- Oven-roasted Butternut Squash .
Ingredients
- ▢ 1 pound fresh green beans washed and trimmed
- ▢ 3 tablespoons water
- ▢ 1 tablesooon butter
- ▢ Salt and pepper
Instructions
- Place washed and trimmed green beans in a microwave-safe bowl. Add just enough water to cover the bottom of the bowl, 2 to 3 tablespoons.
- Cover the bowl with a microwave-safe plate and microwave for 4 to 6 minutes, until green beans are just tender.
- Carefully remove plate (the steam will be hot), drain any remaining liquid, and add about a tablespoon of butter to the bowl. Toss to coat and sprinkle with salt and pepper to taste.
- Serve and enjoy!

2-ingredient Pupsicles (3 Ways)
Ingredients
Special Equipment
- Silicone treat molds or ice cub tray
Banana Peanut Butter Pupsicles
- 2 very ripe bananas mashed
- 2 to 4 tablespoons peanut butter *
Yogurt and Berries Pupsicles
- 1/2 cup chopped strawberries, blackberries or raspberries, pureed, or whole blueberries
- 2 5-ounce containers plain yogurt *
Pumpkin and Banana Pupsicles
- 2 very ripe bananas mashed
- 1/4 cup pumpkin puree NOT pumpkin pie filling
Instructions
- If using floppy silicone molds, place them on a baking sheet or cutting board that will fit in your freezer, and clear enough space in your freezer for the molds to lay flat.
Banana Peanut Butter Pupsicles
- In a small, microwave-safe bowl, microwave peanut butter for 10 to 20 seconds and stir until pourable. To each mold, add a spoonful of peanut butter and enough mashed banana to fill the mold. Use a knife to swirl in the peanut butter if desired.
Yogurt and Berries Pupsicles
- Combine spoonfuls of berries and yogurt until molds are filled.
Pumpkin and Banana Pupsicles
- Combine spoonfuls of pumpkin and mashed banana until molds are filled.
- Freeze until solid, 3 to 4 hours. Remove treats from molds/trays and store in an air-tight freezer bag for up to 3 months.
